Electrical Discharge Machining
Contents
Introduction
Electrical discharge machining (EDM) is a subtractive machining process in which material in a conductive workpiece is removed by spark erosion. There are two main classes of EDM:
- wire EDM, in which the tool is a wire that slices cuts into the work
- sinker EDM, in which the tool is a machined block that "sinks" into the workpiece, gradually creating a negative of the tool pattern
Other variants exist, for example low-precision EDM is often used to remove broken taps or drills from metal parts, and Chisel EDM may be useful for certain fabrication processes in self-replicating machines.
Electrical discharge machining provides a way to cut metal without needing to develop high forces at the cutting tool. For this reason, EDM is a good candidate for machining metal using a RepRap-style machine. A low-cost RepRap made of a combination of printed plastic and off-the-shelf hardware store parts is naturally less stiff and less mechanically stable than a conventional machine tool. EDM provides a potential means for a RepRap to gain metal processing capability without having to sacrifice self-replicability.
Principle of Operation
A power supply applies a voltage potential between the tool and the work. The tool is brought close to the work under automatic control, and some method is used to maintain close spacing between the two so that arcing may occur. From the Wikipedia article:
When the distance between the two electrodes is reduced, the intensity of the electric field in the volume between the electrodes becomes greater than the strength of the dielectric (at least in some point(s)), which breaks, allowing current to flow between the two electrodes. This phenomenon is the same as the breakdown of a capacitor (condenser) (see also breakdown voltage). As a result, material is removed from both the electrodes. Once the current flow stops (or it is stopped – depending on the type of generator), new liquid dielectric is usually conveyed into the inter-electrode volume enabling the solid particles (debris) to be carried away and the insulating properties of the dielectric to be restored. Adding new liquid dielectric in the inter-electrode volume is commonly referred to as flushing. Also, after a current flow, a difference of potential between the two electrodes is restored to what it was before the breakdown, so that a new liquid dielectric breakdown can occur.
Safety Warning
Use caution and do not attempt to build an EDM system unless you have the necessary tools and skills.
- The power supplies used in electrical discharge machining can be dangerous (potentially lethal if mains electricity is not properly handled).
- Experimenting with electric arcs submerged in a flammable liquid (certain dielectric fluids are flammable) presents a potential fire hazzard.
Example Homebuilt EDM Systems
Electrical Discharge Machining with old Doorbell Parts
In this usage the current in the spark(discharge) is also used to activate a solenoid that retracts the anode with its magnetic field(presumably some part of it is ferromagnetic), in that way avoiding fusing or sparkless conduction. <videoflash type="youtube">uUN4_-xp1Wc|640|480</videoflash>
DIY Electro Discharge Machine - 4 (uses a DVD player motor and diesel fuel)
<videoflash type="youtube">T0VYrleH1-g|640|480</videoflash>
Wire EDM, home made, burning under Arduino control
<videoflash type="youtube">TWSaEklxYyM|640|480</videoflash>
Chisel EDM
Around 2001 Matt Moses made a contraption to do what he calls "chisel EDM" which is sort of in between sinker EDM and wire EDM. The idea is that one can use a metal blade as the cutting tool, and then cut out patterns in metal sheet. It relates to self replication because one can use, say, an aluminum blade to cut out another blade from aluminum sheet.
Shown below are some pictures of what's left of the project. It was no work of art, and it has been sitting in a box for more than 10 years and some of the parts have been removed for other projects. But the bottom line is: it worked! EDM would be a super add-on to a RepRap machine. It is totally, totally, feasible.
Either vegetable oil or distilled water was used as the dielectric fluid. The power supply went up to 40V, and there was a switchable capacitor box to adjust capacitance. A little (terribly designed) op amp circuit measured tool-to-work voltage and controlled the vertical position of the tool (this was done with a continuous rotation RC servo and a 6-32 lead screw). Power resistors were used for current limiting.
The supply voltage, threshold voltages, main capacitance, and current limiting resistor all adjustable so that the optimum settings could be discovered:
- Supply voltage: 10V, 20V, or 40V
- Current limiting resistance: approximately 100 ohm, 50 ohm, 33 ohm, 25 ohm, 20 ohm, 17 ohm (six 100 ohm, 10 watt power resistors that could be hooked up in parallel)
- Main capacitance: six capacitors which could be switched in in parallel: 4700 uF, 210 uF, 100 uF, 20 uF, 20 uF, 20 uF
When properly tuned, this setup would cut nicely through 0.010 inch aluminum in a few minutes.
Chisel EDM controller

Chisel EDM hardware
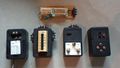
Control Boxes
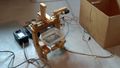
Mostly complete machine
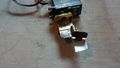
Toolhead closeup
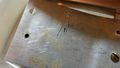
Example straight cut


- Control boxes: Power resistor block at top. From left to right: switchable power supply, capacitor box, toolhead controller, XY controller.
- Mostly complete machine: This is missing the servo-leadscrew mechanism that would raise and lower the toolhead. Also missing the toolhead and toolhead mount.
- Toolhead closeup. This is the blade or "EDM chisel". The servo here is not the servo used to raise and lower the blade. This servo is for rotating the blade to get cuts at different angles.
- Example cuts. You can see that when properly tuned it is possible to get a straight clean cut. The holes are attempts from using a wire as a cutting tool.
Concept for Drilling Nozzles with EDM
It may be possible to use EDM to drill the small hole in an extruder nozzle. In this case, the tool electrode could be a wire, sewing needle, or maybe even a graphite pencil lead.
This drawing shows a concept for making a simple modification to an existing 3D printer so that it can be used to drill holes using EDM. If you are drilling something as small as a nozzle, it may be possible to use low voltages (24V or below). Light bulbs or powers resistors can be used for current limiting.
The tool is held fixed (where the extruder goes) and the Z platform moves the work up/down for arc control. A simple voltage divider connected to a spare pin on a printer controller can read Vsense (some people might be worried that such a noisy signal from the arc might damage the pin - you can add a filter if you're worried).
