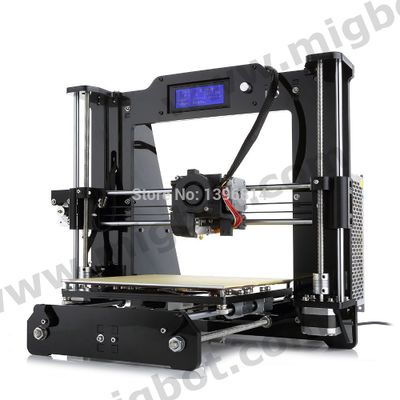
Migbot Prusa i3
Note: This page is a work in progress, I am currently gathering info and FAQ from the Migbot forum thread - Ax
Contents
What is a Migbot?
A Migbot is a cheap and inexpensive Chinese mass produced Prusa i3 3D printer, which usually comes in kit form, where the frame is made from Acrylic. These can be bought from places like eBay, AliExpress, Robot Shop or 3D Printers Online Store. They generally look like the following image:
Types
There are several variants with various parts changed out or modified. For example the Electron 3D Prusa i3 from 3D Printers Online Store or the Afinibot A3 3D Printer from Robot Shop. The base model comes with a 220x220 Aluminium bed. There are optional extras of a larger bed of 220x260 and Auto Levelling using an inductive sensor.
Hardware and Electronics
- Laser cut Acrylic sheet Frame (usually Black)
- MKS Base control board, which comes pre-loaded with Marlin
- 6mm (?)Thick Aluminium build plate.
- MK8 Direct Drive Extruder
- Optional SN04-N NO Proximity Sensor for auto levelling
- GT2 Timing Belts
- 8mm/revolution 2mm pitch (to be confirmed) Leadscrews
- Reprap Discount LCD Panel
- 12V 20A Generic Power Supply
File Repository
The base firmware, build instructions and Migbot software can be found on GitHub at https://github.com/garynmckinney/3DPrinter.
FAQ and Troubleshooting
This FAQ and Troubleshooting are taken from Common issues from the Migbot support thread at http://forums.reprap.org/read.php?406,507737,page=1
- How do I upload the firmware to the printer?
- This can be done by using Arduino IDE from https://www.arduino.cc/en/Main/Software - This is cross platform, so it works on Windows, Mac and Linux. More info can be found on Thomas Sanladerer's video on YouTube at https://youtu.be/2RbcMvhatjU
- My Migbot isn't printing in the centre of the bed after auto levelling, how do I fix this?
- This is generally caused by incorrect X & Y offsets. This can be fixed by going into the firmware and looking for the following in the auto levelling section in configuration.h
 // these are the offsets to the probe relative to the extruder tip (Hotend - Probe)
 #define X_PROBE_OFFSET_FROM_EXTRUDER 12
 #define Y_PROBE_OFFSET_FROM_EXTRUDER 60
 #define Z_PROBE_OFFSET_FROM_EXTRUDER -0.8
- The offsets may not be the true offset of the probe to the nozzle to get it to print centrally, for example X could be 0 and Y could be -30
- What Sensor should I get for auto levelling?
- The Stock sensor is a SN04-N NO Proximity sensor - this is pretty much plug and play and doesn't require any extra wiring or voltage dividing. The other sensor that can be used is the LJ12A3-4-Z/BX, this requires voltage dividing, how to do this can be found on Thomas Sanladerer's video on YouTube at https://youtu.be/EcGFLwj0pnA
- How do I wire the SN04-N up?
- Looking at the Board in place with the 12V power input at the top, the colour coding from top to bottom is as follows: Black > Blue > Brown
- What are the connectors on the MKS board?
- These are JST-XH, which are basically LiPo balance charger connectors. You can buy these pre-crimped from eBay and Amazon.
- My Leadscrews are bent, what are the leadscrews so I can replace them?
- While it's not exactly first hand info and a chance find and there is very limited information, they seem to be 8mm/Revolution or a 2mm pitch. Combine that with the 1.8˚ step angle and 1/16 stepping that the Motors use, that comes to very close to what the default firmware is set to.
Upgrades
CrackinX's Migbot Rework - https://drive.google.com/folderview?id=0B7nu00kvLxc9Y0lzTHJjT1R3MFU&usp=sharing
Ax's E3D Mount using the existing X Carriage - http://www.thingiverse.com/thing:1119606
Various Migbot parts on Thingiverse - http://www.thingiverse.com/tag:migbot
