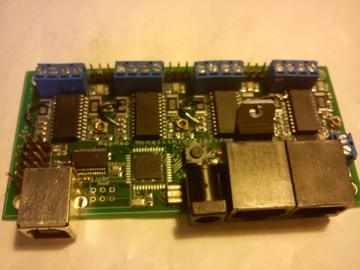
Sprinter on gen3
Release status: working
| Description | Gudes for how to get Gen 3 electronics to work with the Sprinter FirmWare
|
| License | GPL
|
| Author | |
| Contributors | |
| Based-on | |
| Categories | CAM_Toolchains
|
| CAD Models | |
| External Link |
1: To get this to work you have to get rid of the tip management A/D converter, Thermocoupler and the network cable and in stead use a thermistor connected to the 2 pins right next to the USB connector shown on image below.
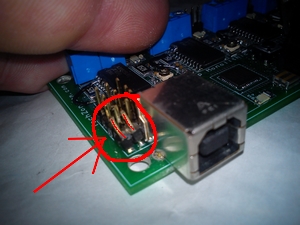 Polarity is no issue so it doesnt mather what way you put the thermistor connector.
2: To power the hot end heater you now have to use the fan connector on the motherboard shown on the image below.
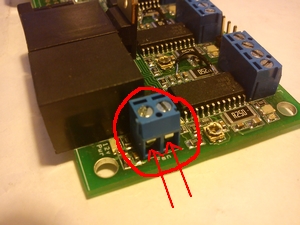 Polarity is no issue here either.
3: Now for the FirmWare upload... You can use the Arduino IDE to upload the Sprinter FirmWare to the board. If you need help to upload you can take a look at how it is done in the video below. Important! There are a few errors you'll probably get while installing, but the following advice should make life easier for you:
- Download arduino-0023 and sanguino-0023r4 Ardunio Sanguino
- Edit arduino-0023/hardware/arduino/cores/arduino/wiring.h and comment out the macro round(x) on line 79
- Edit arduino-0023/hardware/sanguino/boards.txt and change atmega644.upload.speed=57600 to atmega644.upload.speed=38400
- Make sure you use an older version of the Sprinter firmware, especially if using the Techzone Monolithic boards. Because all of the code for Sprinter is available on github, it is easy to get an older version. One such working version can be found here
<videoflash>-y0vuhAK0Ew</videoflash>
If you want to see the Stepper test watch the video below.
<videoflash>WHURp54OdHI</videoflash>
To be able to print with this setup you can use use Pronterface or maybe the Precomplied version of Pronterface for Windows with SFACT.
Gen3+ is is a daughter card for the generation 3 mainboard which plugs into the sanguino header, and replaces the extruder controller. The stepper hack is replaced with a Pololu header, and mosfets are provided for hot end and print platform. http://koti.kapsi.fi/~kliment/gen3plus/
TechZone Gen3 Remix with Gen3+ (and Sprinter FirmWare)
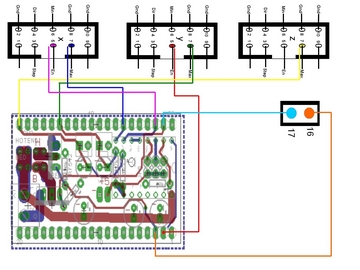
To connect the Gen3+ board to the TechZone Gen3 Remix electronics you first have to disconnect the Remix ExtruderContoller board.
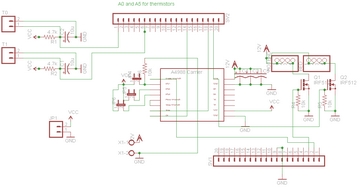
After that you have to connect the boards with wires(rats/birsds-nest method)as shown in the schematics below.
To get access to the enable pins you have to split the ribbon cables as shown in the wiring video. The max pins can also be accessed by the ribbon cable or just use the max pins on the stepper drivers as i did... also shown in the wiring video.
TechZone Gen3 Remix with Gen3+ wiring schematics:
<videoflash>CKaPTJokG7s</videoflash>
<videoflash>sBj1M-lXfQw</videoflash>
The Gen3+ setup works with the Sprinter FirmWare Pronterface SoftWare... or maybe you prefer the Precomplied version of Pronterface for Windows with SFACT SoftWare
You have to set MOTHERBOARD 23 in the Sprinter "Configuration.h" file to use this with TechZone Gen3 remix electronics(as described in the config.h file it self). If you have TechZone Monotronics, set MOTHERBOARD 22.
You can use the Arduino IDE to upload the sprinter FW to the Gen3 motherboard.

