Mendel materials preparation
|
English • العربية • български • català • čeština • Deutsch • Ελληνικά • español • فارسی • français • hrvatski • magyar • italiano • română • 日本語 • 한국어 • lietuvių • Nederlands • norsk • polski • português • русский • Türkçe • українська • 中文(中国大陆) • 中文(台灣) • עברית • azərbaycanca • |
Mechanical: Overview | Mendel solid model files | Procurement | Preparation of materials | Assembly notes | Extruder | X-axis | Z-axis | Y-axis | Circuit boards | Frame | Squaring the axes
Once you’ve got your raw stock, you need to prepare some of it:
Bar
Check the Mendel assembly data sheet for specifications. Cut the bar to size using a hack saw and tape measure. Use soft vice pads so as not to damage the bar surface or threads. If using mild steel, oil immediately to avoid rusting. File off all burrs.
Belt
Check the Mendel assembly data sheet for specifications. Use the Belt splitter jig to cut the widths you need. Do not break the z-belt loop – this needs to be continuous!
Extruder parts
The extruder design is frequently updated: check the Mendel extruder page for the latest procurement/preparation documentation.
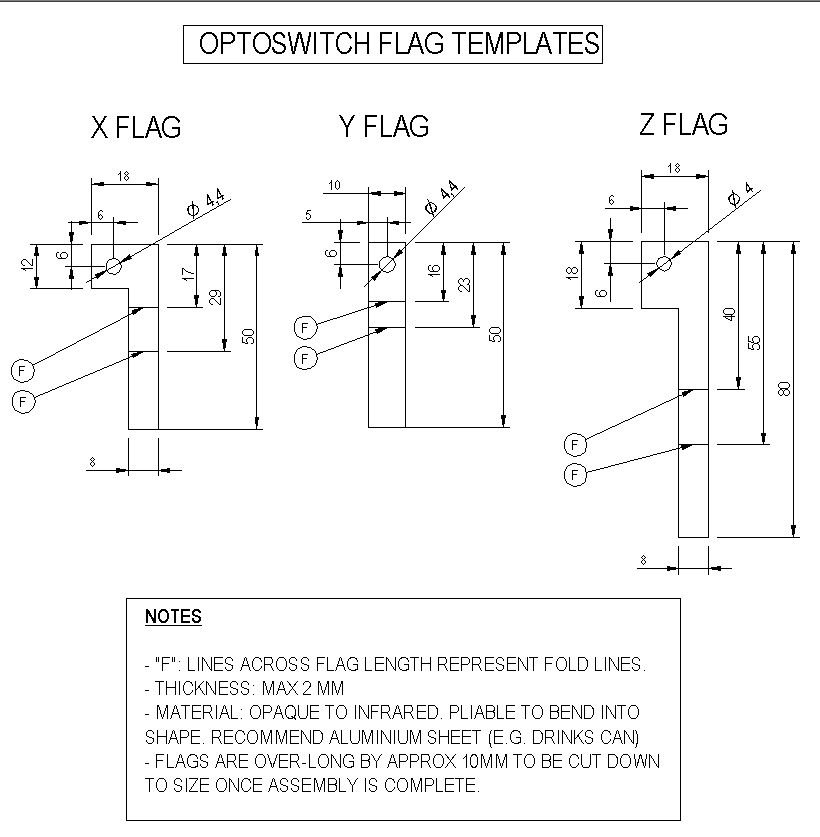
Thin sheet

To prepare your optoswitch flags you need to drill and cut the sheet to shape using tin snips/scissors, depending on sheet thickness. Either use the dimensions shown here or print a template from the dxf file. (Make sure your printer doesn’t scale the template! Measure the reference dimension after printing to check). Once cut, make sure the end isn't reflective (if you used a shiney material, paint the end black or cover it with a small piece of masking tape).
Reprapped parts
Clean out all holes and remove support material if necessary. Please note that this activity can take quite a while depending on the brittle nature of the Reprapped parts. Machine drilling is not a time saver...
Thick sheet
Thick sheet components are best cut on a laser cutter.
This zip file contains dxf’s for all individual sheet components, including a dxf of them all grouped together for a one-shot cut.
If doing manually, or using a hacksaw or - better - a fretsaw, apologies. Whilst it is still possible, the author admits it will not be easy. One of the drawbacks of making the design compact was increasing complexity, and the y-chassis has many complex cutting features in it. Add +0.4 mm on to all nominal hole diameters to ensure a clearance fit for bolts. For example a hole for an M4 bolt should be drilled to 4.4 mm (though 4.5mm will also suffice).
Mounting holes are 218.2mm apart along the x axis, and 124mm apart along the y axis.
Nophead's simplified squashed frog is a better design if you plan on cutting out by hand. His design also leaves out some holes to be drilled later after the RP parts have been attached. (PDF template of this version (8.5x11))
One of the thick-sheet components is the build bed. There is an alternative heated bed here that will reduce warping of parts when you print them (especially if you print a lot at once, like when you are using Mendel to make copies of Mendel).
Studding
Same as bar.
Back to Mendel mechanical construction root.