Has anyone made a Spherebot/Eggbot?
Posted by mydogjustice
|
Has anyone made a Spherebot/Eggbot? May 10, 2012 06:58AM |
Registered: 12 years ago Posts: 54 |
I dont really know of any other resources to get some insight on my problem so I turn to you guys!
I've printed and assembled an eggbot as seen on Thingiverse and I've wired an Uno with two steppers/drivers that I stole from my prusa. Using firmware and diagrams found Speherbot
I'm at the point I'm trying to test and I just cant get anywhere with sending gcode files. I've tried the python files, the ruby transport of the python (Ruby Sender) and the "BinarySender" which is a Processing Applet.
I'm getting pretty much the same results regardless. The python and Ruby senders both read the first line from the gcode file and then just hang. And I dont get any resulting movement from the motors or servo. I've never worked Ruby (or Python for that matter) so I'm kinda crash coursing it right now. Its reading the file and I'm connecting to the Uno (I was having problems connecting but I believe I have that sorted out based on the fact it no longer errors and the first line read from the gcode at least blips the lights on the Uno)
I've triple checked the physical setup and everything is good based to the provided schematic. I have a hunch that I'm missing something simple in the sketch, but it all looks pretty standard with no major customization sections.
Just thought I'd throw it out here since you guys have been such a great resource in the past!
Thanks!
Josh
Josh
//++++++++++++++++++++++++++++++++++++++++++++++++++++++++++++++++++++++
//Prusa / RAMPS_1.4 & ATMega_2560 / Slic3r > Pronterface > Marlin / Luck
//++++++++++++++++++++++++++++++++++++++++++++++++++++++++++++++++++++++
|
Re: Has anyone made a Spherebot/Eggbot? May 15, 2012 07:41PM |
Registered: 12 years ago Posts: 19 |
|
Re: Has anyone made a Spherebot/Eggbot? May 16, 2012 11:35AM |
Registered: 12 years ago Posts: 809 |
How'd you make out? I'd like to make one for this christmas.
- akhlut
Just remember - Iterate, Iterate, Iterate!
[myhomelessmind.blogspot.com]
- akhlut
Just remember - Iterate, Iterate, Iterate!
[myhomelessmind.blogspot.com]
|
Re: Has anyone made a Spherebot/Eggbot? May 16, 2012 11:53AM |
Registered: 12 years ago Posts: 54 |
mydogjustice Wrote:
> I have a hunch that I'm missing
> something simple in the sketch,
I finally got it worked out (although I'm still far from actually printing with it) yesterday using the Ruby script. Although I suspect that the Python code will work as well now.
Sure enough, it was in the arduino sketch. I had to disable the x endstop in the Spherebot.pde
and enable autohoming by uncommenting the following in the StepperModel.h
Still not totally sure why I needed to switch these two properties, but I can now feed and read Gcode to the Uno.
Came to the conclusion that the arduino wasn't answering back to the Ruby console. Had no problems with the serial connection communications and could feed the whole file, but when it came time that I needed the ard to respond, it just sat there and waited.
I need to find a better power source and hookup solution than what I currently have in place as I think I'm under driving the motors, but thats a different story. I was initially going for more of a proof of concept this time around. But now I can at least get things to move. I think long term, I'd like to rewrite the sketch to use the Adafruit motor shield that I have in the drawer. Should be perfect since it will drive two steppers and a servo. My sketching skills are somewhat deffecient so that will be a long term.
Pretty excited to get it finished, but time seems to be a luxury lately
JW
Josh
//++++++++++++++++++++++++++++++++++++++++++++++++++++++++++++++++++++++
//Prusa / RAMPS_1.4 & ATMega_2560 / Slic3r > Pronterface > Marlin / Luck
//++++++++++++++++++++++++++++++++++++++++++++++++++++++++++++++++++++++
> I have a hunch that I'm missing
> something simple in the sketch,
I finally got it worked out (although I'm still far from actually printing with it) yesterday using the Ruby script. Although I suspect that the Python code will work as well now.
Sure enough, it was in the arduino sketch. I had to disable the x endstop in the Spherebot.pde
#define XAXIS_ENDSTOP_PIN -1
and enable autohoming by uncommenting the following in the StepperModel.h
#define AUTO_HOMING
Still not totally sure why I needed to switch these two properties, but I can now feed and read Gcode to the Uno.
Came to the conclusion that the arduino wasn't answering back to the Ruby console. Had no problems with the serial connection communications and could feed the whole file, but when it came time that I needed the ard to respond, it just sat there and waited.
I need to find a better power source and hookup solution than what I currently have in place as I think I'm under driving the motors, but thats a different story. I was initially going for more of a proof of concept this time around. But now I can at least get things to move. I think long term, I'd like to rewrite the sketch to use the Adafruit motor shield that I have in the drawer. Should be perfect since it will drive two steppers and a servo. My sketching skills are somewhat deffecient so that will be a long term.
Pretty excited to get it finished, but time seems to be a luxury lately
JW
Josh
//++++++++++++++++++++++++++++++++++++++++++++++++++++++++++++++++++++++
//Prusa / RAMPS_1.4 & ATMega_2560 / Slic3r > Pronterface > Marlin / Luck
//++++++++++++++++++++++++++++++++++++++++++++++++++++++++++++++++++++++
|
Re: Has anyone made a Spherebot/Eggbot? May 16, 2012 12:02PM |
Registered: 12 years ago Posts: 809 |
Cool. Building a new reprap now, but I think an eggbot is my next build (cheap, fun and useful for decorative arts - the spouse will love it). Glad to hear you've got it moving. Have you done any documentation of your build? That'd be a great resource for those following in your footsteps!
- akhlut
Just remember - Iterate, Iterate, Iterate!
[myhomelessmind.blogspot.com]
- akhlut
Just remember - Iterate, Iterate, Iterate!
[myhomelessmind.blogspot.com]
|
Re: Has anyone made a Spherebot/Eggbot? May 27, 2012 06:45AM |
Registered: 12 years ago Posts: 22 |
Hi All,
I've assembled my printed eggbot and seem to be having very simmilar problems to Josh.
I'm able to manually send Gcode commands one at a time via the Arduino serial monitor and the motors and servo respond as expected.
However I don't get very far when sending an Inkscape generated gcode file (unicorn plugin) via feeder.py or feeder.rb
Feeder.py hangs early on (sometimes the servo will move) saying 0.4% or there abouts (depends on the file).
Feeder.rb will sometimes send each command very slowly with maybe a 20 second delay between commands (motors do respond).
I can't get the inkscape control extension to work as it appears to be looking for a reg entry that identifies the eggbot electronics rather than using a com port directly.
I also can't get the java GUI to do anything other than connect. If I click open I see the outline of a window and then it hangs (probably a java version issue).
I noticed that the Arduino serial monitor defaults to not sending a line ending. When sending commands without a line ending (i.e. \n ) the command is ignored until a \n is received. I thought maybe the ruby/python senders might work if I added a \n but they didn't.
Anyone got this working? What version of Arduino are you using? (Wondering if the ftdi chips on my rev2 boards are causing problems - I've tried two different rev2 unos).
|
Re: Has anyone made a Spherebot/Eggbot? May 30, 2012 06:17AM |
Registered: 12 years ago Posts: 22 |
I'm still not totally sure what is going on or where the problem lies, but I'm getting closer and I was able to get feeder.py to send a small gcode file and have the eggbot print some recognisable text. Its a long way off nice and smooth but that is another issue.
I basically removed the check from feeder.py that looks for the ' k' sequence of chars sent by the arduino after receving a line of gcode. It worked for a little while before getting out of sequence and then the steppers started being really clunky moving one then the other so not sure if that is related yet.
Will post an update if/when I figure out more.
Edit: By the way I got a Rev3 Uno yesterday and that didn't make any difference to the comms issue. (And my mistake, the Rev2 uses an 8u2, the Rev3 uses 8u16 Atmega chip rather than ftdi for USB serial comms)
Edited 2 time(s). Last edit at 05/30/2012 06:21AM by Mark Benson.
I basically removed the check from feeder.py that looks for the '
k' sequence of chars sent by the arduino after receving a line of gcode. It worked for a little while before getting out of sequence and then the steppers started being really clunky moving one then the other so not sure if that is related yet.Will post an update if/when I figure out more.
Edit: By the way I got a Rev3 Uno yesterday and that didn't make any difference to the comms issue. (And my mistake, the Rev2 uses an 8u2, the Rev3 uses 8u16 Atmega chip rather than ftdi for USB serial comms)
Edited 2 time(s). Last edit at 05/30/2012 06:21AM by Mark Benson.
|
Re: Has anyone made a Spherebot/Eggbot? May 30, 2012 06:41AM |
Registered: 12 years ago Posts: 54 |
I havent gotten to play with mine since I updated this post. I dont have any concrete documentation other than a few bookmarks and what I've included in this thread. Sometimes I purposely post to the forum to create documentation. Its a huge part of my job and I'm pretty proficient, although I dont always do during the course of action. I will put some more info together when I get something functional. For the most part, I've just been working off of the Thingiverse comments and the other links in my initial post.
Mark - I never got the python scripts working either. Same conclusion that the Arduino wasnt sending an ack after receiving a code line and never moved forward with the gcode. Have you changed the two lines I mentioned? Thats what it took for me to get mine working with the ruby script. And it does take quite a bit of time for each sequence. The motors and movements seem to be happening at a fairly fast feed rate, but the time to send and ack each manuever is quite slow. I'm using an Uno R2. Like I mentioned, I'm far from finished but seem to be on the right track.
HTH
Josh
Josh
//++++++++++++++++++++++++++++++++++++++++++++++++++++++++++++++++++++++
//Prusa / RAMPS_1.4 & ATMega_2560 / Slic3r > Pronterface > Marlin / Luck
//++++++++++++++++++++++++++++++++++++++++++++++++++++++++++++++++++++++
|
Re: Has anyone made a Spherebot/Eggbot? May 30, 2012 08:18AM |
Registered: 12 years ago Posts: 22 |
mydogjustice Wrote:
-------------------------------------------------------
> Mark - I never got the python scripts working
> either. Same conclusion that the Arduino wasnt
> sending an ack after receiving a code line and
> never moved forward with the gcode. Have you
> changed the two lines I mentioned? Thats what it
> took for me to get mine working with the ruby
> script. And it does take quite a bit of time for
> each sequence. The motors and movements seem to
> be happening at a fairly fast feed rate, but the
> time to send and ack each manuever is quite slow.
> I'm using an Uno R2. Like I mentioned, I'm far
> from finished but seem to be on the right track.
It seems strange that the Arduino answers back to the Arduino serial monitor and any other serial terminal, but the python script isn't seeing it. That said I did chuck in a load of 'print("waiting for serial data")' type debug comments and I was able to see a response from the arduino. It looks to me like the feeder.py is doing two receives though I don't fully understand the ins and outs of the python serial class/module/function (or whatever they are called in Python) it looks to me like one call blocks the other. Taking one out allows the script to work to a point.
I did try your changes serveral times with several different configurations. I had the end stops (both x and y) disabled as a matter of course. I will try the auto home feature again now that things are kinda working and see what happens.
When you say it takes a while for each sequence, do you mean to send the gcode or for it to move motors? The feed rate that the unicorn plugin sets by default is very high. I tried a few different values but by the time I got down to 200mm/min, feeder.py and the arduino were getting out of sync quickly and the axis just stop moving until you start sending gcode again.
Edited 3 time(s). Last edit at 05/30/2012 09:56AM by Mark Benson.
|
Re: Has anyone made a Spherebot/Eggbot? May 31, 2012 05:40AM |
Registered: 12 years ago Posts: 22 |
I think I might be right about the serial.readline() blocking in feeder.py...
There is still something else going on but if I set the serial connection to timeout (sphereBot = serial.Serial(DEVICE, BAUDRATE, timeout=10)) then it seems to work after hanging on the first line for 10 seconds the rest seems ok.
if options.wantToSend: #Default is true
print "About to write ", line, "to the arduino" #Send a line from gcode file to the Arduino
sphereBot.write(line)
print "Data sent"
#Added '~' to the chars the Arduino sees as an end of line char in the spherebot firmware
#Commented out after proving the \n char is seen by the Arduino
#print "Sending ~ as extra linefeed char to see if Arduino picks up on that"
#sphereBot.write("~")
print "Reading data from arduino"
response = sphereBot.readline() #Note: Serial.readline() blocks until timeout or \n char is seen
print "Read serial port. Got back ", response
#Don't need to wait for "k" as the Serial.readline() above blocks until the whole line is read (or it times out).
#Also if Serial.readline() is called above, does that mean the serial buffer is flushed? If so the next call won't
#see the command from the Arduino as it has already been sent (won't ever see the "k"), might explain
#the behaviour I am seeing...
#Commented out as this is stopping the script from sending the next command
#while response[:3] != "k":
#print "In while loop. Got back ", response,
#response = sphereBot.readline()
#print "At end of while loop. Got back ", response,
There is still something else going on but if I set the serial connection to timeout (sphereBot = serial.Serial(DEVICE, BAUDRATE, timeout=10)) then it seems to work after hanging on the first line for 10 seconds the rest seems ok.
if options.wantToSend: #Default is true
print "About to write ", line, "to the arduino" #Send a line from gcode file to the Arduino
sphereBot.write(line)
print "Data sent"
#Added '~' to the chars the Arduino sees as an end of line char in the spherebot firmware
#Commented out after proving the \n char is seen by the Arduino
#print "Sending ~ as extra linefeed char to see if Arduino picks up on that"
#sphereBot.write("~")
print "Reading data from arduino"
response = sphereBot.readline() #Note: Serial.readline() blocks until timeout or \n char is seen
print "Read serial port. Got back ", response
#Don't need to wait for "
k" as the Serial.readline() above blocks until the whole line is read (or it times out).#Also if Serial.readline() is called above, does that mean the serial buffer is flushed? If so the next call won't
#see the command from the Arduino as it has already been sent (won't ever see the "
k"), might explain#the behaviour I am seeing...
#Commented out as this is stopping the script from sending the next command
#while response[:3] != "
k":#print "In while loop. Got back ", response,
#response = sphereBot.readline()
#print "At end of while loop. Got back ", response,
|
Re: Has anyone made a Spherebot/Eggbot? May 31, 2012 06:04AM |
Registered: 12 years ago Posts: 22 |
However I do see things like this:
"First read of serial port. Got back ok:G1 X-22.08 Y-0.14 FG1 X-24.74 Y-0.14 F200.00"
Where there are two commands mashed together on one line and the rest of the commands are missed. This is what I meant when I said it gets out of sequence.
Josh, I did try enabling autohoming but it didn't make much difference other than trying to home the axis but I don't have end stops so that doesn't work.
|
Re: Has anyone made a Spherebot/Eggbot? May 31, 2012 10:59AM |
Registered: 12 years ago Posts: 22 |
This (file updated - see later posts) seems to work* and does look for the the ok response from the Arduino rather than assuming as \n means the data was read and was ok.
*I say seems to work as I am testing on a bare Arduino. Will test on the full Eggbot tonight. Also it isn't based on the feeder.py with displacement. I will update the correct file later.
#response = sphereBot.readline()
#print "read :", response
#while response[:3] != "ok:":
# print "In loop ", response,
# response = sphereBot.readline()
numOfLines = 0
while True: #Do forever
response = sphereBot.readline() #Read data from the serial port
print("read data: " + response) #Print out line read
if (response[:3] == "ok:"):
print "Seen ok:, breaking out of loop"
break
numOfLines = numOfLines + 1 #Incrememnt number of lines read
if (numOfLines >= 1): #If number of lines greater than or equal to 1
print "seen more than one line, breaking out of loop"
break #Break out of loop
Edited 2 time(s). Last edit at 06/01/2012 06:20AM by Mark Benson.
|
Re: Has anyone made a Spherebot/Eggbot? May 31, 2012 12:01PM |
Registered: 12 years ago Posts: 22 |
|
Re: Has anyone made a Spherebot/Eggbot? June 01, 2012 06:17AM |
Registered: 12 years ago Posts: 22 |
I've tidied up my take on feeder.py, taken out all the extranious print statements and put back the egg displacement stuff.
I added the timeout as a variable as I was changing this a lot while testing.
This works on my bare test Arduino, yet to be tested on the eggbot itself.
File removed: Now on github [github.com]
Edited 1 time(s). Last edit at 06/01/2012 10:11AM by Mark Benson.
I added the timeout as a variable as I was changing this a lot while testing.
This works on my bare test Arduino, yet to be tested on the eggbot itself.
File removed: Now on github [github.com]
Edited 1 time(s). Last edit at 06/01/2012 10:11AM by Mark Benson.
|
Re: Has anyone made a Spherebot/Eggbot? June 01, 2012 10:09AM |
Registered: 12 years ago Posts: 22 |
I figured out what was going on. (And could kick myself for missing it these past few days)
The feeder.py resets the Arduino Uno (rev2/rev3) boards when it creates a serial connection and starts sending data before the Arduino is ready.
I've modified feeder.py to take this into account.
[github.com]
I'll remove the files from the posts incase I change it again. Grab it from github.
Edited 1 time(s). Last edit at 06/01/2012 10:12AM by Mark Benson.
|
Re: Has anyone made a Spherebot/Eggbot? March 18, 2013 11:09PM |
Registered: 11 years ago Posts: 42 |
Hey,
Anyone know where to get eggbot firm ware for the arduino uno that works? I have the mechanical stuff all working but can't get a firmware to compile in the arduino software.
I can't get this software to work.
[github.com]
I tried the arduino 1.0, 1.01, and 0023. I chased down a couple of obvious errors, but I can't get it to work.
|
Re: Has anyone made a Spherebot/Eggbot? March 29, 2013 09:11AM |
Registered: 11 years ago Posts: 8 |
pfinucan Wrote:
-------------------------------------------------------
> Hey,
>
> Anyone know where to get eggbot firm ware for the
> arduino uno that works? I have the mechanical
> stuff all working but can't get a firmware to
> compile in the arduino software.
>
> I can't get this software to work.
> [github.com]
>
> I tried the arduino 1.0, 1.01, and 0023. I chased
> down a couple of obvious errors, but I can't get
> it to work.
Same problem ,, get lots of errors when trying to compile. Could use some help with it as well
|
Re: Has anyone made a Spherebot/Eggbot? March 29, 2013 11:11AM |
Registered: 12 years ago Posts: 22 |
|
Re: Has anyone made a Spherebot/Eggbot? March 30, 2013 03:58PM |
Registered: 11 years ago Posts: 8 |
|
Re: Has anyone made a Spherebot/Eggbot? August 10, 2013 09:56AM |
Registered: 11 years ago Posts: 18 |
|
Re: Has anyone made a Spherebot/Eggbot? August 10, 2013 07:40PM |
Registered: 11 years ago Posts: 18 |
|
Guest
Re: Has anyone made a Spherebot/Eggbot? August 17, 2013 06:37PM |
I have troubles with an Arduino micro based spherebot.
I seem to experience the same problems mentioned above:
- I can get everything working through Arduino Serial Monitor. Each Command is executed correctly and acknowledged with "ok:"
also have disabled my endstop
- I have created a Gcode File via EggBot's Inkscape Plugin and the Unicorn GCode Plugin.
- tried to get the file out through ReplicatorG, but ReplicatorG cannot establish connection to my Arduino
I have setup a machine for my Arduino using ReplicatorG's "serialpassthrough" driver, but response from Arduino doesn't come back
- tried to send the file via SphereBotSender under WindowsXP 32Bit.
this utility get's connected to the Arduino but hangs when opening the file pick dialog.
It only run the very first time.
Did anyone have got it running comfortably on an WinXP32 and how?
Is there any Driver/plugin available which could use Arduino based Spherebots from EggBot Plugin in Inkscape directly?
Thanks in advance
|
Guest
Re: Has anyone made a Spherebot/Eggbot? August 18, 2013 01:25PM |
reply to my yesterday's posting which may be helpful to people who have similar problems.
If you have the situation that your Arduino based Spherebot accepts single commands via Arduino Serial Monitor, but hangs, when sending a complete gcode file through SphereBotSender, it could be the scaling.
I had the problem that rotation was working, but Pen movement (x-Axis) did only move at the beginning and hang at the end.
Check the coordinates in your Gcode file and compare with your experience from Arduino Serial Monitor or with the limits in code.
Mine wanted to print outside of the limits. So it did not do any pen movements.
I wonder why my scale is so much smaller than mentioned in the calculated Arduino SpereBot codes, but after playing around with the parameters I could calibrate it quite well for the beginning. Seems that I have to create my own inkscape template after getting everything to work.
Still open is my research for an inkscape plugin, which allows direct printing of the path to Arduino.
|
Guest
Re: Has anyone made a Spherebot/Eggbot? August 18, 2013 01:49PM |
> - tried to send the file via SphereBotSender under
> WindowsXP 32Bit.
> this utility get's connected to the
> Arduino but hangs when opening the file pick
> dialog.
> It only run the very first time.
Interesting behavior:
When I click the buttons in SphereBotSender and take care not moving the mouse on click, it seems to work and doesn't hang.
When moving the mouse while clicking (submultiples of mm which may happen after some cups of coffee ) the SphereBotSender hangs and has to be shut down via Task Manager.
> WindowsXP 32Bit.
> this utility get's connected to the
> Arduino but hangs when opening the file pick
> dialog.
> It only run the very first time.
Interesting behavior:
When I click the buttons in SphereBotSender and take care not moving the mouse on click, it seems to work and doesn't hang.
When moving the mouse while clicking (submultiples of mm which may happen after some cups of coffee
) the SphereBotSender hangs and has to be shut down via Task Manager.
|
Guest
Re: Has anyone made a Spherebot/Eggbot? September 02, 2013 05:51PM |
This GUI was a great help for me. It was written by Alexander Balasch.
https://github.com/thunderbug1/Spherebot-Host-GUI
Hi Project description may also be helpful for others: http://coolrobotprojects.blogspot.co.at/.
Mine is working perfectly now with Arduino Micro (Spherebot Firmware) + Spherebot-Host-GUI.
https://github.com/thunderbug1/Spherebot-Host-GUI
Hi Project description may also be helpful for others: http://coolrobotprojects.blogspot.co.at/.
Mine is working perfectly now with Arduino Micro (Spherebot Firmware) + Spherebot-Host-GUI.
|
Re: Has anyone made a Spherebot/Eggbot? September 07, 2013 03:57PM |
Registered: 10 years ago Posts: 6 |
bigkahuna Wrote:
-------------------------------------------------------
> anyone still active on this project, I got the
> firmware to compile using 0022
> but my uno won't upload. I can upload using 1.05
> but the firmware won't
> compile.
>
> John
I'd be very interested in why the new 1.05 (and 1.03) IDE won't work, and I can't get the older 023 to compile either.
I'm trying with an Nano but it just won't work with either IDE for me. (Win Vista 32... )
)
I thought I'd get the firmware squared away before jumping into a build....
Mike
-------------------------------------------------------
> anyone still active on this project, I got the
> firmware to compile using 0022
> but my uno won't upload. I can upload using 1.05
> but the firmware won't
> compile.
>
> John
I'd be very interested in why the new 1.05 (and 1.03) IDE won't work, and I can't get the older 023 to compile either.
I'm trying with an Nano but it just won't work with either IDE for me. (Win Vista 32...
)I thought I'd get the firmware squared away before jumping into a build....
Mike
|
Re: Has anyone made a Spherebot/Eggbot? September 08, 2013 09:58AM |
Registered: 12 years ago Posts: 37 |
Hello all. I've been trying to get the firmware from the github to compile. I've had zero luck. I've tried multiple versions of the IDE. None have worked. I've included the nonstandard files. It just hasn't helped. Would someone be willing to post their arduino code that worked and the version of the IDE it was compiled in.
I have all the major parts to build one but I wan to get the firmware taken care of first.
Thanks
Conscripted
I have all the major parts to build one but I wan to get the firmware taken care of first.
Thanks
Conscripted
|
Re: Has anyone made a Spherebot/Eggbot? September 10, 2013 04:31PM |
Registered: 10 years ago Posts: 6 |
OK, I got it to verify and upload to my Nano clone.
Details of what I did to fix this are as follows for anyone else that runs into a similar issue with this firmware.
Note that I really haven’t tested it out yet – this was just the first step in getting it working (it does seem to accept serial communications though as it replies back “ ok: “ to sent text / commands.
First step is to ensure that the downloaded sketch “SphereBot-Master” ends up in your Sketchbook folder as a folder named SphereBot. (folder name needs to match sketch name)
The next step is to download the 2 libraries noted in the readme file and add them to the libraries folder in the same place your sketchbook folder is. The following wiki really helped explain it (this was what I was doing wrong…)
http://arduino-info.wikispaces.com/Arduino-Libraries
The last step to getting it to work for me was to rename “WProgram.h” to “Arduino.h” in the library files TimerOne.h and SoftwareServo.h or any place else WProgram.h shows up IF you are using and arduino IDE Ver 1.0 or later.
I hope this helps others -
Mike
Edited 1 time(s). Last edit at 09/11/2013 09:10AM by Mike-Ross.
|
Re: Has anyone made a Spherebot/Eggbot? March 06, 2015 05:54PM |
Registered: 11 years ago Posts: 22 |
I am aware this thread is old but I stumbled upon it when trying to get my spherebot working. My setup is similiar to those above (a mix of [www.thingiverse.com] and [www.thingiverse.com] with the arduino firmware [github.com]). I am using an arduino nano clone and had the same problems with the feeder script (pyhon, processing etc.) hanging as described above, not working at all or only intermittently.
Well, it turned out to be an electrical problem: I had the tiny servo hooked up to the nano (signal and 5V supply), as described in the setup, and the nano powered by usb only. I thought, the nano would be able to handle the single servo via usb power. The steppers, of course, were connected to a separate 12V supply.
The solution: Removing (as a test) the servo from the nano made the feeder script and the firmware work. The obvious follow-up solution then was to power the nano using the external 12V supply as well, via VIN. When powered via VIN, the servo can be reconnected and the nano seems to be able to handle the single servo on the 5V rail. The nano seems to be able to handle the 12V Vin as well, as the AMS1117 regulator doesn't even get warm.
My spherebot is working now. Although the wiring is still a mess..
Maybe this helps someone.
Best Regards,
steffen
|
Re: Has anyone made a Spherebot/Eggbot? March 13, 2015 03:59AM |
Registered: 14 years ago Posts: 128 |
I built an eggbot about a year ago to print onto golf balls using an Arduino Uno microprossor..
I made the following notes, hopefully they may be of help and don't have too many errors...
------------------------------------------------------------------------------------------------------------------------------------------------------------------------------
I had a couple of spare (200 step) stepper motors and a need to write on my golf balls I thought it would be cool to build a Finucane Derivative Eggbot from Thingiverse [github.com]
Hopefully the following may help others in building this project. As so often happens you battle to get something to work and then try and remember what you did after. Have fun.. A lot of good work from people with software and designs.
I basically started out with downloading the STL files and then 3D printed them. Later I redesigned the frames to include the bearing holders as part of the frames rather than having a separate bearing holder bolted to the frames.
I designed a driver PCB (100mm x 40mm) using the free version of Eagle software. This is for mounting the 2 Pololu stepper drivers. I used Polulo drivers with heat sinks but don’t think they are really required.
The M0, M1, M2 (Micro stepper pins) were tied together and held to +5v via a 4.7k resistor enabling 16 micro stepping. This allows the stepping motor which is a 200 step motor 3200 steps per revolution. The Reset and Sleep are also tied together.
All inputs and outputs from the driver PCB have connectors – Input is a 12 plug connector (11 pins are used)
A fuse was added to provide additional protection.
An additional connector was included to provide option of an end optical/switch sensor for the pen motor. I ended up later using an optical sensor for homing the pen.
Construction is pretty much look and build. The thing to watch out for is making sure there is very little twist of the pen assembly. You need to have the pen move, when the motor shaft turns. Also when the rotate motor moves, the object you are printing on needs to move and not slip. This is more critical with golf balls having a dimple finish.
Currently my threaded shaft lengths are: 3 shafts at 330mm, front top shafts: 100mm & 80mm.
I had a number of bits left over from building Repraps.
Some of the items sourced.
Arduino Uno (DEV-11021), small Servo ( ROB-09065), pack of jumper wires (PRT-09387), 2 x Pololu stepper drivers (G3D, these had heat sinks already mounted), Mains power adaptor 12v DC 2.5A (MP3490)
After assembling the Spherebot, I decided I wished for it to be of stronger construction and printed another 2 end frames.
The 2 inner end frames I cut out part of the top front frame to allow the pen to move more.
I designed a driver PCB mounting block for the PCB driver board. This was to give greater strength. I also designed a matching block that is position to the front. This makes it easier for keeping everything square.
The same was done for the Arduino Uno board.
8 mm nuts lock nuts were used - more of a look thing.. however they are a pain to wind onto the threaded rods.
The PCB mounting block is designed to hold the driver PCB using 4 stand off screw mounts. For setup the PCB can be raised higher and screwed in placed with 2 screws to allow for the Pololu driver current adjustments.
If building a Spherebot again I would strongly look at purchasing an arduino stepper motor shield
[RI0023" target="_blank" rel="nofollow">www.dfrobot.com])
You would need to look at connecting the servo wires to this shield for the Arduino PWM output, 0v, +5v; as well as making sure everything can fit in place by the rotate stepper motor.
One thing I found that the servo spring didn’t fit with the servo motor that I was using and designed a spring that was smaller.
I bent a small piece of craft wire to connect the servo arm to the spring.
Also you need a very small diameter but long screws to position the servo motor to the motor arm.
I designed a slightly stronger pen motor arm that connects to the motor hub. I found the one I first printed would twist a bit when the arm moved, printing on golf balls is harder than smooth surfaces . The arm was designed to have a home sensor plate.
This was later replaced with one I machine out of polycarbonate which is a lot stronger material.
I designed a plate for a +12v power switch for the end frame. This provides a quick on/off rather than pulling the power socket out.
The PCB driver PCB has a 12 pin connector (only 11 pins are used) . On the other end of the connector cable I joined the cable to patch pins which are then pushed into the Arduino I/O’s socket.
A short 3 wire extension cable was required to connect from the driver PCB to the servo cable as the servo cable was too short.
The suction cups that I could buy locally were different than what the original design used.
I brought from the local $2 shop a small toy gun and designed a drive and idler assembly to allow these suction cups to be used.
I have been using coloured permanent marker (Extra fine point) purchased from a local Stationary (Stabilo).
Hardware setup
The Pololu stepper drivers need to have the current limits set.
The Pololu drivers I used have 2 adjustment pots Ref & OSC
I set the Ref voltage for both drivers to 0.4 volts . This is measured between the metal pot and 0v
Software setup
A number of steps is required for the setup of the spherebot software.
- Installing the Arduino PC sofware.
- Configuring and loading the Spherebot Arduino firmware.
- Testing the spherebot firmware and hardware
- Installing and configure Inkscape software (Drawing program).
- Installing a Gcode sender program.
Installing the Arduino PC sofware:
- Ensure that you have the latest Arduino PC sofware. Download from: [arduino.cc]
If you don’t have the latest version you may find that your PC won’t reconise the Arduino device and load drivers. (Using version 22 I found this happened). Usually under device manager it will show as an unknown device and you can’t load a driver. Latest version 1.0.5 will automaticly detect and install the required Arduino driver.
Configuring and loading the Spherebot Arduino firmware:
- Download the arduino firmware file (SphereBot-Master0 from: [github.com] and place in a folder named as Spherebot.
- Download 2 arduino library files (SoftwareServo & TimerOne) from:
SoftwareServo: [www.arduino.cc]
TimerOne: [www.arduino.cc]
The files need to be placed into the Arduino/libraries (where ever you have placed the Arduino sofware) as two folders named SoftwareServo and Timer1.
Also you need to copy SoftwareServo.h and Timerone.h files that are in these library files into the folder you named as Spherebot.
Run the Arduino Sketch software and open the spherebot folder and select Spherebot file. You should see all 5 sketches e. g.. Spherebot, SoftwareServo.h, StepperModel.ccp, StepperModel.h TimeOne.h
In both the SoftwareServo.h, StepperModel.ccp sketches, rename WProgram.h to Arduino.h.
In the Spherebo sketch there is a setting for the minumum and maximum movement for the pen stepper motor. This is to stop the pen moving too near the centre of rotation of the object as well as hitting the side frames.
There is also a zoom setting. Both of these setting are interconnected.
Normal settings.
#define XAXIS_MIN_STEPCOUNT -467
#define XAXIS_MAX_STEPCOUNT 467
#define DEFAULT_ZOOM_FACTOR 1.
Change these to:
#define XAXIS_MIN_STEPCOUNT -280
#define XAXIS_MAX_STEPCOUNT 280
#define DEFAULT_ZOOM_FACTOR 0.02
Under the tools menu ensure correct board setup and port setting. ( I have found some times you need to disconnect and reconnect to detect the correct port). If not sure of port setting, check under PC device manager to which port the Arduino is showing up as.
Upload the firmware and also save the Arduino sketch file.
Note: In the Spherebo sketch “StepperModel.h” there is a inactive feature //#define AUTO_HOMING. Best to leave this inactive when first testing as it requires a 0 volt signal from a sensor to stop the X Pen motor from continously rotating. It can be later used if desired.
Testing the Spherebot firmware and hardware:
After loading the Spherebot firmaware, whenever the Spherebot is connected via the USB to a PC the Spherebot servo motor will move the pen motor for the pen up position. This is set by the spherebot firmware default setting. This will most likely need to be changed depending on the physical position of the servo arm. This can be set later. (Spherebot sketch [ #define DEFAULT_PEN_UP_POSITION 50]) Note: The Spherebot servo motor is drived off the PC +5volts USB connection and doesn’t use the stepper motor +12volt supply. Pressing the arduino reset will cause a reset and thus will also move the pen motor for the pen up default position.
Testing movements.
Note: The Spherebot uses the X axis for the pen rotation where as the Eggbot uses the X axis as the object rotation
This means with Sherebot you will have a document in a portrait view. However text/objects can be rotated should you wish to print around an object.
The pen stepper motor (X motor ) rotates approx 56 degrees either side of vertical; 112 degrees in total or about 1000 steps
The rotation stepper (Y motor) takes 3200 steps for one revolution.
You can easy swap the X and Y axis in the firmware.
Note: This can make it more correct when using the Gcode sender when using the X/Y axis tools.
In the spherebot sketch (approx half way down) change the folowing
double xVal;
boolean hasXVal = getValue('Y', command, &xVal); Change this to X
if(hasXVal) xVal*=zoom;
double yVal;
boolean hasYVal = getValue('X', command, &yVal); Change this to Y
if(hasYVal) yVal*=zoom;
Think the above is wrong
-------------------------------------------------------
The rotation stepper (Y motor) will need to be reversed by swapping one pair of the field winding around.
#define XAXIS_DIR_PIN 7
#define XAXIS_STEP_PIN 8
#define XAXIS_ENABLE_PIN 6
#define XAXIS_ENDSTOP_PIN 3
#define YAXIS_DIR_PIN 10
#define YAXIS_STEP_PIN 11
#define YAXIS_ENABLE_PIN 9
#define YAXIS_ENDSTOP_PIN -1 // <0 0> No Endstop!
#define SERVO_PIN 2
to this --------------------------------------------------
#define YAXIS_DIR_PIN 7
#define YAXIS_STEP_PIN 8
#define YAXIS_ENABLE_PIN 6
#define YAXIS_ENDSTOP_PIN 3
#define XAXIS_DIR_PIN 10
#define XAXIS_STEP_PIN 11
#define XAXIS_ENABLE_PIN 9
#define XAXIS_ENDSTOP_PIN -1 // <0 0> No Endstop!
#define SERVO_PIN 2
---------------------------------------------
Using the Arduino software that was used to upload the firmware you can use it to send Gcodes to test movements of the stepper motors and servo motor. Use Tools/Serial Monitor. At the bottom of Serial monitor screen set the following: Both NL&CR and 115200 baud.
Gcodes:
M300 S80 (Moves servo motor to the Sxx position – Can use this command to determine default up-position setting for firmware).
M18 (Turn off stepper motors).
M300 S255 (Turn off servo – can cause the pen to drop down onto the object with some servo’s)
G1 Xxx Yxx Fxxxx ( Move the Pen motor to postion Xxx and move the Rotate motor to position Yxx at Speed of Fxxx
G1 X100 Y3000 F1500 Moves pen motor to position 100 and rotates object to position 3000 at speed of 1500.
G1 X0 Y0 F1500 Moves pen motor to position 0 and rotates object to position 0 at speed of 1500.
G1 X-100 Y-3000 F1500 Moves pen motor to position -100 and rotates object to position -3000 at speed of 1500.
Note:
 +)xx position the pen motor should move in a clockwise rotation (top to right) as viewed from the front of the spherebot.
Y(+)xx position the rotate motor should move in a top to front rotation as viewed from the front of the spherebot.
- If either movement is opposite then the approperate stepper motor will need to have its direction reversed. This can be done by swapping the polarity around for one set of the stepper motor coil. e.g.2 wires transposed for one coil.
Installing and configure Inkscape software (Drawing program).
Note: To print from Inkscape for an spherebot the drawing file needs to be saved using a add-on program which allows you to save the file as a gcode file. Another program (gcode sender) is then required to send the file to the spherebot to print. This is different to an Eggbot which has an exension file added to Inkscape that allows direct printing from within the Inkcscape program. The Eggbot extension also has controls that allow the eggbot pen to be directly controlled within inkscape – this feature will not work with the Spherebot. Eggbots don’t use Arduino processors.
- Download the Inkscape software from [inkscape.org] and install.
This is usually installed in a folder in the user files not c: program files folder
To print text you need an engraving font (One of the good things is Herheys text allows for different size changes where other fonts don't).
- Download the Herheys text extension from
[code.google.com] and install the 3 files directly in to the entensions folder. E.g Inkscape/InkscapePortable/App/Inkscape/share/entensions.
There is a good write up about using this Herheys test font. [www.evilmadscientist.com]
- Download and install the eggbot software from
[code.google.com]
This automatically installs the eggbot extensions for using an Eggbot, there are a couple of things that you may wish to use when drawing objects, but remember that you can’t use it to print or control the Spherebot.
To print to objects you need a Gcode entension.
- Download the Gcode entension from [github.com]
and install the src folder into the entensions folder. E.g Inkscape/InkscapePortable/App/Inkscape/share/entensions.
Also copy the unicorn folder from within the src folder directly into the entension folder.
Intial Inkscape setup and testing
Open up Inkscape, it’s a little slow in opening and I also found it didn’t run on my old computer laptop.
First thing is to set the document size; File – document properties
set size Width 1300 px height 3400 px and make sure display document size is ticked.
If X/Y axis have been swapped in firmware-, use Width 3400 px height 1300 px
Save this as a .svg file into Inkscape templates folder as default.svg. E.g Inkscape/InkscapePortable/App/Inkscape/share/templates.
One thing you can do is draw a box around the document and save the document. This is normally a Inkscape.svg file. You should be also able to save it as a Makerbot Unicorn g-code(*.gcode) file.
If this option is not available you have not set up the Unicorn extension correctly.
Before saving there is a screen that you can change values E.g. pen up , pen down, speeds etc. You can play around with these to get the best print quality. There is also a registration page that you may wish to untick to stop the pen from placing a dot on the object before printing.
The other thing I found there was a command M300 S255 (Turn off servo) that was added at the end of the gcode file by the Unicorn extension, this was causing the pen to drop down onto the object after the print had finished. I think this depends on the servo used. This can be disabled by deleting it out of the Inkscape/InkscapePortable/App/Inkscape/share/entensions/Unicorn “context” file. Use notepad to view and look for the M300 S255, code and delete it and then save file. Best to change the Unicorn “context” file in the src folder as well.
The next thing is to view the document that you draw a box around and saved as a gcode file. Use notepadto view and you will see the gcode that will be sent to your spherebot. This can be great if you have issues with printing.
It will show the values of the max and min X pen and Y motor, very useful when playing around with the firmware scale factor and document default sizes.
There is a lot of help information on using inkscape on the internet but this is not targeted for spherebots in general.
Installing a Gcode sender program.
- Download the gcode sender program from:
[github.com]
Unzip and run: spherebot_UI applicattion file.
Select port and file to print.
If not sure of port setting, check under PC device manager to which port the Arduino is showing up as.
Home position sensor
After getting my Spherebot printing I then decided I would try out using the home sensor option.
First I had to design a new pen motor block assembly to be able to attach a home LED sensor.
I had an old printer sensor. This requires +5v and 0v’s and outputs a +5v signal when the sensor is clear.
I fitted it to my Spherebot and tested that I was getting a 0 volt signal when the sensor was blocked.
- First issue it wasn’t detecting that the LED was blocked. This was because the light was not being blocked my the 3D printed plastic. Painting on some white paper wipe out (Twik) fixed this issue.
Next thing was to enable the auto homing feature in the Arduino sketch firmaware. By deleting “ / / ”
In the Spherebo sketch “StepperModel.h” //#define AUTO_HOMING.
On connecting the USB connector or pressing the Arduino reset buttom the pen motor would move in an anti-clockwise direction until the home sensor was blocked and the turn clockwise to the central position.
The firmware Max amd Min values will determine the central position so depending where the home sensor is, these may need changing and the Inkscape document size will need to be worked with to obtain correct sizes object…
Using Operational
Ope3n Inkscape and create image.
Save created image as a .svg file.
Also save as a Makerbot CNC file. (if error occurs good chance that you have used a space character when using Herheys text.- Note to obtain a space when using Herheys text use an underscore when using the text bock and then delete the underscore on the page).
To print image on object – open GCode sender and select file to print.
-------------------------------------------
The CoreXY Openbeam picture shows what the Eggbot (Golfbot) finally ended up looking like.
Edited 1 time(s). Last edit at 03/13/2015 04:04AM by RepRot.
I made the following notes, hopefully they may be of help and don't have too many errors...
------------------------------------------------------------------------------------------------------------------------------------------------------------------------------
I had a couple of spare (200 step) stepper motors and a need to write on my golf balls I thought it would be cool to build a Finucane Derivative Eggbot from Thingiverse [github.com]
Hopefully the following may help others in building this project. As so often happens you battle to get something to work and then try and remember what you did after. Have fun.. A lot of good work from people with software and designs.
I basically started out with downloading the STL files and then 3D printed them. Later I redesigned the frames to include the bearing holders as part of the frames rather than having a separate bearing holder bolted to the frames.
I designed a driver PCB (100mm x 40mm) using the free version of Eagle software. This is for mounting the 2 Pololu stepper drivers. I used Polulo drivers with heat sinks but don’t think they are really required.
The M0, M1, M2 (Micro stepper pins) were tied together and held to +5v via a 4.7k resistor enabling 16 micro stepping. This allows the stepping motor which is a 200 step motor 3200 steps per revolution. The Reset and Sleep are also tied together.
All inputs and outputs from the driver PCB have connectors – Input is a 12 plug connector (11 pins are used)
A fuse was added to provide additional protection.
An additional connector was included to provide option of an end optical/switch sensor for the pen motor. I ended up later using an optical sensor for homing the pen.
Construction is pretty much look and build. The thing to watch out for is making sure there is very little twist of the pen assembly. You need to have the pen move, when the motor shaft turns. Also when the rotate motor moves, the object you are printing on needs to move and not slip. This is more critical with golf balls having a dimple finish.
Currently my threaded shaft lengths are: 3 shafts at 330mm, front top shafts: 100mm & 80mm.
I had a number of bits left over from building Repraps.
Some of the items sourced.
Arduino Uno (DEV-11021), small Servo ( ROB-09065), pack of jumper wires (PRT-09387), 2 x Pololu stepper drivers (G3D, these had heat sinks already mounted), Mains power adaptor 12v DC 2.5A (MP3490)
After assembling the Spherebot, I decided I wished for it to be of stronger construction and printed another 2 end frames.
The 2 inner end frames I cut out part of the top front frame to allow the pen to move more.
I designed a driver PCB mounting block for the PCB driver board. This was to give greater strength. I also designed a matching block that is position to the front. This makes it easier for keeping everything square.
The same was done for the Arduino Uno board.
8 mm nuts lock nuts were used - more of a look thing.. however they are a pain to wind onto the threaded rods.
The PCB mounting block is designed to hold the driver PCB using 4 stand off screw mounts. For setup the PCB can be raised higher and screwed in placed with 2 screws to allow for the Pololu driver current adjustments.
If building a Spherebot again I would strongly look at purchasing an arduino stepper motor shield
[RI0023" target="_blank" rel="nofollow">www.dfrobot.com])
You would need to look at connecting the servo wires to this shield for the Arduino PWM output, 0v, +5v; as well as making sure everything can fit in place by the rotate stepper motor.
One thing I found that the servo spring didn’t fit with the servo motor that I was using and designed a spring that was smaller.
I bent a small piece of craft wire to connect the servo arm to the spring.
Also you need a very small diameter but long screws to position the servo motor to the motor arm.
I designed a slightly stronger pen motor arm that connects to the motor hub. I found the one I first printed would twist a bit when the arm moved, printing on golf balls is harder than smooth surfaces . The arm was designed to have a home sensor plate.
This was later replaced with one I machine out of polycarbonate which is a lot stronger material.
I designed a plate for a +12v power switch for the end frame. This provides a quick on/off rather than pulling the power socket out.
The PCB driver PCB has a 12 pin connector (only 11 pins are used) . On the other end of the connector cable I joined the cable to patch pins which are then pushed into the Arduino I/O’s socket.
A short 3 wire extension cable was required to connect from the driver PCB to the servo cable as the servo cable was too short.
The suction cups that I could buy locally were different than what the original design used.
I brought from the local $2 shop a small toy gun and designed a drive and idler assembly to allow these suction cups to be used.
I have been using coloured permanent marker (Extra fine point) purchased from a local Stationary (Stabilo).
Hardware setup
The Pololu stepper drivers need to have the current limits set.
The Pololu drivers I used have 2 adjustment pots Ref & OSC
I set the Ref voltage for both drivers to 0.4 volts . This is measured between the metal pot and 0v
Software setup
A number of steps is required for the setup of the spherebot software.
- Installing the Arduino PC sofware.
- Configuring and loading the Spherebot Arduino firmware.
- Testing the spherebot firmware and hardware
- Installing and configure Inkscape software (Drawing program).
- Installing a Gcode sender program.
Installing the Arduino PC sofware:
- Ensure that you have the latest Arduino PC sofware. Download from: [arduino.cc]
If you don’t have the latest version you may find that your PC won’t reconise the Arduino device and load drivers. (Using version 22 I found this happened). Usually under device manager it will show as an unknown device and you can’t load a driver. Latest version 1.0.5 will automaticly detect and install the required Arduino driver.
Configuring and loading the Spherebot Arduino firmware:
- Download the arduino firmware file (SphereBot-Master0 from: [github.com] and place in a folder named as Spherebot.
- Download 2 arduino library files (SoftwareServo & TimerOne) from:
SoftwareServo: [www.arduino.cc]
TimerOne: [www.arduino.cc]
The files need to be placed into the Arduino/libraries (where ever you have placed the Arduino sofware) as two folders named SoftwareServo and Timer1.
Also you need to copy SoftwareServo.h and Timerone.h files that are in these library files into the folder you named as Spherebot.
Run the Arduino Sketch software and open the spherebot folder and select Spherebot file. You should see all 5 sketches e. g.. Spherebot, SoftwareServo.h, StepperModel.ccp, StepperModel.h TimeOne.h
In both the SoftwareServo.h, StepperModel.ccp sketches, rename WProgram.h to Arduino.h.
In the Spherebo sketch there is a setting for the minumum and maximum movement for the pen stepper motor. This is to stop the pen moving too near the centre of rotation of the object as well as hitting the side frames.
There is also a zoom setting. Both of these setting are interconnected.
Normal settings.
#define XAXIS_MIN_STEPCOUNT -467
#define XAXIS_MAX_STEPCOUNT 467
#define DEFAULT_ZOOM_FACTOR 1.
Change these to:
#define XAXIS_MIN_STEPCOUNT -280
#define XAXIS_MAX_STEPCOUNT 280
#define DEFAULT_ZOOM_FACTOR 0.02
Under the tools menu ensure correct board setup and port setting. ( I have found some times you need to disconnect and reconnect to detect the correct port). If not sure of port setting, check under PC device manager to which port the Arduino is showing up as.
Upload the firmware and also save the Arduino sketch file.
Note: In the Spherebo sketch “StepperModel.h” there is a inactive feature //#define AUTO_HOMING. Best to leave this inactive when first testing as it requires a 0 volt signal from a sensor to stop the X Pen motor from continously rotating. It can be later used if desired.
Testing the Spherebot firmware and hardware:
After loading the Spherebot firmaware, whenever the Spherebot is connected via the USB to a PC the Spherebot servo motor will move the pen motor for the pen up position. This is set by the spherebot firmware default setting. This will most likely need to be changed depending on the physical position of the servo arm. This can be set later. (Spherebot sketch [ #define DEFAULT_PEN_UP_POSITION 50]) Note: The Spherebot servo motor is drived off the PC +5volts USB connection and doesn’t use the stepper motor +12volt supply. Pressing the arduino reset will cause a reset and thus will also move the pen motor for the pen up default position.
Testing movements.
Note: The Spherebot uses the X axis for the pen rotation where as the Eggbot uses the X axis as the object rotation
This means with Sherebot you will have a document in a portrait view. However text/objects can be rotated should you wish to print around an object.
The pen stepper motor (X motor ) rotates approx 56 degrees either side of vertical; 112 degrees in total or about 1000 steps
The rotation stepper (Y motor) takes 3200 steps for one revolution.
You can easy swap the X and Y axis in the firmware.
Note: This can make it more correct when using the Gcode sender when using the X/Y axis tools.
In the spherebot sketch (approx half way down) change the folowing
double xVal;
boolean hasXVal = getValue('Y', command, &xVal); Change this to X
if(hasXVal) xVal*=zoom;
double yVal;
boolean hasYVal = getValue('X', command, &yVal); Change this to Y
if(hasYVal) yVal*=zoom;
Think the above is wrong
-------------------------------------------------------
The rotation stepper (Y motor) will need to be reversed by swapping one pair of the field winding around.
#define XAXIS_DIR_PIN 7
#define XAXIS_STEP_PIN 8
#define XAXIS_ENABLE_PIN 6
#define XAXIS_ENDSTOP_PIN 3
#define YAXIS_DIR_PIN 10
#define YAXIS_STEP_PIN 11
#define YAXIS_ENABLE_PIN 9
#define YAXIS_ENDSTOP_PIN -1 // <0 0> No Endstop!
#define SERVO_PIN 2
to this --------------------------------------------------
#define YAXIS_DIR_PIN 7
#define YAXIS_STEP_PIN 8
#define YAXIS_ENABLE_PIN 6
#define YAXIS_ENDSTOP_PIN 3
#define XAXIS_DIR_PIN 10
#define XAXIS_STEP_PIN 11
#define XAXIS_ENABLE_PIN 9
#define XAXIS_ENDSTOP_PIN -1 // <0 0> No Endstop!
#define SERVO_PIN 2
---------------------------------------------
Using the Arduino software that was used to upload the firmware you can use it to send Gcodes to test movements of the stepper motors and servo motor. Use Tools/Serial Monitor. At the bottom of Serial monitor screen set the following: Both NL&CR and 115200 baud.
Gcodes:
M300 S80 (Moves servo motor to the Sxx position – Can use this command to determine default up-position setting for firmware).
M18 (Turn off stepper motors).
M300 S255 (Turn off servo – can cause the pen to drop down onto the object with some servo’s)
G1 Xxx Yxx Fxxxx ( Move the Pen motor to postion Xxx and move the Rotate motor to position Yxx at Speed of Fxxx
G1 X100 Y3000 F1500 Moves pen motor to position 100 and rotates object to position 3000 at speed of 1500.
G1 X0 Y0 F1500 Moves pen motor to position 0 and rotates object to position 0 at speed of 1500.
G1 X-100 Y-3000 F1500 Moves pen motor to position -100 and rotates object to position -3000 at speed of 1500.
Note:
+)xx position the pen motor should move in a clockwise rotation (top to right) as viewed from the front of the spherebot.Y(+)xx position the rotate motor should move in a top to front rotation as viewed from the front of the spherebot.
- If either movement is opposite then the approperate stepper motor will need to have its direction reversed. This can be done by swapping the polarity around for one set of the stepper motor coil. e.g.2 wires transposed for one coil.
Installing and configure Inkscape software (Drawing program).
Note: To print from Inkscape for an spherebot the drawing file needs to be saved using a add-on program which allows you to save the file as a gcode file. Another program (gcode sender) is then required to send the file to the spherebot to print. This is different to an Eggbot which has an exension file added to Inkscape that allows direct printing from within the Inkcscape program. The Eggbot extension also has controls that allow the eggbot pen to be directly controlled within inkscape – this feature will not work with the Spherebot. Eggbots don’t use Arduino processors.
- Download the Inkscape software from [inkscape.org] and install.
This is usually installed in a folder in the user files not c: program files folder
To print text you need an engraving font (One of the good things is Herheys text allows for different size changes where other fonts don't).
- Download the Herheys text extension from
[code.google.com] and install the 3 files directly in to the entensions folder. E.g Inkscape/InkscapePortable/App/Inkscape/share/entensions.
There is a good write up about using this Herheys test font. [www.evilmadscientist.com]
- Download and install the eggbot software from
[code.google.com]
This automatically installs the eggbot extensions for using an Eggbot, there are a couple of things that you may wish to use when drawing objects, but remember that you can’t use it to print or control the Spherebot.
To print to objects you need a Gcode entension.
- Download the Gcode entension from [github.com]
and install the src folder into the entensions folder. E.g Inkscape/InkscapePortable/App/Inkscape/share/entensions.
Also copy the unicorn folder from within the src folder directly into the entension folder.
Intial Inkscape setup and testing
Open up Inkscape, it’s a little slow in opening and I also found it didn’t run on my old computer laptop.
First thing is to set the document size; File – document properties
set size Width 1300 px height 3400 px and make sure display document size is ticked.
If X/Y axis have been swapped in firmware-, use Width 3400 px height 1300 px
Save this as a .svg file into Inkscape templates folder as default.svg. E.g Inkscape/InkscapePortable/App/Inkscape/share/templates.
One thing you can do is draw a box around the document and save the document. This is normally a Inkscape.svg file. You should be also able to save it as a Makerbot Unicorn g-code(*.gcode) file.
If this option is not available you have not set up the Unicorn extension correctly.
Before saving there is a screen that you can change values E.g. pen up , pen down, speeds etc. You can play around with these to get the best print quality. There is also a registration page that you may wish to untick to stop the pen from placing a dot on the object before printing.
The other thing I found there was a command M300 S255 (Turn off servo) that was added at the end of the gcode file by the Unicorn extension, this was causing the pen to drop down onto the object after the print had finished. I think this depends on the servo used. This can be disabled by deleting it out of the Inkscape/InkscapePortable/App/Inkscape/share/entensions/Unicorn “context” file. Use notepad to view and look for the M300 S255, code and delete it and then save file. Best to change the Unicorn “context” file in the src folder as well.
The next thing is to view the document that you draw a box around and saved as a gcode file. Use notepadto view and you will see the gcode that will be sent to your spherebot. This can be great if you have issues with printing.
It will show the values of the max and min X pen and Y motor, very useful when playing around with the firmware scale factor and document default sizes.
There is a lot of help information on using inkscape on the internet but this is not targeted for spherebots in general.
Installing a Gcode sender program.
- Download the gcode sender program from:
[github.com]
Unzip and run: spherebot_UI applicattion file.
Select port and file to print.
If not sure of port setting, check under PC device manager to which port the Arduino is showing up as.
Home position sensor
After getting my Spherebot printing I then decided I would try out using the home sensor option.
First I had to design a new pen motor block assembly to be able to attach a home LED sensor.
I had an old printer sensor. This requires +5v and 0v’s and outputs a +5v signal when the sensor is clear.
I fitted it to my Spherebot and tested that I was getting a 0 volt signal when the sensor was blocked.
- First issue it wasn’t detecting that the LED was blocked. This was because the light was not being blocked my the 3D printed plastic. Painting on some white paper wipe out (Twik) fixed this issue.
Next thing was to enable the auto homing feature in the Arduino sketch firmaware. By deleting “ / / ”
In the Spherebo sketch “StepperModel.h” //#define AUTO_HOMING.
On connecting the USB connector or pressing the Arduino reset buttom the pen motor would move in an anti-clockwise direction until the home sensor was blocked and the turn clockwise to the central position.
The firmware Max amd Min values will determine the central position so depending where the home sensor is, these may need changing and the Inkscape document size will need to be worked with to obtain correct sizes object…
Using Operational
Ope3n Inkscape and create image.
Save created image as a .svg file.
Also save as a Makerbot CNC file. (if error occurs good chance that you have used a space character when using Herheys text.- Note to obtain a space when using Herheys text use an underscore when using the text bock and then delete the underscore on the page).
To print image on object – open GCode sender and select file to print.
-------------------------------------------
The CoreXY Openbeam picture shows what the Eggbot (Golfbot) finally ended up looking like.
Edited 1 time(s). Last edit at 03/13/2015 04:04AM by RepRot.
Attachments:
open | download - Spherebot3.JPG (331.7 KB)
open | download - Spherebot0.JPG (343.8 KB)
open | download - Spherebot1.JPG (335.5 KB)
open | download - Spherebot2.JPG (373.2 KB)
open | download - Spherebot4.JPG (114 KB)
open | download - CoreXY Openbeam-1.JPG (339.8 KB)
open | download - Spherebot6.jpg (73.8 KB)
open | download - Spherebot5.jpg (54.7 KB)

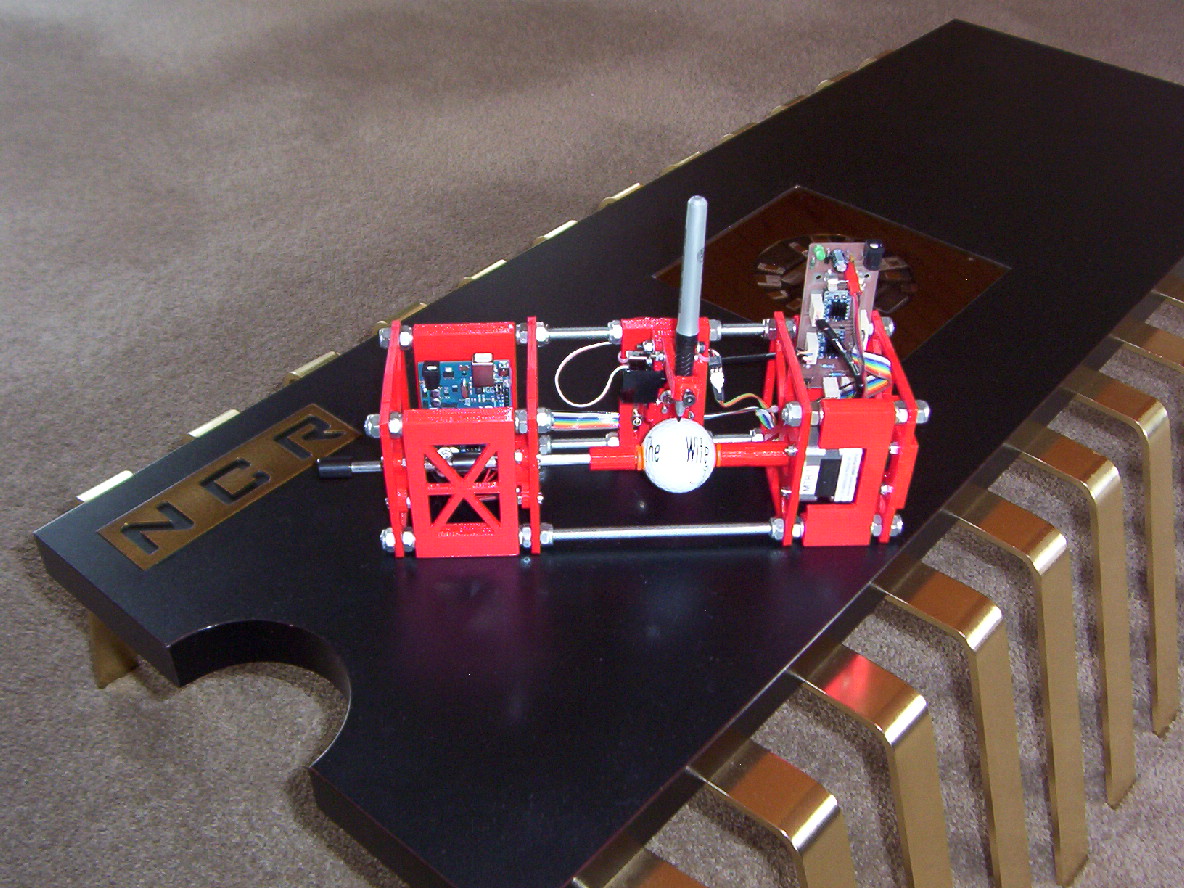
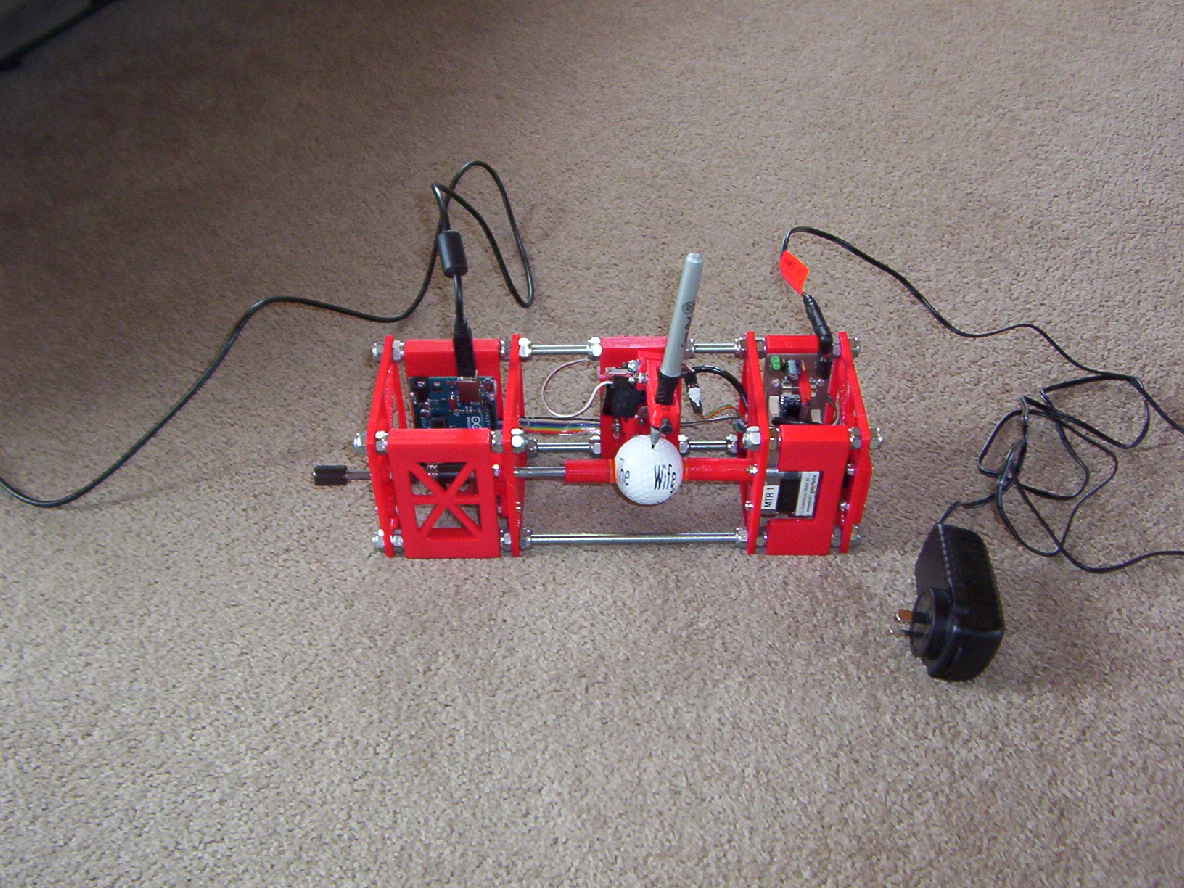
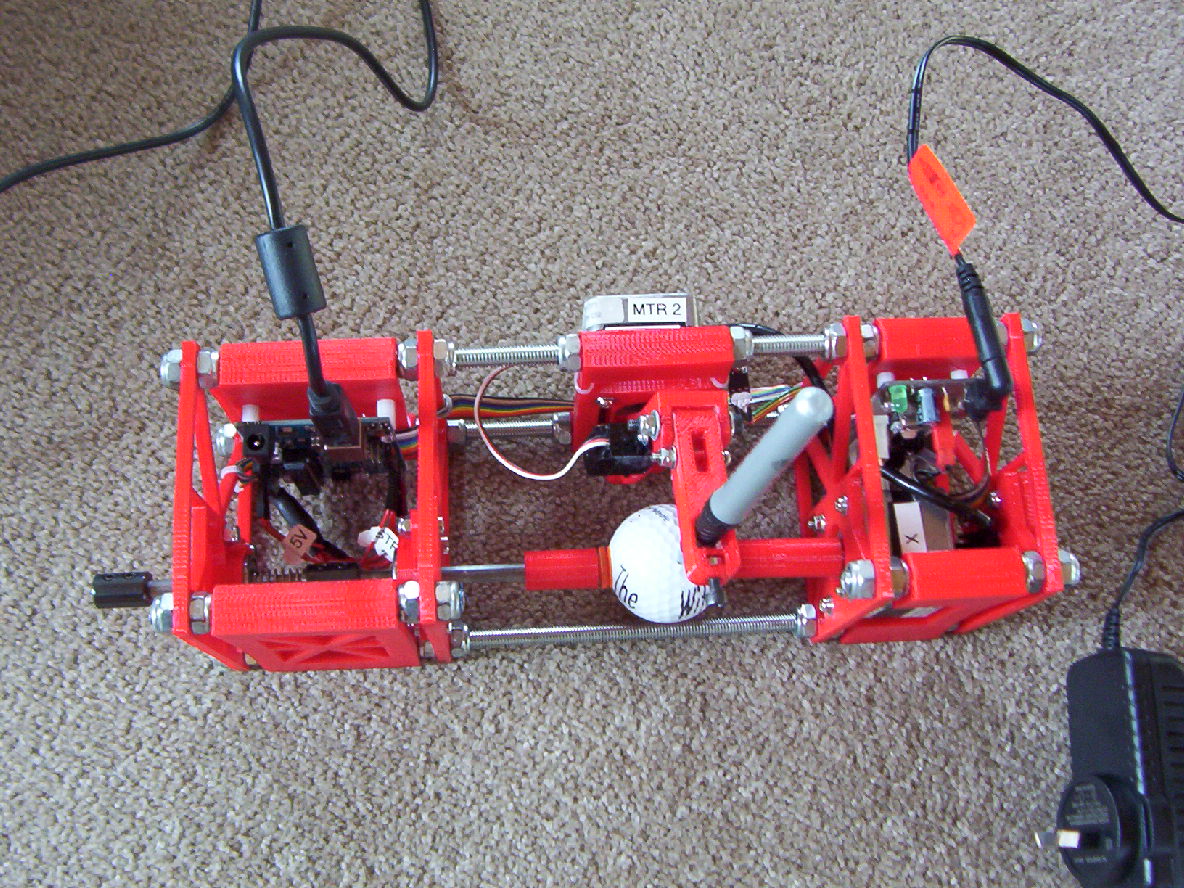
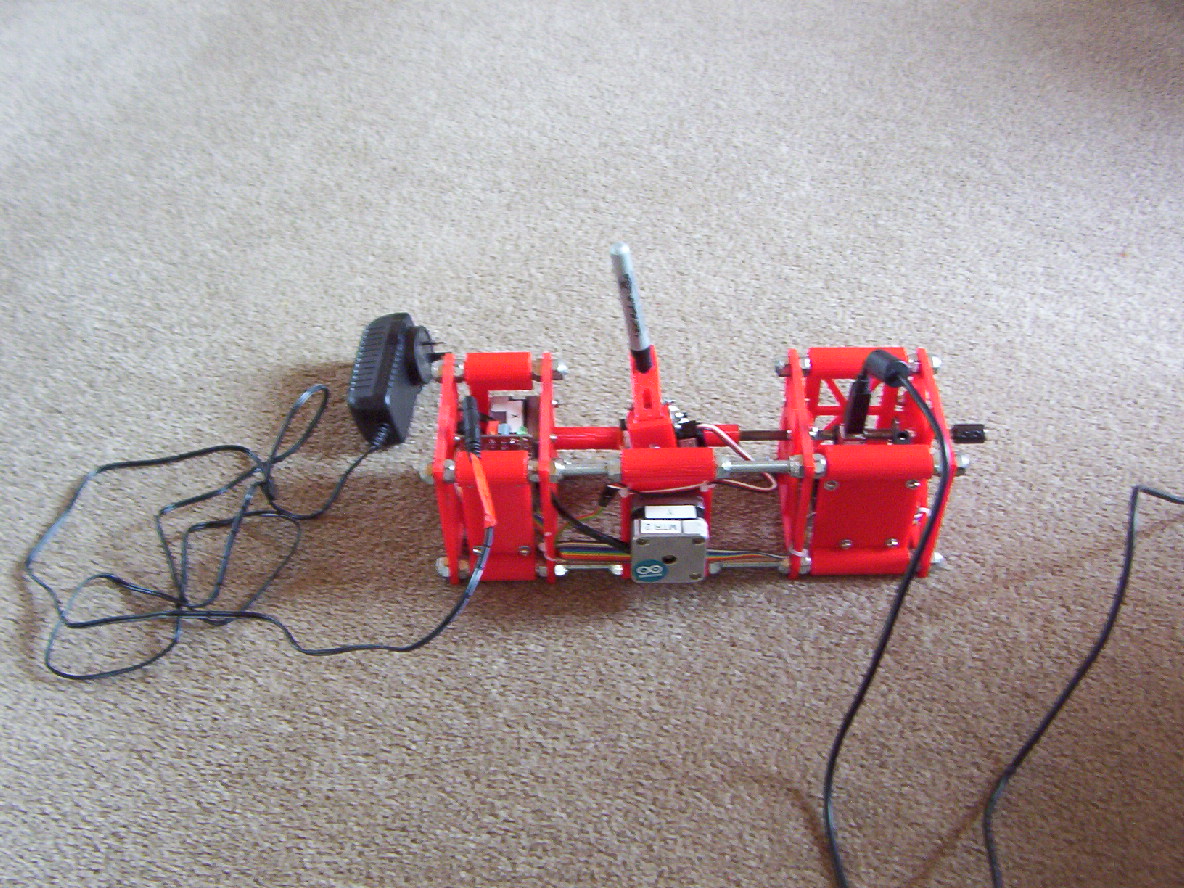
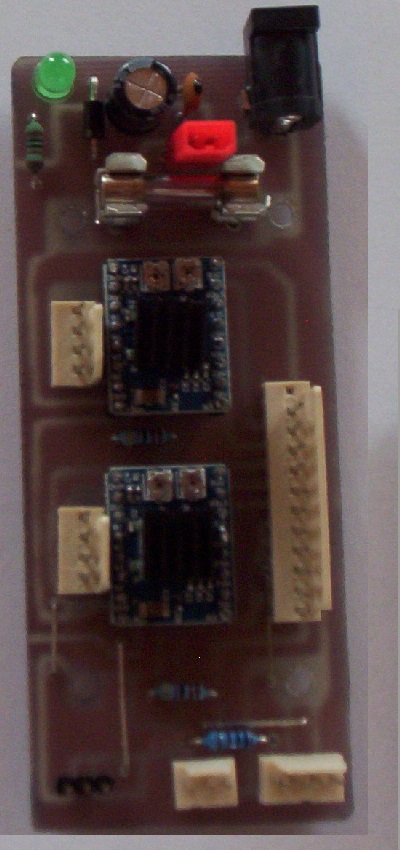
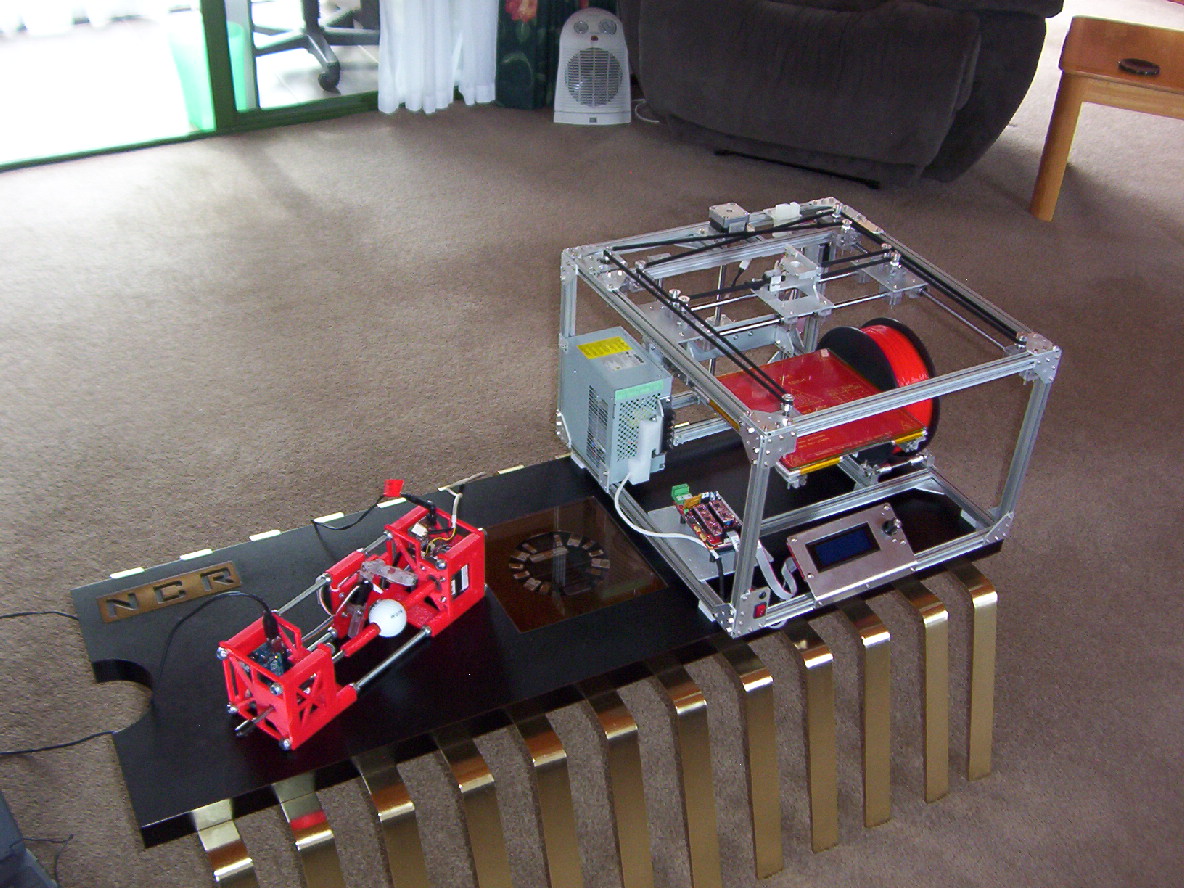
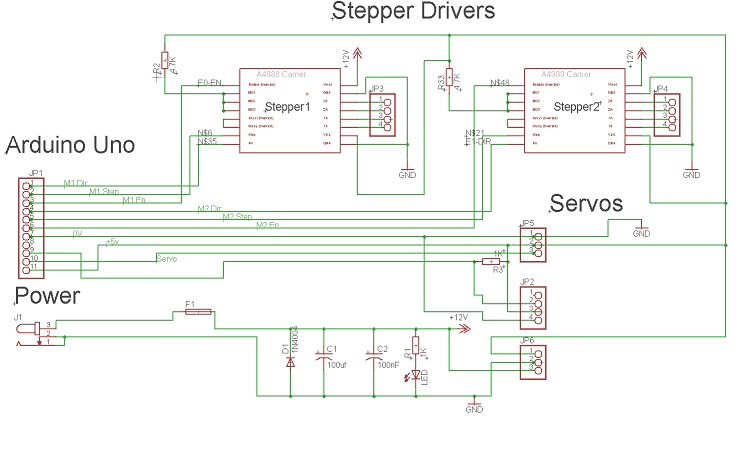
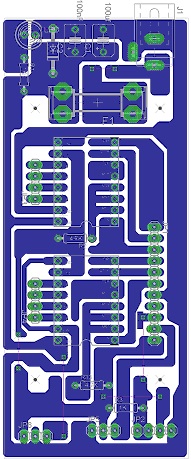
Sorry, only registered users may post in this forum.