Tantillus portable 3D printer
Posted by Sublime
|
Re: Tantillus portable 3D printer May 22, 2012 04:32PM |
Registered: 13 years ago Posts: 2,947 |
Those were the two I thought you were talking about. So far they have been ok because after the first layer that droops it seems to support the next layer. If I add a little support fin under each spot at the end it should be easy for people to cut it off and will allow a proper bridge.
Check the repo in a few hours or tomorrow and I will add some support.
Check the repo in a few hours or tomorrow and I will add some support.
| FFF Settings Calculator | Gcode post processors | Geometric Object Deposition Tool Blog |
| Tantillus.org | Mini Printable Lathe | How NOT to install a Pololu driver |
|
Re: Tantillus portable 3D printer May 23, 2012 08:04PM |
Admin Registered: 17 years ago Posts: 7,879 |
Base_3 and Base_4 need to be printed on edge. I tried Base_3 that way but it soon lifted as there is not enough contact area to hold it down when printed with ABS. I reverted to the ABS versions with the cut outs and they stayed stuck down.
The tops of the cut outs are a bit scrappy because they have rounded corners. Also the 45 degree lip that goes round a corner tends to pull away. It doesn't matter much as it is on the inside.
So I have the lower third of the box, not perfect aesthetically due the overhangs, but functional I think.
[www.hydraraptor.blogspot.com]
|
Re: Tantillus portable 3D printer May 24, 2012 01:55AM |
Registered: 13 years ago Posts: 2,947 |
Sweet, If there is anything you can think of to improve the way they print let me know and I will try and make the changes.
| FFF Settings Calculator | Gcode post processors | Geometric Object Deposition Tool Blog |
| Tantillus.org | Mini Printable Lathe | How NOT to install a Pololu driver |
|
Re: Tantillus portable 3D printer May 24, 2012 03:18AM |
Registered: 13 years ago Posts: 15 |
This thread for me epitomises RepRap and what the whole project is about, let alone the forum.
Like minded people, pioneers of the accumulated knowledge, and with practical experience gained in years of involvement with the project, cooperating to better an already good design.
Each contibutor here, if driven only by financial greed would be jealously protecting their own commercialised offerings, but no - as when Nophead published the first tantsalising glimpses of the Mendel90, the uppermost question in their minds is - 'How can I improve it?'.
Now that's how innovation and progress happen.
|
Re: Tantillus portable 3D printer May 24, 2012 01:44PM |
Admin Registered: 17 years ago Posts: 7,879 |
I think the middle_side connectors are wrong. They seem to be the same as the middle_front but they should have a chamfered top edge.
[www.hydraraptor.blogspot.com]
[www.hydraraptor.blogspot.com]
|
Anonymous User
Re: Tantillus portable 3D printer May 24, 2012 01:51PM |
|
Re: Tantillus portable 3D printer May 24, 2012 08:13PM |
Registered: 13 years ago Posts: 2,947 |
nophead Wrote:
-------------------------------------------------------
> I think the middle_side connectors are wrong. They
> seem to be the same as the middle_front but they
> should have a chamfered top edge.
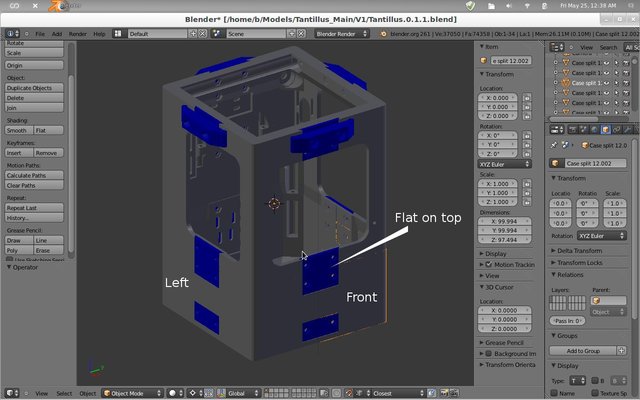
I download them and imported them into the source and they are the correct parts. But it turns out that I have not rotated them into the correct position to print them. I have added a note to the git README to inform people they are not oriented yet. I also uploaded the case source (blend file) so if anyone would like to make changes or just see what it looks like fully assembled it is there now.
-------------------------------------------------------
> I think the middle_side connectors are wrong. They
> seem to be the same as the middle_front but they
> should have a chamfered top edge.
I download them and imported them into the source and they are the correct parts. But it turns out that I have not rotated them into the correct position to print them. I have added a note to the git README to inform people they are not oriented yet. I also uploaded the case source (blend file) so if anyone would like to make changes or just see what it looks like fully assembled it is there now.
| FFF Settings Calculator | Gcode post processors | Geometric Object Deposition Tool Blog |
| Tantillus.org | Mini Printable Lathe | How NOT to install a Pololu driver |
|
Re: Tantillus portable 3D printer May 25, 2012 03:00AM |
Admin Registered: 17 years ago Posts: 7,879 |
I can't fit them because they have a flat edge, whereas the hole needs four chamfered edges.
[www.hydraraptor.blogspot.com]
[www.hydraraptor.blogspot.com]
|
Re: Tantillus portable 3D printer May 25, 2012 04:07AM |
Registered: 13 years ago Posts: 2,947 |
It almost sounds like you have the second layer rotated 180.
These pictures should help.
Edited 1 time(s). Last edit at 05/25/2012 04:08AM by Sublime.
These pictures should help.


Edited 1 time(s). Last edit at 05/25/2012 04:08AM by Sublime.
| FFF Settings Calculator | Gcode post processors | Geometric Object Deposition Tool Blog |
| Tantillus.org | Mini Printable Lathe | How NOT to install a Pololu driver |
|
Re: Tantillus portable 3D printer May 25, 2012 05:47AM |
Admin Registered: 17 years ago Posts: 7,879 |
Hmm, I am not at home at the moment but from memory it doesn't look like that.
[www.hydraraptor.blogspot.com]
[www.hydraraptor.blogspot.com]
|
Re: Tantillus portable 3D printer May 25, 2012 02:39PM |
Admin Registered: 17 years ago Posts: 7,879 |
Sorry my mistake, I had the pieces of the the 3D jigsaw puzzle in the wrong place. Thanks for the view of the back, I couldn't find one.
Should there be a connector along the bottom at the back, or is that recess on the inside or something else?
[www.hydraraptor.blogspot.com]
Should there be a connector along the bottom at the back, or is that recess on the inside or something else?
[www.hydraraptor.blogspot.com]
|
Re: Tantillus portable 3D printer May 25, 2012 02:53PM |
Registered: 13 years ago Posts: 2,947 |
nophead Wrote:
-------------------------------------------------------
> Sorry my mistake, I had the pieces of the the 3D
> jigsaw puzzle in the wrong place. Thanks for the
> view of the back, I couldn't find one.
>
> Should there be a connector along the bottom at
> the back, or is that recess on the inside or
> something else?
There is no connector along the bottom at the back because each of the cubes had to fit within 100 x 100 x 100 so the back panel could not be made any thicker and the lower z bracket takes up all the space for the connector at the bottom of the back on the inside. Also the lower z bracket, z motor mount and the middle rear connector all hold the case together there so it was not required.
| FFF Settings Calculator | Gcode post processors | Geometric Object Deposition Tool Blog |
| Tantillus.org | Mini Printable Lathe | How NOT to install a Pololu driver |
|
Re: Tantillus portable 3D printer May 25, 2012 09:12PM |
Registered: 13 years ago Posts: 2,947 |
To help everyone I have added an stl of the case fully assembled as well as one in an exploded state to the github repo. I also added a folder with images of it from all sides in an exploded state.

| FFF Settings Calculator | Gcode post processors | Geometric Object Deposition Tool Blog |
| Tantillus.org | Mini Printable Lathe | How NOT to install a Pololu driver |
|
Re: Tantillus portable 3D printer May 26, 2012 12:29PM |
Admin Registered: 17 years ago Posts: 7,879 |
How do the stiffener pieces work? They are raised at the ends so if I put bolts through and tightened them they would bend the edges of the box.
Edited 1 time(s). Last edit at 05/26/2012 12:32PM by nophead.
[www.hydraraptor.blogspot.com]
Edited 1 time(s). Last edit at 05/26/2012 12:32PM by nophead.
[www.hydraraptor.blogspot.com]
|
Re: Tantillus portable 3D printer May 26, 2012 02:04PM |
Registered: 13 years ago Posts: 2,947 |
nophead Wrote:
-------------------------------------------------------
> How do the stiffener pieces work? They are raised
> at the ends so if I put bolts through and
> tightened them they would bend the edges of the
> box.
That is actually the function. The case has very little clearance inside (1mm +/-) so they are designed to pull the center of the box outwards. To stop them from exerting to much force I used washers behind them to adjust the amount of bend applied to the case.
| FFF Settings Calculator | Gcode post processors | Geometric Object Deposition Tool Blog |
| Tantillus.org | Mini Printable Lathe | How NOT to install a Pololu driver |
|
Re: Tantillus portable 3D printer May 26, 2012 03:34PM |
Admin Registered: 17 years ago Posts: 7,879 |
So here it is:
The ABS variants of the parts print OK in ABS. I used a single outline and 25% fill and it uses about 800g of plastic. It would be a lot cleaner if the holes were teardropped, the holes in mid air had a support membranes in the bottom and any corners in mid air had support. As it is it is certainly functional after some clean up with a knife.
I used M4 nuts and bolts but the nut traps are far too big, but not big enough to get a spanner in, so it is tricky to assemble.
Edited 1 time(s). Last edit at 05/26/2012 03:35PM by nophead.
[www.hydraraptor.blogspot.com]
|
Re: Tantillus portable 3D printer May 26, 2012 04:02PM |
Registered: 13 years ago Posts: 2,947 |
It looks really good. And yes it could use more support but is also printable without so I think I will leave it without and people can use auto generated support if they want. But if more people think it is needed I will try and find the time to add it.
Which holes do you think should be teardrops? The large ones in the ABS?
I thought I had support membranes on the holes in mid air but may have forgot them when re-exporting the parts.
You will need to change out the nuts and bolts on the very top where the stiffeners go. It has to use normal nuts (not nylocks) and really short bolts because of how little clearance there is in those spots. You may also need the stiffeners to pull the nuts away from the XYends that slide past on the rod.
Do M5's exist? The #10 bolts I use measure 4.8mm in diameter around the threads. The short ones measure 5mm long and the long ones measure 18mm long.
Do you mind if I add your picture to the wiki?
| FFF Settings Calculator | Gcode post processors | Geometric Object Deposition Tool Blog |
| Tantillus.org | Mini Printable Lathe | How NOT to install a Pololu driver |
|
Re: Tantillus portable 3D printer May 26, 2012 04:27PM |
Registered: 12 years ago Posts: 939 |
|
Re: Tantillus portable 3D printer May 26, 2012 04:30PM |
Registered: 13 years ago Posts: 2,947 |
Polygonhell Wrote:
-------------------------------------------------------
> M5's exist, but 5mm is an odd metric length, he'll
> probably have to use 6mm with a washer on the
> outside.
> I've seen 18mm but 16 and 20 are more common.
6mm long should work without the washer as 5mm was just long enough.
16 and 20 should work depending on where they are being used.
| FFF Settings Calculator | Gcode post processors | Geometric Object Deposition Tool Blog |
| Tantillus.org | Mini Printable Lathe | How NOT to install a Pololu driver |
|
Re: Tantillus portable 3D printer May 26, 2012 04:47PM |
Registered: 12 years ago Posts: 127 |
I have been following this close. I would love to print one in abs but I was waiting to see how they turned out for someone else. I fear my prusa 2 is no where near calibrated enough to handle it  I will just need to wait I guess.
Ryan
Quality Engineer & Hobbyist
thingsandtrains.blogspot.com
I will just need to wait I guess.Ryan
Quality Engineer & Hobbyist
thingsandtrains.blogspot.com
|
Re: Tantillus portable 3D printer May 26, 2012 05:19PM |
Admin Registered: 17 years ago Posts: 7,879 |
Yes you are welcome to use the picture.
The holes are slightly too small for M5 but they could be reamed out. The socket for the head is too small for pan head, but cap heads fit. With M4 there is room for a washer. The nut trap is too big in diameter but also too shallow for M5 full nuts, which are about 4mm thick. Since even M4 nuts are thicker than the traps it may need half nuts for clearance and they are less common. An alternative would be to put the screw head inside and nuts on the outside as pan heads and hex heads are thinner than nuts.
I would normally teardrop all holes (as it takes no effort with openscad) but the only ones that look bad are the rounded corners of the ABS stress relief holes.
[www.hydraraptor.blogspot.com]
|
Re: Tantillus portable 3D printer May 26, 2012 05:27PM |
Registered: 13 years ago Posts: 2,947 |
nophead Wrote:
-------------------------------------------------------
> Yes you are welcome to use the picture.
>
> The holes are slightly too small for M5 but they
> could be reamed out. The socket for the head is
> too small for pan head, but cap heads fit. With M4
> there is room for a washer. The nut trap is too
> big in diameter but also too shallow for M5 full
> nuts, which are about 4mm thick. Since even M4
> nuts are thicker than the traps it may need half
> nuts for clearance and they are less common. An
> alternative would be to put the screw head inside
> and nuts on the outside as pan heads and hex heads
> are thinner than nuts.
The #10 nuts I have measure 3.3mm thick so the M5/M4 regular nuts should work but may end up really close to the XYends.
>
> I would normally teardrop all holes (as it takes
> no effort with openscad) but the only ones that
> look bad are the rounded corners of the ABS stress
> relief holes.
The normal holes never cause me an issue but that may be a result of printing with low layer heights which does a little better with horizontal holes. The large openings in the ABS version can easily be changed but I am not sure how. Should I just make them large teardrops? Or squares?
If I get time to make a metric version should I make the holes for the bolts larger or the nut traps smaller?
I will add the picture and a small explanation of the orientation to the wiki. Thanks
| FFF Settings Calculator | Gcode post processors | Geometric Object Deposition Tool Blog |
| Tantillus.org | Mini Printable Lathe | How NOT to install a Pololu driver |
|
Re: Tantillus portable 3D printer May 26, 2012 05:46PM |
Registered: 12 years ago Posts: 115 |
nophead: Very nice print(s). What kind of ABS are you using? It's Natural color is much whiter that the Chi Mei 947 ABS that Makerbot and Ultimachine use here (theirs is more of a classic ABS off white/manilla color). I am interested in getting some to try out.
Also, do you have an idea how log it took you to print the parts?
sublime: Quite impressive. I really need to spend more time on Blender tutorials. Did you design the whole printer in Blender? Is there a module / that allows you do do the exploded view of the whole assembly? Or did you manually move each piece? I really have to thank you for your blendercookie reference a month or so back. Their tutorials have been very helpful. The tutorial where the guy takes the standard cube and sculpts it into a mans head in under a hour still has me spellbound. I had never even heard of blender cookie before. As soon as I work through their free tutorials, I am definitely going to pay for some of their advanced stuff.
Overall also a very good job. Any idea how long does it take to build the complete printer?
|
Re: Tantillus portable 3D printer May 26, 2012 05:58PM |
Admin Registered: 17 years ago Posts: 7,879 |
Sublime Wrote:
-------------------------------------------------------
> The large openings in the ABS version can easily
> be changed but I am not sure how. Should I just
> make them large teardrops? Or squares?
I use truncated teardrops, rather than traditional pointed ones, so for the large openings I would use an arc until the gradient hits 45 and then use a tangent to meet the horizontal. I.e. a stretched, truncated tear drop.
>
> If I get time to make a metric version should I
> make the holes for the bolts larger or the nut
> traps smaller?
I would go for M4 and just make the nut traps smaller and perhaps a little deeper.
[www.hydraraptor.blogspot.com]
|
Re: Tantillus portable 3D printer May 26, 2012 06:15PM |
Registered: 13 years ago Posts: 2,947 |
Beekeeper Wrote:
-------------------------------------------------------
>Quite impressive. I really need to spend
> more time on Blender tutorials. Did you design the
> whole printer in Blender?
Yes, It is what I learnt to model on and have never looked back. I find it easy now but I know it has I steep learning curve (I feel that way about openscad but can now fumble my way through). The case source files are in the Repo, if you look at them be sure to understand it is my work flow and may confuse people at first. Please feel free to ask questions of how it works. A fews thing to tell you is I use the layers very heavily (little boxes at the bottom with dots in them) this allows me to have the parts that are being Booleaned to be hidden from the final part being made. I also tend to produce an entire negative space and then export it, then import it again and use it to difference from the blank part. this speeds up rendering and reduces errors in the parts that result in non-manifolded final parts. You will find the main work usually in the first layer and then booleaned parts below in the second row of layers. The second bank of layers has the parts that have been exported and re-imported to produce the final parts. (note: this only applies to really complex parts like the case where it would take an hour to compile otherwise)
Is there a module / that
> allows you do do the exploded view of the whole
> assembly? Or did you manually move each piece?
I did it manually but on parts that had been imported into the scene so it didn't need to compile all the shapes. It only took me a minute to do. But there may be a plugin or add-on to do just such a thing, I am not a script user and don't think to look for such things. You could also create an index frame in the assembled position and one in the exploded position which would allow you to animate or just switch between states.
I
> really have to thank you for your blendercookie
> reference a month or so back. Their tutorials have
> been very helpful. The tutorial where the guy
> takes the standard cube and sculpts it into a mans
> head in under a hour still has me spellbound. I
> had never even heard of blender cookie before. As
> soon as I work through their free tutorials, I am
> definitely going to pay for some of their advanced
> stuff.
No problem, it has been invaluable to me also. Here are a few things I have in my Blender reference bookmarks:
[www.rab3d.com] Old blender but still useful info
[www.blendercookie.com]
[wiki.blender.org]
[wiki.blender.org]
[wiki.blender.org]
[wiki.blender.org] <--- Life saver.
The loop tools are already installed just not enabled. The rest of the extensions may or may not work because the API changed at an incredible rate during the first few months of Blender 2.5+
> Overall also a very good job. Any idea how long
> does it take to build the complete printer?
Thank you, the printed one takes about 30 minutes extra to assemble because of all the pieces and makes the cables harder to install because of how little room there is to get your hands in. The laser cut one which I have built a lot of now take me about the same time as it takes for a Prusa. Be it for some most of a day and others weeks or months.
| FFF Settings Calculator | Gcode post processors | Geometric Object Deposition Tool Blog |
| Tantillus.org | Mini Printable Lathe | How NOT to install a Pololu driver |
|
Re: Tantillus portable 3D printer May 26, 2012 06:18PM |
Admin Registered: 17 years ago Posts: 7,879 |
Beekeeper,
The ABS is from reprapsource.com. Their natural is unusual in being white rather than cream. It also smells less, likes higher temperatures but has more die swell. I mainly like it because it is always round and the diameter varies very little during a reel.
The 12 white parts took between 2 and 4 hours each giving a total of 39.5 hours including warm up and cool down time, 37 hours actual print time. Since they are printed on their edges I could probably combine them into a couple of mammoth builds but it would be a bit disappointing if there was power cut or machine failure.
I don't have a log for the black parts.
[www.hydraraptor.blogspot.com]
|
Re: Tantillus portable 3D printer May 27, 2012 06:40AM |
Registered: 13 years ago Posts: 2,947 |
Just thought I would show off a little on the print quality.
All printed at 100 micron layers 30 - 45mm/s with 180 - 250mm/s travel with acceleration of 9000mm/s^2 with 4mm of retraction at 40mm/s with acceleration of 10,000mm/s^2, E-jerk at 20mm/s X/Y jerk at 20mm/s.
No post processing, these are directly off the printer.
Video of frog print. [www.youtube.com]
More info at [geometricobjectdepositiontool.blogspot.ca]
Edited 1 time(s). Last edit at 05/27/2012 06:41AM by Sublime.
All printed at 100 micron layers 30 - 45mm/s with 180 - 250mm/s travel with acceleration of 9000mm/s^2 with 4mm of retraction at 40mm/s with acceleration of 10,000mm/s^2, E-jerk at 20mm/s X/Y jerk at 20mm/s.
No post processing, these are directly off the printer.

Video of frog print. [www.youtube.com]


More info at [geometricobjectdepositiontool.blogspot.ca]
Edited 1 time(s). Last edit at 05/27/2012 06:41AM by Sublime.
| FFF Settings Calculator | Gcode post processors | Geometric Object Deposition Tool Blog |
| Tantillus.org | Mini Printable Lathe | How NOT to install a Pololu driver |
|
Re: Tantillus portable 3D printer May 27, 2012 12:21PM |
Registered: 15 years ago Posts: 123 |
Thanks for providing all that information about your build parameters.
I am truly impressed, considering my ultimaker still makes lots of strings when printing anything (despite my best efforts at retraction). Mind if I ask a few more questions about your method?
What plastic are you using?
What temperature are you extruding at?
What does your extruder gear look like?
How long is your bowden tube?
Consider me sold.
|
Re: Tantillus portable 3D printer May 27, 2012 03:54PM |
Registered: 13 years ago Posts: 2,947 |
destroyer2012 Wrote:
-------------------------------------------------------
> Thanks for providing all that information about
> your build parameters.
>
> I am truly impressed, considering my ultimaker
> still makes lots of strings when printing anything
> (despite my best efforts at retraction). Mind if I
> ask a few more questions about your method?
Ask away, that is what I am here for.
>
> What plastic are you using?
I have the same success 4043D PLA and RepRaper tech (reprap walmart) PLA. All the iridescent parts are the RepRaper tech plastic, the opaque red and silver are 4043D.
>
> What temperature are you extruding at?
First I should say I am using J-head Mk-IVb and Marlin with the default 100k thermistor table and have not calibrated it so these number may mean nothing to other hotends and temp tables.
First layer 205 so it sticks well and 190 to 215 depending on speed (those pictures were done at 200).
>
> What does your extruder gear look like?
The extruder uses a hobbed bolt like Wades design but is an unusual shape to fit inside the machine.
You can see some of the assembly pictures that I have already posted here [www.tantillus.org]
EDIT: One of the gear sets is shown on that last link but I have recently desgined new gears with stronger teeth as I was a little worried those may not last (no failures yet). The new gears are not herringbone like the ones pictured.
>
> How long is your bowden tube?
It's about 650mm plus the hotend and extruder totalling around 700mm of compressible filament. The key is the shape of the Bowden tube. It is a simple curve that never goes beyond the bend radius of the filament or tubing. It's shape also means the filament follows the outside of the tube the whole time. Where as the Ultimaker the tube forums a half peanut shape which means the filament changes side of the tube mid way through the tube which gives it some slop.
>
> Consider me sold.
Thanks that is a real compliment from an Ultimaker owner.
Edited 2 time(s). Last edit at 05/27/2012 04:54PM by Sublime.
| FFF Settings Calculator | Gcode post processors | Geometric Object Deposition Tool Blog |
| Tantillus.org | Mini Printable Lathe | How NOT to install a Pololu driver |
|
Re: Tantillus portable 3D printer May 28, 2012 04:15AM |
Registered: 15 years ago Posts: 123 |
So it's 3mm filament, right?
I am somewhat surprised you think that having the filament on one side of the bowden tube matters so much because when you retract, doesn't the filament pull away from the tube wall anyway? I don't think my bowden tube is ever a half peanut shape, only very slightly when the head is in the homing position, otherwise it's curved properly as far as I know.
Just to keep all the info on one page the ultimaker bowden (not counting the nozzle length) is 68 cm, so about the same as yours.
You know I'm starting to think that the reason you are doing so well is the J-head nozzle. The ultimaker nozzle doesn't use a PTFE tube liner, so the melt zone ends up being about 2 cm long or so, whereas with the J-head the melt zone is small. In retrospect, the fact that anyone can get retraction to work with ultimaker is amazing considering that nozzle. Maybe I'll switch to a PTFE-liner nozzle and report back, but considering my machine works ok now and "if it aint broke dont fix it" that might not happen for a while .
.
I am somewhat surprised you think that having the filament on one side of the bowden tube matters so much because when you retract, doesn't the filament pull away from the tube wall anyway? I don't think my bowden tube is ever a half peanut shape, only very slightly when the head is in the homing position, otherwise it's curved properly as far as I know.
Just to keep all the info on one page the ultimaker bowden (not counting the nozzle length) is 68 cm, so about the same as yours.
You know I'm starting to think that the reason you are doing so well is the J-head nozzle. The ultimaker nozzle doesn't use a PTFE tube liner, so the melt zone ends up being about 2 cm long or so, whereas with the J-head the melt zone is small. In retrospect, the fact that anyone can get retraction to work with ultimaker is amazing considering that nozzle. Maybe I'll switch to a PTFE-liner nozzle and report back, but considering my machine works ok now and "if it aint broke dont fix it" that might not happen for a while
.


Sorry, only registered users may post in this forum.