Design guide for 3D printing
Posted by LoboCNC
|
Design guide for 3D printing October 30, 2014 02:43PM |
Registered: 10 years ago Posts: 564 |
I put together a short guide for designing parts for 3D printing: Design Tips for 3D Printing
It assumes you're already facile with your 3D design software and design in general, but are just starting to design things for FFF-type printers. I really need to add a bunch of illustrations/photos, but I thought I'd go ahead and post it in hopes of getting any comments or suggestions. Also let me know if you find the pre-highlighted format annoying or useful. BTW, before starting, I looked around for something similar, but didn't find anything presented at this level. If you know of any good alternatives, it'd save me from having to spruce this up.
It assumes you're already facile with your 3D design software and design in general, but are just starting to design things for FFF-type printers. I really need to add a bunch of illustrations/photos, but I thought I'd go ahead and post it in hopes of getting any comments or suggestions. Also let me know if you find the pre-highlighted format annoying or useful. BTW, before starting, I looked around for something similar, but didn't find anything presented at this level. If you know of any good alternatives, it'd save me from having to spruce this up.
|
Re: Design guide for 3D printing October 30, 2014 03:18PM |
Registered: 10 years ago Posts: 553 |
Put in lots of pictures and diagrams and it'll be a great resource.
greghoge.com
HUGE 3D PRINTER PARTS SALE!!!
greghoge.com
HUGE 3D PRINTER PARTS SALE!!!
|
Re: Design guide for 3D printing October 30, 2014 03:34PM |
Registered: 10 years ago Posts: 17 |
seems like a good start.
One thing (you sort of mentioned this) which I thought helped me out a lot was to always keep in mind which way I would be printing the object while designing. Then make sure every feature in the Z direction occurs at an integer multiple of the layer height you're going to print at. This just prevents from relying on the slicer to do the layer rounding for you, which can have mixed results and seems to be different for different slicers. The most obvious place to notice the rounding by the slicer is when it calculates the Z separation between the part and support material. A lot of times 1 layer height can make all the difference between supports that break away clean and supports that you have to scrape off with a razor blade. I found if you want any chance at consistent results you better just design the thing in exact multiples.
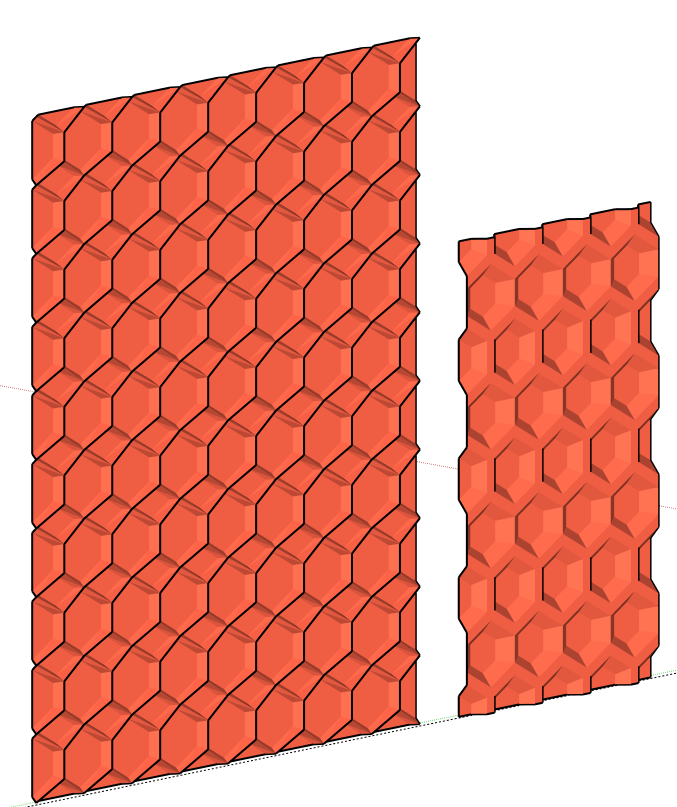
also one thing I like doing is applying a texture vertical surfaces, like dimples or some kind of diamond pattern (image attached). In sketchup I make one tile with the feature, array it large enough to fit the part, then wrap it along the surface of the part with a shape bender extension. I started doing this because it makes the layer lines much less visible. Especially if your individual layer heights are not perfectly consistent throughout the parts, just building in some texture can clean up the look a lot.
One thing (you sort of mentioned this) which I thought helped me out a lot was to always keep in mind which way I would be printing the object while designing. Then make sure every feature in the Z direction occurs at an integer multiple of the layer height you're going to print at. This just prevents from relying on the slicer to do the layer rounding for you, which can have mixed results and seems to be different for different slicers. The most obvious place to notice the rounding by the slicer is when it calculates the Z separation between the part and support material. A lot of times 1 layer height can make all the difference between supports that break away clean and supports that you have to scrape off with a razor blade. I found if you want any chance at consistent results you better just design the thing in exact multiples.
also one thing I like doing is applying a texture vertical surfaces, like dimples or some kind of diamond pattern (image attached). In sketchup I make one tile with the feature, array it large enough to fit the part, then wrap it along the surface of the part with a shape bender extension. I started doing this because it makes the layer lines much less visible. Especially if your individual layer heights are not perfectly consistent throughout the parts, just building in some texture can clean up the look a lot.
Sorry, only registered users may post in this forum.