Top Layer of print is squashed
Posted by sodonnell
|
Top Layer of print is squashed January 25, 2015 09:09PM |
Registered: 9 years ago Posts: 53 |
Hey everyone, I have an issue with my Z-axis and I have tried everything I could think of the fix it.
I am printing on a home made Prusa i3 with abs with a .5mm head with a layer height of .2mm. I am running Marlin with auto leveling setup. As you can see from my attached images (specifically top.jpg) my print gets a bit messed up as it gets to the top of the print. Thus far the things I've tried is checked my z steps/mm and it is good, I lowered my z acceleration to 25, and I checked my Z_PROBE_OFFSET_FROM_EXTRUDER setting for autoleveling at different heights with no real change. Some other things you might be interested in is my zjerk is .4 and I am using Cura as my slicing program. The only other thing I can think of is that the x and y acceleration is causing the z axis acceleration to go higher do to the z-axis compensation from the auto bed leveling. However I don't know if this can even happen. Any help with this would be greatly appreciated.
THANKS!!!
|
Re: Top Layer of print is squashed January 26, 2015 02:40AM |
Registered: 10 years ago Posts: 56 |
|
Re: Top Layer of print is squashed January 26, 2015 03:53AM |
Registered: 9 years ago Posts: 1,011 |
+1 for a temperature issue : overheating on top of the part. A cooling fan is not a good idea with ABS, bounding will not be as good and you risks wrapping. With small parts, the best you can do is to avoid printing single small parts. Try to feed the bed with several identical parts or with a bigger and higher part.
Collective intelligence emerges when a group of people work together effectively. Prusa i3 Folger (A lot of the parts are wrong, boring !)
Collective intelligence emerges when a group of people work together effectively. Prusa i3 Folger (A lot of the parts are wrong, boring !)
|
Re: Top Layer of print is squashed January 26, 2015 09:26AM |
Registered: 9 years ago Posts: 53 |
Thanks for the quick responses. I'm running my hotend at 225. And I did actually try a fan, even though everyone says not to, and that had some adverse effects. But if my temp is too high how come it seems to only be messing up the top layer?
Edited 1 time(s). Last edit at 01/26/2015 09:27AM by sodonnell.
Edited 1 time(s). Last edit at 01/26/2015 09:27AM by sodonnell.
|
Re: Top Layer of print is squashed January 26, 2015 09:26AM |
Registered: 9 years ago Posts: 53 |
|
Re: Top Layer of print is squashed January 26, 2015 09:53AM |
Registered: 9 years ago Posts: 1,011 |
Because temperature accumulate in the part, and last layer don't have any layer on top to flattened it. Just a question, is your extruder well calibrated ? I mean steps per millimeter, flow, and filament diameter ? Can you describe your calibration procedure ?
Collective intelligence emerges when a group of people work together effectively. Prusa i3 Folger (A lot of the parts are wrong, boring !)
Collective intelligence emerges when a group of people work together effectively. Prusa i3 Folger (A lot of the parts are wrong, boring !)
|
Re: Top Layer of print is squashed January 26, 2015 10:41AM |
Registered: 9 years ago Posts: 53 |
Yes I have calibrated my extruder. I started with the extrusion steps/mm, by simply using tape at 50mm and then using printerface to extrude the 50mm then take (distance expected/distance achieved) * steps per mm. And then for each roll of filament I run a single walled part and measure the wall thickness and the height of the object and use the equation above until it is accurate.
|
Re: Top Layer of print is squashed January 26, 2015 09:22PM |
Registered: 9 years ago Posts: 53 |
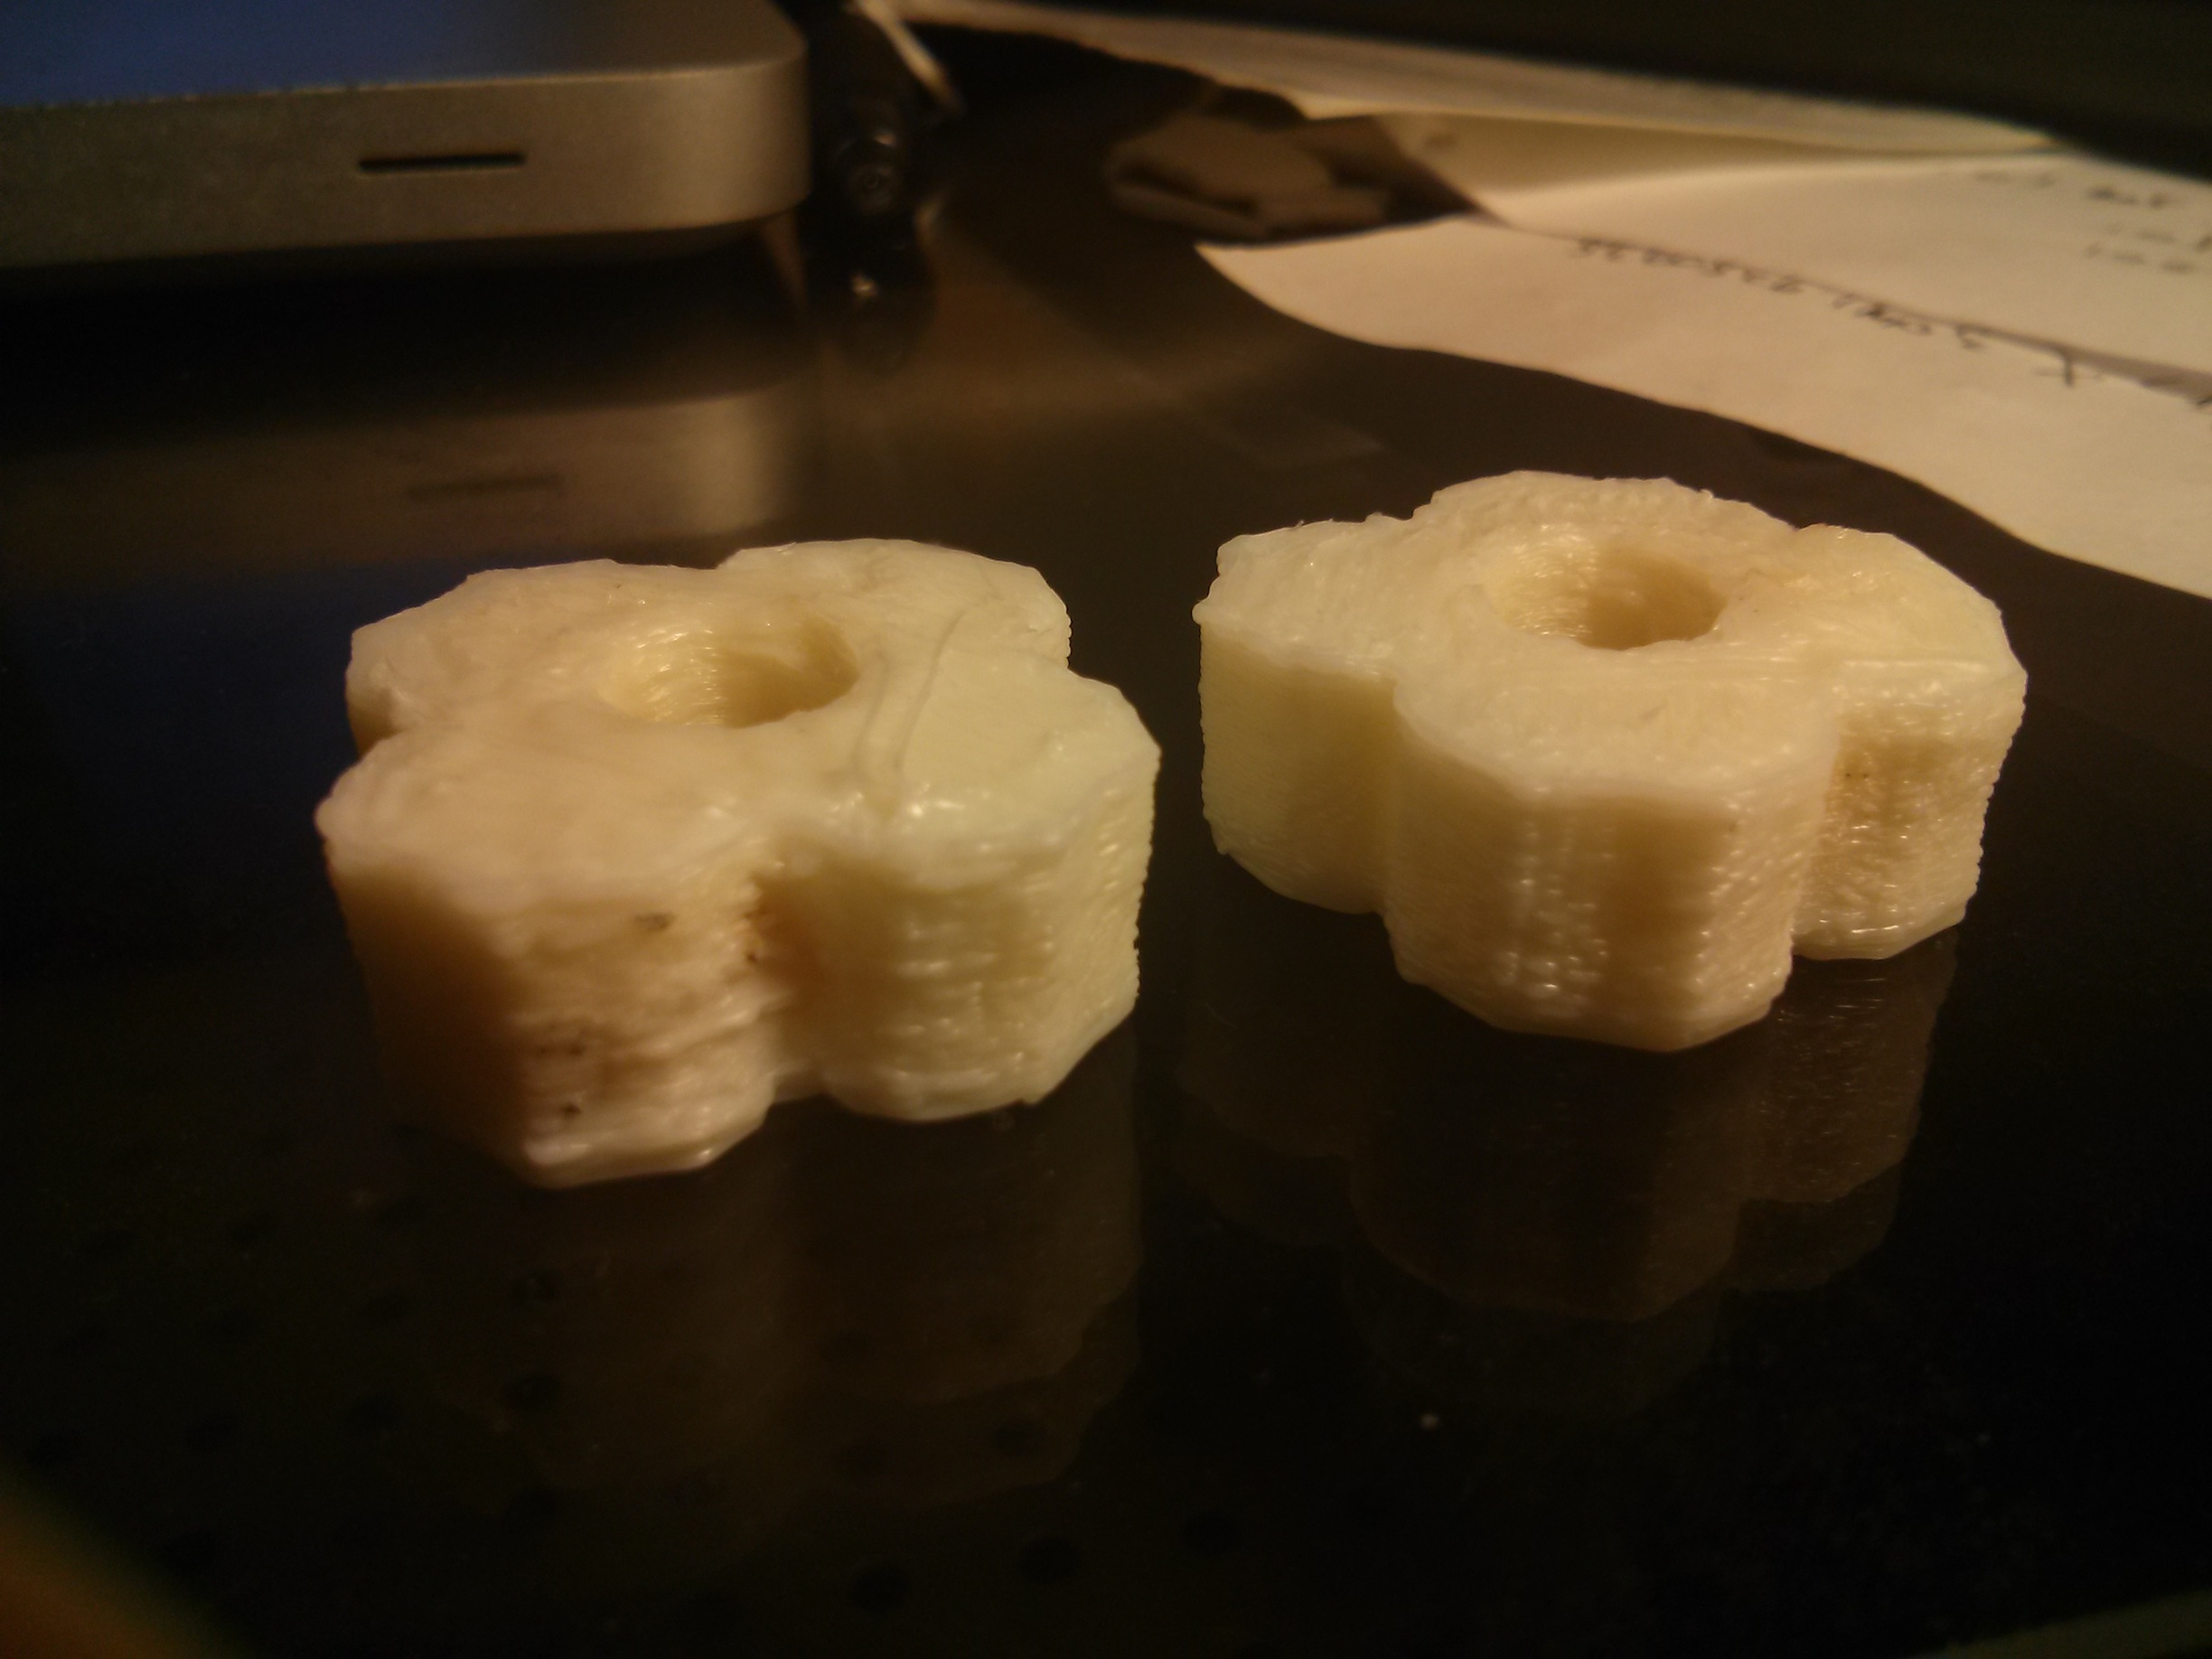
Lowered the hotend temperature to 210C with no noticable improvement. I attempted to print two at the same time and as you can see from the attached photo the prints were worse....significantly worse. I am really lost on this one. I am trying out Cura's cool head lift setting to see if this will help in any way. Any more thoughts by you guys would be awesome...like I said I'm lost.
Thanks
Thanks
|
Re: Top Layer of print is squashed January 27, 2015 05:04AM |
Registered: 9 years ago Posts: 1,011 |
Ok, I'm affraid your calibration is wrong because you should not play with steps per millimeter to adjust the size of your printed walls. Only the feedrate must be adjusted because if you change temperature, the flow will change. Steps per millimeter is fixed because depending of the hardware, and diameter, temperature and flow(feedrate) are linked to the filament, one filament = 1 diameter, 1 temperature set, 1 feedrate. Through, 50mm is not enough to get a good measurement. I propose to redo your calibration.
Collective intelligence emerges when a group of people work together effectively. Prusa i3 Folger (A lot of the parts are wrong, boring !)
Good luckQuote
Zavashier
For extruders, the formula is :
direct drive type : e_steps_per_mm = (motor_steps_per_rev * driver_microstep) / (hob_effective_diameter * pi)
wade (geared type) : e_steps_per_mm = (motor_steps_per_rev * driver_microstep) * (big_gear_teeth / small_gear_teeth) / (hob_effective_diameter * pi)
BUT, for extruders, that's not that simple. Because the tooth of the hob comes inside the filament and that modify the hob effective diameter. So you need to calibrate manualy your extruder after a setup with the formula :
Find your actual extruder step per millimeter settings, write the value
Mark accurately the filament 150mm above the extruder
Ask the printer to extrude 100mm of filament (repetier or so)
Whait the extruder to stop
Now measure the distance from the top of the extruder to the mark
Calculate the real amount of filament extruded (150-the last measurement), write the result
Calculate (last steps per millimeter*100)/the real amount of filament extruded
You've got your new steps per millimeter value
Open your configuration.h and make the correction
Upload the updated firmware to your arduino
Mark again at 150mm and ask again to extrude 100mm of filament
Measure if the result is ok within 2%, if not calculate the new steps per millimeter
When it's ok; your extruder extrude now the good length of filament
The first step of extrusion calibration is done. Congratulations
It's good, but it's not done. We now need to measure accurately the filament itself. Some filaments diameter is not the same all along the filament. You need a digital caliper, and you want to make several measurements to find an average value. When it's done, set your slicer parameters with that value. Remember you want to set this up with each new spool of filament, event with the same colour from the same brand. Now our system is able to extrude 100mm of filament, and we know as precisely as possible the filament diameter. So the software side is able to deliver the right amount of plastic. Good.
BUT, we will melt the plastic, that means we will transform it. That means that the volume of cold (unextruded) plastic possibly differs with the volume of plastic out of the extruder... So we need to check this out.
You need a STL file of a one wall cube, that wall of the same thickness of your nozzle diameter. For example you've got a 0.5mm nozzle, you need 0.5mm walls. Design it or get one at Thingiverse or so.
Print it with slow settings, and verity all repetier (or so) settings are standard or 100%
When it's done measure the thickness of the walls of your printed object, but at the top because the bottom of the part may be thicker.
Calculate (your print wall thickness/nozzle diameter)*100 = your new feedrate
Modify your slicer parameter with the new feed rate
Print another test thin wall cube and verify the thickness of the walls
If you're within 10% of the asked value, it's ok. Remember our repraps are not high precision machines.
If not, Calculate again a new feed rate, BUT calculation is this time different !
last feed rate * (nozzle diameter/measured wall thickness)
when you get an acceptable print, your calibration is done ! Congratulations !
Now you can print benchmark parts, you're as precise as your printer can be. It's good to keep in mind the best your machine can do. You don't need anything else to be calibrated. If the accuracy does not matches your needs, you need probably to upgrade your printer's components do get better prints.
Collective intelligence emerges when a group of people work together effectively. Prusa i3 Folger (A lot of the parts are wrong, boring !)
|
Re: Top Layer of print is squashed January 27, 2015 09:36AM |
Registered: 9 years ago Posts: 53 |
Thanks so much for all your help. And you were right, my filament width setting was way too low. I watched a video about calibrating the filament thickness that steered me down the wrong path a couple months back. The only issue I have now is my print has random holes of the top layer. I am going to increase my top/bottom solid fill height (cura does not have individual settings for each) and further calibrate my filament width. Thanks again, the reprap forums never let me down.
Sorry, only registered users may post in this forum.