VIDEO POSTED! Details about the BerryBot3D
Posted by BerryBot3D
|
Re: VIDEO POSTED! Details about the BerryBot3D May 19, 2013 10:07PM |
Registered: 11 years ago Posts: 67 |
Awesome video Werner. I asked this in the youtube comments, but it's probably more appropriate to have the discussion here. Did you by chance measure the total length of the vent hood? If so, how was the accuracy of the longest dimension? How would you feel about the accuracy of someone scaling your design up even larger, say 1.33x your machine's size? What's the diameter/longest dimension of your current machine?
With the oven hood vent, since it is going to be exposed to heat, do you worry about the integrity of the PLA?
With the oven hood vent, since it is going to be exposed to heat, do you worry about the integrity of the PLA?
|
Re: VIDEO POSTED! Details about the BerryBot3D May 20, 2013 01:14AM |
Registered: 11 years ago Posts: 83 |
Hi Guys,
Hi Frank, Glad to hear you got your mags! Yes I use the pound scale for measuring magnetic pull.
Good find on the carbon/glass tubes. I ordered some to check them out I will report to you Guys and let you know my findings. I am sure they would work great! After all to use carbon tubes is a huge unnecessary overkill!
Rsilvers, I imagine an arrow machine would cut the carbon tubes just like it was made for it!
Thanks Maddox, Yeah this is the best place to discuss building/printing ideas. The length is .020 over on the hood. I noticed the walls of the model in the tight radius at the ends is slightly thicker by about .008. I think it may be due to my settings being maxed on the flow. I am sure I could get this to within .01 if I backed the flow ratio by a very small amount. There is no question the BerryBot3d could be scaled up by 2 and preform just as well. My max width is 14.5”. The bird house you see in the video also came out very accurate at 5x5 inches. I could get close to 16 with a larger pc of glass however it would not be 16” clear in diameter. There is so much air flow and distance from the oven door that the pvc one that I have now does not even get warm. The vent is primarily for exhausting fumes. I was going to put a thin layer of glass 9oz on the inside however I am so happy with the rigidity I am just going to install it as is only adding a few small ribs at the opening.
Now get off the computer and go build something!
Have a great day!
Werner Berry
BerryBot3D
[www.youtube.com]
|
Re: VIDEO POSTED! Details about the BerryBot3D May 20, 2013 11:11AM |
Registered: 11 years ago Posts: 28 |
|
Re: VIDEO POSTED! Details about the BerryBot3D May 23, 2013 06:18PM |
Registered: 11 years ago Posts: 83 |
I received the carbon rods that frank had found today: [goodwinds.com] They are very nice and the price is unbelievable!! The rods are super true and very ridged. I think this would an excellent option and very cost effective. It leaves you with about 4-5 thou clearance between the shoulder screw OD and ID of the rod perfect for the film thickness of JB Weld Quick!! You can get 3 pc 13 1/8" out of one stick that is 39 9/16" long. Great find Frank!
Happy building!
Werner
Happy building!
Werner
Attachments:
open | download - 2013-05-23 15.08.34_1024x577.jpg (349 KB)
open | download - 2013-05-23 14.15.36_1024x577.jpg (326.9 KB)
open | download - 2013-05-23 14.15.19_1024x577.jpg (408.4 KB)
open | download - 2013-05-23 14.15.14_1024x577.jpg (385.2 KB)
open | download - 2013-05-23 14.13.47_1024x577.jpg (395.1 KB)
|
Re: VIDEO POSTED! Details about the BerryBot3D May 24, 2013 06:21PM |
Registered: 11 years ago Posts: 28 |
Great new Werner, I didnt receive mine yet... but cant wait!
Is yours rod dimension 13,125'' + plus the shoulder screw?
A body of mine gave me a small Lathe chuck this week I will do a setup on my mill-drill with it to machine the shoulder.
I did recieve the Dimple die and I will designe a clamping tool for it.
I receive the Azteeg X3 Board and will start to solder the Connector next week and start to play with the soft. Any word of advice befor I start ? I did some solder but never on a Board with microcontroler...
thanks' again for all your help and great Idea!
Happy building to you all!
Frank
|
Re: VIDEO POSTED! Details about the BerryBot3D May 29, 2013 06:17PM |
Registered: 11 years ago Posts: 28 |
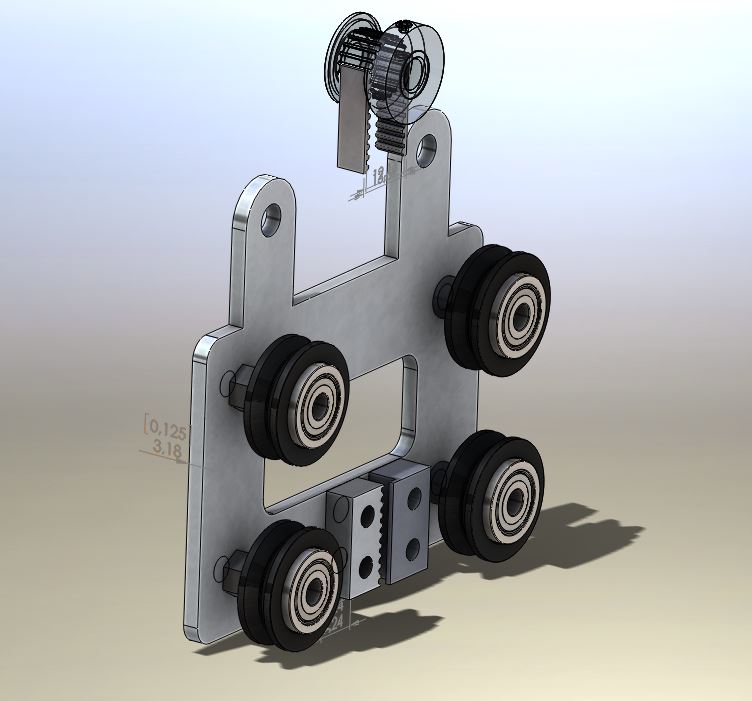
Here some picture for the Dimple Maker I am planning to build I have put a trust bearing but I might try it with only a piece of teflon to see...
I have also add the design of my Carriage that I am working on. I will order the Makerslide next week probably...
I receive the Fiber carbon today, It look great for price really stiff.
Werner : How does it compare to your other Carbon Fiber tubing ?
Frank
I have also add the design of my Carriage that I am working on. I will order the Makerslide next week probably...
I receive the Fiber carbon today, It look great for price really stiff.
Werner : How does it compare to your other Carbon Fiber tubing ?
Frank
|
Re: VIDEO POSTED! Details about the BerryBot3D June 10, 2013 07:14PM |
Registered: 10 years ago Posts: 2 |
Hi Werner thank you for developing and creating an awesom 3D printer. I'm new to this forum but have been following your work ever since I saw Johann's "Rostock" and was searching for inspriation of less industrial looking models. Your's is by far the most elegant with respect to form and function, well done. I've been working on an inexpensive version of my own to produce low volume, rigid part designs for most of the contract lighting we manufacture. However, after showing the design to several of my colegues, they all expressed a desire to have one as well. Now I'm stuck making 7 of these units. I haven't come across anyone selling these right now. Could you PM me so we could discuss? Thank you,
Komissar
Komissar
|
Re: VIDEO POSTED! Details about the BerryBot3D June 11, 2013 01:31AM |
Registered: 13 years ago Posts: 1,797 |
|
Re: VIDEO POSTED! Details about the BerryBot3D June 11, 2013 08:27AM |
Registered: 12 years ago Posts: 147 |
jamesdanielv Wrote:
-------------------------------------------------------
> Komissar :
>
> you may want to update your drawing to show the
> location of the delta bot motors and the extruder
> motor. it is hard to tell from the drawing, but it
> looks like there are also 1 or two motors at the
> base?
Presumably the motors at the base are the delta motors and the three on top are all extruders.
|
Re: VIDEO POSTED! Details about the BerryBot3D June 11, 2013 09:25AM |
Registered: 14 years ago Posts: 3,742 |
YES, that appears to be the case, he just didn't show filament for extruder #2 and #3.
Bob Morrison
Wörth am Rhein, Germany
"Luke, use the source!"
BLOG - PHOTOS - Thingiverse
Bob Morrison
Wörth am Rhein, Germany
"Luke, use the source!"
BLOG - PHOTOS - Thingiverse
|
Re: VIDEO POSTED! Details about the BerryBot3D June 11, 2013 01:52PM |
Registered: 10 years ago Posts: 2 |
@jamesdanielv - yydoctt and rhmorrison are correct. There are x3 Nema 17 steppers in the base. They drive an MXL belt up along the length of the slide-way. There is room at the top for x3 extruders (Nema 17's with reduction gear, per BerryBot, 5:1 ratio) and three spools (2 shown). My colleague is developing a practical electronic solution for this design. There are multiple boards for this design of 3D printer, and they will be released as open source in the next month or so. I'll try to update as often as possible.
|
Re: VIDEO POSTED! Details about the BerryBot3D June 11, 2013 06:28PM |
Registered: 11 years ago Posts: 28 |
Komissar,
Nice work you add cool feature and symmetry ! For the electronic check the Azteeg x3 You can have 7 drive (2 are plug outside on the extension witch I have not found the drawing yet) There even 2 input or Thermocouple 300 + deg c .
I am realy interested by your drawing to I realy like the shape! Do you use Maker slide?
@Berry do you think the base of this printer would be strong enought?
Cant wait to see more !
Frank
My maker slide is on its way! ;o) ...
|
Re: VIDEO POSTED! Details about the BerryBot3D June 11, 2013 08:42PM |
Registered: 11 years ago Posts: 83 |
Hi Guys, Looks great Komissar and thanks for the credit! One thing that Frank is suspecting is the lack of rigidity. One of the key components to the BerryBot3D design is what I call the torsion box base. Even with the use of heavier aluminum structure you will be amazed at the amount of twist/movement that can be induced between the upper and lower decks.
Frank things are looking great! You may find it really simple to use the dimple and mag ball on a flat end effector. As it turns out you can get full travel even without angling down the tabs on the end effector? Although is does look good, something to think about.
Happy Building!
Werner
Frank things are looking great! You may find it really simple to use the dimple and mag ball on a flat end effector. As it turns out you can get full travel even without angling down the tabs on the end effector? Although is does look good, something to think about.
Happy Building!
Werner
|
Re: VIDEO POSTED! Details about the BerryBot3D June 11, 2013 09:07PM |
Registered: 11 years ago Posts: 67 |
|
Re: VIDEO POSTED! Details about the BerryBot3D June 11, 2013 10:09PM |
Registered: 11 years ago Posts: 28 |
Hi guys
I was thinking of folding them, I just never done sheet metal folding yet in solidworks ;oP
But I will check it out just in case ... It was easier to figure the dimension I want in flat orientation.
I have done the soldering of the Azteeg X3 I will start to communicate soon hehe need to find the bigest pc power supply i have and butcher it a little...
Cheer!
Frank
|
Re: VIDEO POSTED! Details about the BerryBot3D June 11, 2013 11:43PM |
Registered: 11 years ago Posts: 83 |
|
Re: VIDEO POSTED! Details about the BerryBot3D June 13, 2013 06:11PM |
Registered: 11 years ago Posts: 28 |
|
Re: VIDEO POSTED! Details about the BerryBot3D June 22, 2013 04:49AM |
Registered: 11 years ago Posts: 12 |
Berry, awesome job - seriously.
Thanks also for contributing to the community as much as you have. You videos are easy to follow and are very informative. Combined with this thread, and I think I have much of the information I need to somewhat duplicate your work. Though I have to say I have serious tool envy. I mean, now I need to get a metal brake, a pneumatic crimper and even worse, you've convinced me I need to build a CNC router. Lots of work to do!
There are a couple things I haven't been able to figure out, hopefully you can shed some light.
* How long was is the makerslide rails you went with? In fact, how far apart are they?
* Where can I find those dimple dies?
* In one of your videos at the beginning you opened by saying you were going to talk about how the base of your printer was created - the torsion box, I think you called it. Though, I think the rest of the video was taken up talking about the plenum (which I will do my best to replicate - waiting 20 minutes for 110c on my MendelMax 1.5 is too long!). Would you mind talking about the base of your printer? I see you welded everything, and I did find the drawing in this thread, but I know you've likely got a bunch more to say... I can feel it.
* How long did you end up making the carbon arms? I saw something about making 3 out of a longer rod, but I'd like to know what your final dimensions are.
I ask all these things because the berrybot3d printer output is simply tops, and evidently consistent!
Oh, bonus question. Which CNC Router design did you go with? Are there plans anywhere? (or is that also home-grown?).
Thank you, and keep up the good work!
Jeremy
|
Re: VIDEO POSTED! Details about the BerryBot3D July 02, 2013 10:11PM |
Registered: 11 years ago Posts: 28 |
Hi Jerbro,
The Dimple set can be found there Dimple set 0,25''
Hi have order a set and they are quick to ship.
I will finish my Dimple maker tomorrow and will post some pictures as soon its tested ;oP see up there or some render pictures
Cant wait for the next Berry video! My printer is comming together slowly some major work around the house was planned... A Bathroom remodel But all the great input of everybody is Apreciated!
Frank
|
Re: VIDEO POSTED! Details about the BerryBot3D July 07, 2013 02:41AM |
Registered: 11 years ago Posts: 12 |
Thanks for the link, Frank, I appreciate it! I've now got a bunch of carbon rods, the magnets, a 1/2" ballnose endmill for the socket-cap shoulder bolts (or whatever they're called), the Teflon gasket material and even an arrow cutter for the carbon rods. I'll try to combine this with the Kossel carriage and probably a self-designed effector. Hopefully I can integrate the dimple into the process somewhere.
Hopefully Berry has a chance to respond to my other questions. I wouldn't be surprised if someone was trying to license his design... (and thus, taking all his free time).
Thanks again,
Jeremy
Hopefully Berry has a chance to respond to my other questions. I wouldn't be surprised if someone was trying to license his design... (and thus, taking all his free time).
Thanks again,
Jeremy
|
Re: VIDEO POSTED! Details about the BerryBot3D July 07, 2013 06:28PM |
Registered: 11 years ago Posts: 28 |
I am running out of free time these day I will re-design my effector for a strait configuration and test it on the Maker Slide hopefully soon...
its a great design your right Berry is doing a wonderful job whit is machine!
here some shot of the dimple maker I have Made
I still need to buy some alluminum to test it...
Frank
Edited 1 time(s). Last edit at 07/07/2013 06:33PM by Frank_The_Rock.
its a great design your right Berry is doing a wonderful job whit is machine!
here some shot of the dimple maker I have Made
I still need to buy some alluminum to test it...
Frank


Edited 1 time(s). Last edit at 07/07/2013 06:33PM by Frank_The_Rock.
|
Re: VIDEO POSTED! Details about the BerryBot3D July 07, 2013 07:38PM |
Registered: 11 years ago Posts: 12 |
|
Re: VIDEO POSTED! Details about the BerryBot3D July 08, 2013 11:35AM |
Hi Werner, Congratulations on an ASTOUNDING Delta build, in the process of designing and building our own machine and yours has been an inspiration. Thanks so much for sharing your journey and inventions as well, the magnetic joints are brilliant and a real find for any delta builder.
I thought I'd let you know that the video you link to on this post seems to have disappeared - getting the error "This video has been removed by the user" [www.youtube.com]
Was a brilliant video so perhaps it has been removed in error?
Also amazed by your huge print! [www.youtube.com]
Thanks for being an inspiration to the community and keep up the brilliant work!
|
Re: VIDEO POSTED! Details about the BerryBot3D July 08, 2013 01:07PM |
Registered: 11 years ago Posts: 12 |
eyebee - it looks like Werner has removed most of his 'this is how I did what I did' Berrybot3D videos, which is unfortunate. I see 5 videos associated with his youtube account today, which is less than half of what used to be there.
I'm actually bummed about this, as I've chosen to watch them over and over (and planned to do so again), picking up small details here and there.
I'm actually bummed about this, as I've chosen to watch them over and over (and planned to do so again), picking up small details here and there.
|
Re: VIDEO POSTED! Details about the BerryBot3D July 08, 2013 02:08PM |
Registered: 12 years ago Posts: 141 |
I was going to ask the same thing about Werners videos. After watching his "how I did" videos, it has inspired me to build a Delta type printer. I have been gone for about 5 weeks and when I was able to check again - those are gone. I hope hes not pissed about people "adopting" his ideas - as they are really innovative.
|
Re: VIDEO POSTED! Details about the BerryBot3D July 08, 2013 02:18PM |
Registered: 11 years ago Posts: 67 |
|
Re: VIDEO POSTED! Details about the BerryBot3D July 08, 2013 05:42PM |
Registered: 11 years ago Posts: 12 |
Parabolic - I don't think Werner was concerned about folks using his innovations - as he stated multiple times this was his was to contribute back to the maker community, and that, by watching his videos, we could figure out how he did what he did. I suppose that's was true - while his videos were around. (Did anyone save a copy of them? I'd love to have those as a reference...)
Either way, while they lasted (and with this thread), they sparked many ideas. I'm sure we'll be able to put together an equivalent machine. I'll certainly try.
Now, time to get some makerslide, time to build a cnc router (or rent time on one) and continue the good innovation Mr. Barry showed us.
Either way, while they lasted (and with this thread), they sparked many ideas. I'm sure we'll be able to put together an equivalent machine. I'll certainly try.
Now, time to get some makerslide, time to build a cnc router (or rent time on one) and continue the good innovation Mr. Barry showed us.
|
Re: VIDEO POSTED! Details about the BerryBot3D July 08, 2013 05:52PM |
Registered: 12 years ago Posts: 141 |
|
Re: VIDEO POSTED! Details about the BerryBot3D July 08, 2013 06:09PM |
Registered: 11 years ago Posts: 12 |
Also, before I forget (and so I can refer to this thread going forward), Werner used these steppers: [www.stepperonline.com]. Though right now, it looks like they're out of stock (probably just a coincidence).
|
Re: VIDEO POSTED! Details about the BerryBot3D July 08, 2013 09:32PM |
Registered: 10 years ago Posts: 1 |
FYI. Just received a reply from Stepperonline.com indicating that they do not have plans to re-stock this model (17HS24-1204S-PG5) as it is a slow mover (not popular). They have suggested model 17HS19-1684S-PG5 instead BUT... there are some important differences...
Product Specifications - 17HS24-1204S-PG5 vs. 17HS19-1684S-PG5
Rated Current/phase - 1.2A vs. 1.68A
Phase Resistance - 4.0ohms vs. 1.8ohms
Voltage - 4.8V vs. 2.8V
Inductance - 7.7mH±20%(1KHz) vs. 3.2mH±20%(1KHz)
Weight - 700g vs. 550g
Mechanical Dimension
Motor length - 60mm vs. 47mm
Edited 1 time(s). Last edit at 07/08/2013 09:34PM by NG_2013.


Sorry, only registered users may post in this forum.