Update on the E3D All Metal Hotend (Now finally shipping!)  [Lots of pictures]
Posted by SanjayM
|
Re: Update on the E3D All Metal Hotend (Now finally shipping!) [Lots of pictures] March 01, 2014 01:03AM |
Registered: 10 years ago Posts: 17 |
|
Re: Update on the E3D All Metal Hotend (Now finally shipping!) [Lots of pictures] March 01, 2014 01:55AM |
Registered: 10 years ago Posts: 1,381 |
Quote
bruce356
Hi again, just printed with ABS and instead of jamming after 1.5 hrs with PLA it jammed after 2 hrs with ABS. Sorry but do not have much confidence in this hot end unless I got a bad one?
Regards - bruce
Are the groves in your extruders hob jammed up with stripped filament?
Are the edges of the hob rounded, worn down, do you have a new hob to compare it to?
Take a pic of it.
It's possible that over time the hob is slowly being packed with shavings from the filament,
then slipping a few hours into the build.
Have you cleaned the hob before printing a big project?
Why is there a chunk of filament ground away?

In addition, black filament typically has a lot of fillers, and junk (floor sweepings) blended into it,
and over time the crap fillers, and debris could be building up in the nozzle.
Best to use a virgin, uncolored filament for testing-evaluation.
Edited 2 time(s). Last edit at 03/01/2014 02:08AM by A2.
|
Re: Update on the E3D All Metal Hotend (Now finally shipping!) [Lots of pictures] March 01, 2014 02:03AM |
Registered: 11 years ago Posts: 661 |
|
Re: Update on the E3D All Metal Hotend (Now finally shipping!) [Lots of pictures] March 01, 2014 02:08AM |
Registered: 10 years ago Posts: 17 |
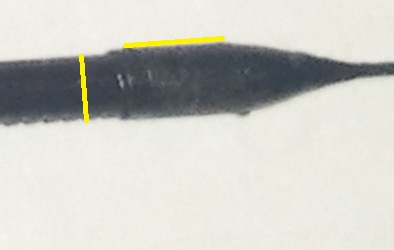
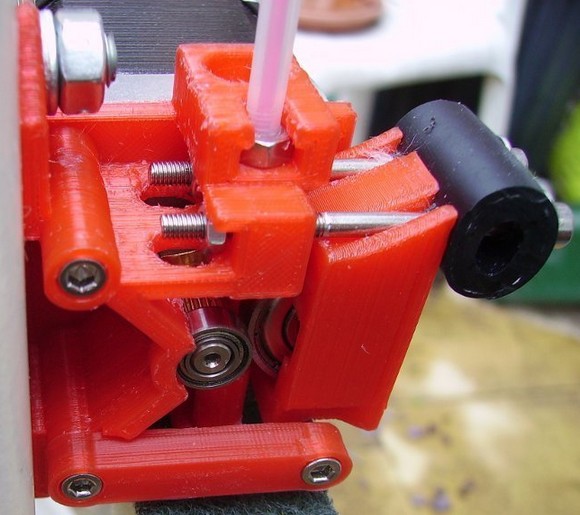
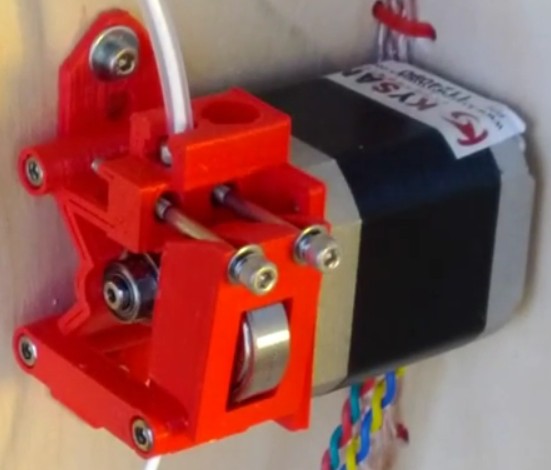
Hi A2 thanks for the reply, this is a new MM2, hob is new and the area where your red arrow is, is the hob cutting away the pla because of a jam the hob keeps rotating but the filament does not move anymore. The ridges that you see along the bottom of PLA are the tooth marks made by the hob.
I have just pulled the hot end apart and found the inside bore in the stainless steel part has a spiral groove all the way through (looks like a course thread but not as deep as a thread more like a deeper scratch mark), do they all have this, it seems to me that this could cause the filament to jam when it expands in its rubbery state before liquefying.
Regards - bruce
|
Re: Update on the E3D All Metal Hotend (Now finally shipping!) [Lots of pictures] March 01, 2014 02:19AM |
Registered: 11 years ago Posts: 661 |
Quote
bruce356
Hi again, just printed with ABS and instead of jamming after 1.5 hrs with PLA it jammed after 2 hrs with ABS. Sorry but do not have much confidence in this hot end unless I got a bad one?
Regards - bruce
Your PLA temp may be a bit low for an all metal hot end which is causing the jam as the print progresses. I've found that with an all metal hot end I have to print a bit hotter than I do with a JHead. I've also found the Maxstuder to be a bit tweaky when it comes to idler tension particuarly wtih a printed idler. IIRC Maxbots/MTW uses a machined AL idler and I've had some made but the spring tension is still key and in my experience does not have the margin of error/forgiveness that something like a Gregs/Wades has. The first Maxstruder I built I had to work with it a bit until I could get similar performance to what I had on my i2s and i3s with a few different hot ends including JHead, Aluhead and Prusa 1.
Is the E3D your first hot end? I wouldn't suggest any all metal hot end to start and would recommend a JHead for ease of use and to shorten the learning curve on configuring the printer. If it's not your first hot end don't use the settings from your previous tool and experiment find the best settings for your machine. Make sure your using the right thermistor table and get your PID tuned as best you can with PID autotuen before you start the config,
|
Re: Update on the E3D All Metal Hotend (Now finally shipping!) [Lots of pictures] March 01, 2014 02:46AM |
Registered: 10 years ago Posts: 17 |
Hi vegasloki, it is my first hot end, I thought all metal would be the best way to go. As posted above:-
"I have just pulled the hot end apart and found the inside bore in the stainless steel part has a spiral groove all the way through (looks like a course thread but not as deep as a thread more like a deeper scratch mark), do they all have this, it seems to me that this could cause the filament to jam when it expands in its rubbery state before liquefying."
You may be right about temperature as some run at 200+ degrees, my maxtruder came with a ball bearing idler I assume that should be ok. I am not impressed with the one sided only support of the spring-ball bearing assembly, its a bit crappy. Spring tension is at minimum and it bites into the pla and abs quite nicely giving good grip (as can be seen in photo). A JHead will be my next item to purchase.
regards - bruce
|
Re: Update on the E3D All Metal Hotend (Now finally shipping!) [Lots of pictures] March 01, 2014 04:19AM |
Registered: 10 years ago Posts: 1,381 |
Quote
bruce356
I have just pulled the hot end apart and found the inside bore in the stainless steel part has a spiral groove all the way through (looks like a course thread but not as deep as a thread more like a deeper scratch mark), do they all have this, it seems to me that this could cause the filament to jam when it expands in its rubbery state before liquefying.
A long helix in the side wall of a hole is typical caused when the cutter is removed from the hole.
Can you take a picture of the grove?
The grove could be caused from a burr on the tool, chips packing in the flutes,
or a slight run out from a high speed cutter oscillating, etc.
Short of stopping the cutter before retraction, use lots of coolant, use a different style of drill bit,
end mill, boring tool, and tool geometry, flute helix, add a radius to the corner,
(I've radius the perimeter of a drill bit to improve the finish, and accuracy, pseudo reamer).
Some times a hole is drilled without using a center drill, and the hole will be off center from the axis of the machine spindle.
Upon tool retraction, the tool is not loaded, and an oscillation develops which causes the bit to rub on the surface of the bore.
Lot's of weird patterns can develops.
The hole could also be reamed, honed, and then lapped, and then polished, cost buckets of money.
Stainless is nasty to machine without using an appropriate coolant,
having the correct cutter geometry, using high rpm's with an appropriate feed rate, etc, etc.
End of the day it's a simple fix for an experienced machinist to make.
Quote
E3D
CNC Machined Parts
High precision
High quality surface finish
All heated parts are either steel, aluminium or brass. By using a stainless steel heat-break and active cooling we have reduced the distance in which the plastic transitions from ambient temperatures to extrusion temperatures to 2mm. This extremely short transition from cold filament to molten plastic provides highly precise extrusion with little extrusion force and reduced jamming.
[e3d-online.com]
Looks to me that the plug is between 3 mm and 4 mm long, and the variability of your temperature,
and extrusion rate would effect the plug length.
I don't see a helix impression in the slug, so I'm not convinced that the plug is an issue.

The tooling marks left by the hob on the filament are quite pronounced.
I think it's possible that the hobbed filament peaks are snagging in the grove,
(if the grove is the problem, it might not be, and some thing else is to blame).

Test:
Adjust the pressure on the idler to reduce the bite depth of the hob, reduce your feed rate,
and use a natural or white filament if you have it on hand, to see if you can print longer than 2 hours.
Edited 2 time(s). Last edit at 03/01/2014 04:43AM by A2.
|
Re: Update on the E3D All Metal Hotend (Now finally shipping!) [Lots of pictures] March 01, 2014 04:57AM |
Registered: 10 years ago Posts: 17 |
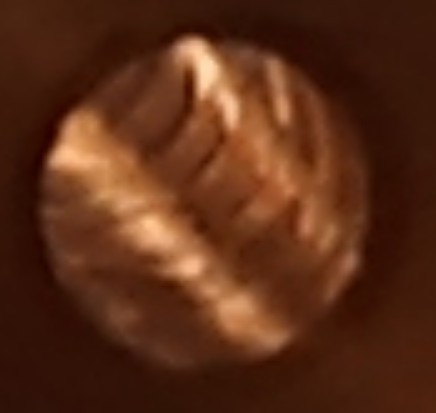
Hi A2, Thanks, I understand your comments about machining I am a fitter and turner by trade, the internal finish in my opinion should be smooth after using a reamer, when I run a small shaft (with a smooth tip no scratching) up and down inside the bore I can feel the bumps.
The plug is about 4mm long or just a tad under and it would be difficult to see any markings as I had to heat the hot end to 240 to enable removal, that would have caused slight softening of the pla plug surface.
The Maxtruder is set to minimum pressure, I would have to cut the spring to reduce it any further. The problem becomes apparent when the filament feed slows right down (plug height increases as heat creeps up the pla/ABS), while its feeding quickly it runs smoothly, only when the filament sits there fore a while (very slow feed and reversing) then it jams.
Regards - bruce
P.S trying to shoot picture with my phone inside a 2mm hole is bit hard.
Edited 1 time(s). Last edit at 03/01/2014 04:59AM by bruce356.
|
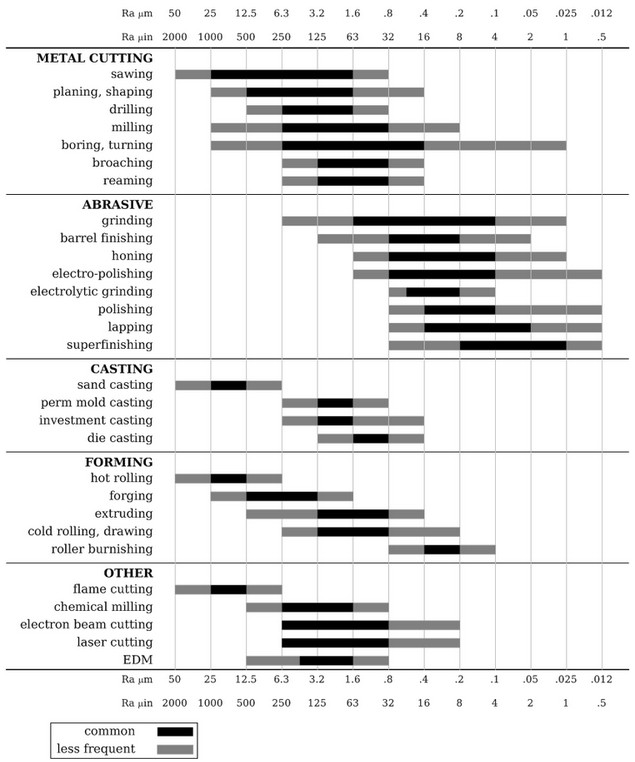
Re: Update on the E3D All Metal Hotend (Now finally shipping!) [Lots of pictures] March 01, 2014 06:08AM |
Registered: 10 years ago Posts: 1,381 |
Quote
bruce356
Thanks, I understand your comments about machining I am a fitter and turner by trade,

Quote
bruce356
the internal finish in my opinion should be smooth after using a reamer,
when I run a small shaft (with a smooth tip no scratching) up and down inside the bore I can feel the bumps.
There is no call out for reaming, or any other secondary processing.
The blueprint specifies drilling,
The machining method, and process is typically not documented on a blueprint.
The machinist might be hogging out the material.
Sounds like a rough surface finish, and possibly rougher than the low end typical for drilling.
I don't see a call out for surface finish on the blueprint.
Kind of difficult to measure the surface finish on a tiny bore.
I use a visual chart to help interpret surface finish, one for steel, and another one for plastics.

[files.e3d-online.com]
If I interpret the hole tolerance as the roughness average (Ra) it would be 50 um.
The low end for drilling is 12.5 um.
Ra 50 um is the lowest value on this chart.

[www.ljstar.com]
[en.wikipedia.org]
50.00 micrometer = 0.00197 inch
0.05 millimeter = 0.00197 inch
[www.translatorscafe.com]
Well if you have a small brass lapping tool, and some Clover lapping compound at home you could smooth it out


Edited 1 time(s). Last edit at 03/01/2014 06:10AM by A2.
|
Re: Update on the E3D All Metal Hotend (Now finally shipping!) [Lots of pictures] March 01, 2014 09:22AM |
Registered: 10 years ago Posts: 17 |
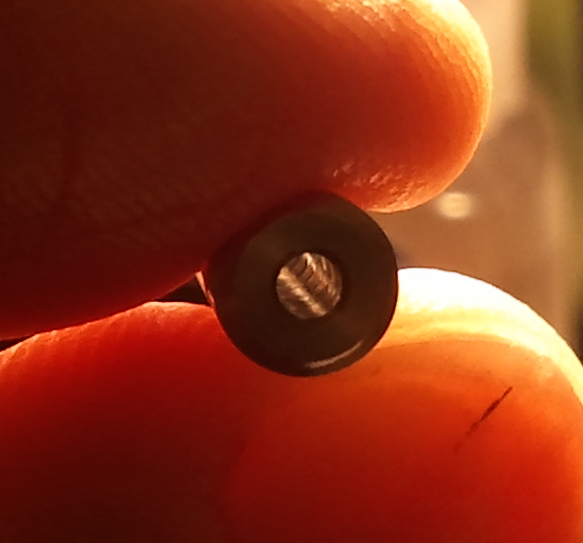
Hi A2, generally the finish inside the 2mm bore is very good, just the score marks spoil this finish. I think I would be pushing it to try and lap these score marks out of existence without spending a lot of time and ending up with an oversize bore.
I only have a mobile phone camera, I have attached a photo it is not brilliant but you can see what I am talking about.
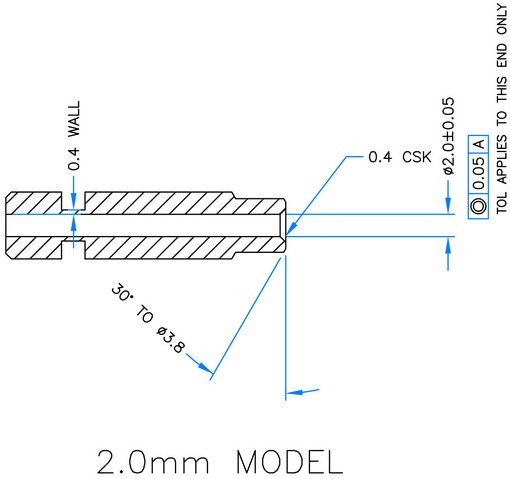
In the model drawing above it does not show a chamfer or bevel at the hot end (left side) but mine has one. This probably does not matter because at that point the PLA/ABS would be molten.
Regards - bruce
I only have a mobile phone camera, I have attached a photo it is not brilliant but you can see what I am talking about.
In the model drawing above it does not show a chamfer or bevel at the hot end (left side) but mine has one. This probably does not matter because at that point the PLA/ABS would be molten.
Regards - bruce
|
Re: Update on the E3D All Metal Hotend (Now finally shipping!) [Lots of pictures] March 01, 2014 01:09PM |
Registered: 10 years ago Posts: 19 |
|
Re: Update on the E3D All Metal Hotend (Now finally shipping!) [Lots of pictures] March 01, 2014 01:44PM |
Registered: 11 years ago Posts: 661 |
Quote
bruce356
Hi vegasloki, it is my first hot end, I thought all metal would be the best way to go. As posted above:-
"I have just pulled the hot end apart and found the inside bore in the stainless steel part has a spiral groove all the way through (looks like a course thread but not as deep as a thread more like a deeper scratch mark), do they all have this, it seems to me that this could cause the filament to jam when it expands in its rubbery state before liquefying."
You may be right about temperature as some run at 200+ degrees, my maxtruder came with a ball bearing idler I assume that should be ok. I am not impressed with the one sided only support of the spring-ball bearing assembly, its a bit crappy. Spring tension is at minimum and it bites into the pla and abs quite nicely giving good grip (as can be seen in photo). A JHead will be my next item to purchase.
regards - bruce
Al metal hot ends are great it's just not the best choice for a starter hot end. On a Maxstruder all of the idler bearings are sealed bearings. The idler is the arm part the bearing is mounted to and spring supports. Being too loose can lead to a jam as well. What others use as a temp setting is a good starting point but for best results you'll have to find out what is best for your machine. If you are using JHead temps with an E3D it's likely too low. Another issue is that MTW states to use thermistor table 1 in Marlin which is a generic EPCOS 100k (big head). The E3D is drilled for the smaller Semitec 100k (pn 104GT-2) that is table 5 in Marlin. They quit making the big head EPCOS 100k that we all know and love (though plenty of clone replacements and some left over original stock are available in Shenzhen) with nearly everyone moving to the Semitec.
|
Re: Update on the E3D All Metal Hotend (Now finally shipping!) [Lots of pictures] March 01, 2014 03:29PM |
Registered: 10 years ago Posts: 903 |
Stupid question - has anyone else had a problem with the brass block coming loose? I heated it up to 300C and torqued it down per the instructions when I put it together. This morning , I noticed that when sliding the calibration paper under the nozzle that the block was rotating freely on its threads! It has only run about 20 meters of PLA at 185C since assembly, and I thought that it was odd that it came loose after so little use. I will re-torque it at 300C later today, and hopefully it was just a fluke random occurrence.....
|
Re: Update on the E3D All Metal Hotend (Now finally shipping!) [Lots of pictures] March 01, 2014 03:44PM |
Registered: 11 years ago Posts: 374 |
@vreihen
I would guess that you did not properly seat the nozzle against the heat break inside the heat block. There must be a gap between the flat on the nozzle and the bottom face of the heat block. See step 2 of this pdf: [files.e3d-online.com]
I would guess that you did not properly seat the nozzle against the heat break inside the heat block. There must be a gap between the flat on the nozzle and the bottom face of the heat block. See step 2 of this pdf: [files.e3d-online.com]
|
Re: Update on the E3D All Metal Hotend (Now finally shipping!) [Lots of pictures] March 01, 2014 05:03PM |
Registered: 10 years ago Posts: 32 |
|
Re: Update on the E3D All Metal Hotend (Now finally shipping!) [Lots of pictures] March 01, 2014 05:26PM |
Registered: 10 years ago Posts: 1,381 |
Quote
bruce356
my maxtruder came with a ball bearing idler I assume that should be ok.
I am not impressed with the one sided only support of the spring-ball bearing assembly, its a bit crappy.
Airtripper's extruder supports both the shaft ends of the idler bearing, and the hob.

Airtripper's direct drive bowden extruder
Johann Rocholl
[www.youtube.com]
Airtripper's Bowden Extruder
Johann Rocholl
[www.youtube.com]
Airtripper's Bowden Extruder
by Airtripper, published May 2, 2012
[www.thingiverse.com]
Airtripper's 3D Printer and Arduino Blog
3D Printer usage and modifications plus Arduino powered electronic projects and 3D Printing designs.
[airtripper.com]
Quote
bruce356
In the model drawing above it does not show a chamfer or bevel at the hot end (left side) but mine has one.
The blueprint is instructing the machinist to "drill" from a specified side,
and it's not specifying that the breakout end to be deburred, (chamfer).
Possibly there are verbal instructions to the machinist to buck the breakout end while machining to eliminate a burr from forming,
and a square sharp edge is required. Doesn't seem to me that a square edge is necessary if the plastic is liquid in that zone.
[files.e3d-online.com]

Quote
bruce356
generally the finish inside the 2mm bore is very good, just the score marks spoil this finish.
I think I would be pushing it to try and lap these score marks out of existence without spending a lot of time and ending up with an oversize bore.
Good picture!
Yea I can see what your saying now.
I'm quite sure if you email the company with that photo, and an explanation of your issues you would get a replacement.
Edited 1 time(s). Last edit at 03/01/2014 05:28PM by A2.
|
Re: Update on the E3D All Metal Hotend (Now finally shipping!) [Lots of pictures] March 01, 2014 07:50PM |
Registered: 10 years ago Posts: 17 |
@ vegasloki
QUOTE "Another issue is that MTW states to use thermistor table 1 in Marlin which is a generic EPCOS 100k (big head). The E3D is drilled for the smaller Semitec 100k (pn 104GT-2) that is table 5 in Marlin."
I know that E3D have been shipping the new smaller Semitec since November 2013, I bought mine from MakersToolWorks and they obviously still have old stock as I received my kit with the EPCOS 100k thermistor (2.5mm bore in heater block) so default table 1 would be ok.
Thanks and regards - bruce
|
Re: Update on the E3D All Metal Hotend (Now finally shipping!) [Lots of pictures] March 01, 2014 11:35PM |
Registered: 10 years ago Posts: 17 |
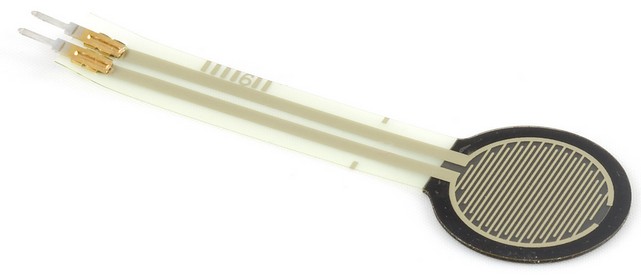
Hi A2, I have been reading the information by Airtripper, he has published some very interesting stuff in particular the "Extruder Force Sensor" this would be a brilliant inclusion in 3D printing. If an extruder approaches a certain pre determined load the printer would stop, send an audible alarm that something is wrong, the blockage in the extruder can be rectified and printing can continue without ending up with stripped filament & failed print plus having to throw away the part or parts.
Airtripper's extruder is a well designed extruder but I am not using Bowden.
Thanks for the links, I have had a few hours of very interesting reading.
Regards - bruce
Airtripper's extruder is a well designed extruder but I am not using Bowden.
Thanks for the links, I have had a few hours of very interesting reading.
Regards - bruce
|
Re: Update on the E3D All Metal Hotend (Now finally shipping!) [Lots of pictures] March 02, 2014 12:24AM |
Registered: 10 years ago Posts: 1,381 |
@bruce356:
Agree, and in addition it would be nice if a G-code dump of the last executed line was identified.
This would allow you to fix the issue, and resume printing where it stopped saving the job from going into the trash.
Johann developed a neat application using a force sensing resistors ($7.50 USD)
that you could apply to the extruder, and hot end bracket interface.
Autolevel with Force Sensing Resistors works better than expected
[groups.google.com]
Johan's Marlin - Delta Auto Bed Leveling
[forums.reprap.org]
YouTube video: [youtu.be]
Documentation: [reprap.org]
FSR product details: [www.phidgets.com]
Source code: [github.com]
Project history: [deltabot.tumblr.com]
Learn to use a solid modeler like FreeCad, and modify the design.
[freecadweb.org]
[sourceforge.net]
[forum.freecadweb.org]
If dimensioned blueprints can be found I'd be willing to make the modifications to it,
but I strongly encourage you to learn FreeCad.
Once you master FreeCad, you'll be able to use just about any solid modeler.
I wont work from a .STL data file , (PITA).
Edited 2 time(s). Last edit at 03/02/2014 02:46AM by A2.
Quote
bruce356
If an extruder approaches a certain pre determined load the printer would stop, send an audible
alarm that something is wrong, the blockage in the extruder can be rectified and printing can continue
without ending up with stripped filament & failed print plus having to throw away the part or parts.
Agree, and in addition it would be nice if a G-code dump of the last executed line was identified.
This would allow you to fix the issue, and resume printing where it stopped saving the job from going into the trash.
Johann developed a neat application using a force sensing resistors ($7.50 USD)
that you could apply to the extruder, and hot end bracket interface.

Autolevel with Force Sensing Resistors works better than expected
[groups.google.com]
Johan's Marlin - Delta Auto Bed Leveling
[forums.reprap.org]
YouTube video: [youtu.be]
Documentation: [reprap.org]
FSR product details: [www.phidgets.com]
Source code: [github.com]
Project history: [deltabot.tumblr.com]
Quote
bruce356
Airtripper's extruder is a well designed extruder but I am not using Bowden.
Learn to use a solid modeler like FreeCad, and modify the design.
[freecadweb.org]
[sourceforge.net]
[forum.freecadweb.org]
If dimensioned blueprints can be found I'd be willing to make the modifications to it,
but I strongly encourage you to learn FreeCad.
Once you master FreeCad, you'll be able to use just about any solid modeler.
I wont work from a .STL data file
, (PITA).Edited 2 time(s). Last edit at 03/02/2014 02:46AM by A2.
|
Re: Update on the E3D All Metal Hotend (Now finally shipping!) [Lots of pictures] March 02, 2014 08:40AM |
Registered: 10 years ago Posts: 903 |
Quote
bruce356
I know that E3D have been shipping the new smaller Semitec since November 2013, I bought mine from MakersToolWorks and they obviously still have old stock as I received my kit with the EPCOS 100k thermistor (2.5mm bore in heater block) so default table 1 would be ok.
It appears to me that MTW is making a substitution in the E3D "kit" they are shipping. If you look at the official E3D assembly instructions, it seems that half of the steps are assembling the thermistor. MTW is shipping pre-assembled EPCOS thermistors with the E3D, which is a good thing for most of us although a few might argue that they were denied the joy of assembling it themselves. I don't think that MTW is selling old E3D stock, as the unit I received last month was drilled for both thermistors per E3D's transition plan. I ordered a J-head from MTW at the same time, and it came with a pre-wired Semitec thermistor. They also sell pre-wired thermistors. I'm guessing that they chose to bundle pre-wired thermistors to save themselves the support and warranty grief from people who didn't assemble their thermistors properly, and I for one am glad that I didn't have to deal with little PTFE sleeves, microscopic crimps, and kapton tape to assemble my hotends.....
|
Re: Update on the E3D All Metal Hotend (Now finally shipping!) [Lots of pictures] March 02, 2014 10:39AM |
Registered: 10 years ago Posts: 903 |
Quote
crispy1
I would guess that you did not properly seat the nozzle against the heat break inside the heat block. There must be a gap between the flat on the nozzle and the bottom face of the heat block. See step 2 of this pdf: [files.e3d-online.com]
I made sure that the gap was still present after torquing the nozzle at 300C the first time.
When I brought it back up to 300C to torque it down again, I also noticed that the cartridge heater was floating loose! (I let it cool down without adjusting, and the set screw held it again at room temperature.) The set screw holding it in was originally torqued cold, and I think that E3D might want to change the instructions to torque that hot as well. I don't think that a lot of torque should be applied hot, since it might damage the cartridge heater when everything contracts when cold.....
|
Re: Update on the E3D All Metal Hotend (Now finally shipping!) [Lots of pictures] March 02, 2014 10:52AM |
Registered: 11 years ago Posts: 374 |
Quote
When I brought it back up to 300C to torque it down again, I also noticed that the cartridge heater was floating loose! (I let it cool down without adjusting, and the set screw held it again at room temperature.) The set screw holding it in was originally torqued cold, and I think that E3D might want to change the instructions to torque that hot as well. I don't think that a lot of torque should be applied hot, since it might damage the cartridge heater when everything contracts when cold.....
Interesting. I've assembled 5-6 E3Ds and never had an issue with the set screw on the cartridge coming loose. I always torque them down when cold. If anything they get tighter over repeated heating/cooling cycles.
BTW if you've run plastic through the hotend, it might be worth taking it apart and using a blowtorch to completely burn away all scraps of plastic on the nozzle and heat break. If there is plastic on the mating face they won't seat properly when you torque them down.
|
Re: Update on the E3D All Metal Hotend (Now finally shipping!) [Lots of pictures] March 02, 2014 05:44PM |
Registered: 10 years ago Posts: 17 |
Hi A2, regarding Johann's Extruder Force Sensor system, I will wait for him to develop it further, certainly the sensor is very cheap.
Thank you for the offer to modify the Airtripper's direct drive bowden extruder but at this stage I will stick with the Maxtruder from MakersToolWorks. This mod would be a lot of work for you and I do appreciate your kindness but as you say I am going to have to learn how to create drawings myself. I do have access to a program called Autodesk Inventor through work so I will start learning.
I know what you mean about .STL files they do seem very limited in what can be done with them and some I have downloaded have errors.
On a brighter note, I reassembled my E3D and took vegasloki's advice about increasing extrusion temperature, I went from 185/190 to 210 deg C with the black PLA and was able to successfully complete the 2.1/4 hour print part - Hurray.
Again thanks very much to both of you (A2 & vegasloki) for advice, information and help.
I have contacted E3D and await a reply regarding the score marks in the bore.
Regards - bruce
|
Re: Update on the E3D All Metal Hotend (Now finally shipping!) [Lots of pictures] March 02, 2014 06:09PM |
Registered: 10 years ago Posts: 17 |
@ vreihen
Hi vreihen, I was not meaning to sound critical of MakersToolWorks regarding the E3D, my block only has one hole drilled all the way through for EPCOS thermistor (2.5mm) and it is right next to the nozzle, in fact looking into the bore of the thermistor hole one can see the tapped thread for the brass nozzle just breaking through, this gives very accurate temperature sensing.
I agree with you about pre-wired thermistors already being assembled, this is much better than having to do it yourself and MTW do a neat job.
I realise there is little difference between v4.1 and v5 so it would not have bothered me if MTW had sent a v4.1.
I have no issue with MTW they have given me very good service, I would recommend them to anyone.
Regards - bruce
|
Re: Update on the E3D All Metal Hotend (Now finally shipping!) [Lots of pictures] March 02, 2014 06:19PM |
Registered: 10 years ago Posts: 17 |
Hi all, by the way how do you guys insulate the E3D against the negative effects of air from the bed cooling fans (I have one fan on each side of the extruder/hotend). At 100% fan speed I have a little difficulty maintaining a steady temperature it tends to fluctuate by up to 5 degrees C.
At this stage I have just reduced fan speed to 35%, that solves the hot end fluctuations but does not provide enough cooling for PLA.
Thanks and regards - bruce
At this stage I have just reduced fan speed to 35%, that solves the hot end fluctuations but does not provide enough cooling for PLA.
Thanks and regards - bruce
|
Re: Update on the E3D All Metal Hotend (Now finally shipping!) [Lots of pictures] March 02, 2014 06:46PM |
Registered: 11 years ago Posts: 118 |
Quote
bruce356
Hi all, by the way how do you guys insulate the E3D against the negative effects of air from the bed cooling fans (I have one fan on each side of the extruder/hotend). At 100% fan speed I have a little difficulty maintaining a steady temperature it tends to fluctuate by up to 5 degrees C.
At this stage I have just reduced fan speed to 35%, that solves the hot end fluctuations but does not provide enough cooling for PLA.
Thanks and regards - bruce
I isolate my E3D Heater with some glass fiber taped on Kapton.
It takes longer to cool down but the temperature fluctuates way less (less than 0.1°C)
I need this isolation not because of a fan but because of the airflow caused by high printing speed and thermal conductivity of the Aluminium Heater...
ps: its important not to isolate the complete heaterblock,
this can cause negative effects for the cooling bridge!
Edited 3 time(s). Last edit at 03/02/2014 06:49PM by mrc.
|
Re: Update on the E3D All Metal Hotend (Now finally shipping!) [Lots of pictures] March 05, 2014 06:33AM |
Registered: 10 years ago Posts: 1,381 |
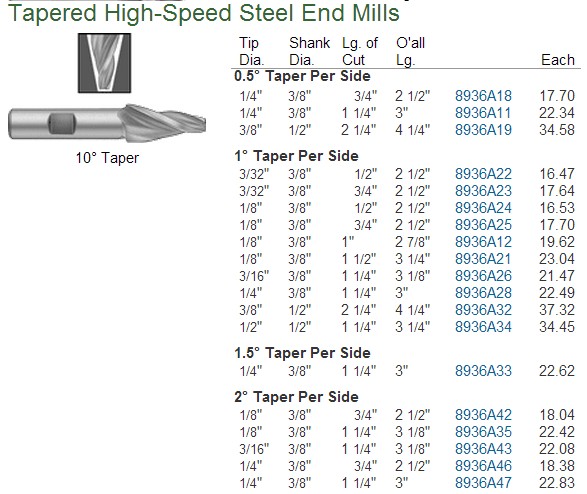
A few ideas to machine an inverse tapered bore into the barrel of the hot end.
A big savings over a tapered end mill or reamer is an inexpensive taper point drill.
For comparison I chose a starting diameter of Dia 0.125" inch, (3.18 mm).
Taper Point Drill
Dia 0.125: $5.07.
[www.mcmaster.com]
Tapered High-Speed Steel End Mills
Dia 0.125: $22.42, 2° Taper Per Side.
[www.mcmaster.com]
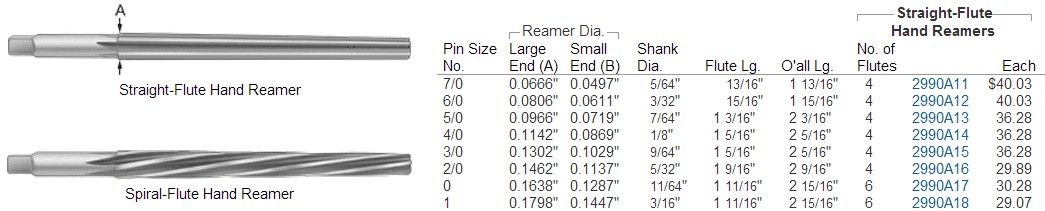
High-Speed Steel Reamers for Taper-Pin Holes
Dia 0.125: $30.28.
[www.mcmaster.com]
@bruce356:
You might be able to clean up the bore of the barrel with a flex hone.
It will produce a smoother finish than the mill finish, use with mineral oil.
I'm guessing but I think the rpm will be around 1000 to 2000 rpm.
Miniature Flex Hone (Flexible Cylinder Hones)
2 mm, $3.94 / ea
[www.brushresearch.com]
Edited 1 time(s). Last edit at 03/05/2014 06:35AM by A2.
A big savings over a tapered end mill or reamer is an inexpensive taper point drill.
For comparison I chose a starting diameter of Dia 0.125" inch, (3.18 mm).
Taper Point Drill
Dia 0.125: $5.07.
[www.mcmaster.com]

Tapered High-Speed Steel End Mills
Dia 0.125: $22.42, 2° Taper Per Side.
[www.mcmaster.com]

High-Speed Steel Reamers for Taper-Pin Holes
Dia 0.125: $30.28.
[www.mcmaster.com]

@bruce356:
You might be able to clean up the bore of the barrel with a flex hone.
It will produce a smoother finish than the mill finish, use with mineral oil.
I'm guessing but I think the rpm will be around 1000 to 2000 rpm.
Miniature Flex Hone (Flexible Cylinder Hones)
2 mm, $3.94 / ea
[www.brushresearch.com]


Edited 1 time(s). Last edit at 03/05/2014 06:35AM by A2.
Attachments:
open | download - ScreenHunter_483 Mar. 05 05.27.jpg (63.2 KB)
open | download - ScreenHunter_484 Mar. 05 05.29.jpg (76.1 KB)
open | download - ScreenHunter_485 Mar. 05 05.33.jpg (74.8 KB)
open | download - ScreenHunter_486 Mar. 05 06.07.jpg (13.6 KB)
open | download - ScreenHunter_488 Mar. 05 06.18.jpg (30.8 KB)
|
Re: Update on the E3D All Metal Hotend (Now finally shipping!) [Lots of pictures] March 06, 2014 11:19AM |
Registered: 10 years ago Posts: 44 |
So, I've rebuilt my hot end... with new E3D parts from Filastruder, I am still having a blocked hot end and ruined prints after rebuilding. I sent a message off to E3D for advice on how to be more successful with the hot end... Here's a cut and paste of what I sent via the contact form. I'm cross posting here for information sharing purposes so that others may be able to benefit or offer their own experiences to arrive at a consistient solution.
So, I have an E3D hot end, and I'm having difficulties getting it to print well. When I first got the hot end I tried it with my Bulldog Lite Extruder (Printed an appropriate base and turned a press fit flange for the top to fit nicely into the Bulldog mounting slot.)I had really poor results with both PLA and ABS, I could heat the nozzle and easily manually push filament through, but after a few minutes of printing it would lock up in the hot end and stop extruding... I took it apart and the barrel bent... So I had to shelf the E3D for a couple of weeks.
I put in an order last week for some replacement parts from Filastruder.com to rebuild the hot end.
I rebuilt the hot end yesterday and ran PID Auto Tune, got the firm ware flashed for the Semitec thermistor (option 5 in Marlin, from what I can tell from Filastruder's site that is the correct option for the one that I was sent. I did a PLA print of a few parts (medium sized) and they printed quite nicely... though I had to run at 215-220 which is a smidge higher than I normally would, but that's what it took to get the PLA to move through smoothly. I sliced at .2mm layer thickness and with .5mm retract at 60mm sec. (Using Ultimaker PLA, so it's the good stuff)
But I did a second print... with several smaller parts and a few larger parts... about a 5 hr print. About 1 hr in the hot end stopped moving PLA through the nozzle... I pulled the filament out, trimmed the plug at the end off and restarted the print and again at about the same spot in the print, about an hour in the same blockage occurred.
I hope I have provided enough information for information for you to offer some advice as to where the problem might lie with my prints. The first print turned out really well. But I'm not able to work without the end stopping the extrusion eventually. Any advice on having better success with your hot end?
Nathan
I have a J-Head hot end on the way... I'm going to give the E3D a week to sort out before I give up on it... hopefully I can get good results eventually... If not I'll move to the J-Head. I'm at the point where I want to print without having to fuss with my hot end any longer...
Edited 1 time(s). Last edit at 03/06/2014 11:20AM by 3DogNate.
- Ord Bot Hadron frame, Panucatt Xteeg X3, Viki LCD, RRD Bulldog Lite Extruder, Custom hot end...
|
Re: Update on the E3D All Metal Hotend (Now finally shipping!) [Lots of pictures] March 06, 2014 11:38AM |
Registered: 11 years ago Posts: 210 |
|
Re: Update on the E3D All Metal Hotend (Now finally shipping!) [Lots of pictures] March 06, 2014 12:04PM |
Registered: 10 years ago Posts: 44 |


Sorry, only registered users may post in this forum.