Update on the E3D All Metal Hotend (Now finally shipping!)  [Lots of pictures]
Posted by SanjayM
|
Re: Update on the E3D All Metal Hotend (Now finally shipping!) [Lots of pictures] March 07, 2014 07:08PM |
Registered: 10 years ago Posts: 1,381 |
@3DogNate:
Did the heat break bend while you disassembled the hot end while it was cold.
I didn't find a reference in the E3D assembly instructions of how to disassemble the hot end, can some one share there experience.
I've designed tooling for hot plate fusion welding of plastics, and for me it's easier to disassemble if it's on the warm side.
To help reduce the torque to unscrew the E3D heat break, I think disassembly could be made easier if it was warmed up.
I don't want to make a temperature suggestion, because it's really easy to strip out the threads in aluminum when it's hot.
I don't know what the best practice is for the E3D, you should inquirer.
|
Re: Update on the E3D All Metal Hotend (Now finally shipping!) [Lots of pictures] March 07, 2014 07:32PM |
Registered: 10 years ago Posts: 44 |
Quote
A2
@3DogNate:
Did the heat break bend while you disassembled the hot end while it was cold.
I didn't find a reference in the E3D assembly instructions of how to disassemble the hot end, can some one share there experience.
I've designed tooling for hot plate fusion welding of plastics, and for me it's easier to disassemble if it's on the warm side.
To help reduce the torque to unscrew the E3D heat break, I think disassembly could be made easier if it was warmed up.
I don't want to make a temperature suggestion, because it's really easy to strip out the threads in aluminum when it's hot.
I don't know what the best practice is for the E3D, you should inquirer.
Yes, it was cold. That was exactly the lesson I learned... Disassemble while warm...
|
Re: Update on the E3D All Metal Hotend (Now finally shipping!) [Lots of pictures] March 08, 2014 02:23AM |
Registered: 11 years ago Posts: 334 |
Quote
3DogNate
Quote
jzatopa
3DogNate I am in the middle of building a printer and plan on using the same combination of extruder and E3D except I will be using the bulldogXL. How did you account for the size mismatch between the e3D and bulldog mount? Did you use a metal shim or something else? I skimmed your posts and didn't see if you explained that yet.
I see you have quite a lot of fans on your print head. Have you tried pointing them all at the barrel while printing? This isn't a fix but it might help narrow down your problem to thermal or mechanical.
I turned a press fit bushing for the top ring of the heat sink on the lathe to fit the bulldog with no slop. The heater cartridge has no problems keeping a constant temp even with the PLA cooling fans blowing.
I'm not worried about if the heater cartridge is keeping up. There is a chance that the fan on the barrel isn't enough to keep the heatsink cool. Try pointing an extra fan at the barrel while it is printing to see if it stops jamming, if it does its a cooling issue. If that has no affect then the problem is somewhere else. You may also want to try flipping the barrel fan from push to pull to see if that makes a difference.
WWW.ZATOPA.COM - Your Place for high quality 3D Printing Filament and accessories
|
Re: Update on the E3D All Metal Hotend (Now finally shipping!) [Lots of pictures] March 08, 2014 03:39AM |
Registered: 10 years ago Posts: 17 |
@ A2,
Honing a bore with a flex honing tool would not give me the result that I would be looking for as it would simply in the main follow the existing contour of the bore.
Yes it would polish the bore but it would still have Hi spots and low spots like ocean waves.
I have contacted E3D and they are sending another heat break that they say has a smooth consistent bore.
Thanks again A2, I will let you know how it goes when I have the new part.
regards - bruce
|
Re: Update on the E3D All Metal Hotend (Now finally shipping!) [Lots of pictures] March 08, 2014 08:38AM |
Registered: 10 years ago Posts: 88 |
Holy Moly!!! I built a Prusa i3 and started with a Chinese J-Head clone and couldn't get it to print on any surface reliably. Switched to the E3D and now I can print straight on the glass. I didn't do anything to the glass I hadn't tried before just cleaned with Windex glass cleaner.
Thanks for the kick ass hotend!!!
Thanks for the kick ass hotend!!!
|
Re: Update on the E3D All Metal Hotend (Now finally shipping!) [Lots of pictures] March 08, 2014 02:53PM |
Registered: 11 years ago Posts: 53 |
3dognate i dont have an e3d but it is very similar i was having same issues as you it would print a few small object then jam. if i retracted it out and cutoff put back in it was good for a few more.
what worked for me was putting the filament thru a sponge and adding a couple of drops of oil on filament just above the sponge. it made a big difference i have since accidentally left extruder on for an hour without printing and it still did not jam.
it is a easy thing to try.
also early on part of my problems was nozzle not torqued enough. if when you take nozzle out look at end of nozzle that buts up to the ss heat break make sure no leakage of filament was getting between the two .
i have wondered why they tell you to heat up extruder before torquing the nozzle. seems doing i cold would be better then when it got hot the expansion would make it tighter.
|
Re: Update on the E3D All Metal Hotend (Now finally shipping!) [Lots of pictures] March 08, 2014 04:57PM |
Registered: 10 years ago Posts: 903 |
|
Re: Update on the E3D All Metal Hotend (Now finally shipping!) [Lots of pictures] March 09, 2014 04:46AM |
Registered: 10 years ago Posts: 4 |
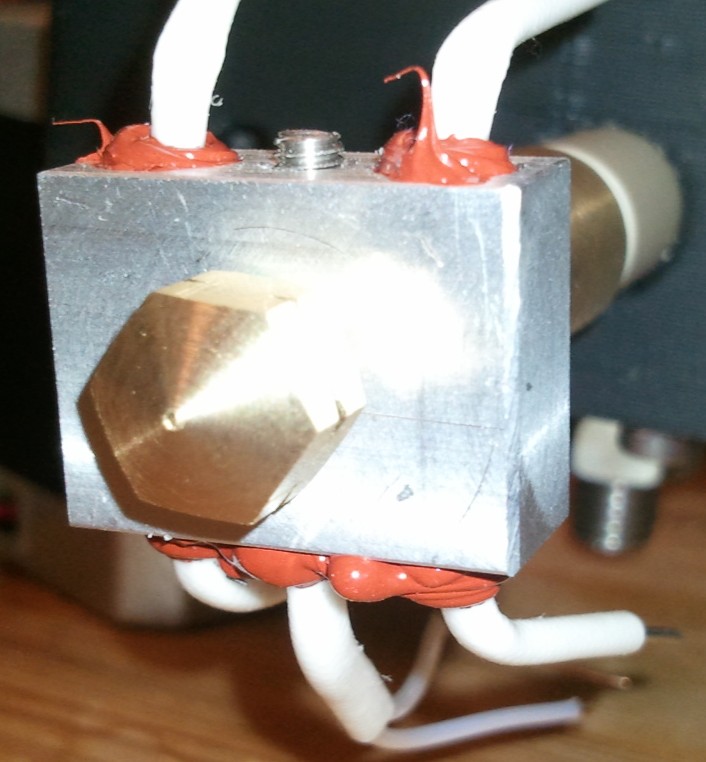
Hello everyone, I am wondering how E3D gets the inside of the heat breaks polished? I look inside of one and it looks smooth, I am trying to do a water cooled metal hot end but I can't make the center channel on the heat break smooth I always get tool marks, I was looking through the post and I saw some tips on how to do it most of them are manually polishing the heat break, if I am doing just one is fine but if I want to do a bunch is not something viable there has to be a better way, any of you guys know how? Thank you.
|
Re: Update on the E3D All Metal Hotend (Now finally shipping!) [Lots of pictures] March 09, 2014 05:15AM |
Admin Registered: 11 years ago Posts: 1,063 |
Quote
Aluma
Hello everyone, I am wondering how E3D gets the inside of the heat breaks polished? I look inside of one and it looks smooth, I am trying to do a water cooled metal hot end but I can't make the center channel on the heat break smooth I always get tool marks, I was looking through the post and I saw some tips on how to do it most of them are manually polishing the heat break, if I am doing just one is fine but if I want to do a bunch is not something viable there has to be a better way, any of you guys know how? Thank you.
i have done the inside of a 2mm home with a pipe cleaner from a craft show and a liberal amount of valve grinding paste followed by cerium oxide
-=( blog )=- -=( thingiverse )=- -=( 3Dindustries )=- -=( Aluhotend - mostly metal hotend)=--=( Facebook )=-
|
Re: Update on the E3D All Metal Hotend (Now finally shipping!) [Lots of pictures] March 09, 2014 05:35AM |
Registered: 10 years ago Posts: 4 |
|
Re: Update on the E3D All Metal Hotend (Now finally shipping!) [Lots of pictures] March 09, 2014 06:02AM |
Admin Registered: 11 years ago Posts: 1,063 |
Quote
Aluma
Thank you for the input thejollygrimreaper, however that is what I am trying to avoid doing manual polishing, there has to be a better way, I do not think that E3D hand polishes one by one. I was reading about some kind of electric polishing but I had not done any more research on it. Anyone else has any ideas? Thank you.
probably should have been clearer you can stick one end of the pipe cleaner in the chuck of a drill or dremel
-=( blog )=- -=( thingiverse )=- -=( 3Dindustries )=- -=( Aluhotend - mostly metal hotend)=--=( Facebook )=-
|
Re: Update on the E3D All Metal Hotend (Now finally shipping!) [Lots of pictures] March 09, 2014 06:27AM |
Registered: 11 years ago Posts: 117 |
|
Re: Update on the E3D All Metal Hotend (Now finally shipping!) [Lots of pictures] March 09, 2014 09:53AM |
Registered: 10 years ago Posts: 44 |
Quote
jkoljo
Try a reamer.
A reamer, oil, slow rpm and a consistent feed will make a much higher polish than a compound in stainless. I polish Aluminum and stainless performance motorcycle parts frequently.... stainless takes considerable effort to polish to a mirror finish.... Valve lapping compound will only create an even satin finish... (a nice finish, but not a mirror finish..) The best way to get that polished finish on stainless is right off the cutter. A 1.8 mm drill followed by a 2 mm reamer would be the ticket.
Edited 1 time(s). Last edit at 03/09/2014 09:53AM by 3DogNate.
|
Re: Update on the E3D All Metal Hotend (Now finally shipping!) [Lots of pictures] March 09, 2014 02:43PM |
Registered: 10 years ago Posts: 4 |
|
Re: Update on the E3D All Metal Hotend (Now finally shipping!) [Lots of pictures] March 09, 2014 06:43PM |
Registered: 12 years ago Posts: 46 |
|
Re: Update on the E3D All Metal Hotend (Now finally shipping!) [Lots of pictures] March 09, 2014 07:46PM |
Registered: 10 years ago Posts: 1,381 |
|
Anonymous User
Re: Update on the E3D All Metal Hotend (Now finally shipping!) [Lots of pictures] March 13, 2014 05:50AM |
 up for that amazinly fast shipping
|
Re: Update on the E3D All Metal Hotend (Now finally shipping!) [Lots of pictures] March 18, 2014 03:44PM |
Registered: 12 years ago Posts: 177 |
Hi all,
Once again - too long since I've reared my head here. Apologies once again.
The people that were having issues have been in touch with me via the contact form on our website, and we're working with them to get them sorted. If you're really struggling and think something is wrong with your hotend the absolute best way to get in touch is by the contact form - we almost always respond within 24 hours. I just can't monitor sprawling forums across the internet and provide effective support.
To that end we have created a forum on our website where people can ask general questions about how to fit it to their particular machines, we have a lot of really cool content already. We're also running a competition for the best threads/posts/guides. By way of some encouragement we are offering store credit prizes for the best content.
[forum.e3d-online.com]
Winner
£75 Store Credit
2nd Place
£50 Store Credit
3rd Place
£30 Store Credit
4th - 10th Place
£20 Store Credit
The posts can be on anything, however we are particularly looking for:
Assembly guides - printer specific or not
Reports of prints in interesting materials - very high temperatures?
Troubleshooting guides
Hacks & Mods
Printed Add-Ons - Carriages, mounts, ducts, etc..
Kraken-related experiences
For many of you, this could be as simple as re-posting one of your existing guides on our site. We're looking to create a centralised knowledge-base pertaining to all things E3D so that info is more easily accessed than this (now sprawling) thread.
Hope to see some of you on the other side!
Cheers,
Sanjay
|
Re: Update on the E3D All Metal Hotend (Now finally shipping!) [Lots of pictures] March 21, 2014 03:03PM |
Registered: 10 years ago Posts: 65 |
|
Re: Update on the E3D All Metal Hotend (Now finally shipping!) [Lots of pictures] March 21, 2014 08:41PM |
Registered: 10 years ago Posts: 903 |
Quote
swoozle
What are folks running for retract distance with the E3D hotend, 1.75mm bowden version?
I realize this takes a bit of tweaking for each individual extruder/tube setup, but it would be useful to know a typical successful distance.
My Bowden tube is about 700mm long with a geared extruder, and for PLA my retraction distance in Cura is set for 4.5mm and retraction speed is 100 mm/sec (at 190C temperature). I am not done searching for the optimum values yet, but this has been pretty string-free if you are looking for a starting point.....
|
Re: Update on the E3D All Metal Hotend (Now finally shipping!) [Lots of pictures] March 25, 2014 03:31AM |
Registered: 11 years ago Posts: 661 |
Quote
jzatopa
I'm not worried about if the heater cartridge is keeping up. There is a chance that the fan on the barrel isn't enough to keep the heatsink cool. Try pointing an extra fan at the barrel while it is printing to see if it stops jamming, if it does its a cooling issue. If that has no affect then the problem is somewhere else. You may also want to try flipping the barrel fan from push to pull to see if that makes a difference.
Mine is the same. Jams with PLA no matter what, fan 100% using the included fan and shroud. I don't know if E3D or MTW printed the shroud but the fit is unacceptable. It barely stays on the heat sink and freely twists and vibrates. I'm printing a new one right now on one of my printers but so far it'snot able to print PLA even at 225*. It may be a mechanical issue as the force required to manally push it through is far more than a JHead, Prusa 1 or Prusa 2. It's the same as with the Prusa 1 or Prusa 2 that it jams after starting the print. It took quite a bit of tweaking to get the Prusa 1 to work with ABS and I sold the Prusa 2 after a week or so.
|
Re: Update on the E3D All Metal Hotend (Now finally shipping!) [Lots of pictures] March 25, 2014 10:25AM |
Registered: 10 years ago Posts: 94 |
|
Re: Update on the E3D All Metal Hotend (Now finally shipping!) [Lots of pictures] March 25, 2014 12:38PM |
Registered: 10 years ago Posts: 1,381 |
If thermistors are susceptible to shorting, use a non electrically conductive thermal paste.
There is also a Thermal Conductive Heatsink Glue Silicone Grease Plaster Viscous Adhesive for PC GPU (ebay).
I would use a high temp automotive silicone (red).
Silicone would also prevent the thermistor from moving around, which would eliminate erroneous temperature readings.
I think this is the superior method that can be employed.
Loctite® Superflex® Red High Temp RTV silicone resist temperatures to 600°F (315°C) intermittent (any automotive supply store).
Resists aging, weather and thermal cycling without shrinking, cracking or hardening.
To insulate the heater block and further encapsulate the thermistor wrap the heater block with Self-Fusing Silicone Rubber Tape, +260ºC (+500ºF).
Wrap the heater block with mica/ceramic paper if you're worried about the silicone enduring higher temps.
Self-Fusing Silicone Tape would also look more professional than Kapton tape.
[source.theengineer.co.uk]
|
Re: Update on the E3D All Metal Hotend (Now finally shipping!) [Lots of pictures] March 25, 2014 07:33PM |
Registered: 11 years ago Posts: 661 |
That's a great idea. The Loctite product (part number) in the US for the silicone self fusing tape is "Go 2 Repair Wrap". Same product, different product name/number for the US.
Some of the off brand polyimide tapes don't adhere very well. I use 3M Kapton brand but it's not cheap compared to the others. But it does adhere better.
Some of the off brand polyimide tapes don't adhere very well. I use 3M Kapton brand but it's not cheap compared to the others. But it does adhere better.
|
Re: Update on the E3D All Metal Hotend (Now finally shipping!) [Lots of pictures] March 31, 2014 08:10PM |
Registered: 10 years ago Posts: 1,381 |
An example of using red RTV silicone on a heater block.
[www.hackerspace-ffm.de]
[www.hackerspace-ffm.de]
Edited 1 time(s). Last edit at 03/31/2014 08:10PM by A2.

[www.hackerspace-ffm.de]
[www.hackerspace-ffm.de]
Edited 1 time(s). Last edit at 03/31/2014 08:10PM by A2.
|
Re: Update on the E3D All Metal Hotend (Now finally shipping!) [Lots of pictures] April 01, 2014 02:24PM |
Registered: 11 years ago Posts: 334 |
I got my e3d mounted to my bulldog XL last night and it prints wonderfully but it took way to much to get it to mount properly. Sanjay what are the chances you will be offering a different barrel for the e3d that fits standard j-head mounts or at least fits the bulldog XL perfectly. I would also love to see a screw in thermistor or thermo couple for the heater block.
WWW.ZATOPA.COM - Your Place for high quality 3D Printing Filament and accessories
WWW.ZATOPA.COM - Your Place for high quality 3D Printing Filament and accessories
|
Re: Update on the E3D All Metal Hotend (Now finally shipping!) [Lots of pictures] April 01, 2014 08:15PM |
Registered: 10 years ago Posts: 1,381 |
@jzatopa:
E3D J-Head adapter ring
[www.thingiverse.com]
Solidoodle_Bulldog_XL_E3D_Carriage
[www.thingiverse.com]
Solidoodle_Bulldog_XL_E3D_Linear_Bearing_Carriage
[www.thingiverse.com]
E3D J-Head adapter ring
[www.thingiverse.com]
Solidoodle_Bulldog_XL_E3D_Carriage
[www.thingiverse.com]
Solidoodle_Bulldog_XL_E3D_Linear_Bearing_Carriage
[www.thingiverse.com]
|
Re: Update on the E3D All Metal Hotend (Now finally shipping!) [Lots of pictures] April 01, 2014 11:22PM |
Registered: 11 years ago Posts: 334 |
A2 I am aware of all those parts and have played around with them but I am looking for a plug and play solution. I want to have my cake and eat it too 
WWW.ZATOPA.COM - Your Place for high quality 3D Printing Filament and accessories
WWW.ZATOPA.COM - Your Place for high quality 3D Printing Filament and accessories
|
Re: Update on the E3D All Metal Hotend (Now finally shipping!) [Lots of pictures] April 11, 2014 04:42PM |
Registered: 10 years ago Posts: 239 |
I'm sure the answer to this question is somewhere in these 28 pages but.......... What is the process for removing the nozzle from a used E3D? preferably while still on the machine. I want to play around with smaller nozzles and switch back and forth quickly. BTW, about 30 hours on my V5 and it has been flawless. Just need to find someone to write a nozzle wipe sub program cuz I'm tired of cleaning this things snoty nose right before a print
|
Re: Update on the E3D All Metal Hotend (Now finally shipping!) [Lots of pictures] April 11, 2014 10:29PM |
Registered: 10 years ago Posts: 1,381 |
Quote
Bill Clark
What is the process for removing the nozzle from a used E3D?
This question has come up before, I don't think there is an E3D procedure published explaining how to remove the E3D nozzle.
I'm not making a temperature recommendation, I'm only pointing you to some reference material, best to contact the manufacturer directly.
E3D assembly instructions excerpt:
heat the now complete hot end up to 290C,
[files.e3d-online.com]
The Merlin hot end procedure to remove the nozzle recommended a lower temperature but greater than 200C.
to detach the hotend from the extruder, heat it to 200+ °C
[merlin-hotend.de]
So I think between 200C and 290C you could begin testing.
The challenge with disassembly is reducing the slow erosion/destruction of the parts, aluminum is the worse, brass, and SS not so bad.
The softer material will tend to stick to the harder material, and build up over time.
Where permissible, I've added a high temperature anti seize to the threads to help prolong the life of the threads.
But if you have a food or medical use, you don't want to be applying anti seize where it can come in contact with the filament.


Sorry, only registered users may post in this forum.