What causes these ripple-looking lines
Posted by jbernardis
|
Re: What causes these ripple-looking lines January 07, 2016 06:36AM |
Registered: 12 years ago Posts: 1,450 |
There seems to be four ways of dealing with vibration:-
- Make the construction so rigid that there is nothing to vibrate. This leads to a very heavy construction and is the method favored in milling machines as it can also brace against the forces from the cutter as well as minimising vibration. In a FDM printer there is no (or very little) equivalent to the cutting force. Note also that a stepper motor in a microstepped position is much more compliant (bad thing) than it is in full step or half stepped position.
- Make the construction fairly rigid but don't constrain bits that don't need to be constrained. Mounting the frame on rubber feet is an example of this as it allows much of the vibrational energy to be absorbed in moving the whole printer - this kind of mount can be quite springy and does not need to do any significant damping.
- Absorb the vibrations so that they don't reach a point of resonance. This needs a material that will absorb the energy rather like the shock absorbers on a car. Good examples are the type of stepper motor dampers sold by stepper motor manufacturers and also. If this type of damper were made with a simple springy material they would work at some frequencies but give large increases in vibration at others.
- The forth method is to claim that the ripples and other artifacts add to the character and charm of 3D printed objects.

|
Re: What causes these ripple-looking lines January 07, 2016 07:47AM |
Registered: 11 years ago Posts: 5,780 |
I don't agree with the conclusion at this site: [wiki.arcol.hu] regarding rigidity of construction.
My printer uses NEMA-23 motors which vibrate more than NEMA-17 motors, probably due to higher detent torque among other things. I used to have ripple problems when I ran the motors from a 12V supply and used A4988 drivers. The ripple was most pronounced in the Y axis which had a very large moving mass driven by a belt. When I rebuilt the machine, I made it more rigid by using fully supported linear guides instead of end-supported rails in X and Y, switched to DSP based drivers, 32V power supplies to run the X and Y motors, and changed to a ball screw drive in the Y axis. Now I get no ripple or ringing.
My machine is noisy, entirely due to the Y axis, which uses a very high torque (495 oz-in) motor and ball screw drive. I have tried using a vibration damping motor mount and a centrifugal damper, microstepping from 4:1- 64:1, all with no effect- the machine remains stubbornly noisy. I do have adjustable rubber feet on the machine.
You see ripple where a line either starts or ends abruptly such as at the corners of a rectangle. At those locations the motor is either accelerating or decelerating. To me that suggests a motor/belt/driver problem. Playing with speed, acceleration, and jerk can affect/reduce the ringing/rippling which also points to a motor/belt/driver issue. This makes me think there are two ways for ripple to occur and the reality is probably some of each. First, the position of the nozzle moves slightly in relation to the bed. That will modulate the thickness of the line of plastic if motion is in the Z direction and will modulate the line position if it is in the X or Y axis. Second, the speed of the nozzle varies slightly along the line it is supposed to be traveling, which will also modulate the thickness of the line. The first cause is due to slop in bearings and flexibility in the machine's frame and guide rails. The second is related to behavior of the motor and drive system- if the belt is springy (which it is) and the motor is springy (which it is), the position of the nozzle can oscillate slightly around its target position along it's axis.
All this assumes the extruder is functioning perfectly well and not causing any modulation in the plastic line. When I rebuilt my machine another thing that changed was going from a direct drive extruder to one with a 5:1 gear box. It is possible that that had some effect as well because all the above discussion is based on the assumption that extruder behaves exactly as it is supposed to without causing any artifacts. It is possible that the extruder is modulating the width of the line and causing the ripple. That should be visible by putting an interrupted print under a microscope- at the rippled area the line width would vary instead of the line position. I can no longer produce rippled prints so I can't look at it to see if that has an effect. It would be hard to distinguish extruder effect from driver/belt/motor springiness.
Ultra MegaMax Dominator 3D printer: [drmrehorst.blogspot.com]
|
Re: What causes these ripple-looking lines January 07, 2016 08:37AM |
Registered: 12 years ago Posts: 1,450 |
I had not thought of or heard your point about the modulating of the laid plastic, but thinking back it seems to be a common feature on some of my prints in the past. I will look for it in future.
The original post from jbernardis back in 2013 showed ripples along the entire length of a side, this seems to be a candidate for the modulation that you mention, either acceleration in the direction of travel or in the Z axis.
I used to get similar artifacts on my Rostock printer but it was cured in two parts:-
Mike
Just a quick edit: You mention that you tried stepper motor dampers and they did nothing for the noise. My experiance of these is limited to two on a still to be comissioned 5 extruder printer (which is very very rigid) Dampers made by Minebea changed the X and Y steppers from a full chorous to almost silent. I would not expect centrifugal dampers to work on a lead screw setup and most that I have seen have been dampers only in the immagination of the sellers - they need an uncoupled moving mass and a damping medium such as Rocol grease.
Edited 1 time(s). Last edit at 01/07/2016 08:51AM by leadinglights.
The original post from jbernardis back in 2013 showed ripples along the entire length of a side, this seems to be a candidate for the modulation that you mention, either acceleration in the direction of travel or in the Z axis.
I used to get similar artifacts on my Rostock printer but it was cured in two parts:-
- The printer was put on very compliant rubber dome feet - this about halved the artifact.
- A 2kg plate was put on top of the printer with some of it's weight relieved by 4 springs and the bottom of the plate and acrylic surface it was resting were smeared with Rocol Kilopoise damping grease. This totally killed the standing ripples although there are still some rapidly decaying ripples from corners.
Mike
Just a quick edit: You mention that you tried stepper motor dampers and they did nothing for the noise. My experiance of these is limited to two on a still to be comissioned 5 extruder printer (which is very very rigid) Dampers made by Minebea changed the X and Y steppers from a full chorous to almost silent. I would not expect centrifugal dampers to work on a lead screw setup and most that I have seen have been dampers only in the immagination of the sellers - they need an uncoupled moving mass and a damping medium such as Rocol grease.
Edited 1 time(s). Last edit at 01/07/2016 08:51AM by leadinglights.
|
Re: What causes these ripple-looking lines January 07, 2016 05:56PM |
Registered: 10 years ago Posts: 62 |
 Just solved this problem on my Solidoodle 3 with Ramps 1.4!
 I had similar problem. If I looked at a single layer perimeter with a magnifier I could see differences in the line width with bumps spaced very closely together. Drive gear is about 10mm (guess) so if problem was related to drive gear being off center pulse/unevenness would have been every 30mm (pi*d). Next best guess was stepper driver problem. It didn't seem likely as I thought an error in micro steps would not look like that but I switched driver for a new one off the shelf. Did not solve the problem. Next choice was stepper, Very unlikely as a bad winding would cause more problems but I do recall old stepper driven mills had problems when one of the stepper motor poles on the armature got demagnetized. It was a long shot and I had a spare so I changed stepper and still had same problem.
Pause for beer.
Had a eureka moment. I had a similar problem with my large CNC servo mill when I got noise on the encoder wiring. My hot end wiring was tightly bundled with the stepper wires in a cable rap. It seemed possible that the 40W hot end resistor wiring could be inducing micro steps on the stepper as the Ramps board continually pulses the resistor (PID) to keep it at the right temperature.
Separated wiring and problem was solved.
Roger
|
Re: What causes these ripple-looking lines April 21, 2016 03:27AM |
Registered: 8 years ago Posts: 33 |
Ripple Eliminator for 3D Printer
[www.thingiverse.com]
Edited 3 time(s). Last edit at 04/22/2016 04:02AM by fredchan.
[www.thingiverse.com]

Edited 3 time(s). Last edit at 04/22/2016 04:02AM by fredchan.
|
Re: What causes these ripple-looking lines April 21, 2016 07:13AM |
Registered: 11 years ago Posts: 5,780 |
Pretty useless post here and at Thingiverse. There's no description of what it is or how or why it works. Can you explain it?
Ultra MegaMax Dominator 3D printer: [drmrehorst.blogspot.com]
Ultra MegaMax Dominator 3D printer: [drmrehorst.blogspot.com]
|
Re: What causes these ripple-looking lines April 21, 2016 07:21AM |
Registered: 8 years ago Posts: 916 |
|
Re: What causes these ripple-looking lines April 21, 2016 07:47AM |
Registered: 9 years ago Posts: 330 |
|
Re: What causes these ripple-looking lines April 21, 2016 08:10AM |
Registered: 9 years ago Posts: 4 |
|
Re: What causes these ripple-looking lines April 21, 2016 08:15AM |
Registered: 11 years ago Posts: 5,780 |
Quote
nebbian
It looks to me like the diode hack, in a nice modular board form.
That hack is specific to DRV8825 drivers operating in a specific decay mode and not generally applicable. Of course, most people are probably not aware of that...
Ultra MegaMax Dominator 3D printer: [drmrehorst.blogspot.com]
|
Re: What causes these ripple-looking lines April 21, 2016 08:25AM |
Registered: 9 years ago Posts: 4 |
|
Re: What causes these ripple-looking lines April 21, 2016 08:32AM |
Registered: 8 years ago Posts: 155 |
|
Re: What causes these ripple-looking lines April 21, 2016 08:36AM |
Registered: 9 years ago Posts: 4 |
Information from Watterott:
Product description
The SilentStepStick Protector is an addon module for StepStick and Pololu A4988 compatible stepper motor drivers.
The board provides flyback diodes (freewheeling diodes) for the motor outputs, so that they are also protected against induction voltages in the unpowered state of the driver.
|
Re: What causes these ripple-looking lines April 21, 2016 10:35AM |
Registered: 8 years ago Posts: 116 |
Quote
the_digital_dentist
Quote
nebbian
It looks to me like the diode hack, in a nice modular board form.
That hack is specific to DRV8825 drivers operating in a specific decay mode and not generally applicable. Of course, most people are probably not aware of that...
Why would this be specific to DRV8825s?
It's never a bad idea to have flyback diodes on an inductive device. I would have assumed they were built-in to the stepper driver chips.
|
Re: What causes these ripple-looking lines April 21, 2016 10:38AM |
Registered: 8 years ago Posts: 116 |
Quote
Tinchus
Im also interested... what is the lectronic part???? the post in thingiverse explains nothing.... Can soeone provide instructions and how and why this electronics would solve the rippling effect?
The board's mask shows "5408" so I would assume 1N5408 diodes.
See: [en.wikipedia.org] for an explanation.
|
Re: What causes these ripple-looking lines April 21, 2016 10:59AM |
Registered: 11 years ago Posts: 5,780 |
Quote
hoxsiew
Quote
the_digital_dentist
Quote
nebbian
It looks to me like the diode hack, in a nice modular board form.
That hack is specific to DRV8825 drivers operating in a specific decay mode and not generally applicable. Of course, most people are probably not aware of that...
Why would this be specific to DRV8825s?
It's never a bad idea to have flyback diodes on an inductive device. I would have assumed they were built-in to the stepper driver chips.
For the DRV8825, they're not fly-back diodes: [cabristor.blogspot.ca]
Ultra MegaMax Dominator 3D printer: [drmrehorst.blogspot.com]
|
Re: What causes these ripple-looking lines April 21, 2016 11:33AM |
Registered: 8 years ago Posts: 33 |
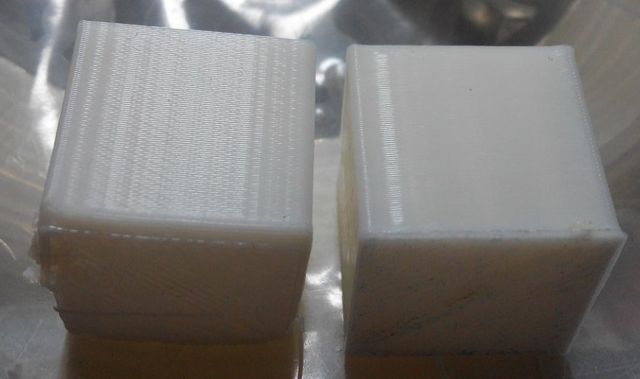
[cabristor.blogspot.hk]
work for A4988 also , the white cubes are printed using Kossel mini, Mega2560 + RAMPS + 4 x A4988
Edited 2 time(s). Last edit at 04/21/2016 11:41AM by fredchan.
work for A4988 also , the white cubes are printed using Kossel mini, Mega2560 + RAMPS + 4 x A4988
Edited 2 time(s). Last edit at 04/21/2016 11:41AM by fredchan.
|
Re: What causes these ripple-looking lines April 21, 2016 11:58AM |
Registered: 8 years ago Posts: 116 |
Quote
fredchan
[cabristor.blogspot.hk]
work for A4988 also , the white cubes are printed using Kossel mini, Mega2560 + RAMPS + 4 x A4988
So are you the developer? Are these voltage limiting or flyback diodes? The page you (and digital dentist) reference seems to only apply to a DRV8825 and only one that has some means of setting the decay mode pin (not present on pololu type boards and not even a thing on A4988s).
|
Re: What causes these ripple-looking lines April 22, 2016 04:00AM |
Registered: 8 years ago Posts: 33 |
We just do according to the website from a group of Makers from Hong Kong
[www.hkepc.com]
it works with 8825 and also the A4988
the white cubes are printed using Kossel mini, Mega2560 + RAMPS + 4 x A4988
Edited 1 time(s). Last edit at 04/22/2016 04:01AM by fredchan.
[www.hkepc.com]
it works with 8825 and also the A4988
the white cubes are printed using Kossel mini, Mega2560 + RAMPS + 4 x A4988
Edited 1 time(s). Last edit at 04/22/2016 04:01AM by fredchan.
|
Re: What causes these ripple-looking lines April 22, 2016 01:21PM |
Registered: 9 years ago Posts: 1,873 |
|
Re: What causes these ripple-looking lines April 24, 2016 04:10AM |
Registered: 8 years ago Posts: 33 |
delta type & cartesian types printer can benefit of slient of stepper also !!!
each euro 5.5 x 3 = 16.5
[www.watterott.com]
Edited 1 time(s). Last edit at 04/24/2016 04:12AM by fredchan.
each euro 5.5 x 3 = 16.5
[www.watterott.com]
Edited 1 time(s). Last edit at 04/24/2016 04:12AM by fredchan.
|
Re: What causes these ripple-looking lines May 05, 2016 05:37AM |
Registered: 11 years ago Posts: 364 |
|
Re: What causes these ripple-looking lines May 05, 2016 09:02AM |
Registered: 8 years ago Posts: 3,525 |
Might this not be related to 1.75mm filament being driven from a direct extruder, the relatively low steps/mm results in pulsing of the filament as it is extruded. I say this as I noticed this effect more on my kossel mini with a minimal un-geared extruder compared to the e3d titan I am using now with its 3:1 reduction my steps/mm are now 255 not 96.
Simon Khoury
Co-founder of [www.precisionpiezo.co.uk] Accurate, repeatable, versatile Z-Probes
Published:Inventions
Simon Khoury
Co-founder of [www.precisionpiezo.co.uk] Accurate, repeatable, versatile Z-Probes
Published:Inventions
|
Re: What causes these ripple-looking lines July 05, 2018 08:43PM |
Registered: 13 years ago Posts: 32 |
A little late to the party but I was experiencing a similar problem. In my case it was nozzle drag from a jenky nozzle. The bad nozzle was plowing the fresh plastic creating the ripples.
Initially it was only happening in the y direction when printing single wall cubes. When I rotated the part 45 degrees the pattern was consistent on all 4 walls.
Multistruder
Initially it was only happening in the y direction when printing single wall cubes. When I rotated the part 45 degrees the pattern was consistent on all 4 walls.
Multistruder

Sorry, only registered users may post in this forum.