3D cement printer
Posted by AndreyR
|
3D cement printer June 05, 2013 04:40PM |
Registered: 10 years ago Posts: 55 |
3D Cement Printer
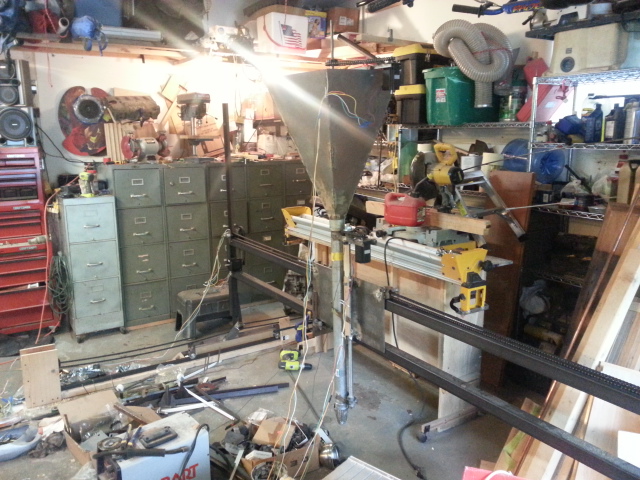
I am prototyping a cement printer. So far, I have the first version. It’s 1/3 of full scale and the major
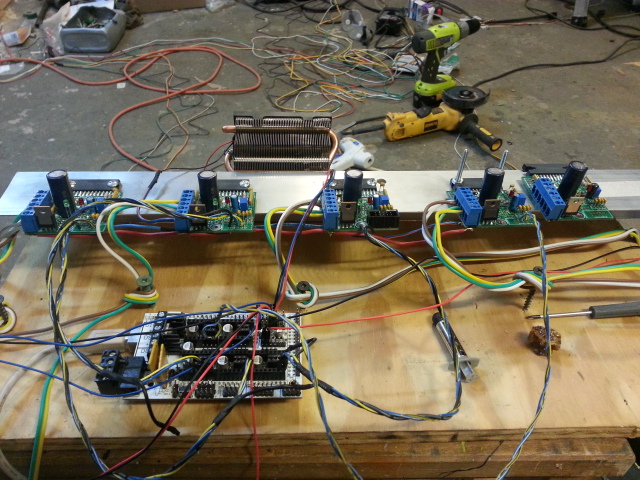
parts are done. I have Arduino and RAMPS for the brain and Toshiba James Newton Massmind 4 Amp
drivers. (Software- Pronterface, Firmfare- Sprinter.)
But I am having some trouble, and would appreciate assistance. Thanks in advance!
1) How can I disconnect the temperature function completely? I don’t need it for a cement
extrusion. For now I am using a solder iron to heat a thermistor to start a printing. I can certainly
use a resistor for that purpose, but I am thinking of getting rid of RAMPS. Looks like I only need
to use an Arduino 2560 board because I just need direction and step signals.
2) Question about scaling and travel distance- for now I have 4m (12 ft) for X, and in the future, it’s
going to be 12m (36 ft) X and 20m (60 ft) Y. It looks like Sprinter does not like these digits and
won’t let me set up distances this long. Where and how can I do this?
3) Is there anybody willing to help to draw a simple rectangle in any CAD and make STL files? I have
to do the first printing soon, and have so many things to do regarding the mechanical parts,
welding, wiring, etc. and not enough time to study CAD. I need 2 simple boxes like this, with one
box inside the other, space between the two walls (no mesh between the walls). Eventually, on
a real house, there’s going to be insulation between the 2 walls.
I am prototyping a cement printer. So far, I have the first version. It’s 1/3 of full scale and the major
parts are done. I have Arduino and RAMPS for the brain and Toshiba James Newton Massmind 4 Amp
drivers. (Software- Pronterface, Firmfare- Sprinter.)
But I am having some trouble, and would appreciate assistance. Thanks in advance!
1) How can I disconnect the temperature function completely? I don’t need it for a cement
extrusion. For now I am using a solder iron to heat a thermistor to start a printing. I can certainly
use a resistor for that purpose, but I am thinking of getting rid of RAMPS. Looks like I only need
to use an Arduino 2560 board because I just need direction and step signals.
2) Question about scaling and travel distance- for now I have 4m (12 ft) for X, and in the future, it’s
going to be 12m (36 ft) X and 20m (60 ft) Y. It looks like Sprinter does not like these digits and
won’t let me set up distances this long. Where and how can I do this?
3) Is there anybody willing to help to draw a simple rectangle in any CAD and make STL files? I have
to do the first printing soon, and have so many things to do regarding the mechanical parts,
welding, wiring, etc. and not enough time to study CAD. I need 2 simple boxes like this, with one
box inside the other, space between the two walls (no mesh between the walls). Eventually, on
a real house, there’s going to be insulation between the 2 walls.

|
Re: 3D cement printer June 05, 2013 05:40PM |
Registered: 12 years ago Posts: 1,236 |
|
Re: 3D cement printer June 05, 2013 06:01PM |
Registered: 10 years ago Posts: 55 |
|
Re: 3D cement printer June 05, 2013 06:20PM |
Registered: 12 years ago Posts: 1,236 |
I don't know about sprinter, but firmwares typically store distances in micrometers in a 32 bit, which gives about +/- 2m range. If you scale everything suitably, you might be able to get larger range, at the cost of resolution obviously. If you were to scale by 100, the resolution would be 0.1mm, and the range +/-200m, which should be OK.
RAMPS might be handy if you need to turn valves on off, but if you don't need on board steppers or heater drivers, then you don't really need it. What might be useful in an "industrial" setting i.e. big motors etc, is some isolation via optocouplers.
RAMPS might be handy if you need to turn valves on off, but if you don't need on board steppers or heater drivers, then you don't really need it. What might be useful in an "industrial" setting i.e. big motors etc, is some isolation via optocouplers.
|
Re: 3D cement printer June 06, 2013 09:36AM |
Registered: 10 years ago Posts: 55 |
|
Re: 3D cement printer June 06, 2013 11:54AM |
Registered: 10 years ago Posts: 26 |
So first, WOW! I can't wait to see that thing running! That is some serious weight being moved about.
The older versions of sprinter will work without the extruder thermister being connected at all. I'm using the version from April 19, 2011 (not sure of the version number) for testing since I don't have an extruder (quite yet, it's almost done). There may be features you need in later versions, but using the older version is worth a try.
If that doesn't work, comparing that version with later versions would show what was changed, and perhaps allow a custom version to be hacked up that doesn't watch the thermister. I personally don't understand why it can't be configured to accept 0 as the minimum temperature...
Of course, the other possibility is to measure the voltage on the A2D pin from the thermister when it's at temp and re-create that voltage with a pot as a voltage divider to "fake" the current firmware out.
[www.linistepper.com] Open source stepper motor drivers.
|
Re: 3D cement printer June 06, 2013 04:38PM |
Registered: 10 years ago Posts: 55 |
|
Re: 3D cement printer June 06, 2013 04:55PM |
Registered: 12 years ago Posts: 147 |
|
Re: 3D cement printer June 06, 2013 06:12PM |
Registered: 10 years ago Posts: 55 |
|
Re: 3D cement printer June 06, 2013 06:23PM |
Registered: 10 years ago Posts: 55 |
yydoctt Wrote:
-------------------------------------------------------
> Try kisslicer, it's better.
>
> Or you could scale the print and scale your
> steps/mm in marlin accordingly. Not sure how
> you're calculating cement flow but that'd also
> need scaling. So try kisslicer, I think it might
> be up to the task.
also, slis3r always trying to make solid box not empty one. But I need just a thin walls.... not solid concrete house. Not sure what to do.
|
Re: 3D cement printer June 06, 2013 06:29PM |
Registered: 10 years ago Posts: 7 |
|
Re: 3D cement printer June 06, 2013 06:33PM |
Registered: 11 years ago Posts: 939 |
In Marlin and repetier there is an unused thermistor type, that will prevent all the temperature checking, it's 0 in Repetier, and either 0 or -1 in Marlin. I would assume Sprinter has something similar.Quote
1) How can I disconnect the temperature function completely? I don’t need it for a cement
___________________________________________________________________________
My blog [3dprinterhell.blogspot.com]
|
Re: 3D cement printer June 06, 2013 08:18PM |
Registered: 12 years ago Posts: 85 |
|
Re: 3D cement printer June 06, 2013 08:38PM |
Registered: 11 years ago Posts: 973 |
|
Re: 3D cement printer June 07, 2013 12:54AM |
Registered: 10 years ago Posts: 55 |
JamesNewton Wrote:
-------------------------------------------------------
>
> Of course, the other possibility is to measure the
> voltage on the A2D pin from the thermister when
> it's at temp and re-create that voltage with a pot
> as a voltage divider to "fake" the current
> firmware out.
260 ohm resistor and I have 246 C forever!!! Its easy and clever, thank you for the advise !!!
|
Re: 3D cement printer June 20, 2013 02:08PM |
Registered: 10 years ago Posts: 55 |
Finally, I have got the printer to homing and the files are running smoothly- a small victory against the monsters I am creating against/for myself.
Most of my time was spent setting up Merlin and Slic3r. It took a few days to scale my files to get them down to 1000 x 500 x 250 mm. In kisslicer, scaling looks even more difficult to me. Regretfully, if I change the scaling too much, I don't see the path of the printing/what I'm printing on the pronterface window. It would be great to modify this program to allow me to do so. However, what I have learned-
-I need some kind of safety feature in case the left or right rails are stuck. Looks like I need an odometer of some sort to count the number of steps on the left and right side. I could use sprockets plus a magnet plus a sensor, like ABS on a car. And if the left and right signals aren't the same, it will trigger a relay to cut power.
I already had a crash accident because one side was stuck. Any ideas how I can make a counter/controller?
-I have learned that step motors, even big motors, do not have much power compared to DC motors. I have Nema 42, 6 amps, and it's barely enough for the prototype. In real life, for the full scale printer, it needs 10 times more power, which is really expensive. I have started thinking about some kind of repeater or amplifier between stepper and DC.
In my case, I need one stable speed, and it's better to use a DC motor. Anybody have any ideas or experience using DC for X and Y?
-In real life, during the house building process, I need every layer to start with the homing procedure. This is the only way I can know that the printer did not shift due to wind etc during the procedure and the house isn't crooked.
How and where can I conduct this set-up?
-After the first print, I decided to change the extruder design. I am going to use a pump and AC or DC motors. Here, the very first print and the extruder need to be modified (I'm probably going to make the pump free-standing). I was expecting this and I know the hardest part of this project is going to be building this extruder. Nonetheless, the first print is very exciting for me.
Thanks, and I appreciate any help you guys can give me.
Andrey
|
Re: 3D cement printer June 20, 2013 03:15PM |
Registered: 10 years ago Posts: 26 |
I think the biggest problem is the chain bouncing on the X and Y axis. I was noticing that on the video and was concerned but wasn't going to say anything unless you really did have problems with missed steps. When the chain bounces, it puts a huge strain on the motor and if the bouce happens at just the wrong time, could lead to a missed step. Some method of taking the "slop" out of the chain would probably help a lot.
Another possibility is a different drive system. See this video of a machine about the same size as yours:
[www.youtube.com]
It's actually running a weaker driver and much weaker motors. The difference is the linear gear drive. No chain. Here is a photo album that shows how it works:
[plus.google.com]
[plus.google.com]
Now, that linear rack is expensive, but I'm thinking it could be printed in segments and then each segment bolted to the side of the track.
Going to a DC servo system would probably overcome the chain issues, but as you noted, the cost is extreme.
[www.linistepper.com] Open source stepper motor drivers.
|
Re: 3D cement printer June 20, 2013 03:43PM |
Registered: 12 years ago Posts: 1,236 |
When you get to that size and need more torque it would be better to use servo motors. e.g. [www.ebay.com]
|
Re: 3D cement printer June 20, 2013 05:42PM |
Admin Registered: 11 years ago Posts: 3,096 |

|
Re: 3D cement printer June 20, 2013 07:03PM |
Registered: 12 years ago Posts: 177 |
You might want to look at Gecko-Drives and DC motors.
A gecko drive basically transforms a DC motor into a stepper motor, with some fancy electronics, clever internal algorithms and a fast parallel logic type gate array. What this basically would mean is you could use the DC motor of your choice, but still get the precision and compatibility with Marlin/RAMPS.
A gecko drive basically transforms a DC motor into a stepper motor, with some fancy electronics, clever internal algorithms and a fast parallel logic type gate array. What this basically would mean is you could use the DC motor of your choice, but still get the precision and compatibility with Marlin/RAMPS.
|
Re: 3D cement printer June 20, 2013 07:48PM |
Registered: 10 years ago Posts: 55 |
JamesNewton Wrote:
-------------------------------------------------------
> I think the biggest problem is the chain bouncing
> on the X and Y axis.
> Another possibility is a different drive system.
For the next review, I am going to slide one side of the chain inside the square pipe and the other side on the top of the pipe.
Another good reason I would use a chain- construction codes in the US are very strict; it is very possible that I might have to build my first real printed house somewhere in another country. Thus, I need to have an easy-to-replicate design. Something like the first generation of Reprap. Chains and pipes i can buy everywhere.
Also, how can I get the max amps from your driver? How many volts PCU is it better to use? I have 12V, 16A.
|
Re: 3D cement printer June 20, 2013 08:14PM |
Registered: 10 years ago Posts: 55 |
SanjayM Wrote:
-------------------------------------------------------
> You might want to look at Gecko-Drives and DC
> motors.
have to study about that, looks that's what i need
and here the video i have:
[www.youtube.com]
-------------------------------------------------------
> You might want to look at Gecko-Drives and DC
> motors.
have to study about that, looks that's what i need
and here the video i have:
[www.youtube.com]
|
Re: 3D cement printer June 20, 2013 08:35PM |
Registered: 10 years ago Posts: 26 |
AndreyR Wrote:
-------------------------------------------------------
> Also, how can I get the max amps from your driver?
> How many volts PCU is it better to use? I have
> 12V, 16A.
Oh goodness! The driver is rated up to 4 amps, 50 volts. Use a 48 volt supply and you will see much more power, especially at higher speeds. It will also get hotter, so make sure you have a good heatsink and maybe a fan. Max current is when vRef is at 2.4 volts as documented at the bottom of the page at:
[www.massmind.org]
[www.linistepper.com] Open source stepper motor drivers.
|
Re: 3D cement printer June 20, 2013 10:02PM |
Registered: 11 years ago Posts: 186 |
Just calibrate your printer to treat mm as cm. That is super simple. Then everything you print will be printed 10:1 scale.
[www.matter-replicator.com]
[www.matter-replicator.com]
|
Re: 3D cement printer June 22, 2013 11:20AM |
Registered: 10 years ago Posts: 55 |
JamesNewton Wrote:
-------------------------------------------------------
> AndreyR Wrote:
> --------------------------------------------------
> -----
> > Also, how can I get the max amps from your
> driver?
> > How many volts PCU is it better to use? I have
> > 12V, 16A.
>
> Oh goodness! The driver is rated up to 4 amps, 50
> volts. Use a 48 volt supply and you will see much
> more power, especially at higher speeds. It will
> also get hotter, so make sure you have a good
> heatsink and maybe a fan. Max current is when vRef
> is at 2.4 volts as documented at the bottom of the
> page at:
> [www.massmind.org]
Can I Use simple like " transformer / bridge / capasitor' " power Supply for your drivers ?
Or do I need some fancy ? I have a 48 V transformer . . . large one
|
Re: 3D cement printer June 22, 2013 01:26PM |
Admin Registered: 11 years ago Posts: 3,096 |
|
Re: 3D cement printer June 22, 2013 04:52PM |
Registered: 10 years ago Posts: 26 |
Yeah, the supply doesn't have to be regulated. But the filtering capacitor has to be huge to prevent ripple. And you must make sure it isn't putting out more that 50 volts ever. I would suggest using a battery stack in addition to the cap. A stack of old led acid cells with a battery charger (some scooters have 36 or 48 volt chargers) is probably a better power source.
[www.linistepper.com] Open source stepper motor drivers.
[www.linistepper.com] Open source stepper motor drivers.
|
Re: 3D cement printer June 22, 2013 08:46PM |
Registered: 10 years ago Posts: 32 |
|
Re: 3D cement printer July 05, 2013 11:28AM |
Registered: 10 years ago Posts: 32 |
|
Re: 3D cement printer July 07, 2013 12:57PM |
Registered: 10 years ago Posts: 55 |
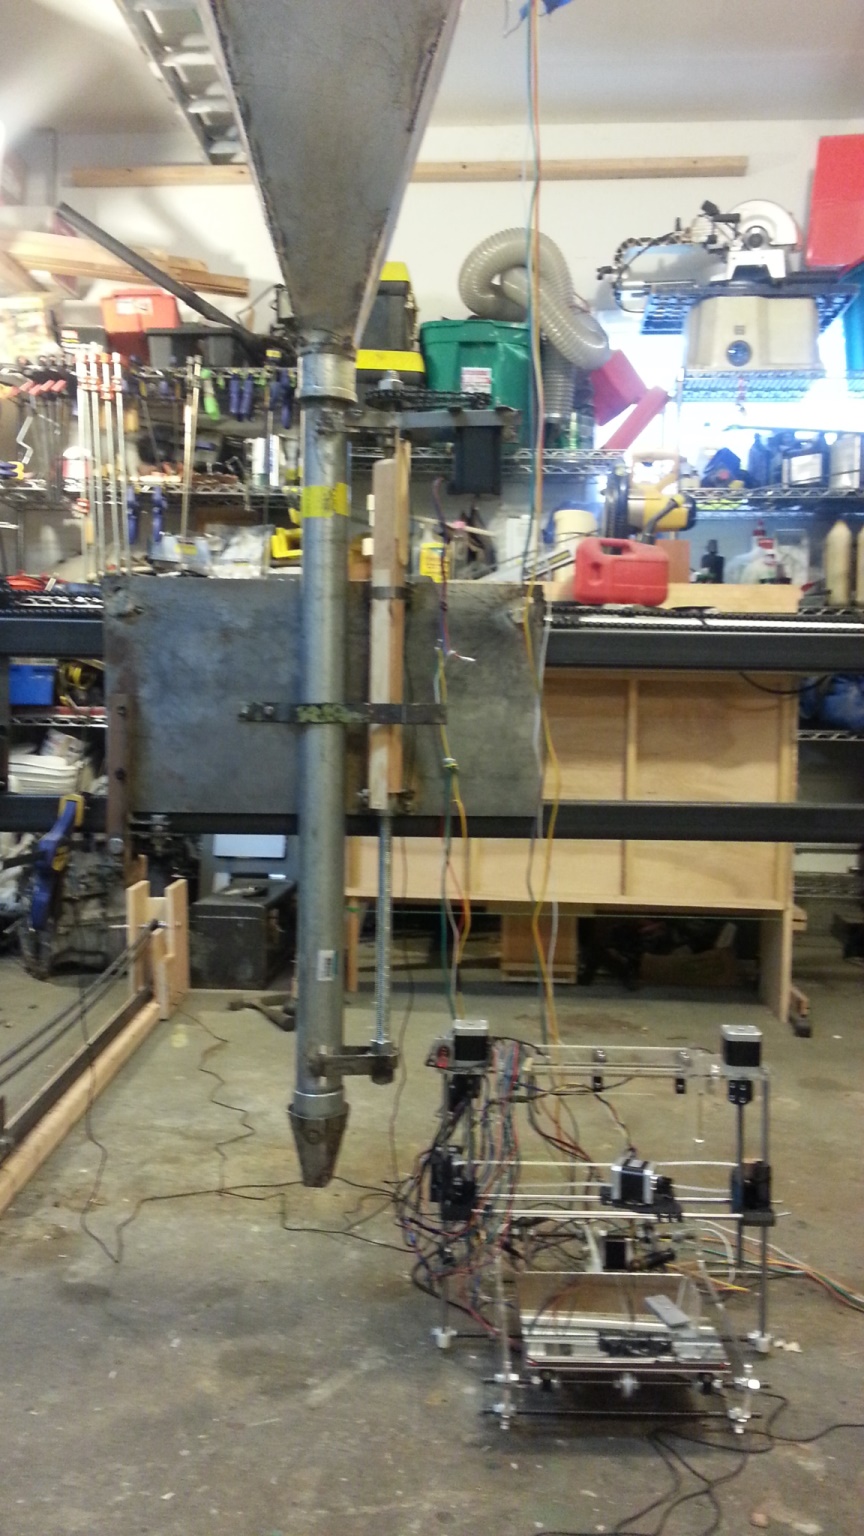
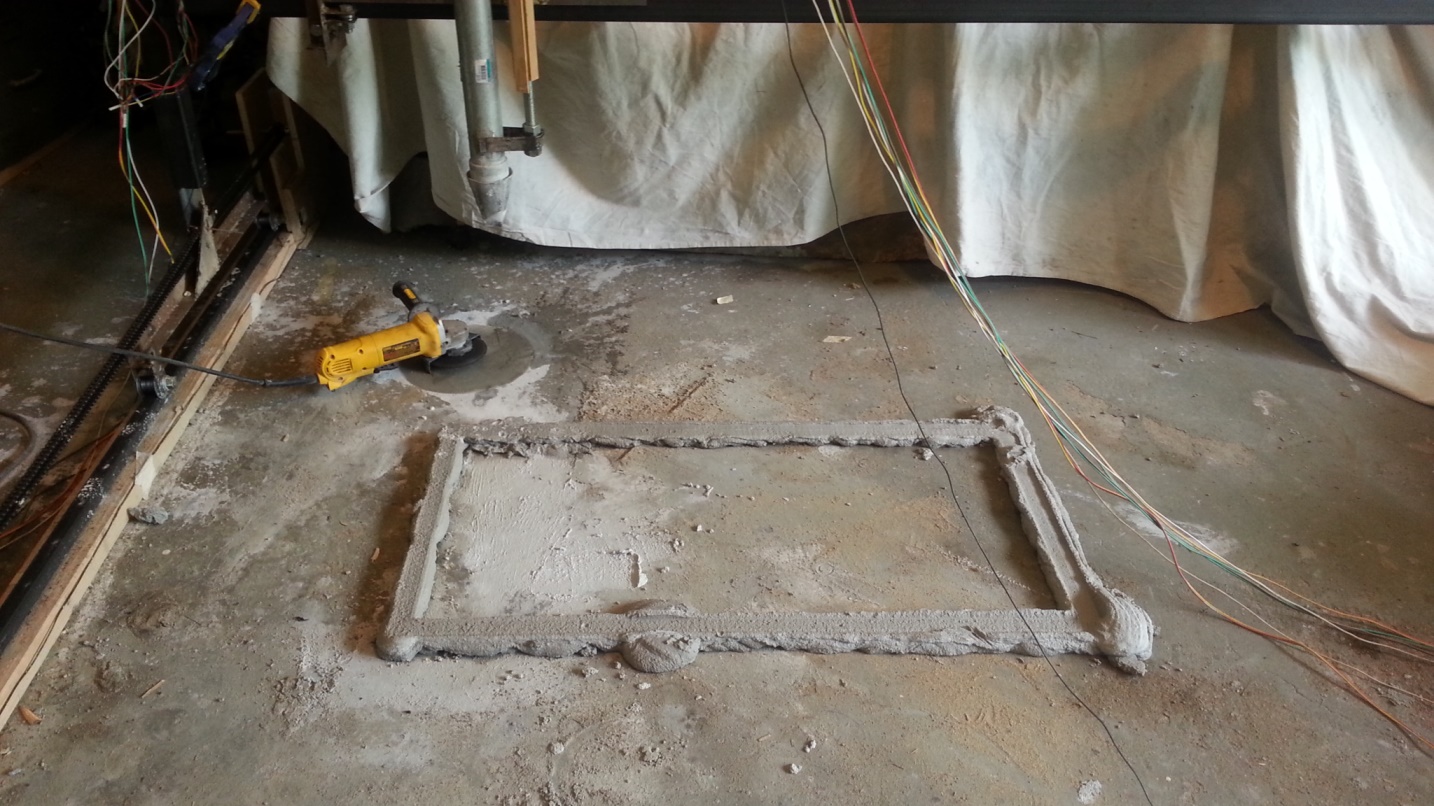
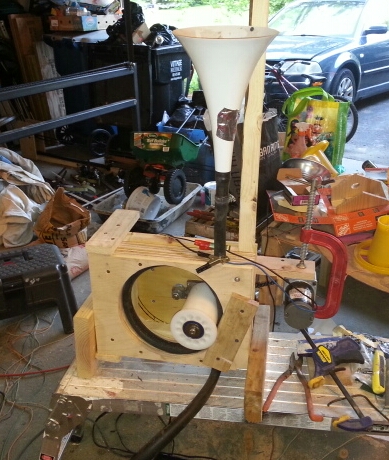
Here is my update.
The first stage- the metal parts, motor, hardware, software, firmware- is done. Everything looks and moves nicely. I was able to print, though the extrusion is unstable. After several tries, I have come to the conclusion that it's better to use a progressive cavity pump for the extruder.
Here is where I run into a problem, as the cheapest price I could find for this pump is $5,500 for a new pump (and I can't find any used ones).
I need a specific progressive cavity pump for a high velocity mortar/cement.
I tried to buy several parts and built the pump myself. I even sent several inquiries for parts from different companies, but haven't heard back. I'm thinking this is because they want specific part numbers, model, etc. But anyway, even individual the parts for the pump will cost a lot.
After several days of depression, frustration, and cursing the injustice of mankind, I decided to build a home-made peristaltic/ hose pump. I made it within a few days, but its pressure is not enough for a high-velocity mortar. Thus, a hose pump doesn't work for this purpose.
Right now, I'm trying to use air compressor to push the mortar.This is a temporary solution and isn't going to work in the long-run, but at the moment, I need at least some way to make the printer print until I can find a way to obtain a better pump.
PS. Here are a couple pictures of my experiments. My daughter equated me to Iron Man scrapping together different parts in an underground cave... In a Steampunk art contest, I'd probably get first place.

Sorry, only registered users may post in this forum.