How to get non-porous print and minimize drooping perimeters
Posted by BobHewson
|
How to get non-porous print and minimize drooping perimeters November 21, 2013 02:28PM |
Registered: 11 years ago Posts: 62 |
I printed a steam train whistle (thingiverse item by MikeP-NZ) with my Prusa/mendel.
I followed the printing info on the project and had a few problems I could use some advice on.
My set-up was as follows"
Increased size by 1.25 (Plater setting in Slic3r) for larger deeper toned whistle
PLA 1.75mm, temp 185C, 60C on heated bed
Nozzle 0.50mm
Layer height 0.25mm
2 perimeters
3 layers top and bottom
Speed 30
25% infill - rectilenear
Used support setting
Software used is Slic3r and Repentier
1st problem was from the support setting, support is OK on the outside, but it also provided support in the hollow whistle cavity which renders it non-operable.
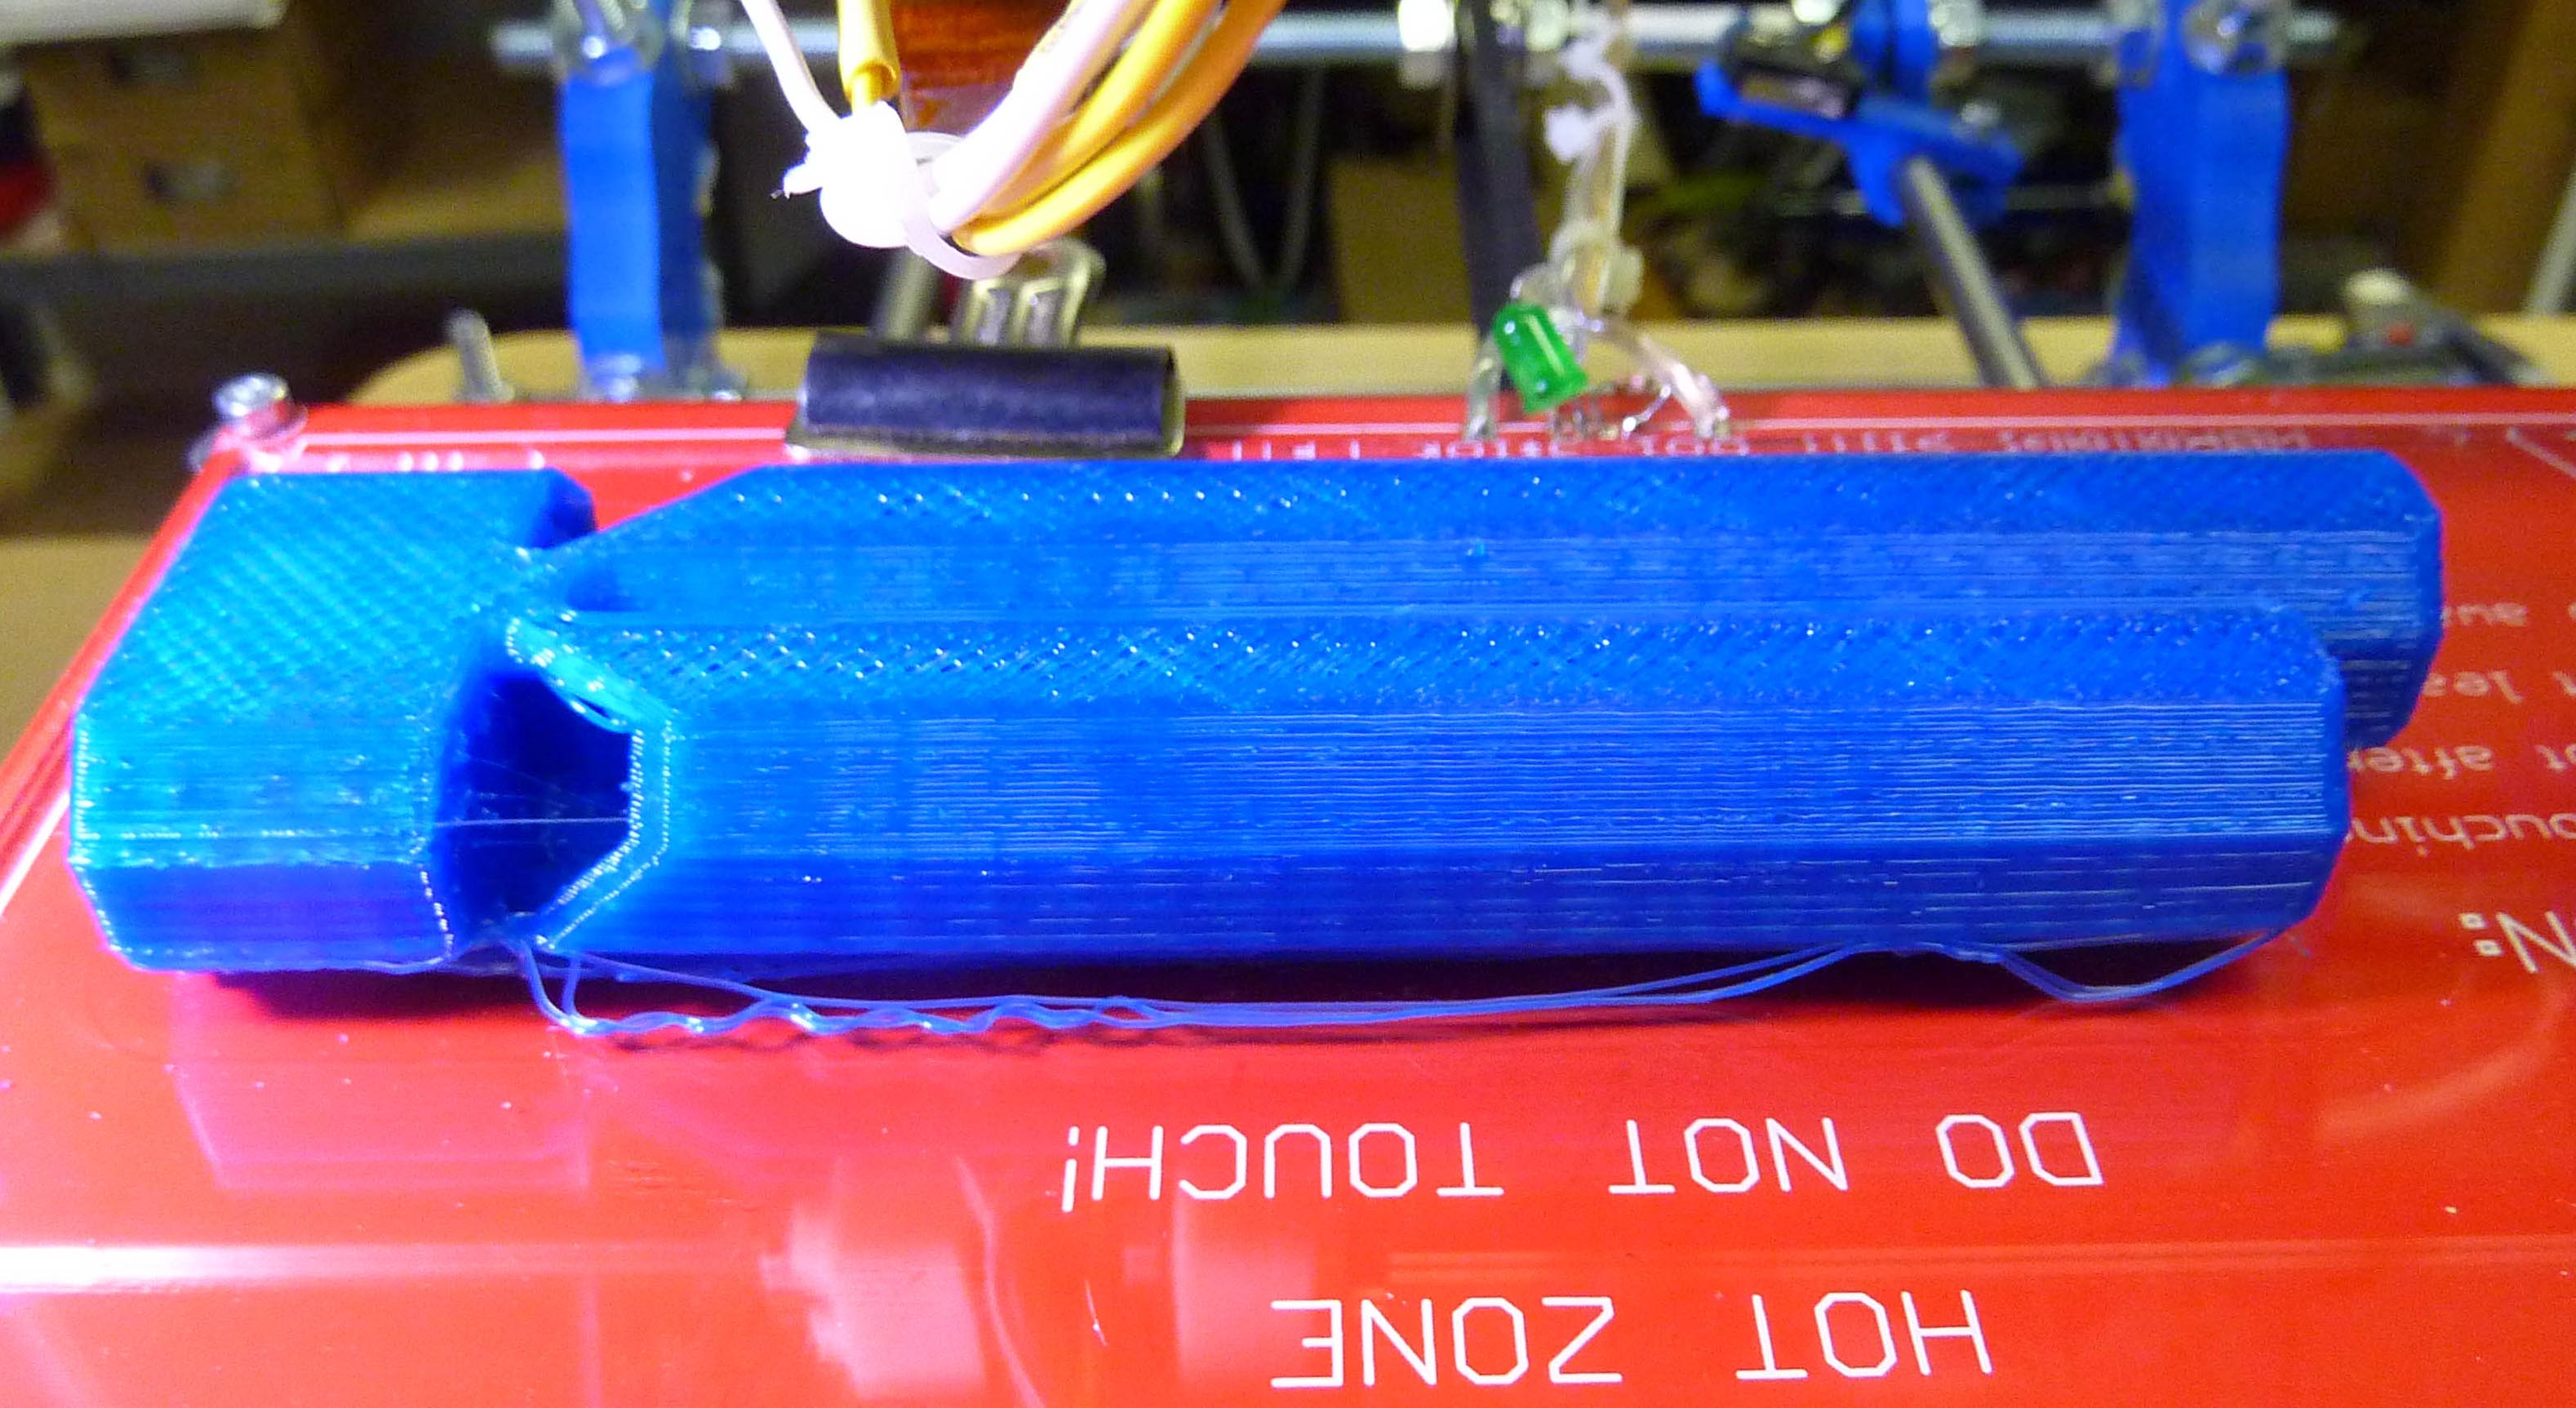
2nd problem occured when I removed support and reran item. As the layers built up the outer perimeter of several layers didn't lay down properly and drooped (see photo).
3rd problem was that the whole whistlle is porous allowing air to escape throughout the whistle rather than at the relief opening. The porosity is particularly bad at the area where the perimeter dripped, and the top surface (see photo).
Any suggestions to get a non-porous structure and minimize sags/droops will be appreciated.
Bob
I followed the printing info on the project and had a few problems I could use some advice on.
My set-up was as follows"
Increased size by 1.25 (Plater setting in Slic3r) for larger deeper toned whistle
PLA 1.75mm, temp 185C, 60C on heated bed
Nozzle 0.50mm
Layer height 0.25mm
2 perimeters
3 layers top and bottom
Speed 30
25% infill - rectilenear
Used support setting
Software used is Slic3r and Repentier
1st problem was from the support setting, support is OK on the outside, but it also provided support in the hollow whistle cavity which renders it non-operable.
2nd problem occured when I removed support and reran item. As the layers built up the outer perimeter of several layers didn't lay down properly and drooped (see photo).
3rd problem was that the whole whistlle is porous allowing air to escape throughout the whistle rather than at the relief opening. The porosity is particularly bad at the area where the perimeter dripped, and the top surface (see photo).
Any suggestions to get a non-porous structure and minimize sags/droops will be appreciated.
Bob
|
Re: How to get non-porous print and minimize drooping perimeters November 23, 2013 04:37AM |
Registered: 12 years ago Posts: 80 |
What version of slic3r are you using? I know there have been some problems with top infill not being solid a while back, that's been solved afaik.
The bridging layer on the top wall should have been ok though, so something else is wrong too.
Make sure your extrusion feed rate is calibrated, it looks like it's low. That could explain the failed overhangs, if the extrusion isn't wide enough, it's not going to stick well to the previous layer.
Also check x/y motion is accurate. The steps/mm for x and y should be calculated (based on your pulley/motor setup), and if the actual motion doesn't look like it's correct, that indicates a mechanical problem.
Check Triffid Hunters calibration guide on the wiki for more details.
/Andreas
|
Re: How to get non-porous print and minimize drooping perimeters November 25, 2013 10:42PM |
Registered: 11 years ago Posts: 62 |
I am using Slic3r 1.0
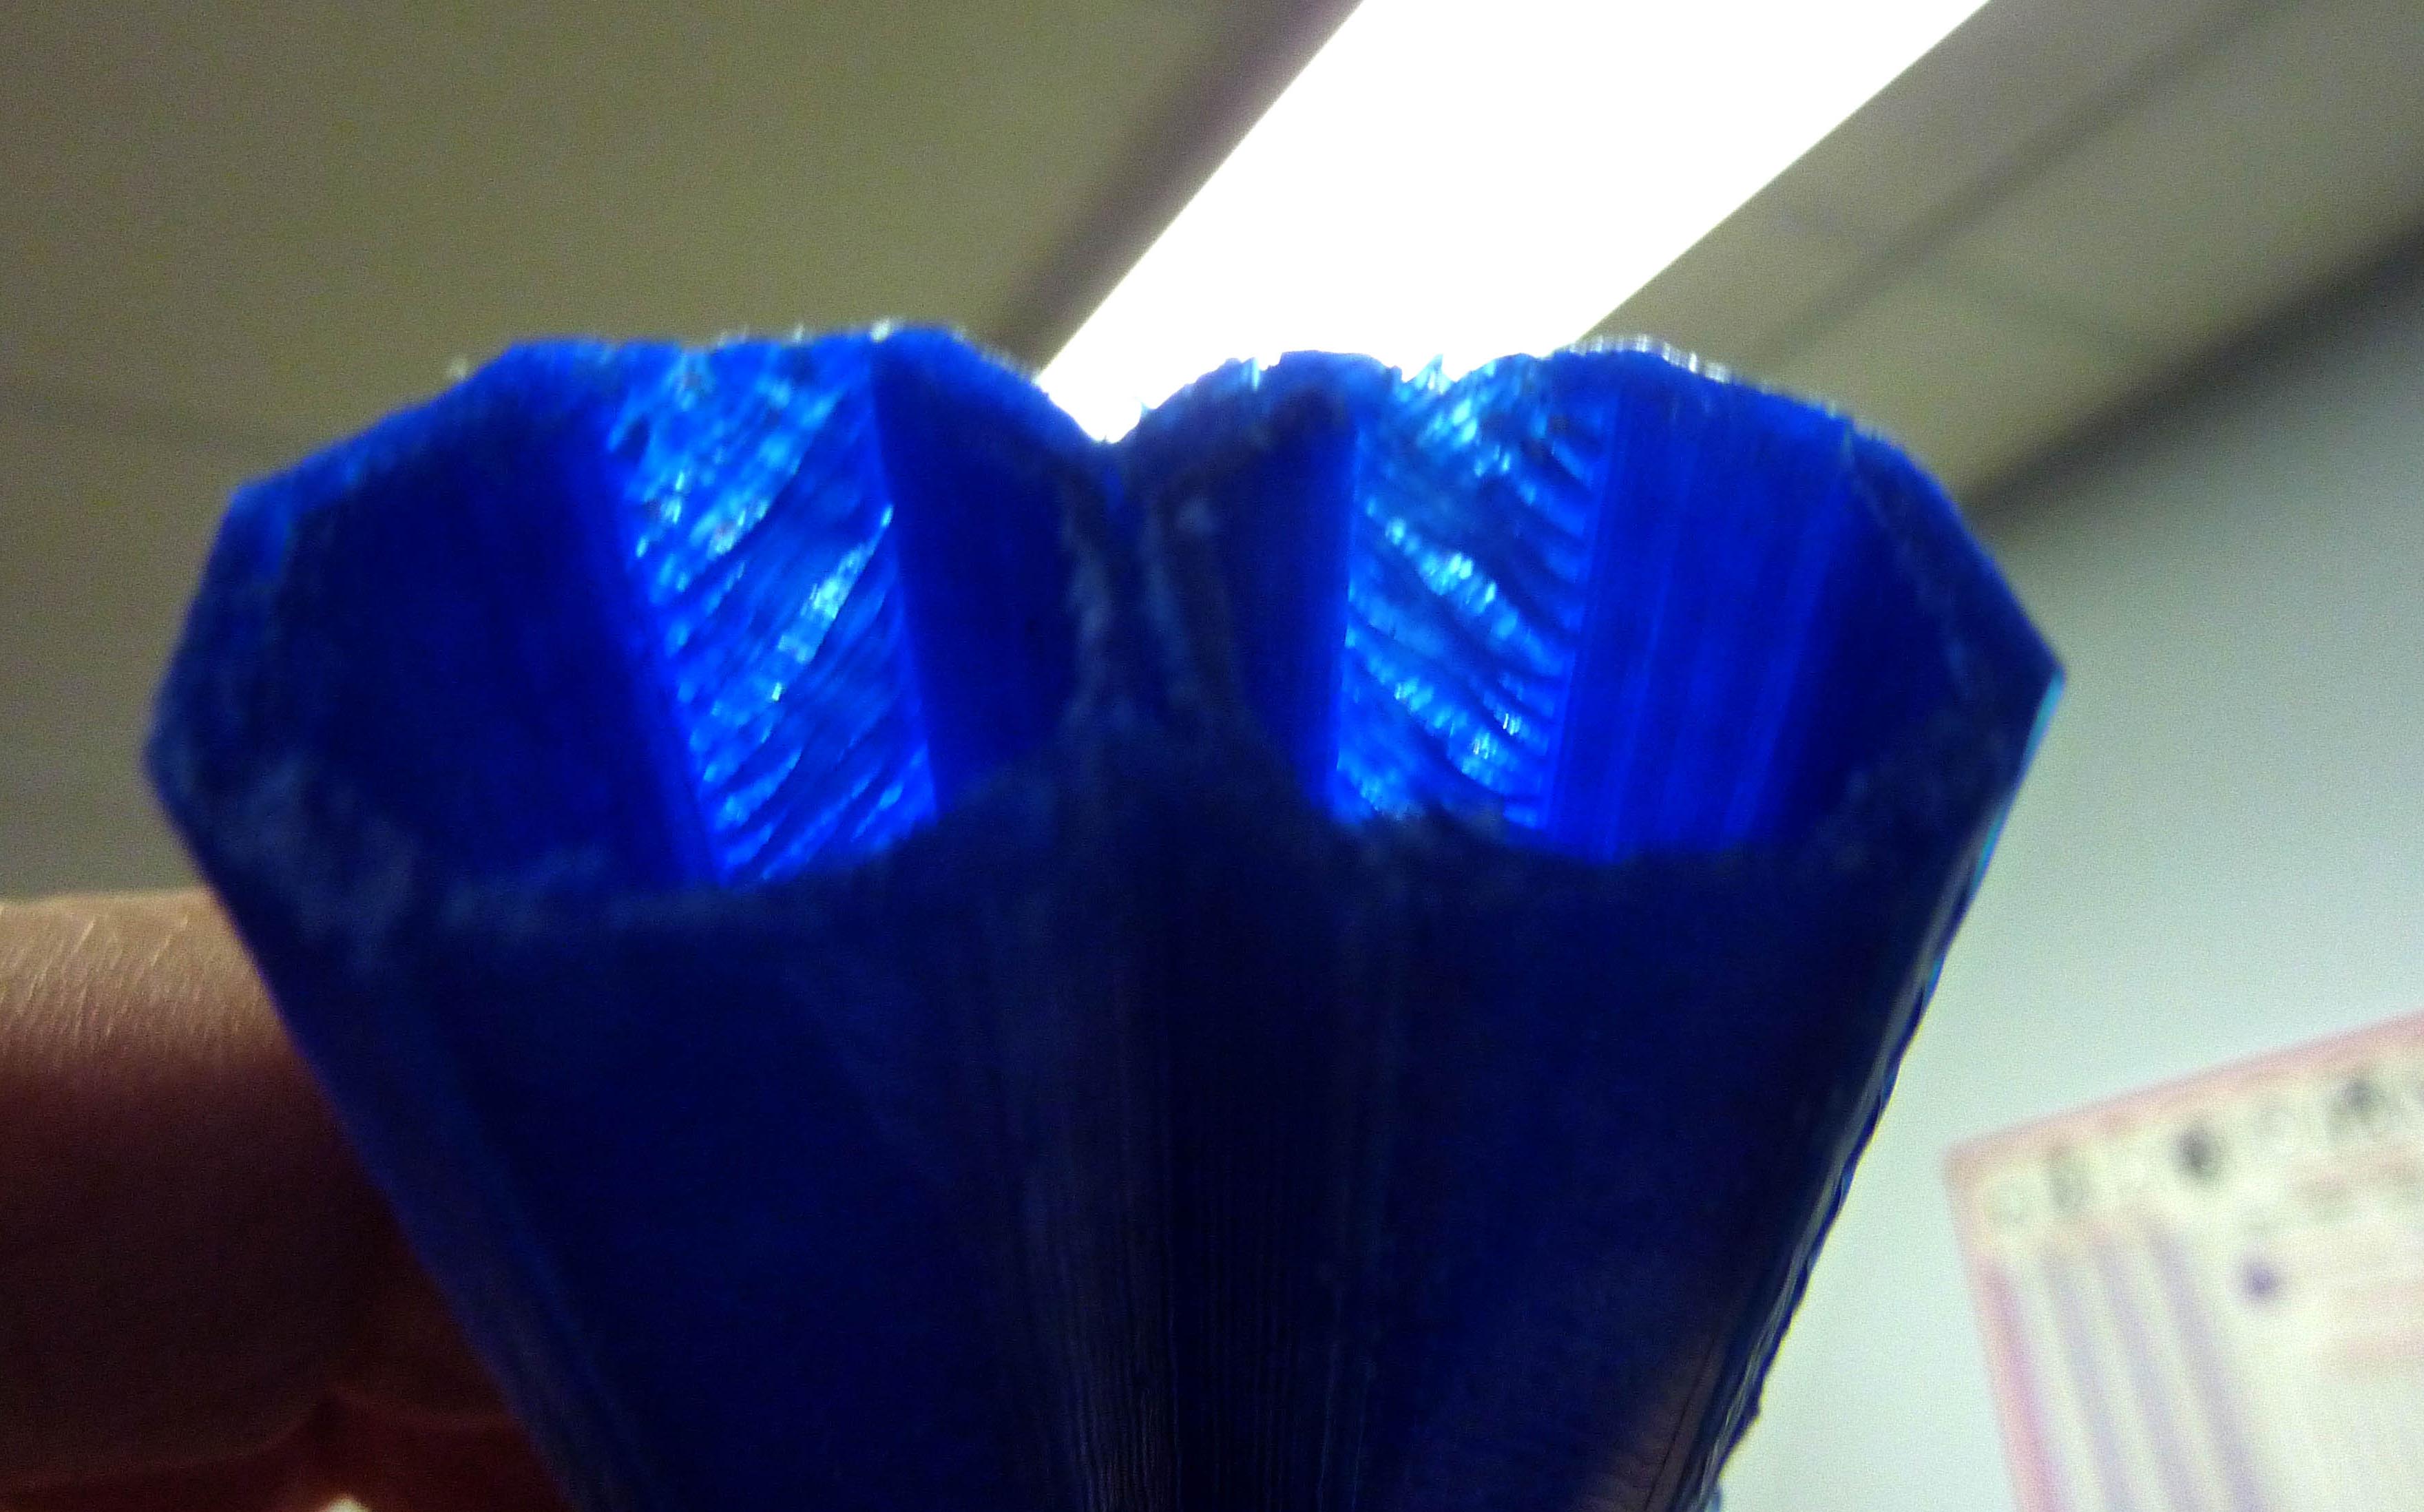
I have calibrated my extruder, I have been trying various width settings with slight improvement but still porous. I also changed back to 0.35 nozzle. Changes are showing slow movement towards non-porous print. Worst part is the "solid'' top lyers which are not solid but rather rough/uneven and porous.
Bob
|
Re: How to get non-porous print and minimize drooping perimeters November 26, 2013 12:41AM |
Registered: 11 years ago Posts: 248 |
|
Re: How to get non-porous print and minimize drooping perimeters December 10, 2013 03:38PM |
Registered: 12 years ago Posts: 81 |
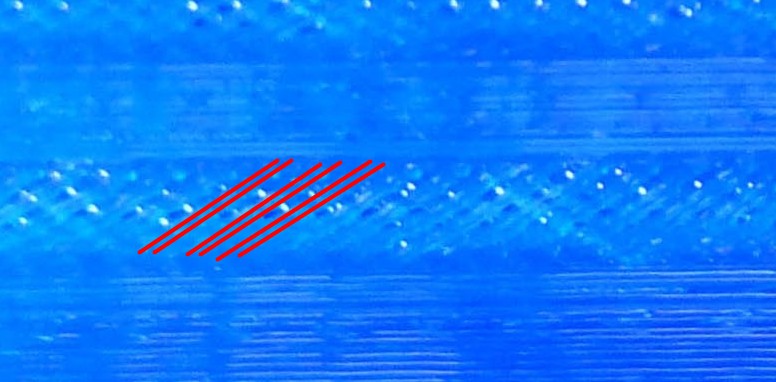
It looks in the first picture that you have a backlash problem causing alternating infill lines to be spaced apart and together. I've cropped and drawn what it looks like (attached)
If you do have backlash causing this (I did on my printer) you will have tremendous problems getting the infill both non-porous and not globby/overextruded.
-Rob A>
If you do have backlash causing this (I did on my printer) you will have tremendous problems getting the infill both non-porous and not globby/overextruded.
-Rob A>
|
Re: How to get non-porous print and minimize drooping perimeters December 10, 2013 03:50PM |
Admin Registered: 12 years ago Posts: 2,569 |
|
Re: How to get non-porous print and minimize drooping perimeters December 11, 2013 04:32AM |
Registered: 11 years ago Posts: 72 |

|
Re: How to get non-porous print and minimize drooping perimeters February 04, 2014 05:42PM |
Registered: 11 years ago Posts: 75 |
I don't think your printer is setup properly - based on these pics, you have 2 issues that I can see:
1) The top infill is not DENSE enough... (AND... this is not a slicer setting!)
This is a tricky TRICKY thing to fix, because naturally you go to your slicer and change the width... A width of 100% means that the extrusion is equal in height and width (ie the printer tries to lay a "round" thread) and a width of 200% means the width is double the height (excuse the maths lesson, I'll get to my point shortly) which creates a flatter thread. Flatter threads are GOOD because they have much more contact area with the previous layer = better bond.
THE TRICK is that, if you have gaps at 100% and you have gaps at 200%, you can turn it up or down as much as you want with little-to-no effect on the gaps. Your slicer TRIES to make the threads touch... at 100% it will lay the threads at the correct distance so that they touch... At 200%, it ADJUSTS that distance and again, tries to make the threads touch to create a sealed part. A lot of people think "I have a .2mm gap between threads, so I'll increase the width by .2mm - All this does is puts an EXTRA .2mm gap between the threads and extrudes enough extra material to cover that EXTRA .2mm, but it does nothing to fill the initial .2mm gap which you're trying to fix!
What WAS your extrusion width / width ratio? At least nozzle size?
2) Is there excessive wobble there? Or extrusion amount fluctuations? It's hard to tell from the pics, but the threads on that part seem fairly inconsistent. Do you see the thickness of threads changing around perimeters? Is it possible your bed is not rigid / is shaking? or the X carriage? The top infill lines, they may not be the flattest, but are they "straight" in x and y or do they show signs of wobble?
Again, it's a little hard to see from the pics (and I understand, it's a little hard to TAKE the pics too!) but let us know if you think we're barking up the wrong tree and we can look elsewhere for the solution ;-)
mechasonics.blogspot.com - Information and Experiences with 3D Printing, Engineering, Hacking and Technology.
[www.youtube.com] - RepRap Hardware and Software, Upgrades, Recommendations and Cool Videos!
www.facebook.com/jbainesy - Friend me on Facebook
www.google.com/+JarredBaines - Follow me on Google+
|
Re: How to get non-porous print and minimize drooping perimeters February 04, 2014 07:31PM |
Registered: 11 years ago Posts: 560 |
|
Re: How to get non-porous print and minimize drooping perimeters February 05, 2014 07:36AM |
Registered: 11 years ago Posts: 75 |
I just tried that - it looked great in repetier's gcode viewer, nice close threads...
But when I printed using those settings (with E steps too accurate to cause any issues) the threads were way too thin, not enough extrusion so it just sort of blobbed in the corners... didn't work for me.
Dirty Steve, the path does look like it's better (although would take longer to print) but with stock settings I can't get it to work. Do you have any idea what else you are doing that I might not be doing? lol :-)
Oh and I know the OP is using Slic3r, my post was slicer-independent (based on the ones i've used all reducing extrusion amount when you reduce the thread width).
I'm under the impression that it HAS to reduce the extrusion because you're asking for a thinner thread... if you're printing .25 layers and decide to go from .4mm width to .8mm width threads it needs to lay more plastic down to create a thread that's twice as wide...
mechasonics.blogspot.com - Information and Experiences with 3D Printing, Engineering, Hacking and Technology.
[www.youtube.com] - RepRap Hardware and Software, Upgrades, Recommendations and Cool Videos!
www.facebook.com/jbainesy - Friend me on Facebook
www.google.com/+JarredBaines - Follow me on Google+
|
Re: How to get non-porous print and minimize drooping perimeters February 05, 2014 10:00AM |
Registered: 11 years ago Posts: 53 |
|
Re: How to get non-porous print and minimize drooping perimeters January 23, 2018 12:12PM |
Registered: 6 years ago Posts: 2 |
Sorry, only registered users may post in this forum.