Embroidery using Reprap ???
Posted by rogerclark
|
Embroidery using Reprap ??? July 26, 2014 08:56PM |
Registered: 10 years ago Posts: 273 |
Hi,
Could anyone point me in the right direction in order to build my own embroidery machine ?
I've done some research on the web but have not turned up anything useful.
Looing at commercial embroidery machines, they just seem to be a standard seweing machine, but have a XY head mechanism that holds an embroidery hoop (https://en.wikipedia.org/wiki/Embroidery_hoop).
The XY head is driven as the sewing machine is run, with the path defined so that you end up with an image (albeit only one colour at a time and you have to change the cottom - in much the same way you have to change filament on a 3D printer if you want to print in multiple colours and only have one extruder)
Looking at the sewing machine I have access to. It would be easy to attach an optic (beam break) type sensor, to delect when the needle was up, and hence to calculate the rate at which the XY head needed to be moved.
The speed of the machine is controlled by a foot peddle, which appears just to be a variable resistor.
So technically it appears to be possible to build some hardware, using the standard reprap eletronics, i.e Mega2560+RAMPS + 2 x stepper motors, to drive an XY head (I suspect that lead screws may be the easiest method as high speed movement doesnt seem to be required)
But Marlan etc would need to be modified, so the movement with the speed of the needle rather than just operating at the speed defined in the GCODE etc
Also, generation of the path would be tricky.
But it looks like, if I designed a 3D model that was 1 layer thick, that Slic3r etc may be able to generate a path, that would effectively turn this into an image in embroidery
Anyway, was fairly sure that this must have been all done before, but can't find anything :-(
Thanks
Roger
PS.
I have a MendelMax 1.5 and was building another 3D printer, so I have all the hardware etc, in order to build a basic XY head using leadscrews or belt drive.
|
Re: Embroidery using Reprap ??? July 27, 2014 05:32AM |
Registered: 10 years ago Posts: 1,381 |
These are all my notes on DIY CNC Embroidery machines, please post your progress:
1. DIY- CNC Embroidery Machine
[www.cnczone.com]
2. RoboSew, Computerized Embroidery
[130.94.182.150]
3. Embroidery machines DIY
[www.cnczone.com]
4. CNC Embroidery DIY
[boxedcnc.blogspot.com]
5. Looking for informatio about machine code for embroidery machines
[www.cnczone.com]
6. Sophiesew Software (free)
[sophiesew.com]
[sophiesew.software.informer.com]
[www.facebook.com]
7. SophieSew Tutorial 2by adamlhumphreys
[adamlhumphreys.deviantart.com]
Edited 1 time(s). Last edit at 07/27/2014 05:32AM by A2.
1. DIY- CNC Embroidery Machine
[www.cnczone.com]
2. RoboSew, Computerized Embroidery
[130.94.182.150]
3. Embroidery machines DIY
[www.cnczone.com]
4. CNC Embroidery DIY
[boxedcnc.blogspot.com]
5. Looking for informatio about machine code for embroidery machines
[www.cnczone.com]
6. Sophiesew Software (free)
[sophiesew.com]
[sophiesew.software.informer.com]
[www.facebook.com]
7. SophieSew Tutorial 2by adamlhumphreys
[adamlhumphreys.deviantart.com]

Edited 1 time(s). Last edit at 07/27/2014 05:32AM by A2.
|
Re: Embroidery using Reprap ??? July 28, 2014 03:20PM |
Registered: 10 years ago Posts: 869 |
You may be surprised at how fast you'll need to move if you want to complete a project in a reasonable amount of time. A typical embroidery machine does 800 stitches/minute or 16/second. If a particular pattern needs 1/4" per stitch, that could be 4" of movement in a second. That lead screw is going to really be moving. Now obviously you can slow down the stitches per second, but you still have the synchronization of the XY movement to the switch. I don't think you'd soley want to perform your movements soley on if the beam is blocked. That's going to make your stitch rate extremely low.Quote
rogerclark
Looking at the sewing machine I have access to. It would be easy to attach an optic (beam break) type sensor, to delect when the needle was up, and hence to calculate the rate at which the XY head needed to be moved.
The speed of the machine is controlled by a foot peddle, which appears just to be a variable resistor.
So technically it appears to be possible to build some hardware, using the standard reprap eletronics, i.e Mega2560+RAMPS + 2 x stepper motors, to drive an XY head (I suspect that lead screws may be the easiest method as high speed movement doesnt seem to be required)
I don't think your embroidery quality would be very good if you use slicer. I've only had limited experience with a commercial sewing machine with embroidery capability but the quality of the embroidery software will have a huge impact on the quality of the final product. With 3D printing (or CNC milling or CNC laser cutting or whatever...) you don't care a huge amount how the product is laid down (additive manufacturing) or removed (subtractive manufacturing), just that it's done so completely. With embroidering, the stitch pattern and length of stitch can make a big difference. Slic3r would basically just create a pattern where the thread covered the whole surface, but it wouldn't be tight especially in large coverage areas and you'd see through it as the stitch would be long.Quote
But it looks like, if I designed a 3D model that was 1 layer thick, that Slic3r etc may be able to generate a path, that would effectively turn this into an image in embroidery
Not saying that it can't be done...just that there may be a lot of work to get to the point to be able to get it done.
|
Re: Embroidery using Reprap ??? August 01, 2014 07:39PM |
Registered: 10 years ago Posts: 273 |
Guys
Thanks for the detailed replies.
I looks like controlling the stitch rate and needed position will be critical and I'm not sure if a regular sewing machine is going to suit this purpose.
I will probably need to do some experimentation and research to see if its practical to control a normal machine.
Re beam breaking.
I'm not sure why this would not be a good method to determine needle position, as the sensor could be put at the top of the needles travel, so there would just be one short pulse at each top point.
I could probably fit an additional sensor half way down the travel, or possibly even at the bottom of travel or both, and that would give a quite precise indication of stitch speed.
But I'm wondering if proper embroidery machines are low inertia. Well lower than a regular machine. I guess I'd need to find a shop that sells them, and take a look, and also watch some videos on YouTube
Anyway, I realise this isn't an easy project, so will probably take quite a bit of time before I have any progress
Cheers
Roger
|
Re: Embroidery using Reprap ??? August 01, 2014 07:52PM |
Registered: 10 years ago Posts: 1,381 |
Maybe you can use one of these ideas to sense where the needle is: (The linear hall effect sensor is pretty cool.)
Linear Hall effect sensor tutorial - 3D printer end stops
[www.youtube.com]
UPGRADING MY REPRAP WITH CHEAP HALL EFFECT SENSORS.
[notanumber.net]
Hall effect sensor on fridge magnet
[www.youtube.com]
Magnetic Linear Encoder – and it works
[www.synthetos.com]
AS5306 magnetic linear encoder test
[www.youtube.com]
Hall-O
[reprap.org]
Edited 1 time(s). Last edit at 08/01/2014 08:11PM by A2.
|
Re: Embroidery using Reprap ??? August 01, 2014 08:07PM |
Admin Registered: 11 years ago Posts: 1,063 |
Quote
A2
Maybe you can use one of these ideas to sense where the needle is:
UPGRADING MY REPRAP WITH CHEAP HALL EFFECT SENSORS.
[notanumber.net]
Hall effect sensor on fridge magnet
[www.youtube.com]
Magnetic Linear Encoder – and it works
[www.synthetos.com]
AS5306 magnetic linear encoder test
[www.youtube.com]
Hall-O
[reprap.org]
may not be necessary , depending on the sewing machine, some of them have a setting where it will put the needle down in the same spot every time , some also have a setting where the bit under the foot won't move either,
-=( blog )=- -=( thingiverse )=- -=( 3Dindustries )=- -=( Aluhotend - mostly metal hotend)=--=( Facebook )=-
|
Re: Embroidery using Reprap ??? August 01, 2014 08:22PM |
Registered: 10 years ago Posts: 1,381 |
I'm envisioning that a stepper motor is used, with 2 end stops on the needle shaft, with a bespoke thread, and foot guide. If you use a common sewing machine then only the needle tip needs to be calibrated.
I updated my previous post, check out the linear hall effect sensor, it allows you to fine tune your end stop location either manually (potentiometer) or programmatically (requires extra coding).
I updated my previous post, check out the linear hall effect sensor, it allows you to fine tune your end stop location either manually (potentiometer) or programmatically (requires extra coding).
|
Re: Embroidery using Reprap ??? August 02, 2014 02:19AM |
Registered: 10 years ago Posts: 273 |
Hi A2,
From what I understand, its not just the needle that needs to be driven up and down. There is mechanics under the foot of the machine which hooks the thread when the needle is down.
AFIK, most conventional machines operate from one main motor, and have a cam which moves the needle up and down and the same motor drives the mechanics under the machine.
I guess there is no specific reason why there could not be too separate stepper motors, one for the needle and one for the stuff under the machine, but as synchronisation is vital and I'm not sure if the mechanism under the machine could be driven undependantly without tieing the the tread in knots.
The machines tend to have quite powerful motors, i.e several hundred watts, from what I've seen, so although the main motor could be replaced by a stepper motor, its going to have to be quite a powerful one, and require a lot more power than the RAMPS board can deliver.
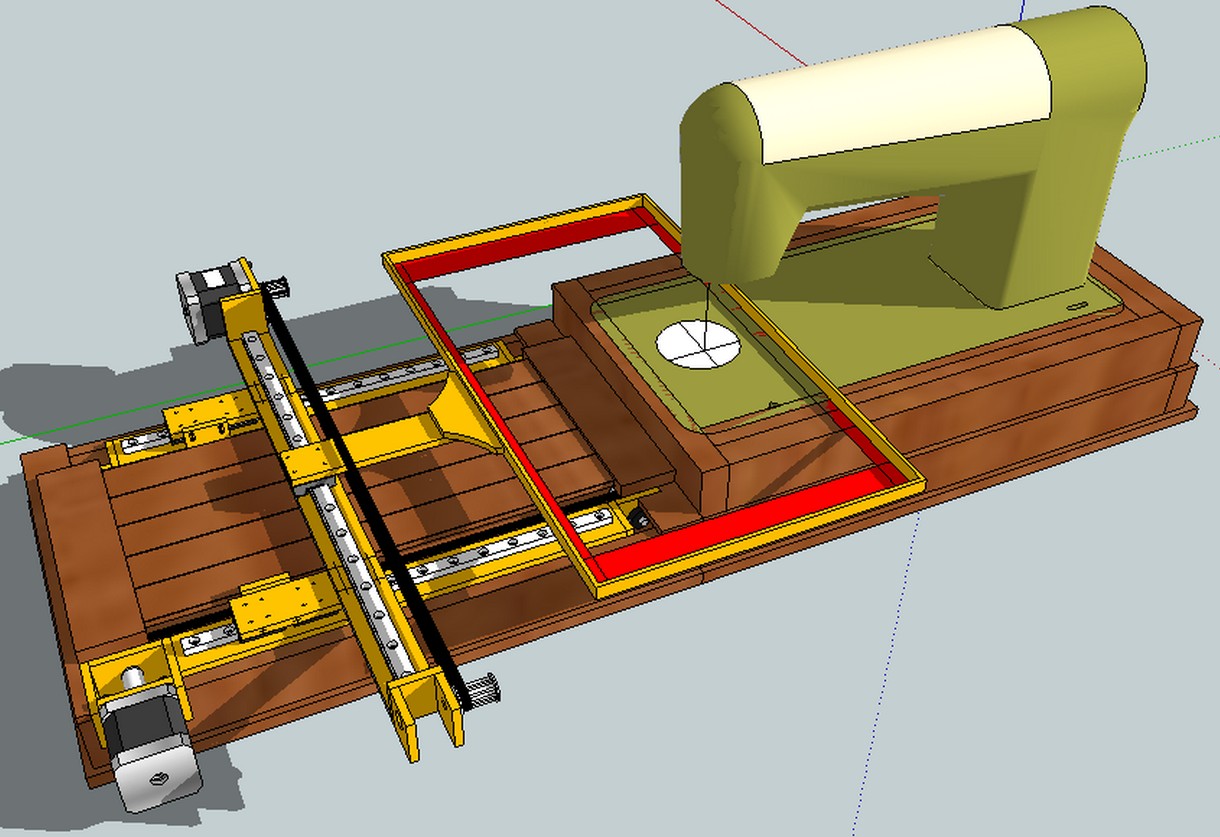
I was really hoping that I could build something which could be attached to a normal sewing machine. i.e Clip some sensors onto the needle arm (opto or hall etc) and connect to the "foot peddle" input to the machine to control the speed.
Then build a system using 2 motors (with belt drive) to move the embroidery hoop, in a similar way to the picture you posted
Actually I'm not that keen on the Y axis having a single rail in that system.
I have some left over 10mm linear bearings, and some 10mm smooth rod. So the system would probably resemble the my Mendle max, with 2 rods in each axis, except the X axis is bolted to the Y carriage (bed) rather than to the Z axis (as there is no Z axis).
I'd use a conventional embroidery hoop, rather than a rectangle (as this gives better rigidity. to the cloth).
However I can see this is definately not a simple idea and there is a lot of research / experimentation that would be needed even before started to build the XY carriage (as that would be the simple part, as it could easily be controlled by printrun etc for testing.
From what I understand, its not just the needle that needs to be driven up and down. There is mechanics under the foot of the machine which hooks the thread when the needle is down.
AFIK, most conventional machines operate from one main motor, and have a cam which moves the needle up and down and the same motor drives the mechanics under the machine.
I guess there is no specific reason why there could not be too separate stepper motors, one for the needle and one for the stuff under the machine, but as synchronisation is vital and I'm not sure if the mechanism under the machine could be driven undependantly without tieing the the tread in knots.
The machines tend to have quite powerful motors, i.e several hundred watts, from what I've seen, so although the main motor could be replaced by a stepper motor, its going to have to be quite a powerful one, and require a lot more power than the RAMPS board can deliver.
I was really hoping that I could build something which could be attached to a normal sewing machine. i.e Clip some sensors onto the needle arm (opto or hall etc) and connect to the "foot peddle" input to the machine to control the speed.
Then build a system using 2 motors (with belt drive) to move the embroidery hoop, in a similar way to the picture you posted

Actually I'm not that keen on the Y axis having a single rail in that system.
I have some left over 10mm linear bearings, and some 10mm smooth rod. So the system would probably resemble the my Mendle max, with 2 rods in each axis, except the X axis is bolted to the Y carriage (bed) rather than to the Z axis (as there is no Z axis).
I'd use a conventional embroidery hoop, rather than a rectangle (as this gives better rigidity. to the cloth).
However I can see this is definately not a simple idea and there is a lot of research / experimentation that would be needed even before started to build the XY carriage (as that would be the simple part, as it could easily be controlled by printrun etc for testing.
|
Re: Embroidery using Reprap ??? August 04, 2014 04:10PM |
Registered: 11 years ago Posts: 198 |
Determining needle position should be relatively simple, using a toothed wheel with a missing tooth, attached to the wheel in the end of the sewing machine, this would give both speed an positional information to the controler. The controller could then start moving the fabric as the needle leaves the fabric, with a feedrate that ensures that the move is complete when the needle hits the fabric again.
The hardest part I think, would be to generate the toolpath, to get consistent embroidery, and to move the fabric around fast enougt to do the job in a decent time.
The hardest part I think, would be to generate the toolpath, to get consistent embroidery, and to move the fabric around fast enougt to do the job in a decent time.
|
Re: Embroidery using Reprap ??? August 04, 2014 04:47PM |
Registered: 10 years ago Posts: 1,381 |
|
Re: Embroidery using Reprap ??? August 05, 2014 11:38AM |
Registered: 11 years ago Posts: 198 |
|
Re: Embroidery using Reprap ??? February 08, 2015 10:14PM |
Registered: 10 years ago Posts: 1,381 |
cdru
I just watched a video that had some commentary on stitch rate 960/minute, are you in the embroidery biz?
Engine Room - Part 1
SV Seeker
[www.youtube.com]
.... and I'm curious if rogerclark has moved forward with his project?
Quote
cdru
You may be surprised at how fast you'll need to move if you want to complete a project in a reasonable amount of time. A typical embroidery machine does 800 stitches/minute or 16/second.
I just watched a video that had some commentary on stitch rate 960/minute, are you in the embroidery biz?
Engine Room - Part 1
SV Seeker
[www.youtube.com]
.... and I'm curious if rogerclark has moved forward with his project?
|
Re: Embroidery using Reprap ??? February 09, 2015 09:03AM |
Registered: 10 years ago Posts: 869 |
Not in the biz, but have done some embroidery. My wife has a Janome MC10000 which at the time she got it was kind of "top of the line" sewing machine/embroidery machine for the home user.Quote
A2
I just watched a video that had some commentary on stitch rate 960/minute, are you in the embroidery biz?
|
Re: Embroidery using Reprap ??? March 13, 2016 09:37AM |
Registered: 8 years ago Posts: 75 |
Sorry, only registered users may post in this forum.