Refit of a MakerBot Cupcake; request for suggestions
Posted by docdawning
|
Refit of a MakerBot Cupcake; request for suggestions January 19, 2015 01:23PM |
Registered: 9 years ago Posts: 31 |
Howdy friends. I bought the 155th MakerBot and built it back in the day. It worked for maybe 10 hours of printing and ended up shelved until now as the failures were too much and I was out of money and time.
My Goal
I want to get printing. I like doing some under-the-hood work, but I'm employed so I don't have infinite time to re-invent the wheel either.
I'm totally open to suggestions. I'm hoping to largely recycle most of this CupCake CNC machine and rebuild it as something I can print with. I am willing to consider buying a modern RepRap kit. It just seems to me like my existing machine is most of the way towards my goal.
Rebuilding / Upgrading / Refitting my CupCake
If I'm to make this Cupcake print, I *think* I need to work-out at least the following:
I've ordered a new plastruder from ebay that I hope to integrate:
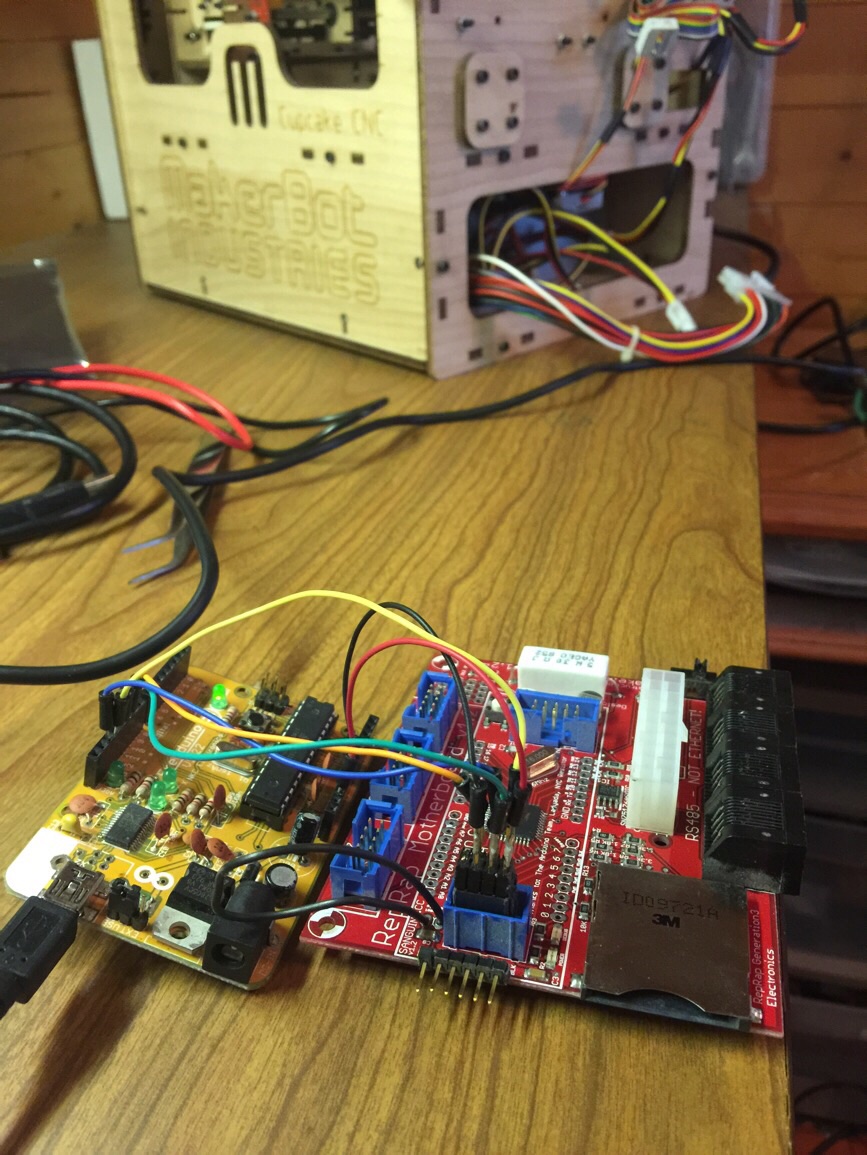
This machine uses the RepRap Gen3 Motherboard V1.2.
I have a potentially major problem with that board now too. It never failed once years ago when I last operated this machine, however now I can't get it to power-on. I've tried many power supplies which have tested as good. When I hook on my FTDI cable I can occasionally get the red LED to pulse or on rare occasion I can get it to stay on, however ReplicatorG never gets a reply for the board. I'm planning on reflowing this board and maybe that'll fix my problem, but I may be needing to replace this board too. I'll certainly need to modify it to run a 4th stepper too, for the new plastruder. I figure I can make a 3G5D shield or do the "ugly cable hack" to add that support. But maybe a replacement board is best. If I replace the board, I may have to replace my stepper drivers too? I'm not sure. Below's an image of one of my stepper drivers:
Any informed help would be very much appreciated!

My Goal
I want to get printing. I like doing some under-the-hood work, but I'm employed so I don't have infinite time to re-invent the wheel either.
I'm totally open to suggestions. I'm hoping to largely recycle most of this CupCake CNC machine and rebuild it as something I can print with. I am willing to consider buying a modern RepRap kit. It just seems to me like my existing machine is most of the way towards my goal.
Rebuilding / Upgrading / Refitting my CupCake
If I'm to make this Cupcake print, I *think* I need to work-out at least the following:
- How to integrate my new MK8 Plastruder (image below)
- Add a heated-build platform or something equivalent
I've ordered a new plastruder from ebay that I hope to integrate:

This machine uses the RepRap Gen3 Motherboard V1.2.

I have a potentially major problem with that board now too. It never failed once years ago when I last operated this machine, however now I can't get it to power-on. I've tried many power supplies which have tested as good. When I hook on my FTDI cable I can occasionally get the red LED to pulse or on rare occasion I can get it to stay on, however ReplicatorG never gets a reply for the board. I'm planning on reflowing this board and maybe that'll fix my problem, but I may be needing to replace this board too. I'll certainly need to modify it to run a 4th stepper too, for the new plastruder. I figure I can make a 3G5D shield or do the "ugly cable hack" to add that support. But maybe a replacement board is best. If I replace the board, I may have to replace my stepper drivers too? I'm not sure. Below's an image of one of my stepper drivers:

Any informed help would be very much appreciated!
|
Re: Refit of a MakerBot Cupcake; request for suggestions January 19, 2015 03:36PM |
Registered: 9 years ago Posts: 31 |
I suppose replacing my motherboard could be a good move regardless. I need to drive another stepper regardless and while I CAN hack the RepRap Gen3 board to accomplish this, I'd still need to find another board to drive that motor too. While that IS an option, I see there are some decent-looking boards out there I could get. I'm particularly interested in this right now:
Geeetech RAMBo (RepRap Arduino-compatible Mother Board) V1.2G 3D Printer RepRap
Has anyone here printed with that board? How easy is it to use boards such as this with ReplicatorG or MatterControl?
Any tips would be awesome. Are there better boards out there? I'd rather spend a bit more if it gets me a much better board.
Edited 1 time(s). Last edit at 01/19/2015 05:37PM by docdawning.
|
Re: Refit of a MakerBot Cupcake; request for suggestions January 20, 2015 06:37PM |
Registered: 9 years ago Posts: 31 |
I learned today that yes, such boards can be used with at least MatterControl and some other programs.
I didn't realize that 3D printing has evolved around Arduino the way it has. Very cool. So these boards tend to get flashed with firmwares that provide standard interfaces, such as the Marlin firmware. Then the printing software need merely support the interface of those firmwares.
So to answer my question above, since the RAMBo can run at least the Marlin firmware, MatterControl will work with it. There's also the RAMPS board that will run Marlin, but it costs a lot less than the RAMBo board. Sweetness.
|
Re: Refit of a MakerBot Cupcake; request for suggestions January 21, 2015 07:17AM |
Registered: 13 years ago Posts: 7,616 |
Gen3 electronics is a fine thing and almost on par with "modern" ATmega based electronics. Stepper drivers are half-stepping only, which makes the steppers loud, but they should work anyways. You have no use for all these features of a Rambo or whatever unless you build mostly a new printer.
Before replacing electronics I'd check the power supply. Pull off this 20-pin connector, put a bridge between the green and one of the black wires, turn on the mains switch and look wether it comes to life (fan starts spinning). If not, get another supply, it's a commodity PC power supply.
If it does start, connect to the printer with a serial terminal. Depending on firmware 38400, 57600 or 115200 baud (favourites varied at that time). You can upload a modern firmware like Teacup to get all the new features like acceleration and look-ahead.
| Generation 7 Electronics | Teacup Firmware | RepRap DIY |
|
Re: Refit of a MakerBot Cupcake; request for suggestions January 21, 2015 05:44PM |
Registered: 9 years ago Posts: 31 |
I ordered a RAMBo board last night. Though I'm still interested in my Gen3 board. I manually tapped all pins with my soldering iron, I replaced the oscillator (I have a big pile of the exact right ones) and I banged my head against a wall for a few hours. I've already tried many other power supplies that all pass tests with my dedicated ATX PSU tester.
I haven't figured out how to upload a new firmware. I tried uploading Sailfish with ReplicatorG, took me a while to figure out how to even line that up. But no matter what I do, I cannot make contact with the board. I used tweezers to short the ATX green line to ground to make my PSU run. When doing that all my PCBs on the MakerBot light up as they should. I've tried powering up with nothing connected and with everything connected. With the ATX forced on, the green power LED on the gen3 board lights up otherwise it doesn't.
Perhaps tonight I'll goof around with a serial terminal some more. I remain very open to suggestions.
Edited 1 time(s). Last edit at 01/21/2015 05:45PM by docdawning.
|
Re: Refit of a MakerBot Cupcake; request for suggestions January 26, 2015 01:16AM |
Registered: 9 years ago Posts: 31 |
Turns out reflashing the gen3 board was very helpful. I used an Arduino as the ISP, which wasn't too rough. I've found the gen3 won't retain the firmware if I unpower it after flashing & uploading the firmware. One of my axes won't move either. I suspect it's either something in the Marlin build I'm using or the avr chip itself. I know the steppers and motor controllers all work fine too. Not that any of this matters since now I also have not just a high-quality RAMBo enroute but a Smoothieboard too. 
ICSP
Steppers barely working
[youtu.be]
Edited 2 time(s). Last edit at 01/26/2015 01:24AM by docdawning.
ICSP

Steppers barely working
[youtu.be]
Edited 2 time(s). Last edit at 01/26/2015 01:24AM by docdawning.
|
Re: Refit of a MakerBot Cupcake; request for suggestions January 26, 2015 08:45AM |
Registered: 13 years ago Posts: 7,616 |
Quote
docdawning
I've found the gen3 won't retain the firmware if I unpower it after flashing & uploading the firmware.
Likely you haven't set the BOD (Brown Out Detector) fuses.
| Generation 7 Electronics | Teacup Firmware | RepRap DIY |
|
Re: Refit of a MakerBot Cupcake; request for suggestions January 26, 2015 10:11AM |
Registered: 9 years ago Posts: 1,011 |
IMHO your printer should print like it is. You did not spent that much time to make it work (I spent 10 times more on my modern prusa I3 !). My advice : don't buy stuff to replace certainly allready working components. First check out each component step by step, with our help, and we'll manage to make it work.
Then you'll have all the time to dream about improvements.
Collective intelligence emerges when a group of people work together effectively. Prusa i3 Folger (A lot of the parts are wrong, boring !)
Then you'll have all the time to dream about improvements.
Collective intelligence emerges when a group of people work together effectively. Prusa i3 Folger (A lot of the parts are wrong, boring !)
|
Re: Refit of a MakerBot Cupcake; request for suggestions January 26, 2015 11:38AM |
Registered: 9 years ago Posts: 31 |
Quote
Traumflug
Quote
docdawning
I've found the gen3 won't retain the firmware if I unpower it after flashing & uploading the firmware.
Likely you haven't set the BOD (Brown Out Detector) fuses.
Interesting. It retained firmware back when it was new. Maybe the base Arduino Sanguino bootloader needs a little tweaking?! Thanks!
Edited 1 time(s). Last edit at 01/26/2015 11:39AM by docdawning.
|
Re: Refit of a MakerBot Cupcake; request for suggestions January 26, 2015 11:52AM |
Registered: 9 years ago Posts: 31 |
Quote
Zavashier
IMHO your printer should print like it is. You did not spent that much time to make it work (I spent 10 times more on my modern prusa I3 !). My advice : don't buy stuff to replace certainly allready working components. First check out each component step by step, with our help, and we'll manage to make it work.
Then you'll have all the time to dream about improvements.
Yeah, I only waited a day for comments from the forum before asking people in IRC. And all along I've suspected the gen3 could work, but you see my extruder is from 2008 so it uses a dc motor. To drive my incoming MK8, I'll need another stepper driver and the ugly cable hack.
I ordered a high-quality RAMBo, I think of it as the top-end refinement of the AVR boards. Lots of software support and history.
Then I learned of the Smoothieboard which I think of like a Tesla car. Quite new & different with a vastly shorter history and less broad support. But the end-to-end support of it looks very promising and I've seen some arguments for it that compel me to try it as well.
My first goal is to just get the Cupcake working. The next stage will be to build a new reprap derivative, preferably something massive that will also lend itself well to quick re-tooling for laser cutting as well. So with that in mind, I figured I'd rather get new boards to use, than goof with the gen3. I have been playing with the gen3 while I wait for the mail because I suspected it could work and I wanted to see if my steppers & pulleys perform fine. As expected they themselves work same as ever, which is good.
On the side, I've been working on a heated build platform. So far I've got 3 100mm x 100mm x 3mm aluminum plates, of which I expect to run a heater wire under one (or between two). I haven't put much more work in to that just yet.
If you know of anyone selling pre-made 100mm x 100mm heater PCBs please let me know.
Edited 2 time(s). Last edit at 01/26/2015 11:56PM by docdawning.
|
Re: Refit of a MakerBot Cupcake; request for suggestions January 27, 2015 05:01AM |
Registered: 13 years ago Posts: 7,616 |
Quote
docdawning
If you know of anyone selling pre-made 100mm x 100mm heater PCBs please let me know.
This is RepRap, which means making instead of buying: [www.reprap.org]
You can print PLA without heated bed. Might be a good idea to fix other things first.
| Generation 7 Electronics | Teacup Firmware | RepRap DIY |
|
Re: Refit of a MakerBot Cupcake; request for suggestions January 27, 2015 07:04AM |
Admin Registered: 13 years ago Posts: 6,998 |
You could have just upgraded to a gen3+
[www.lulzbot.com]
Replaces DC motor controller with a daughter board on the gen3.
[www.lulzbot.com]
Replaces DC motor controller with a daughter board on the gen3.

|
Re: Refit of a MakerBot Cupcake; request for suggestions January 27, 2015 01:46PM |
Registered: 9 years ago Posts: 31 |
Quote
Dust
You could have just upgraded to a gen3+
Oh well, maybe I'll do this later, if I build better machines for my RAMBo and Smoothie.
Do you know of any particularly high-quality version of this upgrade board and the vendors I can get them from?
Edited 2 time(s). Last edit at 01/27/2015 01:47PM by docdawning.
|
Re: Refit of a MakerBot Cupcake; request for suggestions January 27, 2015 01:53PM |
Registered: 9 years ago Posts: 31 |
Yeah, I've been working on making my own. But for all I know, some vendor has what I want available. Once upon a time, MakerBot sold them. So, therefore I've put the question out there.
Quote
docdawning
On the side, I've been working on a heated build platform. So far I've got 3 100mm x 100mm x 3mm aluminum plates...
I've been roughly following this Instructable.
The link you shared looks helpful. Thank you very much.
|
Re: Refit of a MakerBot Cupcake; request for suggestions January 28, 2015 04:00PM |
Registered: 9 years ago Posts: 31 |
Today's update...
Gen3 programming now persists
I've got firmware storing persistently on the gen3 board now. I'm not sure if it's my Sanguino bootloader or the Marlin firmware, but it's working now. I think it's in the bootloader. I nuked all my tools and have been operating out of head versions from github.
How to mount an MK8 extruder?
I also received my MK8 extruder. I need to figure out how to mount it on my lateral Z platform. The MK8 doesn't really seem to have any especially obvious mount points on it. I'm thinking I may try to make some kind of adjustable metal structure to clam on to the extruder.
Here's a pic, to prove it happened.
I'm thinking I could unscrew the bolts (carefully) and attach a mounting plate perhaps?
Build Platforms, easier than we thought!
In other news, I read this amazing tale and learned that heated, level adjustable build platforms are a lot of unnecessary work!
avrdude on OSX
I've also observed and confirmed with some people over IRC (and via some searching), it seems something is missing with OS X support, probably with respect to good FTDI support. I've tried installing FTDI's driver and disabling my apple KEXT that handles the FTDI. All the while it seems properly supported, yet my avrdude's never work. I think maybe avrdude for OS X may be broken. I might try to fix it or find the root issue, except that I also like Linux, so I've been using a dedicated Linux VM and all's well with that.
Any comments specifically on mounting methods for the MK8?
Edited 1 time(s). Last edit at 01/28/2015 04:09PM by docdawning.
Gen3 programming now persists
I've got firmware storing persistently on the gen3 board now. I'm not sure if it's my Sanguino bootloader or the Marlin firmware, but it's working now. I think it's in the bootloader. I nuked all my tools and have been operating out of head versions from github.
How to mount an MK8 extruder?
I also received my MK8 extruder. I need to figure out how to mount it on my lateral Z platform. The MK8 doesn't really seem to have any especially obvious mount points on it. I'm thinking I may try to make some kind of adjustable metal structure to clam on to the extruder.
Here's a pic, to prove it happened.


I'm thinking I could unscrew the bolts (carefully) and attach a mounting plate perhaps?
Build Platforms, easier than we thought!
In other news, I read this amazing tale and learned that heated, level adjustable build platforms are a lot of unnecessary work!
avrdude on OSX
I've also observed and confirmed with some people over IRC (and via some searching), it seems something is missing with OS X support, probably with respect to good FTDI support. I've tried installing FTDI's driver and disabling my apple KEXT that handles the FTDI. All the while it seems properly supported, yet my avrdude's never work. I think maybe avrdude for OS X may be broken. I might try to fix it or find the root issue, except that I also like Linux, so I've been using a dedicated Linux VM and all's well with that.
Any comments specifically on mounting methods for the MK8?
Edited 1 time(s). Last edit at 01/28/2015 04:09PM by docdawning.
|
Re: Refit of a MakerBot Cupcake; request for suggestions January 29, 2015 02:09PM |
Registered: 9 years ago Posts: 31 |
Update 2015-01-29...
I spent my latest printer-time giving one last attempt to get printing with this machine as a classic Cupcake. I've tried many builds of replicatorg and none of them seem able to flash the gen3 board with their firmwares. No matter, I'm working with Marlin.
Motor Tuning
I find with Marlin I've yet to figure out how to tune my steppers so they all work as expected. My Z-stage works very well, but my Y is pretty horrible and my X is unresponsive. I know each stage can function because I've connected different stages to the Z signals and they run as expected. So I'm pretty sure it's a firmware issue.
I've been following this guide to get setup & calibrated. Considering how it's gone so far, I'm going to have to get my end-stop sensors hooked up first, because I've ground my Y stage a couple times and that makes me very sad, so both max and min end stops for each stage will be my next goal.
MK8 Extruder Mounting
Not a lot to report here, I took a bunch of photos of how the MK8 extruder could line-up on the Z-stage. I'm going to be cutting some Aluminum angled stuff I have and mounting with that.. Most likely.
I've got two sizes of Aluminum to consider.I prefer the smaller stuff, except it doesn't reach the pre-existing holes (on the right-side, specifically) and I'm not sold that I want to make new holes. I also remain a bit concerned about thermal damage to my Z platform from the motor.
Weak Power caused connection woes
I also found that I could no longer connect to my printer (Marlin 1.0.2 on Gen3-monolithic) using Pronterface. After much head-scratching I decided to hook up my PSU tester and it indicatated that my +5V supply was low, though I'm not sure how low precisely. I decided to quickly try another PSU and I could immediately connect to the printer. Sigh. Of course something like that's going to eat lots of my time. I have a brand new high end 1000W PSU I could use, else I'm stuck with low-quality ~300W ones. I'm a bit worried about killing my nice PSU though..
Comments on that?
Photos
I've started a photo album for this project here: [www.flickr.com]
Edited 3 time(s). Last edit at 01/29/2015 03:05PM by docdawning.
I spent my latest printer-time giving one last attempt to get printing with this machine as a classic Cupcake. I've tried many builds of replicatorg and none of them seem able to flash the gen3 board with their firmwares. No matter, I'm working with Marlin.
Motor Tuning
I find with Marlin I've yet to figure out how to tune my steppers so they all work as expected. My Z-stage works very well, but my Y is pretty horrible and my X is unresponsive. I know each stage can function because I've connected different stages to the Z signals and they run as expected. So I'm pretty sure it's a firmware issue.
I've been following this guide to get setup & calibrated. Considering how it's gone so far, I'm going to have to get my end-stop sensors hooked up first, because I've ground my Y stage a couple times and that makes me very sad, so both max and min end stops for each stage will be my next goal.
MK8 Extruder Mounting
Not a lot to report here, I took a bunch of photos of how the MK8 extruder could line-up on the Z-stage. I'm going to be cutting some Aluminum angled stuff I have and mounting with that.. Most likely.

I've got two sizes of Aluminum to consider.I prefer the smaller stuff, except it doesn't reach the pre-existing holes (on the right-side, specifically) and I'm not sold that I want to make new holes. I also remain a bit concerned about thermal damage to my Z platform from the motor.

Weak Power caused connection woes
I also found that I could no longer connect to my printer (Marlin 1.0.2 on Gen3-monolithic) using Pronterface. After much head-scratching I decided to hook up my PSU tester and it indicatated that my +5V supply was low, though I'm not sure how low precisely. I decided to quickly try another PSU and I could immediately connect to the printer. Sigh. Of course something like that's going to eat lots of my time. I have a brand new high end 1000W PSU I could use, else I'm stuck with low-quality ~300W ones. I'm a bit worried about killing my nice PSU though..
Comments on that?
Photos
I've started a photo album for this project here: [www.flickr.com]
Edited 3 time(s). Last edit at 01/29/2015 03:05PM by docdawning.
|
Re: Refit of a MakerBot Cupcake; request for suggestions January 30, 2015 01:36PM |
Registered: 9 years ago Posts: 31 |
Update for 2015-01-30
MK8 Extruder on Cupcake MakerBot
I spent some hours chipping-away at my scrap metal and ended up with what looks like a suitable mounting solution. I found the screws in the MK8 that I wanted to mount off of should work fine, though I have yet to go get longer ones to make up for the reduction in how far each screw goes in, which is enough that the stepper screw doesn't actually reach threads.


|
Re: Refit of a MakerBot Cupcake; request for suggestions January 31, 2015 04:25PM |
Registered: 9 years ago Posts: 31 |
Update 2015-01-31
MK8 Mounting Complete
It took me a while to finalize the mounting of the MK8 because I needed to find a longer M3 screw to go back in to the stepper. By adding the mount brackets I considerably changed how far in to the stepper the screw would go and thus I couldn't reach the threads any more. I went to 6 different stores. Finally a remote control toy specialty store and something I could use, though it was too long, but I just used some old stand-offs to make it work. The screw I removed from the stepper is an inch and a quarter long. I figure an inch and a half (or around 40mm) would be enough, though in my case I used something 50mm long and used stand-offs that probably let about 35mm of the screw go in to the motor.
So here is my CupCake with the MK8 Extruder mounted fully, ready to be wired on to a motherboard:
I tried to mount the extruder reasonably high to maximize my Z/vertical limits for printing. Here's a photo to illustrate how high I can print with this configuration:
Roughly, that gives me a max Z height of about 120mm.
Edited 1 time(s). Last edit at 01/31/2015 04:50PM by docdawning.
MK8 Mounting Complete
It took me a while to finalize the mounting of the MK8 because I needed to find a longer M3 screw to go back in to the stepper. By adding the mount brackets I considerably changed how far in to the stepper the screw would go and thus I couldn't reach the threads any more. I went to 6 different stores. Finally a remote control toy specialty store and something I could use, though it was too long, but I just used some old stand-offs to make it work. The screw I removed from the stepper is an inch and a quarter long. I figure an inch and a half (or around 40mm) would be enough, though in my case I used something 50mm long and used stand-offs that probably let about 35mm of the screw go in to the motor.
So here is my CupCake with the MK8 Extruder mounted fully, ready to be wired on to a motherboard:

I tried to mount the extruder reasonably high to maximize my Z/vertical limits for printing. Here's a photo to illustrate how high I can print with this configuration:

Roughly, that gives me a max Z height of about 120mm.
Edited 1 time(s). Last edit at 01/31/2015 04:50PM by docdawning.
|
Re: Refit of a MakerBot Cupcake; request for suggestions February 01, 2015 04:07PM |
Registered: 9 years ago Posts: 31 |
Update 2015-02-01
Endstops
I had never really dealt with my Endstops when I first built this makerbot. I regretted it severely on at least one occasion. In reading the Marlin firmware calibration guide I linked a few days ago, it commented that endstops should be working before you do much with your steppers. Since I'm now working with a relatively odd-sized machine, and factoring my past endstop regrets, I dug in to wiring them up. Most certainly time-consuming and kind of uninteresting.
Here I'd discovered that something was wrong with my ground header pin on one of my opto-sensors, if you look closely you'll see a little barnacle I added to connect the header to the board's ground plane, which, in-turn made it usable:
As I installed cables, I made one ethernet cable myself before deciding I don't care much about having perfect-length cables just yet. I used a decent amount of hot glue and zip-straps to keep things where I expect them:
Here's an example of a cut zip strap as I'm using them:
Just a shot of lining up one of my X endstops with the zip-strap plastic I was cutting up to fit. I like the zip-straps because they have a slight bend in the end that I can just to deflect the plastic back in to place, should it sag slightly.
I tried my best to secure cables very very cleanly and keep things very organized. When I receive my new RAMBo or Smoothieboards, I'll probably be undoing some of this work, but no matter.
Edited 1 time(s). Last edit at 02/01/2015 04:11PM by docdawning.
Endstops
I had never really dealt with my Endstops when I first built this makerbot. I regretted it severely on at least one occasion. In reading the Marlin firmware calibration guide I linked a few days ago, it commented that endstops should be working before you do much with your steppers. Since I'm now working with a relatively odd-sized machine, and factoring my past endstop regrets, I dug in to wiring them up. Most certainly time-consuming and kind of uninteresting.
Here I'd discovered that something was wrong with my ground header pin on one of my opto-sensors, if you look closely you'll see a little barnacle I added to connect the header to the board's ground plane, which, in-turn made it usable:

As I installed cables, I made one ethernet cable myself before deciding I don't care much about having perfect-length cables just yet. I used a decent amount of hot glue and zip-straps to keep things where I expect them:

Here's an example of a cut zip strap as I'm using them:

Just a shot of lining up one of my X endstops with the zip-strap plastic I was cutting up to fit. I like the zip-straps because they have a slight bend in the end that I can just to deflect the plastic back in to place, should it sag slightly.

I tried my best to secure cables very very cleanly and keep things very organized. When I receive my new RAMBo or Smoothieboards, I'll probably be undoing some of this work, but no matter.

Edited 1 time(s). Last edit at 02/01/2015 04:11PM by docdawning.
|
Re: Refit of a MakerBot Cupcake; request for suggestions February 02, 2015 01:03PM |
Registered: 9 years ago Posts: 31 |
Update 2015-02-02
Endstop work continued
I found a dead endstop, my guess is it had been connected to power with the polarity inverted at some point years ago. I also had a couple endstops that only worked after some resoldering, etc. I've got Max and Min endstops installed and working for my X and Y axes, but I only have a min endstop for my Z, which I don't think is a big deal anyway. That said, I've got a total of about 8 potential replacement endstops in the mail.
If I run without a Z max endstop, then I gain a little over 10mm of vertical print area, I'm not sure I care that much about that though:
X won't function
Since digging this machine out, I've yet to see any stepper attached to the X-axis port of my Gen3 motherboard move more than about 0.1mm (before refusing to do anything further before a full reset). I've confirmed that my X driver and stepper work so long as I hook them up to a different axis on the gen3. My guess is that I fried something in my AVR cpu and thus can't drive the X-driver. Though I don't know how likely this failure is?
MakerBot Cupcake mechanical parameters
I needed to get relatively good values for my feedrate and steps per mm in order to use this thing.. I figured I could find the right values burried somewhere in ReplicatorG. Turns out, yes, very much. Here's the relevant subsection from ReplicatorG's Cupcake Basic confirmation:
Therefore I've entered feedrate values of 5000 for my X and Y, and 150 for my Z.
As well as steps-per-mm of 11.767463 for my X and Y, and 320 for my Z.
I can't really validate these for my X axis, but a bit fo testing with my Y and Z seem to confirm these to be fine values.
Marlin Firmware Config File
I was kind of lighlly irritated by some of the formatting of the Marlin config file, and thought it was lacking a bit of references to online docs, so I decided to pull down a clone of the trunk release, alter the config file and generate a push-request. A minor detour, but something along the way to my eventual victory.
Endstop work continued
I found a dead endstop, my guess is it had been connected to power with the polarity inverted at some point years ago. I also had a couple endstops that only worked after some resoldering, etc. I've got Max and Min endstops installed and working for my X and Y axes, but I only have a min endstop for my Z, which I don't think is a big deal anyway. That said, I've got a total of about 8 potential replacement endstops in the mail.
If I run without a Z max endstop, then I gain a little over 10mm of vertical print area, I'm not sure I care that much about that though:

X won't function
Since digging this machine out, I've yet to see any stepper attached to the X-axis port of my Gen3 motherboard move more than about 0.1mm (before refusing to do anything further before a full reset). I've confirmed that my X driver and stepper work so long as I hook them up to a different axis on the gen3. My guess is that I fried something in my AVR cpu and thus can't drive the X-driver. Though I don't know how likely this failure is?
MakerBot Cupcake mechanical parameters
I needed to get relatively good values for my feedrate and steps per mm in order to use this thing.. I figured I could find the right values burried somewhere in ReplicatorG. Turns out, yes, very much. Here's the relevant subsection from ReplicatorG's Cupcake Basic confirmation:
axis id="x" length="100" maxfeedrate="5000" stepspermm="11.767463" endstops="min"
axis id="y" length="100" maxfeedrate="5000" stepspermm="11.767463" endstops="min"
axis id="z" length="100" maxfeedrate="150" stepspermm="320" endstops="min"
Therefore I've entered feedrate values of 5000 for my X and Y, and 150 for my Z.
As well as steps-per-mm of 11.767463 for my X and Y, and 320 for my Z.
I can't really validate these for my X axis, but a bit fo testing with my Y and Z seem to confirm these to be fine values.
Marlin Firmware Config File
I was kind of lighlly irritated by some of the formatting of the Marlin config file, and thought it was lacking a bit of references to online docs, so I decided to pull down a clone of the trunk release, alter the config file and generate a push-request. A minor detour, but something along the way to my eventual victory.
|
Re: Refit of a MakerBot Cupcake; request for suggestions February 03, 2015 11:49AM |
Registered: 9 years ago Posts: 31 |
Update 2015-02-03
Motion Working
Well, I finally figured out how to get my X axis to move. I was using the GEN3_MONOLITHIC motherboard profile in the Marlin firmware, however, upon switching to the GEN3_PLUS profile my X started working like my already-functional Y and Z.
Here's a video of the motion: [www.youtube.com]
Up next will be to remove the Gen3 board and the drivers and install my new RAMBo board, which I should receive today. I expect it'll take me a few days of fiddling to get things going.
|
Re: Refit of a MakerBot Cupcake; request for suggestions February 04, 2015 12:50PM |
Registered: 9 years ago Posts: 31 |
Update 2015-02-04
I've documented my project thus far, and called it "Episode 1" as I feel like I've reached a milestone. I've got things moving around sanely with the Gen3 board. There's certainly room for refinement, however, since I'm about to replace all the electronics and things are relatively working, I'm calling this the end of the first stage of the project.
I've documented my project thus far, and called it "Episode 1" as I feel like I've reached a milestone. I've got things moving around sanely with the Gen3 board. There's certainly room for refinement, however, since I'm about to replace all the electronics and things are relatively working, I'm calling this the end of the first stage of the project.
|
Re: Refit of a MakerBot Cupcake; request for suggestions February 14, 2015 04:13AM |
Registered: 9 years ago Posts: 31 |
Update 2015-02-13
Well, great success! I've got my "Cupcake" working, I believe rather well. I don't think it's right to call it a MakerBot Cupcake anymore, as it's come so far and isn't the same type of machine now.
I'm calling it Cupcake155, as it's now particularly unique.
I've documented the details of what I did to get it going on my website here.
Edited 1 time(s). Last edit at 02/14/2015 04:14AM by docdawning.

Well, great success! I've got my "Cupcake" working, I believe rather well. I don't think it's right to call it a MakerBot Cupcake anymore, as it's come so far and isn't the same type of machine now.
I'm calling it Cupcake155, as it's now particularly unique.
I've documented the details of what I did to get it going on my website here.

Edited 1 time(s). Last edit at 02/14/2015 04:14AM by docdawning.
|
Re: Refit of a MakerBot Cupcake; request for suggestions February 18, 2015 10:02PM |
Registered: 9 years ago Posts: 248 |
|
Re: Refit of a MakerBot Cupcake; request for suggestions May 29, 2015 03:54PM |
Registered: 9 years ago Posts: 31 |
|
Re: Refit of a MakerBot Cupcake; request for suggestions September 10, 2015 08:32PM |
Registered: 9 years ago Posts: 31 |
Anyone stumbling on this thread down the road, may want to check out my blog where I occasionally post updates on the beast this old rig has become. Check it out here: [www.dawning.ca].
Over & out.
Over & out.
Sorry, only registered users may post in this forum.