New Delta Printer - Look Ma, no rails!
Posted by LoboCNC
|
Re: New Delta Printer - Look Ma, no rails! July 04, 2015 02:31AM |
Registered: 8 years ago Posts: 5,232 |
|
Re: New Delta Printer - Look Ma, no rails! July 04, 2015 11:41AM |
Registered: 10 years ago Posts: 401 |
It's true, we need to add some complexity to get scalability. For me it started with a wish for easier (less time consuming) reproduction. The most fun and fulfilling thing I do with my RepRaps is to make copies for friends and family, and observe how they end up using it. Some let it collect dust, some end up making a living out of it and most end up printing stuff I could never predict the need for.
As I see it, your design is way easier to reproduce than any other design I've seen. It's indeed a very interesting build-your-own printer variant (which is kind of what the RepRap project is all about). I find the low part count a very concrete improvement, and not fussy at all.
Anyways, I'm very interested in how fast/slow the wire eyelets wear down the fishing line.
@o_lampe: Do you mean like a sailing boat winch, where a constant number of windings are forced to "wander" down the shaft, like this: [www.youtube.com]
... and then collect the leftover line on a larger spool? In that case, I guess the larger spool could just be driven by a spring since very little force and precision is needed.
torbjornludvigsen.com
|
Re: New Delta Printer - Look Ma, no rails! July 04, 2015 11:48AM |
Admin Registered: 13 years ago Posts: 730 |
Would you be able to post some pictures of this? I am curious what all the string routing looks like from underneath.Quote
LoboCNC
I've got the in-feed height of both the right and left strings for each pair located in the center of the shaft and as the shaft turns, one string winds up the shaft and the other winds down the shaft. There's a slight bias pulling the strings back towards the center so each string ends up with a tight, single layer wrap.
Also, nice work!
|
Re: New Delta Printer - Look Ma, no rails! July 04, 2015 01:19PM |
Registered: 10 years ago Posts: 169 |
You could also use dead weights on string line to replace the rubber hose for tension on the center post. That way the tension would remain constant regardless of effector position. Suspend the weights in the support posts and run the string line over v-groove pulleys up to the top of the center post where you have the hose mounted now.
|
Re: New Delta Printer - Look Ma, no rails! July 04, 2015 01:28PM |
Registered: 10 years ago Posts: 169 |
Quote
simspeed
You could also use dead weights on string line to replace the rubber hose for tension on the center post. That way the tension would remain constant regardless of effector position. Suspend the weights in the support posts and run the string line over v-groove pulleys up to the top of the center post where you have the hose mounted now.
The same could be true if you replaced the effector fishing line with synchromesh cable. Fix one end solid where you now have the guitar tuners...then string as you have now with the cable running through dual pulleys at the effector and then over a toothed pulley at the stepper motor with the loose end tied to a suspended weight. for tension. That way no wrapping issues at the stepper shaft and constant tension on the cable for all three steppers. Cost more of course but quite scalable and durable.
You could then mount the steppers anywhere you want (the base seems more suited for weight bias), and encase almost everything for a clean appearance with virtually no mechanical tuning or maintenance. I would use 8020 v-slot extrusions for the 3 vertical uprights and suspend dual weights inside the extrusion cavities for each leg of the delta. One for the post tension and one for the stepper cable tension with v pulleys top and bottom.
It'd be a fun build but I'm too involved now to give it a try. Hope someone tries these ideas...
Edited 3 time(s). Last edit at 07/04/2015 01:44PM by simspeed.
|
Re: New Delta Printer - Look Ma, no rails! July 04, 2015 01:43PM |
Registered: 10 years ago Posts: 564 |
Quote
simspeed
You could also use dead weights on string line to replace the rubber hose for tension on the center post. That way the tension would remain constant regardless of effector position. Suspend the weights in the support posts and run the string line over v-groove pulleys up to the top of the center post where you have the hose mounted now.
I'm a little reluctant to use dead weights for tension because it adds to the moving mass and will limit accelerations. Instead, I'm thinking of replacing the surgical tubing with constant force springs.
|
Re: New Delta Printer - Look Ma, no rails! July 04, 2015 01:51PM |
Registered: 10 years ago Posts: 169 |
Good idea Jeff, I'm planning to use CF springs to offset the weight for my X gantry (current build). The mass is still there of course but the motors won't have to support the weight and it won't fall in the event of power failure. Also...on your design, if you were to use equal weights for the pole and stepper motor pairs you would in effect create a CF spring condition because the two weight move opposite directions for a given leg of the delta. Mass would be there but with a correct torque value for the motors it shouldn't be an issue I don't think.
Edited 1 time(s). Last edit at 07/04/2015 02:02PM by simspeed.
Edited 1 time(s). Last edit at 07/04/2015 02:02PM by simspeed.
|
Re: New Delta Printer - Look Ma, no rails! July 04, 2015 02:14PM |
Registered: 10 years ago Posts: 564 |
Quote
MattMoses
Would you be able to post some pictures of this? I am curious what all the string routing looks like from underneath.
Also, nice work!
Thanks! Here's a photo of the rigging. Starting at the motor, I clip on an E-ring over the shaft (it clamps tight enough with out a groove). I then take about 2m of fishing line and tie the middle of the line to the E-ring. One free end of the line winds up the shaft and the other end winds down the shaft. The height of the wire eyelets (foreground one in focus, background one out of focus) is at the same level as the E-ring, so as the lines wind up, they are pulled slightly towards center, keeping the wraps nice and tight. After going thru the upper eyelets, the strings go down thru lower eyelets on the carriage, back up thru the same upper eyelets, and then over to the guitar tuners for taking up slack at the fixed end. This ends up giving you a 2:1 pulley reduction.
Right now, my problem is that I have just barely enough shaft length to wind up all the line that's needed. I could eliminate the 2:1 reduction, but then I'd have to move my tuners to the carriage, which is unattractive, although it would eliminate a source of string wear. (Getting the strings adjusted without the tuners is a nightmare.) Alternately, I may put a larger diameter sleeve over the motor shaft.

|
Re: New Delta Printer - Look Ma, no rails! July 04, 2015 02:34PM |
Registered: 10 years ago Posts: 564 |
Quote
simspeed
Good idea Jeff, I'm planning to use CF springs to offset the weight for my X gantry (current build). The mass is still there of course but the motors won't have to support the weight and it won't fall in the event of power failure. Also...on your design, if you were to use equal weights for the pole and stepper motor pairs you would in effect create a CF spring condition because the two weight move opposite directions for a given leg of the delta. Mass would be there but with a correct torque value for the motors it shouldn't be an issue I don't think.
The problem I'm worried about with adding weights is not so much motor torque for accelerating them, but the added ringing that will occur with the extra mass. The whole setup is not hyper-rigid. Right now, the carriage weights about 100g. It needs somewhere between 500 - 1000g downward force on the tension post to keep all the lines nicely in tension. I don't know exactly much reflected mass there would be at the carriage from a 1000g dead weight pulling downward, but it would certainly end up being a lot more than the 100g that I've got now.
|
Re: New Delta Printer - Look Ma, no rails! July 05, 2015 02:48AM |
Registered: 10 years ago Posts: 169 |
I see that you've obtained excellent results with the design you have now. I can appreciate that value considering the simplicity and relative low cost of your design. But as you've stated there are drawbacks in certain areas that would benefit the utility of the machine if they could be practically overcome. The suggestions I've made are of course just that....whether or not they would prove to be practical can only be known if applied. That application would necessitate changes in structural materials as well as component parts which unfortunately come at higher expense. Whether or not the outcome or expense of those changes would be worthwhile is understandably debatable. I offer them not as critiques of your excellent work, but as secondary thought on possible improvements. I like the idea of adding to the whole of current thought on the 3d printing process, and the ingenious machines that people like yourself come up with. Best of luck to you with this one Jeff...I think it could add significantly to the reprap model of self designed/self-built 3d printers.
|
Re: New Delta Printer - Look Ma, no rails! July 05, 2015 10:51AM |
Registered: 10 years ago Posts: 564 |
@simspeed - While I've gone the ultra-cheap route with the particular printer, I'm starting to become convinced that this basic approach may be a viable alternative printer design. You and others have made excellent suggestions that would make this approach more appealing for a "serious" machine - stiffer, larger work envelope, and generally less sketchy. I'd be very keen to see a printer worked out with gimballed pulleys and using synchromesh cable like you've talked about. As you point out, they'll add some expense, but with some clever design, you could end up very nice, very large printer. In particular, standard deltas scale pretty nicely in Z, where as this configuration should scale more nicely in X & Y, provided your cables are stiff enough.
|
Re: New Delta Printer - Look Ma, no rails! July 05, 2015 11:16AM |
Registered: 10 years ago Posts: 564 |
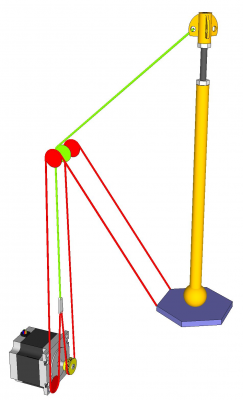
simspeed's thoughts on using synchromesh cable got me to thinking about this possible method for cabling up a Delta-T type printer. (BTW, the "T" is for tensegrity.) This configuration should give near constant downward force on the tension post independent of the Z height. Note you would need tandem synchromesh cables as each motor needs to drive 2 cables in parallel - I've just shown one for clarity.

|
Re: New Delta Printer - Look Ma, no rails! July 05, 2015 11:43AM |
Registered: 10 years ago Posts: 169 |
Quote
LoboCNC
simspeed's thoughts on using synchromesh cable got me to thinking about this possible method for cabling up a Delta-T type printer. (BTW, the "T" is for tensegrity.) This configuration should give near constant downward force on the tension post independent of the Z height. Note you would need tandem synchromesh cables as each motor needs to drive 2 cables in parallel - I've just shown one for clarity.
Now we're on the same wavelength Jeff. I came up with a similar thought and fleshed out the line routing last night in bed. It eliminates any counterweights or springs, and removes the need for a top plate to the printer housing. I'll put a quick drawing together that shows the mechanical components and cable routing that tie the parallel lines for each leg to the tension pole. Cheers...
|
Re: New Delta Printer - Look Ma, no rails! July 05, 2015 12:53PM |
Registered: 10 years ago Posts: 169 |


Here is a representation of the cable routing for one leg. As the motor turns the effector and tension pole moves in conjunction with the other 2 legs throughout the desired path. Static line tension is created by having the tension pole length adjustable to put whatever load is necessary on the combined cables for all legs simultaneously. Mount the motor and pulleys at the base and top of a V-slot C channel extrusion and brace to a base plate accordingly.
Here is the 3 leg Delta-T configuration. Each of the top V groove pulleys would likely have to center pivot around the horizontal axis to follow the effector path without binding. I see that solution pretty easy to build using a pivot plate with a center post slipped down into one of the V-Slot end plate holes.
Edited 2 time(s). Last edit at 07/05/2015 01:04PM by simspeed.
|
Re: New Delta Printer - Look Ma, no rails! July 05, 2015 01:33PM |
Registered: 10 years ago Posts: 564 |
Quote
simspeed
Here is a representation of the cable routing for one leg. As the motor turns the effector and tension pole moves in conjunction with the other 2 legs throughout the desired path. Static line tension is created by having the tension pole length adjustable to put whatever load is necessary on the combined cables for all legs simultaneously. Mount the motor and pulleys at the base and top of a V-slot C channel extrusion and brace to a base plate accordingly.
Here is the 3 leg Delta-T configuration. Each of the top V groove pulleys would likely have to center pivot around the horizontal axis to follow the effector path without binding. I see that solution pretty easy to build using a pivot plate with a center post slipped down into one of the V-Slot end plate holes.
Yeah, something like that! In the green cable, you may need to add an in-line spring because the overall cable length will not remain exactly constant as you move around.
|
Re: New Delta Printer - Look Ma, no rails! July 05, 2015 01:47PM |
Registered: 10 years ago Posts: 169 |
Yea, I wondered about that. As the effector rises or moves closer to the pulley pivot points the red lines will shorten as the green line lengthens but that's proportional for all three legs. The center pivot for the tension post doesn't change in relation to the effector. but I can't decide if the top of the post moves disproportional within the diameter of movement. I tend to think that it does not. If that's true, then the tension on all lines would stay static in all positions wouldn't they? Here's a concept for the top pulley plate. Spacing for clearance would be sized according to dimension for the effector plate and parallel red lines.

|
Re: New Delta Printer - Look Ma, no rails! July 05, 2015 03:21PM |
Registered: 10 years ago Posts: 32 |
|
Re: New Delta Printer - Look Ma, no rails! July 06, 2015 12:11PM |
Registered: 8 years ago Posts: 5,232 |
I tried to figure out the movement and forces for the effector pivot points.
Let´s say the stepper turns clockwise and moves the red line 1 inch. The "rear" pivot point of the effector would lift 1 inch.
But at the same time the red line would allow the front pivot point to drop 1 inch.
The green line would have to lift 2 inches, to make both pivots of the effector lift 1 inch.
Without extra spring force on the green line, the stepper movement would only make the effector turn on a vertical axis instead of moving up down
Solution:
The yellow center post could be a gas spring, we all know from rear car doors etc.
-Olaf
|
Re: New Delta Printer - Look Ma, no rails! July 06, 2015 12:37PM |
Registered: 10 years ago Posts: 169 |
Quote
o_lampe
Let´s say the stepper turns clockwise and moves the red line 1 inch. The "rear" pivot point of the effector would lift 1 inch.
But at the same time the red line would allow the front pivot point to drop 1 inch.
The green line would have to lift 2 inches, to make both pivots of the effector lift 1 inch.
Without extra spring force on the green line, the stepper movement would only make the effector turn on a vertical axis instead of moving up down
Hi Olaf...thanks for you input. For clarification about our mutual understanding of the motion, I'll state what I see and then we can all come to agreement about the motion first...then work to decide what can be done to make it workable.
When you say "rear" and "front" pivot points on the effector I take you to mean the two points where the red lines are attached. In reality those two points act as one as in a typical delta printer.
As you state, lets say the face of the stepper toothed pulley is turning clockwise from this view. Both red lines would move in unison pulling down from the two top red pulleys.that would put an equal pulling motion on the blue effector where the two red lines attach. That does not mean however that the effector would rise when all three legs are attached an programmed to work simultaneously. It "might" rise but it also might move closer to the leg tower on a flat plane depending on the line movement from the other two legs. In this drawing the movement of the red and green lines are 1:1. Downward tension on the yellow post would remain constant from all three towers as the effector is moved about the print area either horizontally, vertically, or angular.
It seems to me that providing a spring anywhere in the linkage, including the gas shock idea (which I like), would put uncontrolled movement into the XYZ plot and produce unintended results for the print itself. Jeff has already proven in his model that the string movement works to produce excellent print control. He has no spring in the string movement itself. He's using the rubber hose as springs. but only to apply tension to the pole then to the effector, not as a component of the plotted movement. Hope I didn't muddy the water.
Edited 1 time(s). Last edit at 07/07/2015 03:58AM by simspeed.
|
Re: New Delta Printer - Look Ma, no rails! July 07, 2015 02:41AM |
Registered: 8 years ago Posts: 5,232 |
|
Re: New Delta Printer - Look Ma, no rails! July 07, 2015 06:11PM |
Registered: 10 years ago Posts: 564 |
After the back & forth here, I decided to re-jigger the spring loading of the tension post. The first photo is a simplified schematic of the rigging. I now have 3 lines coming off each motor pulley - 2 go to the right and left arms of one section of the carriage and wrap in the same direction. The third line wraps in the opposite direction and goes up to a spring pulling on the top of the tension post. This way, as you lower the carriage, the end point of the spring is also lowered and you you maintain a much more constant downward force as you move up and down in Z. This also puts a much lower load on your motor because the spring force provides a positive torque to counteract the negative torque of the lines going to the carriage. Overall, the carriage stiffness is much greater thru a larger range of motion than with the previous setup.
Edit: I've just posted a youtube video of this version in action.


Edited 1 time(s). Last edit at 07/07/2015 07:16PM by LoboCNC.
Edit: I've just posted a youtube video of this version in action.
Edited 1 time(s). Last edit at 07/07/2015 07:16PM by LoboCNC.
|
Re: New Delta Printer - Look Ma, no rails! July 07, 2015 07:57PM |
Registered: 10 years ago Posts: 169 |
Very nice Jeff...very nice! So in this configuration are there Z limitations? Doesn't appear so depending on how much line you have spooled for the Z springs. What about the XY? Does that change much as the angle of the lines gets flatter as Z rises? What do you think the print area useful limits are? Great work...and fast execution of the rebuild!!
Edited 1 time(s). Last edit at 07/07/2015 07:58PM by simspeed.
Edited 1 time(s). Last edit at 07/07/2015 07:58PM by simspeed.
|
Re: New Delta Printer - Look Ma, no rails! July 07, 2015 08:33PM |
Registered: 10 years ago Posts: 564 |
Yes, there will still be limitations in scaling the Z axis. As the lines get longer, the X-Y resolution drops. This design has about a 6" dia print area and about a 6" print height. At the build table, the X-Y resolution is about 33% of the resolution of the linear resolution of the string drive. With this setup, though, my linear resolution is about 2.5x that of a plain stepper with a 20T GT2 pulley, so I'm not yet hurting for resolution overall. However, if I extended it to a 10" print height, the resolution drops to 20% of the linear resolution. Still not horrible, but a significant drop. More worrisome is the loss of stiffness with the longer lines. I could go to thicker fishing line, but as we've discussed, that'd mean using pulleys instead of eyelets (which may end up being necessary anyway). Mostly, I think I'm happy calling this a working version -- except for my lack of solution for limit switches.
|
Re: New Delta Printer - Look Ma, no rails! July 08, 2015 07:42AM |
Registered: 8 years ago Posts: 5,232 |

|
Re: New Delta Printer - Look Ma, no rails! July 08, 2015 08:09AM |
Registered: 9 years ago Posts: 1,873 |
|
Re: New Delta Printer - Look Ma, no rails! July 08, 2015 08:53AM |
Registered: 8 years ago Posts: 5,232 |
|
Re: New Delta Printer - Look Ma, no rails! July 08, 2015 10:15AM |
Registered: 10 years ago Posts: 564 |
Quote
o_lampe
Absolutely amazing!
So quiet, fast and simple. I want one so bad now!
How many different machined parts do you count so far?
Is it important to have the three "springs" pulling exactly with the same force?
-Olaf
Thanks! Right now, the only machined parts are the hot-end heater block, the aluminum carriage plate and the pulleys on the motors that wind up the strings. The aluminum carriage plate could actually be hand fabricated pretty easily, and instead of the pulleys, you could use 5mm ID brass or steel tubing. That leaves the heater block as the only real machined part, although even that could be hand fabricated with a little care. The top and bottom plates are laser cut acrylic, but they could be fabricated by hand as well by using a printed paper template for marking the hole locations.
It's not really that important that the springs pull with exactly the same force. If you look at the latest video, you'll see the 3 springs all get streched to different lengths as the carriage moves around.
|
Re: New Delta Printer - Look Ma, no rails! July 08, 2015 12:33PM |
Registered: 8 years ago Posts: 5,232 |
Quote
o_lampe
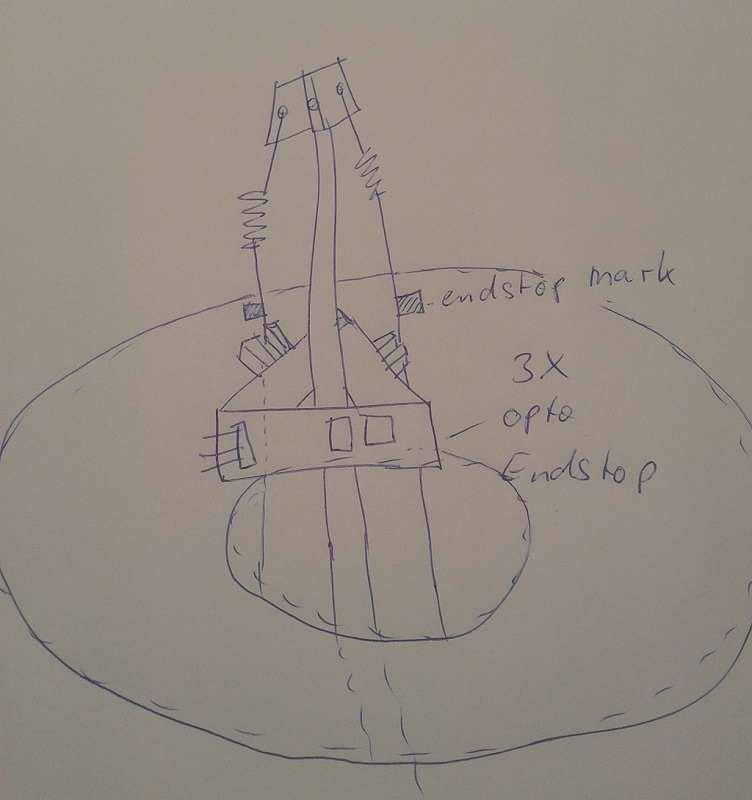
About the homing issue:
Can you add black tape marks on the fishing line, so when they run through an optical endstop, will trigger the home position?
Not very accurate, but a starting point
-Olaf
Just wanted to bump up my earlier proposal.
Now with the rearranged line feed a chance to add endstops? Mount them on the center post, below the rubber?
-Olaf
Edited 2 time(s). Last edit at 07/08/2015 12:41PM by o_lampe.
|
Re: New Delta Printer - Look Ma, no rails! July 08, 2015 01:32PM |
Registered: 10 years ago Posts: 564 |
Quote
o_lampe
Now with the rearranged line feed a chance to add endstops? Mount them on the center post, below the rubber?
-Olaf
Excellent point - with the original setup, trying to put anything on the main drive strings is tricky because they move around at different angles and there's no good place to put the limit switch. The strings going to the tension post don't move around as much, so they may be easier to put a flag on. Exactly where & how is still a good question. Could you post a sketch of what you are thinking of?
|
Re: New Delta Printer - Look Ma, no rails! July 08, 2015 02:59PM |
Registered: 8 years ago Posts: 5,232 |
You know better, for me it´s just a bunch of wires 
When the printhead is homed, there has to be a certain constellation of the wires.
I hoped adding three opto-endstops to the pole and running the tension lines through the optosensor, would be precise enough?
Or a metalfoil wrapped around the lines can trigger inductive sensors?
But I have no experience with deltas, they seem to need a higher accuracy for homing than Cartesians.
-Olaf


Sorry, only registered users may post in this forum.