Yet another Prusa x axis waiting your comments
Posted by toofunal
|
Yet another Prusa x axis waiting your comments March 13, 2016 10:21AM |
Registered: 8 years ago Posts: 10 |
Hello all reprapers;
I’ve been thinking building an all-steel Prusa about a while. I was thinking to do some modifications, especially for belts, I want to use pulleys for idlers and want to have spring tensioners. So I remodeled Prusa v2.5 according to laser cutting dwg. I’ve made some modifications for belt and z axis threaded rod.
I have ability use a lathe machine and I felt free to use lathed parts as vitamins instead of printed parts. I’m aware this is a bit against reprap philosophy.
Hence these are relatively little modifications I want you to ignore them at least for now and comment for whole x axis and extruder.
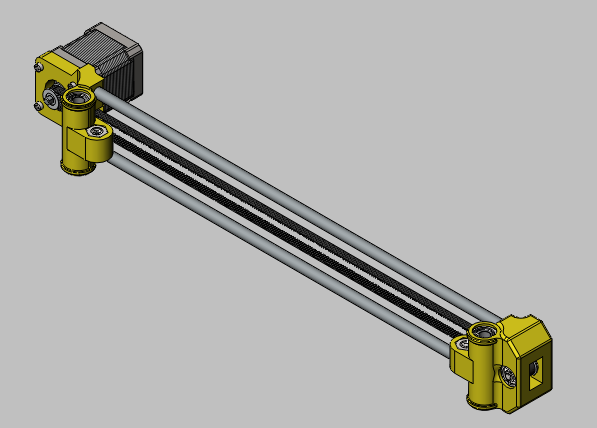
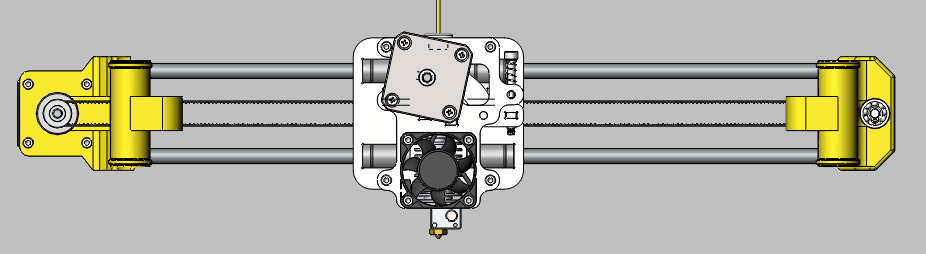
Here is X motor holder and idler parts and smooth rods isometric view. Smooth rod is Ø8 mm.
As y axis I’ve added idler pulled with two 625 bearing. Also I’ve used two M8 nut, I’ve used two LME8UU with circlips for both ends.
This is motor holder for x axis. For Nema17 and LME08UU.
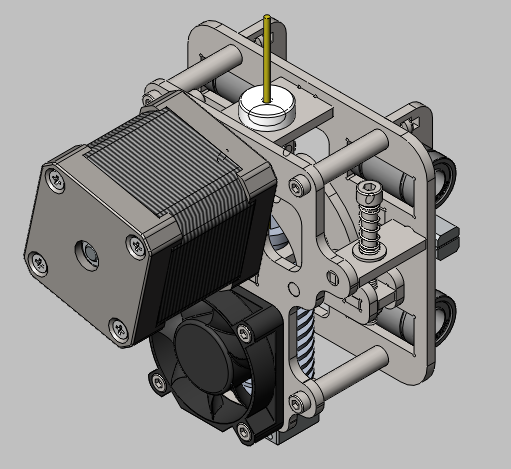
Here is exploded view of X carriage and extruder&hotend. Extruder gear is MK7 Gear (length: 13mm filament Ø1.75mm). Filament idler is againg 625 bearing with no groove. E3d hotend with 6mm mounting bore. (I have a v5 hotend which has 5.6mm bore with Ø12mm diameter. I will lathe 0.4 mm upwards to have 6mm bore. V6 e3d hotends natively have 6mm bores). I will lathe a PTFE part for filament aligner. (White part on top with 2 mm hole)
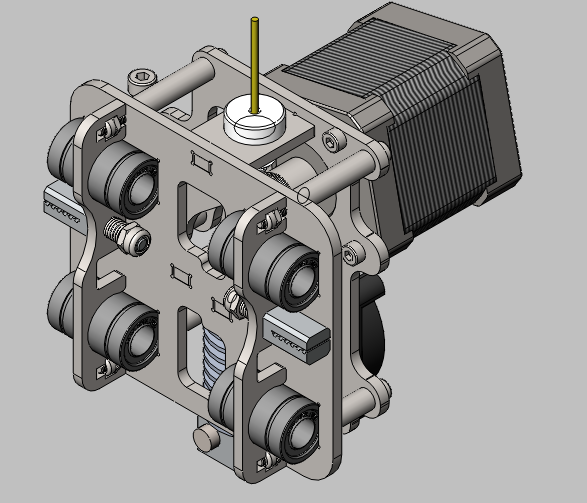
Isometric view of x carriage and extruder. I’m planning to use four little lathed parts around M3x40 bolts as spacer for not tightening idler mechanism.
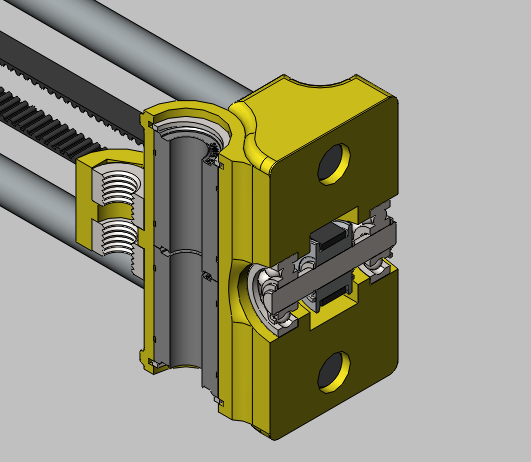
Back of x carriage. I will use to wire erosion cut aluminum parts for belts with spring tensioners.
Cross section views according to filaments mid-plane.
Top view together.
Front view together.
On the prusa all steel.
And finally I want to mention about weights.
These are 940 gram and I think I can’t cut any weight except stepper. I have 17HS8401 (1.8A 78oz-in) which is 400 gr. I may change it, if smaller one will be strong enough to reach required acceleration vales for x carriage movements.
These are 885 gr with steel, 690 gr with aluminum and 624 gr with ABS, (My stepper is a bit heavy, I think a smaller stepper would easily drive filament. And COG is approximately 36 mm apart from smooth rod center for steel 41,5mm for aluminum and 44mm for ABS.
In the light of everting I mentioned above, can you comment for questions below.
1) I will use two 17HS8401 (1.8A 78oz-in) for z axis. Can they lift up worst scenario with M8 rods (steel X carriage) 940+885=1825 gr.
2) Same stepper will drive x carriage, can I achieve required acceleration values?
3) General thoughts regarding design. Cons (please don’t take my head off) and pros (if there is some really ).
Thank you for your time.
Regards.
Tufan.
Edited 1 time(s). Last edit at 03/13/2016 10:34AM by toofunal.
I’ve been thinking building an all-steel Prusa about a while. I was thinking to do some modifications, especially for belts, I want to use pulleys for idlers and want to have spring tensioners. So I remodeled Prusa v2.5 according to laser cutting dwg. I’ve made some modifications for belt and z axis threaded rod.
I have ability use a lathe machine and I felt free to use lathed parts as vitamins instead of printed parts. I’m aware this is a bit against reprap philosophy.
Hence these are relatively little modifications I want you to ignore them at least for now and comment for whole x axis and extruder.

Here is X motor holder and idler parts and smooth rods isometric view. Smooth rod is Ø8 mm.

As y axis I’ve added idler pulled with two 625 bearing. Also I’ve used two M8 nut, I’ve used two LME8UU with circlips for both ends.

This is motor holder for x axis. For Nema17 and LME08UU.

Here is exploded view of X carriage and extruder&hotend. Extruder gear is MK7 Gear (length: 13mm filament Ø1.75mm). Filament idler is againg 625 bearing with no groove. E3d hotend with 6mm mounting bore. (I have a v5 hotend which has 5.6mm bore with Ø12mm diameter. I will lathe 0.4 mm upwards to have 6mm bore. V6 e3d hotends natively have 6mm bores). I will lathe a PTFE part for filament aligner. (White part on top with 2 mm hole)

Isometric view of x carriage and extruder. I’m planning to use four little lathed parts around M3x40 bolts as spacer for not tightening idler mechanism.

Back of x carriage. I will use to wire erosion cut aluminum parts for belts with spring tensioners.

Cross section views according to filaments mid-plane.

Top view together.

Front view together.

On the prusa all steel.
And finally I want to mention about weights.
These are 940 gram and I think I can’t cut any weight except stepper. I have 17HS8401 (1.8A 78oz-in) which is 400 gr. I may change it, if smaller one will be strong enough to reach required acceleration vales for x carriage movements.
These are 885 gr with steel, 690 gr with aluminum and 624 gr with ABS, (My stepper is a bit heavy, I think a smaller stepper would easily drive filament. And COG is approximately 36 mm apart from smooth rod center for steel 41,5mm for aluminum and 44mm for ABS.
In the light of everting I mentioned above, can you comment for questions below.
1) I will use two 17HS8401 (1.8A 78oz-in) for z axis. Can they lift up worst scenario with M8 rods (steel X carriage) 940+885=1825 gr.
2) Same stepper will drive x carriage, can I achieve required acceleration values?
3) General thoughts regarding design. Cons (please don’t take my head off) and pros (if there is some really ).
Thank you for your time.
Regards.
Tufan.
Edited 1 time(s). Last edit at 03/13/2016 10:34AM by toofunal.
Attachments:
open | download - 01.png (56.9 KB)
open | download - 02.png (71.9 KB)
open | download - 03a.png (176.3 KB)
open | download - 04.png (118.8 KB)
open | download - 05.png (118.4 KB)
open | download - 05a.png (150.7 KB)
open | download - 07.png (56.4 KB)
open | download - 09.png (46.5 KB)
open | download - 10.png (47 KB)
open | download - 11.png (94.1 KB)
|
Re: Yet another Prusa x axis waiting your comments March 13, 2016 11:03AM |
Registered: 9 years ago Posts: 1,873 |
Hi Tufan,
This looks really good - congratulations!
Do you have an existing printer, or will this be your first one? If it's the first, it's a very ambitious and impressive design
I have a few thoughts and suggestions as I look through your description:
I find the vertical arrangement of the 8mm smooth rods a weakness in the Prusa design. A relatively small twisting motion of the rods around the common axis translates into quite large vertical movements of the nozzle tip. I'm thinking of redesigning my X axis to put the rods in the horizontal plane. Using larger diameter rods would also help.
I'd recommend T8 lead screws over m8 thread rods.
Your belt tension arrangement looks good, but if you put the adjustment into the idler mount it would be easier to access.
On the extruder, the tension arm doesn't look ideal. You want the long arm on the spring side and the short arm on the bearing side for mechanical advantage. With an ungeared extruder you have to release the tension to change the filament, so you probably want an easily accessible long arm that you can depress to get the filament in and out. You said you were using a mk7 gear and a flat bearing - my mk7 gears are also flat profile and generally you want at least one side to be grooved to help keep the filament centered. If you use a grooved bearing you might not need the ptfe guide on the top, and that might improve the visibility of the top of the feedpath. If you change filaments a lot (I do!) it's surprising how helpful it is to be able to see what you're doing. Similarly, if you get filament grinding you need to be able to access the drive gear to clean out the teeth - how easy or difficult will that be in this design? (Can you tell I've been working on extruder designs recently?).
Looking at your questions, the Z motors won't have any trouble lifting the Z axis, even if you change to leadscews. I use a single Z motor of similar spec and an ungeared belt drive for my T8 Z axis.
Similarly, I don't see any lack of performance with my X axis motor, but I don't print as fast as a lot of people. That said, my system uses 250 mm/s travel moves (but only 1200 mm/s2 acceleration). I use lower accelerations both for print quality and because I hate to see the printer thrashing itself during small infill.
And question 3 I think I already went over the top with
Hope some of these observations are useful, your design is looking great and I hope you enjoy building it!
|
Re: Yet another Prusa x axis waiting your comments March 13, 2016 11:39AM |
Registered: 11 years ago Posts: 5,780 |
A little over a year ago I rebuilt my printer, including a redesign and rebuild of the X axis. I went from two 1/2" round guide rails to a single linear guide mounted on a 1" square aluminum tube. It is very rigid and the linear guide bearings are as perfect as you can get, and much more compact than a design using two end-supported round guide rails. Attaching an extruder is very easy because the bearing block has a flat surface and screw holes.
The X axis attaches to the Z axis screw assemblies with two screws at each end and can be removed as a unit in about 1 minute. The Z axis screws are driven by a single motor and belt, so when I remount the X axis I usually don't have to readjust the bed level or realign the X axis.
The only philosophy I am interested in is the pursuit of maximum print quality and reliability, so I have been trying to eliminate plastic parts from my printer. Here is the new X axis, though I recently replaced the printed motor mount with one machined from aluminum. The last part to replace is the belt tensioner on the left end of the X axis:
Here's the ABS motor mount:
And here's the aluminum replacement. I started with a mount I bought via ebay for $20 and milled/drilled it to place the motor in the same position as the plastic part.:
Here's the ABS belt tensioner- you can see the belt is riding low on the pulley due to the plastic flexing because of tension on the belt. I'll be replacing it with aluminum soon.
Here's a view of the extruder carriage. I could not come up with an easy way to mount the extruder shelf directly to the bearing block so I used the rectangular spacer. At some point I will machine a part that will allow the extruder to mount closer to the block.
You can see my old X-axis here:
Ultra MegaMax Dominator 3D printer: [drmrehorst.blogspot.com]
The X axis attaches to the Z axis screw assemblies with two screws at each end and can be removed as a unit in about 1 minute. The Z axis screws are driven by a single motor and belt, so when I remount the X axis I usually don't have to readjust the bed level or realign the X axis.
The only philosophy I am interested in is the pursuit of maximum print quality and reliability, so I have been trying to eliminate plastic parts from my printer. Here is the new X axis, though I recently replaced the printed motor mount with one machined from aluminum. The last part to replace is the belt tensioner on the left end of the X axis:

Here's the ABS motor mount:

And here's the aluminum replacement. I started with a mount I bought via ebay for $20 and milled/drilled it to place the motor in the same position as the plastic part.:

Here's the ABS belt tensioner- you can see the belt is riding low on the pulley due to the plastic flexing because of tension on the belt. I'll be replacing it with aluminum soon.

Here's a view of the extruder carriage. I could not come up with an easy way to mount the extruder shelf directly to the bearing block so I used the rectangular spacer. At some point I will machine a part that will allow the extruder to mount closer to the block.

You can see my old X-axis here:

Ultra MegaMax Dominator 3D printer: [drmrehorst.blogspot.com]
|
Re: Yet another Prusa x axis waiting your comments March 13, 2016 12:17PM |
Registered: 8 years ago Posts: 10 |
Hi James,
First of all thanks a lot for your comments.
I don’t have a printer but I’ve assembled and run a Sigma Printer for a friend listed on the link below. [www.thingiverse.com] (Which has dual smooth rod for z axis as your suggest )
Doubling smooth rod for z axis is also one of the points that I mused. But I gave up, It will be completely new design. I thought it will be easier to have a 3d printer to print parts for my future designs. I want to keep number of unforeseen things low for my first custom build. I’m not sure if it helps to stabilize z axis but I want to bear M8 rod with a lathed part with a 625 bearing from top to minimize balance on threaded rod. T8 will be in my mind for double smooth rod design.
For the belt tensioners, at the beginning I was thinking in same manner. There are some good examples for idler tensioners already. But this belt end/tensioner design is actually for my delta printer design I used same design directly because I already have this part produced in plenty quantities so I want to use same design. Both belt ends are on X carriage so I think moving carriage to x=100 mm coordinate would help to easy access.
For filament idler arm I’m totally agree with you. I think I have to change arm design. I haven’t studied with such small geometries before. It was hard to find support place for support pin. I think, at least I can expand arm a bit outside even if other side length has to be same to increase moment. I will use grooved gear. I don’t know what the real name is for this gear is but the gear dimension is nearly as below.
I think it will possible to reach extruder gear tooth from top beside from filament aligner or from side
I printed several parts with PLA and 3-4 parts with ABS on my friend’s printer. So I can’t count myself experienced in fdm printing. But as you mentioned one of the tricks I’ve learnt from these short experiences is that, keeping acceleration and speed values low as possible you get higher quality prints. Achieving higher speeds or acceleration values is not primary goal for me.
Thanks again for your precious experience and comments.
Regards.
Edited 1 time(s). Last edit at 03/13/2016 12:23PM by toofunal.
First of all thanks a lot for your comments.
I don’t have a printer but I’ve assembled and run a Sigma Printer for a friend listed on the link below. [www.thingiverse.com] (Which has dual smooth rod for z axis as your suggest
)Doubling smooth rod for z axis is also one of the points that I mused. But I gave up, It will be completely new design. I thought it will be easier to have a 3d printer to print parts for my future designs. I want to keep number of unforeseen things low for my first custom build. I’m not sure if it helps to stabilize z axis but I want to bear M8 rod with a lathed part with a 625 bearing from top to minimize balance on threaded rod. T8 will be in my mind for double smooth rod design.

For the belt tensioners, at the beginning I was thinking in same manner. There are some good examples for idler tensioners already. But this belt end/tensioner design is actually for my delta printer design I used same design directly because I already have this part produced in plenty quantities so I want to use same design. Both belt ends are on X carriage so I think moving carriage to x=100 mm coordinate would help to easy access.
For filament idler arm I’m totally agree with you. I think I have to change arm design. I haven’t studied with such small geometries before. It was hard to find support place for support pin. I think, at least I can expand arm a bit outside even if other side length has to be same to increase moment. I will use grooved gear. I don’t know what the real name is for this gear is but the gear dimension is nearly as below.

I think it will possible to reach extruder gear tooth from top beside from filament aligner or from side


I printed several parts with PLA and 3-4 parts with ABS on my friend’s printer. So I can’t count myself experienced in fdm printing. But as you mentioned one of the tricks I’ve learnt from these short experiences is that, keeping acceleration and speed values low as possible you get higher quality prints. Achieving higher speeds or acceleration values is not primary goal for me.
Thanks again for your precious experience and comments.
Regards.
Edited 1 time(s). Last edit at 03/13/2016 12:23PM by toofunal.
|
Re: Yet another Prusa x axis waiting your comments March 13, 2016 12:38PM |
Registered: 8 years ago Posts: 10 |
Hi Mark,
Despite it is against to reprap philosophy I agree with your philosophy. Thus why I modeled and planning to use lathed parts.
With same thoughts I’m designing a delta type printer with parts with all cnc milled and lathed.
But in my opinion there is a light year between your design and my design.
Your design is way ahead robust and looks like professional rather than a maker hobby machine.
I'm not sure but If I decide to build a career in fdm printing your guide on instructables would be reference guide.
Thanks for your support. Hope to discuss more for future designs.
Regards.
Tufan
|
Re: Yet another Prusa x axis waiting your comments March 13, 2016 02:37PM |
Registered: 11 years ago Posts: 5,780 |
Well, thanks, but I am strictly an amateur. The first version of my machine was built starting from zero knowledge of 3D printers/machine design and very limited knowledge of machining techniques. The second version was just a redesign to fix all the things that bothered me about the first. Now I am slowly correcting minor things about the second design that bother me. I am rapidly running out of things to do to it so development/modifications will be ending soon (I hope) so I can move on to other projects (a coreXY machine with about 1m Z capacity and a chocolate printer).
Ultra MegaMax Dominator 3D printer: [drmrehorst.blogspot.com]
Ultra MegaMax Dominator 3D printer: [drmrehorst.blogspot.com]
|
Re: Yet another Prusa x axis waiting your comments March 14, 2016 08:30AM |
Registered: 8 years ago Posts: 10 |

|
Re: Yet another Prusa x axis waiting your comments March 14, 2016 08:43AM |
Registered: 9 years ago Posts: 1,873 |
Looks good!
You might want to add another filament guide between the gear and the throat of the hotend - that's the classic place for the filament to buckle, especially if you use flex filaments. And possibly you could extend the lever beyond the tension screw mounting so that you have something to press on. Although, I did wonder if it would be possible to load the filament by running the extruder and avoid the need for releasing the tension. It sounds a bit three-handed, but it might work.
Filament jam/runout detection sounds very useful, I should add that to my list
|
Re: Yet another Prusa x axis waiting your comments April 19, 2016 04:48PM |
Registered: 8 years ago Posts: 10 |
Hello again reprapers,
I've built up my recent design,
You may see it while it's working.
Here is the video link.
[www.youtube.com]
Regards..
Edited 1 time(s). Last edit at 04/20/2016 01:30AM by toofunal.
I've built up my recent design,
You may see it while it's working.
Here is the video link.
[www.youtube.com]
Regards..
Edited 1 time(s). Last edit at 04/20/2016 01:30AM by toofunal.
|
Re: Yet another Prusa x axis waiting your comments April 19, 2016 06:07PM |
Registered: 9 years ago Posts: 1,699 |
How high is your printing speed? Because of the principle design of an I3 you can't reach very high speeds. I hope I can tune one of my printers to reach higher speeds until my own design will be ready.
Slicer: Simplify3D 4.0; sometimes CraftWare 1.14 or Cura 2.7
Delta with Duet-WiFi, FW: 1.20.1RC2; mini-sensor board by dc42 for auto-leveling
Ormerod common modifications: Mini-sensor board by dc42, aluminum X-arm, 0.4 mm nozzle E3D like, 2nd fan, Z stepper nut M5 x 15, Herringbone gears, Z-axis bearing at top, spring loaded extruder with pneumatic fitting, Y belt axis tensioner
Ormerod 2: FW: 1.19-dc42 on Duet-WiFi. own build, modifications: GT2-belts, silicone heat-bed, different motors and so on. Printed parts: bed support, (PSU holder) and Y-feet.
Ormerod 1: FW: 1.15c-dc42 on 1k Duet-Board. Modifications: Aluminium bed-support, (nearly) all parts reprinted in PLA/ ABS, and so on.
Quote
the_digital_dentist
Well, thanks, but I am strictly an amateur. The first version of my machine was built starting from zero knowledge of 3D printers/machine design and very limited knowledge of machining techniques. The second version was just a redesign to fix all the things that bothered me about the first. Now I am slowly correcting minor things about the second design that bother me. I am rapidly running out of things to do to it so development/modifications will be ending soon (I hope) so I can move on to other projects (a coreXY machine with about 1m Z capacity and a chocolate printer).
Slicer: Simplify3D 4.0; sometimes CraftWare 1.14 or Cura 2.7
Delta with Duet-WiFi, FW: 1.20.1RC2; mini-sensor board by dc42 for auto-leveling
Ormerod common modifications: Mini-sensor board by dc42, aluminum X-arm, 0.4 mm nozzle E3D like, 2nd fan, Z stepper nut M5 x 15, Herringbone gears, Z-axis bearing at top, spring loaded extruder with pneumatic fitting, Y belt axis tensioner
Ormerod 2: FW: 1.19-dc42 on Duet-WiFi. own build, modifications: GT2-belts, silicone heat-bed, different motors and so on. Printed parts: bed support, (PSU holder) and Y-feet.
Ormerod 1: FW: 1.15c-dc42 on 1k Duet-Board. Modifications: Aluminium bed-support, (nearly) all parts reprinted in PLA/ ABS, and so on.
|
Re: Yet another Prusa x axis waiting your comments April 19, 2016 06:34PM |
Registered: 9 years ago Posts: 1,873 |
|
Re: Yet another Prusa x axis waiting your comments April 19, 2016 11:12PM |
Registered: 11 years ago Posts: 5,780 |
Quote
Treito
How high is your printing speed? Because of the principle design of an I3 you can't reach very high speeds. I hope I can tune one of my printers to reach higher speeds until my own design will be ready.
My Y axis is massive and driven by a ball screw, and the linear guides have some preload which increases stiction and friction. When I chose the motor I did so with a goal of 50 mm/sec print speed. The calculations said I needed about 380 oz-in torque for that, so I bought a 425 oz-in motor. The machine prints beautifully at 50 mm/sec. Since the original design, I have made some modifications that have reduced the mass in the Y axis by about 1 kg, so theoretically I should be able to print faster. I have not tested it any faster. Most of the time I print at 30-50 mm/sec.
Print speed is over-rated. Keep in mind that it's molten plastic coming out of the nozzle. Once it leaves the nozzle, it's out of your control. If you drive the machine super fast, you'll be flinging molten plastic all over the place and the the layer registration will be bad and the print will look terrible. I have seen many videos of people running machines at 200 mm/sec. They get the machine moving that fast but the prints look pretty bad, as expected. What's the point of that kind of speed if the print looks bad? I've printed very few objects where the print quality was less important than print speed.
If you want to print faster, you have to reduce moving mass. Reducing friction helps too. As you increase speed, starting and stopping the motor precisely becomes more difficult and prints start displaying artifacts. Increasing power supply voltage helps.
Ultra MegaMax Dominator 3D printer: [drmrehorst.blogspot.com]
|
Re: Yet another Prusa x axis waiting your comments April 20, 2016 12:36AM |
Registered: 8 years ago Posts: 39 |
|
Re: Yet another Prusa x axis waiting your comments April 20, 2016 03:45AM |
Registered: 9 years ago Posts: 1,699 |
Quote
the_digital_dentist
Quote
Treito
How high is your printing speed? Because of the principle design of an I3 you can't reach very high speeds. I hope I can tune one of my printers to reach higher speeds until my own design will be ready.
My Y axis is massive and driven by a ball screw, and the linear guides have some preload which increases stiction and friction. When I chose the motor I did so with a goal of 50 mm/sec print speed. The calculations said I needed about 380 oz-in torque for that, so I bought a 425 oz-in motor. The machine prints beautifully at 50 mm/sec. Since the original design, I have made some modifications that have reduced the mass in the Y axis by about 1 kg, so theoretically I should be able to print faster. I have not tested it any faster. Most of the time I print at 30-50 mm/sec.
Print speed is over-rated. Keep in mind that it's molten plastic coming out of the nozzle. Once it leaves the nozzle, it's out of your control. If you drive the machine super fast, you'll be flinging molten plastic all over the place and the the layer registration will be bad and the print will look terrible. I have seen many videos of people running machines at 200 mm/sec. They get the machine moving that fast but the prints look pretty bad, as expected. What's the point of that kind of speed if the print looks bad? I've printed very few objects where the print quality was less important than print speed.
If you want to print faster, you have to reduce moving mass. Reducing friction helps too. As you increase speed, starting and stopping the motor precisely becomes more difficult and prints start displaying artifacts. Increasing power supply voltage helps.
My printers can print @40mm/s with a good result and the maximum is about 50mm/s if the function is more important than the look.
They use the same printing principle like the I3. The printing speed for a good looking is ok but I would wish to have higher print speeds for mechanical parts only.
On some FB groups I saw printing results from an I3 with a print speed of 100mm/s whose are looking better than mine with 40mm/s so I am looking for possibilities to improve my printing quality. I hope that I am maybe able to reduce printing time from 30 hours to 20 hours.
My own design which you maybe have seen here will use a bowden extruder to reduce weight on the axis and I hope to achieve a nominal print speed of 100mm/s and a top speed of 200mm/s. I will still print good looking objects with a speed of about 75mm/s, but this will depend at least from the results I will get.
But this is why I am interested in this kinds of threads to learn how the I3 was improved so I maybe can transfer it to my printers. One possibility I can hopefully test soon: Switching from a MXL belt to a GT2 belt even though the manufacturer told me that this will not change anything.
Slicer: Simplify3D 4.0; sometimes CraftWare 1.14 or Cura 2.7
Delta with Duet-WiFi, FW: 1.20.1RC2; mini-sensor board by dc42 for auto-leveling
Ormerod common modifications: Mini-sensor board by dc42, aluminum X-arm, 0.4 mm nozzle E3D like, 2nd fan, Z stepper nut M5 x 15, Herringbone gears, Z-axis bearing at top, spring loaded extruder with pneumatic fitting, Y belt axis tensioner
Ormerod 2: FW: 1.19-dc42 on Duet-WiFi. own build, modifications: GT2-belts, silicone heat-bed, different motors and so on. Printed parts: bed support, (PSU holder) and Y-feet.
Ormerod 1: FW: 1.15c-dc42 on 1k Duet-Board. Modifications: Aluminium bed-support, (nearly) all parts reprinted in PLA/ ABS, and so on.
|
Re: Yet another Prusa x axis waiting your comments April 20, 2016 04:13AM |
Registered: 8 years ago Posts: 10 |
|
Re: Yet another Prusa x axis waiting your comments April 20, 2016 04:21AM |
Registered: 8 years ago Posts: 10 |
Quote
Slackdaddy
Are you mass producing the x carriage/extruder parts ?
Slack
Hello, actually it was a kind of R&D study regarding most common cartesian type. I'm actually developing a delta type and a coreXY type. We establish a company with my friend to produce 3D printers.
3D printer manufacturing will be my professional work soon so If someone interested in with this design we could produce it.
|
Re: Yet another Prusa x axis waiting your comments April 20, 2016 06:13PM |
Registered: 8 years ago Posts: 39 |
Sorry, only registered users may post in this forum.