An alternative to buying a bad kit for $300-500
Posted by the_digital_dentist
|
Re: An alternative to buying a bad kit for $300-500 October 15, 2016 09:55PM |
Registered: 11 years ago Posts: 1,049 |

|
Re: An alternative to buying a bad kit for $300-500 October 15, 2016 10:17PM |
Registered: 10 years ago Posts: 79 |
That's not bad, looks pretty solid. But I don't really want to pay $50 to attach.
I was actually thinking of doing something similar. It's not hard to "machine" aluminum in a drill press. Heck, you can probably even do it with a cordless drill if you're careful and patient.
I think what I am actually going to end up doing will be a $0 solutions using parts of the old hotends. I'll probably try it on Monday or Tuesday, and I'll post pics.
|
Re: An alternative to buying a bad kit for $300-500 October 15, 2016 11:48PM |
Registered: 11 years ago Posts: 5,780 |
Quote
cozmicray
DD
Are you testing out all your mods with original controller / firmware / software?
from LCD only,
software? how connected to PC?
Seems like this beast is LCD control and print from USB stick with special cubex file ?
The original controller was removed on day one, no testing was done with it. I haven't disposed of it yet because someone at the makerspace thinks he might be able to port smoothieware to it, someday.
Cubex uses a proprietary slicer that generates a modified gcode format file. The original controller could be run from that software via USB or you could print stand-alone from a USB memory stick.
Ultra MegaMax Dominator 3D printer: [drmrehorst.blogspot.com]
|
Re: An alternative to buying a bad kit for $300-500 October 16, 2016 12:09PM |
Registered: 8 years ago Posts: 105 |
As I was planning to run a test on the Cubex before modding it I just set up the slicing software, also needed a test print file.
You can't mess around with settings apart from layer height and part density. First layer is always 0.5mm then 5 solid layers of the chosen thickness with 3 perimeters. Infill is single 45 degree lines
Fast draught forces 0.25mm layer with 4 solid starting layers and 5% infill, judging by the print times speed remains the same. Thin density is 10% infill, medium 15% and thick 40% with 5 perimeters.
So slicing the popular treefrog model at 0.1mm layer with medium infill, then comparing to Simplify3D and Sli3er - to get a similar print time the print speed needed to be set to around 30mm/s. Draft mode as they call it in the software which forces 0.25mm layer thickness doesn't appear to change the speed going by the build time.
Choosing PLA over ABS as the print material reduces the print time by about 5%, slicing looks the same, I think I read somewhere is pauses between layers for cooling more with ABS.
Edited 3 time(s). Last edit at 10/16/2016 12:20PM by Firefox3D.
|
Re: An alternative to buying a bad kit for $300-500 October 16, 2016 01:11PM |
Registered: 10 years ago Posts: 79 |
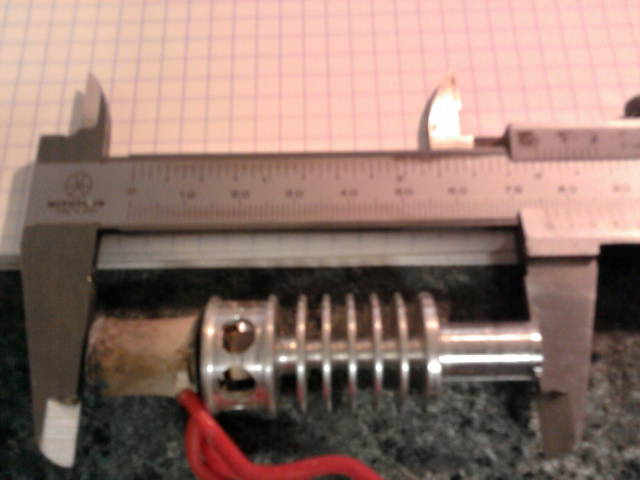
So, I modified my E3D heatsinks to fit the CubeX. I basically hacked off the top of the stock heatsink and used some brazing rod to attach it to the top of the E3D. I did the whole thing using really basic tools. Here are some pictures (brace yourself, it's basically a full write-up).
First, I cut the stock heatsink using a hacksaw blade. This is really easy with a drill. you just chuck up the piece, and let the spinning action do the work.
That leaves you with this.
Next, you need to drill the hole out to 4mm. This is also really easy to do. You just leave the piece in the drill, hold the bit stationary, and guide the piece onto the bit. The spinning work piece will center itself. You have to be actively TRYING to screw this up.
That leaves you with this.
I test fit the teflon to ensure it was good before the next step.
Then I used a piece of 4mm threaded rod to align the piece.
This next part is where I joined them together. I used this alumiweld brazing rod. This stuff is from Harbor Freight, but you can buy little packs of it for a few dollars at most home improvement stores. I used a MAPP gas touch, but propane works just as well.
There are three important steps to this process.
1) Use a stainless steel brush to clean the aluminum, and when you think its good, clean it some more.
2) Heat the part, not the rod. If you try to put the rod in the flame, it will glob up in little balls, and it won't melt into the part.
3) Periodically pull the flame away and rub the rod on the joint. When it is hot enough, the rod will start to melt into the work piece.
Let the part air cool. Do not quench it, that will make it crack.
After it cooled, I chucked it back up in the drill again, like an improvised lathe. I just used a file and some emery cloth to clean it up and smooth it out some. I put too much filler in the first one by accident, which is why the bottom one is more cone-shaped, but that won't hurt anything.
Here they are sitting in the carriage. I am planning on making a fully supported filament path with a small modification to the extruder. I'll post about that when I do it.
First, I cut the stock heatsink using a hacksaw blade. This is really easy with a drill. you just chuck up the piece, and let the spinning action do the work.

That leaves you with this.

Next, you need to drill the hole out to 4mm. This is also really easy to do. You just leave the piece in the drill, hold the bit stationary, and guide the piece onto the bit. The spinning work piece will center itself. You have to be actively TRYING to screw this up.

That leaves you with this.

I test fit the teflon to ensure it was good before the next step.

Then I used a piece of 4mm threaded rod to align the piece.

This next part is where I joined them together. I used this alumiweld brazing rod. This stuff is from Harbor Freight, but you can buy little packs of it for a few dollars at most home improvement stores. I used a MAPP gas touch, but propane works just as well.

There are three important steps to this process.
1) Use a stainless steel brush to clean the aluminum, and when you think its good, clean it some more.
2) Heat the part, not the rod. If you try to put the rod in the flame, it will glob up in little balls, and it won't melt into the part.
3) Periodically pull the flame away and rub the rod on the joint. When it is hot enough, the rod will start to melt into the work piece.
Let the part air cool. Do not quench it, that will make it crack.

After it cooled, I chucked it back up in the drill again, like an improvised lathe. I just used a file and some emery cloth to clean it up and smooth it out some. I put too much filler in the first one by accident, which is why the bottom one is more cone-shaped, but that won't hurt anything.

Here they are sitting in the carriage. I am planning on making a fully supported filament path with a small modification to the extruder. I'll post about that when I do it.

|
Re: An alternative to buying a bad kit for $300-500 October 16, 2016 01:15PM |
Registered: 8 years ago Posts: 318 |
What is a good source for metal to fabricate that adapter? I haven't ever had to purchase stock metal before..
I am going to run the printer as a single extruder with no heated bed on a ramps 1.4 and its stock powerbrick, AT FIRST. From there I will go dual extruder with the E3D's when the adapters are done. New PSU, Heated bed, and possible smoothie will come all together, hopefully before years end.
I am going to run the printer as a single extruder with no heated bed on a ramps 1.4 and its stock powerbrick, AT FIRST. From there I will go dual extruder with the E3D's when the adapters are done. New PSU, Heated bed, and possible smoothie will come all together, hopefully before years end.
|
Re: An alternative to buying a bad kit for $300-500 October 16, 2016 01:27PM |
Registered: 10 years ago Posts: 79 |
|
Re: An alternative to buying a bad kit for $300-500 October 16, 2016 01:30PM |
Registered: 8 years ago Posts: 318 |
|
Re: An alternative to buying a bad kit for $300-500 October 16, 2016 01:52PM |
Registered: 10 years ago Posts: 79 |
Oh, and as for where to get aluminum, I don't know of a place where you'd get a 20mm piece of round stock that doesn't sell in bulk. It's kind of a think piece, for aluminum rod.
You might get lucky at home depot, but I'm not sure.
Edited 1 time(s). Last edit at 10/16/2016 01:54PM by TheJones.
You might get lucky at home depot, but I'm not sure.
Edited 1 time(s). Last edit at 10/16/2016 01:54PM by TheJones.
|
Re: An alternative to buying a bad kit for $300-500 October 20, 2016 09:20AM |
Registered: 7 years ago Posts: 47 |
Hi to you all, got registered today on this interesting CubeX topic, thanks to all of you for sharing good info and photo's on this machine, yes I have one to.
Got it for a good price all intact and printing with original $800 heated bed, but! !, playing with it for 3 weeks now and so far I never got a good print out of it, so A gcode (ramps 1.4) conversion looks unavoidable.
So after some frustration I have stripped the guts out and ordered some new stuff from China (yes !'m cheap), in the mean time I'm reading as much as I can to get good info and whala here I am.
I see that some are getting the E3D v6 ready to install (nicely done btw) but The E3D V5 is longer, could this V5 be the answer?
Oh and please check your bearings on your extruder feeder, the bearings of both feeders on my CubeX duo where dodgy, replacing was not easy, had to dremel them of the axes.
Check the axes diameter before you replace new bearing ! !
Cheers.
|
Re: An alternative to buying a bad kit for $300-500 October 20, 2016 10:16AM |
Registered: 7 years ago Posts: 28 |
Quote
TheJones
That's not bad, looks pretty solid. But I don't really want to pay $50 to attach.
I was actually thinking of doing something similar. It's not hard to "machine" aluminum in a drill press. Heck, you can probably even do it with a cordless drill if you're careful and patient.
I think what I am actually going to end up doing will be a $0 solutions using parts of the old hotends. I'll probably try it on Monday or Tuesday, and I'll post pics.
Speaking of hand drilling, it should work to 3D print a guide for holding the alu plate and guiding the drill steadier than just markings would.
|
Re: An alternative to buying a bad kit for $300-500 October 20, 2016 11:11AM |
Registered: 8 years ago Posts: 318 |
Quote
fg dude
I see that some are getting the E3D v6 ready to install (nicely done btw) but The E3D V5 is longer, could this V5 be the answer?
Oh and please check your bearings on your extruder feeder
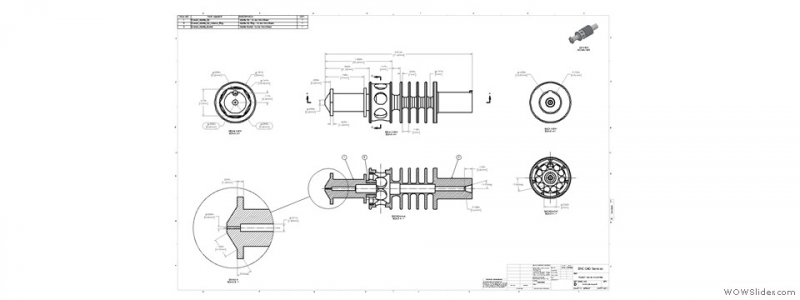
Welcome to the forum! and nice catch on the v5, I will have to look more into it but I think that it may work by just machining down the end of the v5, the extra height makes it really close. This is the only dimensional drawing i can find of the original but if i remember correctly the mounting end is 10mm. From there I know that it is 25 pixels wide by 178 long, with some simple math that means its total length is 71.2 mm. This v5 clone says its 69.7 mm so its REALLY close.
I find this picture very strange, google can't find it in any other size and the ]google group it says its posted on doesn't seem to have it at all.
Also by bearings on your extruder feeder do you mean the bearing that provides tension on the filament against the drive gear?
Edited 2 time(s). Last edit at 10/20/2016 11:21AM by DaGameFace.
If you need some help, or don't understand what I just said, feel free to send me a PM anytime
Printer: Prusa i3, 2 E3D v6 Hotends, Arduino + RAMPS 1.4 with a Bypassed 5V Regulator, 400w Insignia ATX PSU, Custom Designed Bowden Extruders
|
Re: An alternative to buying a bad kit for $300-500 October 20, 2016 11:35AM |
Registered: 7 years ago Posts: 47 |
Thanks DGF, the Cubex hotend mounting end is indeed 10mm, its total length is 75.5 mm but you also have the option to install a pointed nozzle Wich is a bit taller than the flat ones that comes on the V5.
Yes the bearing that provides tension on the filament against the drive gear, there are two bearings on here and on my two feeders the outside bearing had a nick, when rotating it by hand you should feel it.
This gives a problem on the filament feed when printing.
Also check the size of the ax, mine where to big, probably they pressed the bearings on a shaft that is to big an damaged the bearing that way.
|
Re: An alternative to buying a bad kit for $300-500 October 20, 2016 11:43AM |
Registered: 7 years ago Posts: 137 |
|
Re: An alternative to buying a bad kit for $300-500 October 20, 2016 12:23PM |
Registered: 8 years ago Posts: 318 |
|
Re: An alternative to buying a bad kit for $300-500 October 20, 2016 12:34PM |
Registered: 8 years ago Posts: 105 |
Found a better one [alextron.net]
|
Re: An alternative to buying a bad kit for $300-500 October 20, 2016 12:42PM |
Registered: 8 years ago Posts: 318 |
|
Re: An alternative to buying a bad kit for $300-500 October 20, 2016 12:54PM |
Registered: 7 years ago Posts: 47 |
|
Re: An alternative to buying a bad kit for $300-500 October 21, 2016 12:32AM |
Registered: 8 years ago Posts: 318 |
now that im home i measured mine and yeah, 75.5 mm on the nose (strange its dimensional drawings say otherwise..). The more I looked at the design of the stock hotend the more I liked it, its design is very well insulated, both on the hotend with the clay looking material packed around the heater, as well as the cold end being insulated in two ways from the hot end, the various holes drilled in the heatbreak are to limit the amount of heat transfer and is improved by another insulating material (teflon?) in the center. I think that the the 5.4 mm difference in length should not be a problem and will most likely try to source a v5 in the future.
as for controller boards i just found out that my spare arduino has a blown 5v reg, so i need to order something new. For a rewiring of a replicator 2x that i am doing for the college i work at I had ordered a 2 in 1 ramps arduino board if you look at the reviews the only bad ones are just people complaining about poor documentation but anyone familar with a ramps shouldnt have a problem plus there is a very good third party write up if you want specific information. I'm considering buying one to let it live in the cubex long term as it has proper drv8825 1/32 microstepping support as well as very good mounting options for stepper wires (both screw downs and standard dupont connectors)
oh, and... i just broke on of my cubex hotends when i went to take it apart it just didnt and sheared some aluminum instead of unthreading.... so much for the praise i gave it, also the nozzle and hotend being one piece is a deal breaker for pva
Edited 3 time(s). Last edit at 10/21/2016 09:22AM by DaGameFace.
|
Re: An alternative to buying a bad kit for $300-500 October 21, 2016 12:38AM |
Registered: 11 years ago Posts: 5,780 |
I started connecting my smoothieboard to the machine tonight. I have the endstops and X and Z motors running and homing in proper directions. I was able to use some of the original connectors or the internal pieces in the housings that come with the smoothieboard. I'll decide how I'm going to run the Y axis and power the whole thing in the next day or two. I'm thinking of going to 24V, but that will require some acrobatics with the fans and LEDs on the extruder carriage.
Ultra MegaMax Dominator 3D printer: [drmrehorst.blogspot.com]
Ultra MegaMax Dominator 3D printer: [drmrehorst.blogspot.com]
|
Re: An alternative to buying a bad kit for $300-500 October 21, 2016 12:48AM |
Registered: 8 years ago Posts: 318 |
|
Re: An alternative to buying a bad kit for $300-500 October 21, 2016 07:38AM |
Registered: 11 years ago Posts: 5,780 |
I've connected fans in seres before and it seems to work fine. The LED module may have a built in buck converter to drop the voltage to whatever they need.- I'll have to try to find more info about it. I have some small buck converters that I can use if necessary.
Here's a couple data sheets on the LED bars:
[sloanled.com]
[sloanled.com]
It doesn't look like there's any power conversion built in. I don't know how they were running a 3 LED string from a 15V supply with no resistors and no buck converters. Maybe they didn't operate for long... Or maybe they were driving them with a PWM output that powered the extruder cooling fans.
Ultra MegaMax Dominator 3D printer: [drmrehorst.blogspot.com]
|
Re: An alternative to buying a bad kit for $300-500 October 21, 2016 07:48AM |
Registered: 7 years ago Posts: 47 |
Ha ha ha, if the hottends where that good they would be all over the place but even the drawing of them are wrong.
I have two V5 on the way from china, so "soon" we gone find out.
Today my arduino, ramps 1.4, drivers, display and end-stops where in the mailbox.
Power supply 12V 30Amp, pin connectors/dupont jumper housings, new bearings and two hottend are on its way.
I gone make the duo a uno, so just one extruder needed, ordered two in case I skrew up one and have spare parts
As for the 2-1 arduino/ramps board you selected, I'm sure it will be fine and maybe better.
The ramps 1.4 works fine for me so far on my Turnigy fabricator and they are cheap. (bonus for me)
Edited 1 time(s). Last edit at 10/21/2016 07:56AM by fg dude.
|
Re: An alternative to buying a bad kit for $300-500 October 21, 2016 07:55AM |
Registered: 7 years ago Posts: 47 |
Quote
the_digital_dentist
I've connected fans in seres before and it seems to work fine. The LED module may have a built in buck converter to drop the voltage to whatever they need.- I'll have to try to find more info about it. I have some small buck converters that I can use if necessary.
Here's a couple data sheets on the LED bars:
[sloanled.com]
[sloanled.com]
It doesn't look like there's any power conversion built in. I don't know how they were running a 3 LED string from a 15V supply with no resistors and no buck converters. Maybe they didn't operate for long... Or maybe they were driving them with a PWM output that powered the extruder cooling fans.
Good info,
Mine came with a two led bar, and as I can read, they can have 12 volt ?
|
Re: An alternative to buying a bad kit for $300-500 October 21, 2016 09:19AM |
Registered: 8 years ago Posts: 318 |
yeah, i guess i just appreciate the thought that went into the hotend, they had better ideas than results.
Oh, so because I am not going to be using the plexi frame I will no longer have a basment to hide stuff in, but I found out that you can fit an ATX powersupply on the back left side of the printer between the leadscrew and smooth rail for the Z (think mirror image of the scraper bin).
Oh hey, was there ever a good wireless solution found for arduino/ramps. I heard that wireless sd was a no go, ive seen a wireless card and a Bluetooth card put on the same arduino before but not used for printing.Is wireless usb chord a thing?
EDIT: yes, but would need a usb a to b adpater and not sure i can trust wifi for long prints anyway
Edited 2 time(s). Last edit at 10/21/2016 09:42AM by DaGameFace.
|
Re: An alternative to buying a bad kit for $300-500 October 21, 2016 12:03PM |
Registered: 7 years ago Posts: 55 |
It's awesome to see someone else reprap a Cubex Duo!
I spent two weeks trying to decide on my first printer, and started with absolutely no experience with 3D printers... I started reading about people making there own printers, and I just thought the kits and trying to build one from scratch were too expensive for me at the time. That's when I saw a Cubex Duo on Ebay for $260... Buy It Now... free Shipping... seemed like a no brainer! I bought the thing, and it printed great for about two weeks... my proprietary filament started breaking... extruders started clogging... bought aftermarket filament, messed around with Cubeitmod... it was touch and go...
Needless to say, I stripped the Cubex controller and it's being replaced by a Replicape...
I replaced the extruders with a E3D Chimera...
Added a 300mm x 300mm heated bed...
Among other things... it's still in the works. I actually started working on it this week after collecting parts....
I'm just glad to see someone else doing the same thing! It's physically a fantastic printer... looks good as well... I can't wait to get it working again.
Thanks for sharing your build! I plan on sharing mine, but it's honestly been trial and error... try this, try that... I'm documenting everything and will share it when it's presentable...
Edited 2 time(s). Last edit at 10/21/2016 01:19PM by Dancook.
I spent two weeks trying to decide on my first printer, and started with absolutely no experience with 3D printers... I started reading about people making there own printers, and I just thought the kits and trying to build one from scratch were too expensive for me at the time. That's when I saw a Cubex Duo on Ebay for $260... Buy It Now... free Shipping... seemed like a no brainer! I bought the thing, and it printed great for about two weeks... my proprietary filament started breaking... extruders started clogging... bought aftermarket filament, messed around with Cubeitmod... it was touch and go...
Needless to say, I stripped the Cubex controller and it's being replaced by a Replicape...
I replaced the extruders with a E3D Chimera...
Added a 300mm x 300mm heated bed...
Among other things... it's still in the works. I actually started working on it this week after collecting parts....
I'm just glad to see someone else doing the same thing! It's physically a fantastic printer... looks good as well... I can't wait to get it working again.
Thanks for sharing your build! I plan on sharing mine, but it's honestly been trial and error... try this, try that... I'm documenting everything and will share it when it's presentable...

Edited 2 time(s). Last edit at 10/21/2016 01:19PM by Dancook.
|
FrankenCube October 21, 2016 01:39PM |
Registered: 7 years ago Posts: 55 |
Guys, I just read through the entire thread...
I bought my printer back in March of this year, and have been slowly collecting parts to improve it.
I ripped out the bed and installed a 310mm x 310mm (ish) aluminum plate with a 300x300 heatbed above it.
Maybe I was wrong, but I also calculated around 600 watts of power needed for the heatbed, so I have a 600watt (24volt) PSU specifically for that.
I have a Mean Well 450watt (24volt) PSU that I initially thought would take care of everything, so it will be powering the printer.
I scrapped the extruders and the extruder assembly... I built a flat steel carriage to fit where the old steel plate once sat... the E3D Chimera does sit higher between the two bearings... I'm going with smaller fans to cool the prints... the Chimera has its own fan on the cool-end...
I'm using the original end stops, but I may follow the same route with replacing the Z-stop... being a newb, I'm wondering if the z-stop should work from the top or just home to the bottom... it looks like it can be programmed to work either way, but I'm not sure the magnetic stops are accurate enough,
I spent a lot of time talking with Elias Bakken and all of the guys associated with the Replicape Controller, so that's what I'm going with. It also has a "Manga Screen" which is a touchscreen similar to smartphone. The Replicape sits on a Beaglebone Black which uses a Linux program to keep the printer independent of needing a computer to run... and I can control and configure the printer using Octoprint...
I'm still in the process of wiring everything up and getting the endstops, etc. configured. This is my first printer, and it's been trial and error from the start.
@TDD... Great job on the CAD work and sharing your work! Learning CAD is my next step. I never thought of scrapping the Z screw plate, so you just made more work for me! LOL... great idea though!
@Everyone else... congratulations for jumping on the FrankenCube wagon!!
Edited 2 time(s). Last edit at 10/21/2016 01:45PM by Dancook.
I bought my printer back in March of this year, and have been slowly collecting parts to improve it.
I ripped out the bed and installed a 310mm x 310mm (ish) aluminum plate with a 300x300 heatbed above it.
Maybe I was wrong, but I also calculated around 600 watts of power needed for the heatbed, so I have a 600watt (24volt) PSU specifically for that.
I have a Mean Well 450watt (24volt) PSU that I initially thought would take care of everything, so it will be powering the printer.
I scrapped the extruders and the extruder assembly... I built a flat steel carriage to fit where the old steel plate once sat... the E3D Chimera does sit higher between the two bearings... I'm going with smaller fans to cool the prints... the Chimera has its own fan on the cool-end...

I'm using the original end stops, but I may follow the same route with replacing the Z-stop... being a newb, I'm wondering if the z-stop should work from the top or just home to the bottom... it looks like it can be programmed to work either way, but I'm not sure the magnetic stops are accurate enough,
I spent a lot of time talking with Elias Bakken and all of the guys associated with the Replicape Controller, so that's what I'm going with. It also has a "Manga Screen" which is a touchscreen similar to smartphone. The Replicape sits on a Beaglebone Black which uses a Linux program to keep the printer independent of needing a computer to run... and I can control and configure the printer using Octoprint...
I'm still in the process of wiring everything up and getting the endstops, etc. configured. This is my first printer, and it's been trial and error from the start.
@TDD... Great job on the CAD work and sharing your work! Learning CAD is my next step. I never thought of scrapping the Z screw plate, so you just made more work for me! LOL... great idea though!
@Everyone else... congratulations for jumping on the FrankenCube wagon!!
Edited 2 time(s). Last edit at 10/21/2016 01:45PM by Dancook.
|
Re: An alternative to buying a bad kit for $300-500 October 21, 2016 08:46PM |
Registered: 11 years ago Posts: 1,049 |
|
Re: An alternative to buying a bad kit for $300-500 October 22, 2016 01:18AM |
Registered: 11 years ago Posts: 5,780 |
I have the endstops working and the X, Y and Z axes running. I am running with acceleration set to 1000 and speed set to 50 mm/sec in the slicer. It seems a bit wobbly, but there's still a lot of playing around to do with settings. Right now the Y axis motors are connected in parallel (should need about 3A) and I'm driving them with a DSP driver and small 24V 1.7A supply, so they are starving for current. I'm leaning toward adding a 24V 8-10A supply to run the whole thing and connecting the Y motors in series.
I'll be looking at adding bracing to make the frame more rigid, too. I suspect the enclosure helps with rigidity, and I think it would be easy to add diagonal bracing to the sides and back of the frame.
On the plus side, it runs very quietly.
Ultra MegaMax Dominator 3D printer: [drmrehorst.blogspot.com]
|
Re: An alternative to buying a bad kit for $300-500 October 22, 2016 08:31AM |
Registered: 7 years ago Posts: 55 |


Sorry, only registered users may post in this forum.