An alternative to buying a bad kit for $300-500
Posted by the_digital_dentist
|
Re: An alternative to buying a bad kit for $300-500 October 22, 2016 12:51PM |
Registered: 7 years ago Posts: 137 |
I've got a question for you guys.
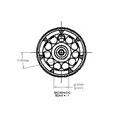
Are they Bearings around the nozzle shaft?
Out of the box thinking is easier when you never fitted in the box to begin with.
Are they Bearings around the nozzle shaft?
Out of the box thinking is easier when you never fitted in the box to begin with.

|
Re: An alternative to buying a bad kit for $300-500 October 22, 2016 03:31PM |
Registered: 7 years ago Posts: 137 |
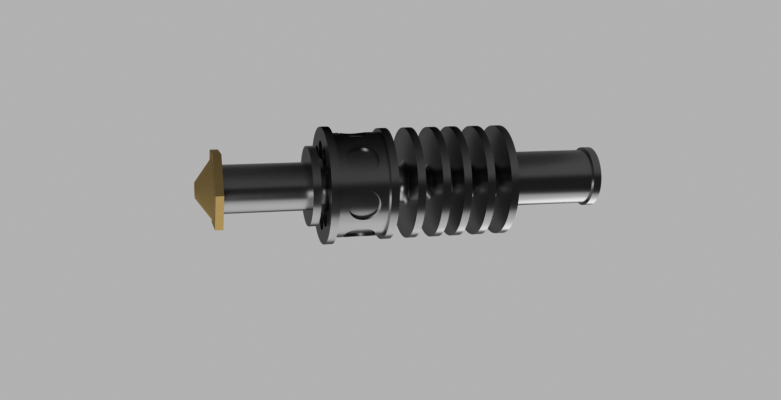
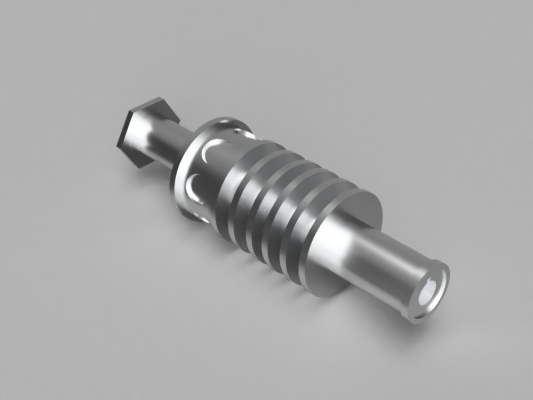
Just getting used to Fusion 360 so I've been making hot ends.
Out of the box thinking is easier when you never fitted in the box to begin with.

|
Re: An alternative to buying a bad kit for $300-500 October 22, 2016 03:36PM |
Registered: 7 years ago Posts: 47 |
|
Re: An alternative to buying a bad kit for $300-500 October 22, 2016 03:48PM |
Registered: 7 years ago Posts: 137 |
On the technical Drawing look like bearings. Lol
I worked it out after I posted and forgot to change my post.
I worked it out after I posted and forgot to change my post.
Quote
fg dude
No bearing on the nozzle, just cooling holes
Edited 1 time(s). Last edit at 10/22/2016 03:49PM by Rlewisrlou666.
Out of the box thinking is easier when you never fitted in the box to begin with.
|
Re: An alternative to buying a bad kit for $300-500 October 22, 2016 04:14PM |
Registered: 7 years ago Posts: 137 |
Out of the box thinking is easier when you never fitted in the box to begin with.

|
Re: FrankenCube October 22, 2016 04:27PM |
Registered: 11 years ago Posts: 5,780 |
Quote
Dancook
I'm using the original end stops, but I may follow the same route with replacing the Z-stop... being a newb, I'm wondering if the z-stop should work from the top or just home to the bottom... it looks like it can be programmed to work either way, but I'm not sure the magnetic stops are accurate enough\
@TDD... Great job on the CAD work and sharing your work! Learning CAD is my next step. I never thought of scrapping the Z screw plate, so you just made more work for me! LOL... great idea though!
@Everyone else... congratulations for jumping on the FrankenCube wagon!!
Thanks- anyone who wants can get a link to my whole printer CAD file by sending me a PM.
You want the machine to home to the top because that's where the bed has to be to start printing. Add a command to the custom gcode section in the slicer to home X and Y and send Z to 270 mm when the print is finished- it will move the bed down so you'll have plenty of room to work at removing it from the bed.
Ultra MegaMax Dominator 3D printer: [drmrehorst.blogspot.com]
|
Re: An alternative to buying a bad kit for $300-500 October 22, 2016 05:03PM |
Registered: 10 years ago Posts: 14,672 |
Any chance the Cubex Duo can be converted to have two independent X carriages? I need a new printer for testing IDEX support in RepRapFirmware and I haven't time to build one from scratch.
Large delta printer [miscsolutions.wordpress.com], E3D tool changer, Robotdigg SCARA printer, Crane Quad and Ormerod
Disclosure: I design Duet electronics and work on RepRapFirmware, [duet3d.com].
Large delta printer [miscsolutions.wordpress.com], E3D tool changer, Robotdigg SCARA printer, Crane Quad and Ormerod
Disclosure: I design Duet electronics and work on RepRapFirmware, [duet3d.com].
|
Re: FrankenCube October 22, 2016 06:13PM |
Registered: 7 years ago Posts: 55 |
Ok, I'll set it up from the top in that case. I'll order a normal switch for it instead of using the magnetic switch. I'll read back through, but I'm going to use your drawing to make an aluminum x-screw plate if you linked it. I had a heck of a time finding aluminum to make my build plate... and it's not the straightest piece. I'm going to rebuild it as well as soon as I get it running.
|
Re: An alternative to buying a bad kit for $300-500 October 22, 2016 06:41PM |
Registered: 11 years ago Posts: 5,780 |
Quote
dc42
Any chance the Cubex Duo can be converted to have two independent X carriages? I need a new printer for testing IDEX support in RepRapFirmware and I haven't time to build one from scratch.
The carriage in these machines is designed to accommodate 3 extruders, so it's pretty big and there wouldn't be a lot of room left for a second carriage unless you don't mind only having about 100 mm of X for each carriage. That said, the bearings are quite long and if you rebuild the extruder carriage using shorter bearings you could make it narrower. You could mount the second X motor on the right side Y axis bearing the same way the first X motor is mounted on the left side.
Alternatively, you could expand the width of the printer by installing longer 12mm rods in the frame, but then the cover wouldn't fit and you'd also have to build that.
In summary, it would be a project no matter how you approach it.
Ultra MegaMax Dominator 3D printer: [drmrehorst.blogspot.com]
|
Re: FrankenCube October 22, 2016 06:45PM |
Registered: 11 years ago Posts: 5,780 |
Quote
Dancook
Ok, I'll set it up from the top in that case. I'll order a normal switch for it instead of using the magnetic switch. I'll read back through, but I'm going to use your drawing to make an aluminum x-screw plate if you linked it. I had a heck of a time finding aluminum to make my build plate... and it's not the straightest piece. I'm going to rebuild it as well as soon as I get it running.
Look for MIC6 or Alca5 cast aluminum tooling plate. It comes milled flat. A 300 x 300 mm piece should cost about $US 40 at retail. If you happen to live near Milwaukee or Minneapolis, you can buy a cut-off for $2.50/lb (about $9) at Howard Precision Metals.
Ultra MegaMax Dominator 3D printer: [drmrehorst.blogspot.com]
|
Re: FrankenCube October 22, 2016 08:07PM |
Registered: 7 years ago Posts: 55 |
I live in Greenville, SC... I'll have to order a piece some time soon. I have to spread my "hobby money" between my 3D printer and my racing quads... not to mention I'm renovating two bathrooms to make the Mrs. happy... these things will nickel and dime you! Thanks for the suggestions... I'll start looking around online for the materials. Worst case, I can just use the stock build plate to get it dialed in.
|
Re: An alternative to buying a bad kit for $300-500 October 22, 2016 08:37PM |
Registered: 10 years ago Posts: 79 |
My apologies to DGF, but it wasn't until Dancook stated asking about plates that I remembered where I ordered the piece for my bed.
These guys will cut just about any piece you want, and they aren't too outrageous on price. [www.midweststeelsupply.com]
Edited 2 time(s). Last edit at 10/22/2016 09:02PM by TheJones.
These guys will cut just about any piece you want, and they aren't too outrageous on price. [www.midweststeelsupply.com]
Edited 2 time(s). Last edit at 10/22/2016 09:02PM by TheJones.
|
Re: An alternative to buying a bad kit for $300-500 October 22, 2016 09:43PM |
Registered: 7 years ago Posts: 321 |
Wow, first time I've looked at this thread, looks like an awesome V2 to do. Nice one Digital Dentist. Ya got some nice machines and it looks awesome. 
Quite frankly I don't have the skills, I think, or if I did try it, it would take me a lot longer than somebody like you.
My creations tend to look a bit Frankenstein, to be honest. Functional but usually a bit ugly in the finishing department.

Quite frankly I don't have the skills, I think, or if I did try it, it would take me a lot longer than somebody like you.
My creations tend to look a bit Frankenstein, to be honest. Functional but usually a bit ugly in the finishing department.
|
Re: An alternative to buying a bad kit for $300-500 October 22, 2016 10:31PM |
Registered: 7 years ago Posts: 137 |
|
Re: An alternative to buying a bad kit for $300-500 October 23, 2016 02:32AM |
Registered: 11 years ago Posts: 5,780 |
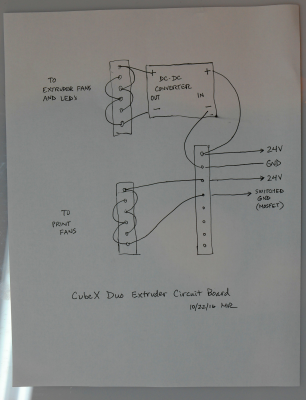
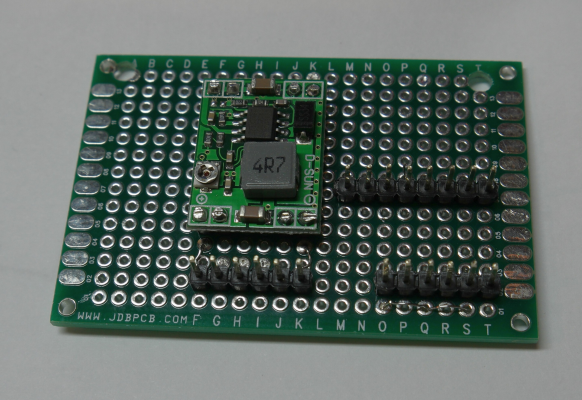
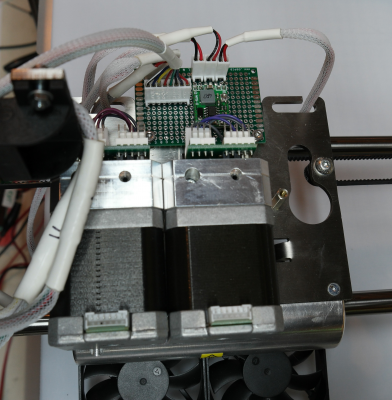
I spent some time figuring out some of the wiring. There are 3 cables coming from the extruder carriage to the controller board. Two go directly to the extruders and carry 4 wires for the motors, 2 for the extruder heater, and 2 for the thermistor. The third cable, 8 wires, connects to the main PCB that has some MOSFETS, a uC, and ultimately to the print cooling fans, extruder fans, and the LEDs. I don't need the MOSFETs and uC (which monitors the filament sensors, etc.), so I made my own board to connect the LEDs and extruder fans to 12V and to connect the print cooling fans to a MOSFET on the the controller board for speed control via PWM. I decided to use a 24V power supply and don't want to toast the extruder fans and LEDs by connecting them to 24V, so I added a tiny buck converter to drop the voltage to 12V. I think the print cooling fans will be OK if I limit the duty cycle via the PWM settings in the firmware.
The new circuit board is about the same size and fits where the original board used to mount.
Ultra MegaMax Dominator 3D printer: [drmrehorst.blogspot.com]
The new circuit board is about the same size and fits where the original board used to mount.
Ultra MegaMax Dominator 3D printer: [drmrehorst.blogspot.com]
|
Re: An alternative to buying a bad kit for $300-500 October 23, 2016 11:48AM |
Registered: 11 years ago Posts: 5,780 |
As you can tell, I like reusing the existing cables as much as possible. Wiring a 3D printer, especially the extruder carriage, is my least favorite part of a build.
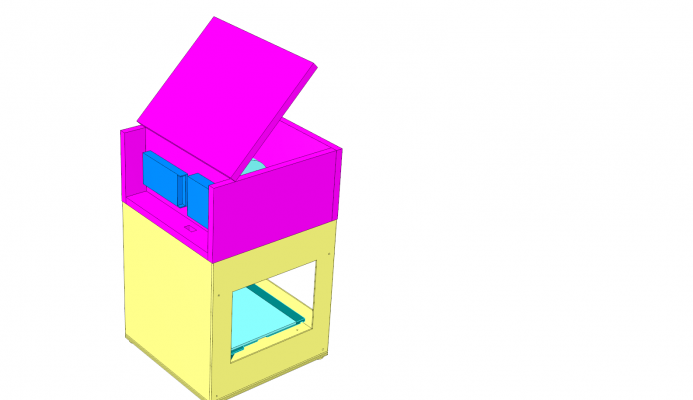
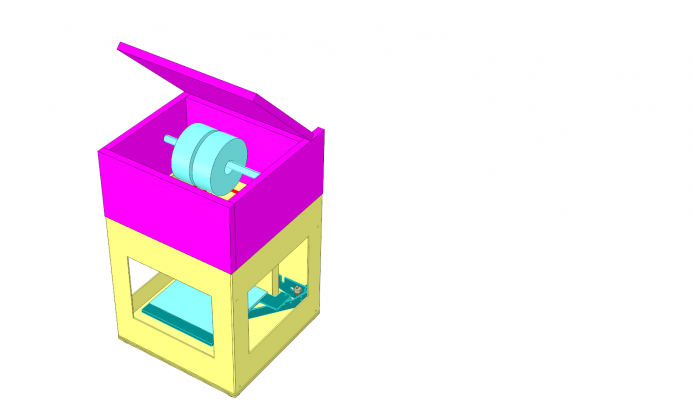
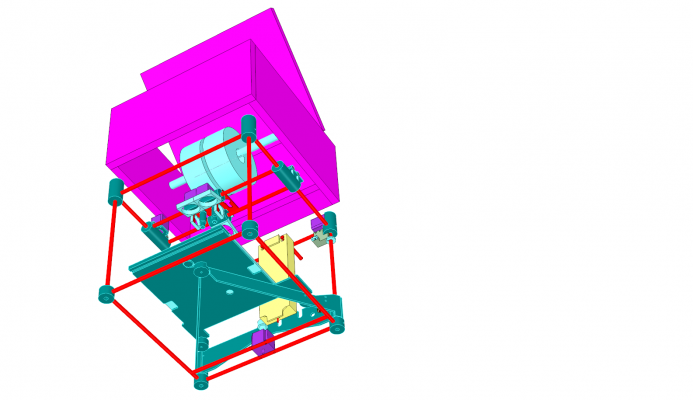
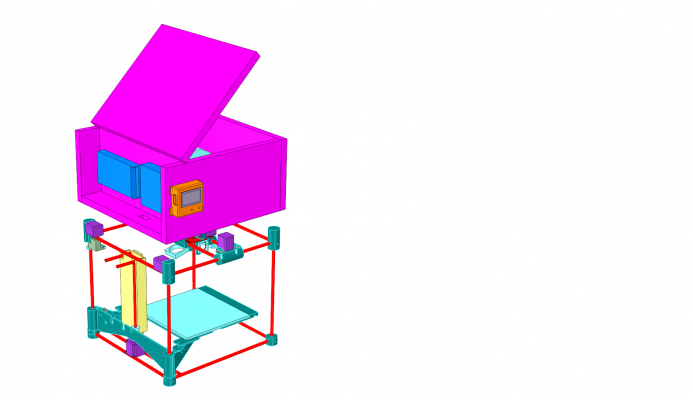
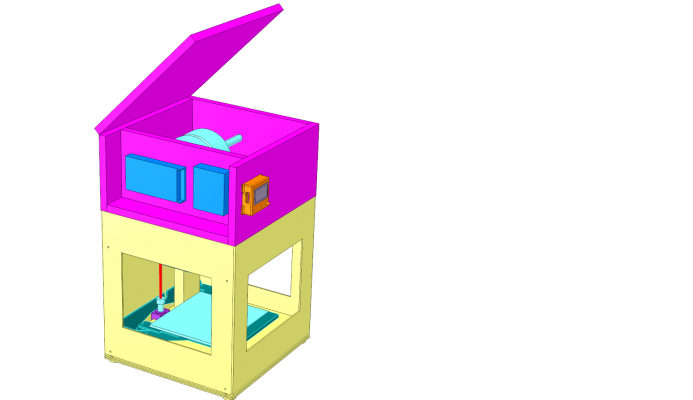
I may eventually want to heat the enclosure to allow printing ABS. That means it would be good to get the controller and power supply out of the heated area. I'm planning to feed filament from above and will need some sort of rack to hang spools, so I came up with the idea in the pictures, below. I can make a box to fit on top of the acrylic enclosure that has a rack to hold two spools of filament (just a piece of PVC pipe and a couple printed ABS hangers). The power supply and controller board mount on the back of the box with exposure to room air. The controller is mounted right at the end of the drag chain ensuring plenty of cable length to easily connect to the board. The box would be made of 1" PIR foam board, and held in place using magnets, or other less-prone-to-dislocation attachments. The whole box, just the top cover, or both could hinge up to load filament and access the extruder carriage for service. The controller board and power supply can be covered with a metal screen to keep out curious fingers.
An LCD controller could be added to the left side of the box to operate the machine without a computer connection.
Better still, put the controller and power supply on the left side and mount the LCD on the front of the box- still plenty of cable length for the controller board connections:
Edited 6 time(s). Last edit at 10/23/2016 12:11PM by the_digital_dentist.
Ultra MegaMax Dominator 3D printer: [drmrehorst.blogspot.com]
|
Re: An alternative to buying a bad kit for $300-500 October 23, 2016 12:08PM |
Registered: 7 years ago Posts: 321 |
Quote
Rlewisrlou666
Are any of you guys rebuilding the Cubex printers replacing the extruder assembly and living in the UK who wouldn't mind parting with it?
It's an expensive job from within the UK on ebay... CubeX printers not cheap here, freight charges very high.
You can get cheap Delta kits though on ebay. They look a little crude, would need some plastic parts redoing with stronger materials, similar rebuilding.
They wouldn't be as tough as a CoreXY design like CubeX (? think thats right) as the frames are aluminium, not steel... but I guess in theory they might print faster, as they have 3 NEMAS for X-Y movement as opposed to just 2 in a CoreXY.
Meh. Youve probably had quite enough of "theory" off me...
 That would be quite a job in itself, only thing similar is the price (about $300 for the kit, $200 on the upgrades).
|
Re: An alternative to buying a bad kit for $300-500 October 23, 2016 12:13PM |
Registered: 11 years ago Posts: 5,780 |
He wants an extruder with the optical filament monitor, not the whole printer.
Edited 1 time(s). Last edit at 10/23/2016 12:14PM by the_digital_dentist.
Ultra MegaMax Dominator 3D printer: [drmrehorst.blogspot.com]
Edited 1 time(s). Last edit at 10/23/2016 12:14PM by the_digital_dentist.
Ultra MegaMax Dominator 3D printer: [drmrehorst.blogspot.com]
|
Re: An alternative to buying a bad kit for $300-500 October 23, 2016 12:21PM |
Registered: 7 years ago Posts: 137 |
@Dragonfire - Thanks for the help buddy. I'm only looking for the Filament monitor board from the extruder as Digital Dentist said.
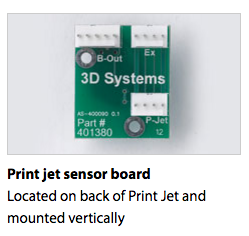
@the_digital_dentist - Is this the right board?
Loads of spares on here [www.3dsystems.com]
Edited 1 time(s). Last edit at 10/23/2016 12:22PM by Rlewisrlou666.
Out of the box thinking is easier when you never fitted in the box to begin with.
@the_digital_dentist - Is this the right board?
Loads of spares on here [www.3dsystems.com]
Edited 1 time(s). Last edit at 10/23/2016 12:22PM by Rlewisrlou666.
Out of the box thinking is easier when you never fitted in the box to begin with.

|
Re: An alternative to buying a bad kit for $300-500 October 23, 2016 12:42PM |
Registered: 11 years ago Posts: 5,780 |
Yes, that's it. I don't think that the board alone would be very useful without the extruder body and drive gear to go with it. The drive gear and pinch roller both have optical discs that the opto devices on the back of the board are watching.
I think a couple of the people here are replacing the extruders, so maybe one of them will offer to part with one. I'm planning on using the extruders, at least initially, or I'd send you one of mine.
I'm surprised at how reasonable most of the CubeX spare prices seem to be... $256 for the extruder is a bit much, but the cables and PCBs are reasonable.
Ultra MegaMax Dominator 3D printer: [drmrehorst.blogspot.com]
|
Re: An alternative to buying a bad kit for $300-500 October 23, 2016 12:48PM |
Registered: 7 years ago Posts: 55 |
The filament monitoring system is one of the few good ideas 3DS had with this printer. I'd like to find a way to pause my print if the system realizes there is no flow. I think 3DS used the sensors more to measure how much filament was used so they could deem your proprietary rolls empty and make more money.
|
Re: An alternative to buying a bad kit for $300-500 October 23, 2016 12:51PM |
Registered: 7 years ago Posts: 55 |
|
Re: An alternative to buying a bad kit for $300-500 October 23, 2016 12:59PM |
Registered: 11 years ago Posts: 5,780 |
The LCD would display "filament feed error" messages if the filament stopped moving, so you'd have a clue as to why your print failed (in addition to monitoring how much filament has been used from a cartridge).
Ultra MegaMax Dominator 3D printer: [drmrehorst.blogspot.com]
Ultra MegaMax Dominator 3D printer: [drmrehorst.blogspot.com]
|
Re: An alternative to buying a bad kit for $300-500 October 23, 2016 01:05PM |
Registered: 7 years ago Posts: 137 |
|
Re: An alternative to buying a bad kit for $300-500 October 23, 2016 01:20PM |
Registered: 11 years ago Posts: 5,780 |
Actually, it may have paused the print and displayed the message.
Now that I think about it, the board may be useful by itself. You can easily make your own optical discs similar to the originals, and attach them to rollers. Feed the filament through the rollers- if the rollers stop turning but the filament is present, you have an extruder jam. If the rollers stop turning and the filament is gone you've run out of filament. Put such a device a few cm or more ahead of the extruder and you'll be able to pause the print and change filament or maybe clean out the extruder.
Ultra MegaMax Dominator 3D printer: [drmrehorst.blogspot.com]
|
Re: An alternative to buying a bad kit for $300-500 October 23, 2016 01:56PM |
Registered: 7 years ago Posts: 55 |
CubexDuo before the mods only said "Print Failed" when the filament ran out or hot end jammed... after several hours of printing... it should have been easy enough to have it pause the print instead... I know it's possible nowadays.
Edited 1 time(s). Last edit at 10/23/2016 01:57PM by Dancook.
Edited 1 time(s). Last edit at 10/23/2016 01:57PM by Dancook.
|
Re: An alternative to buying a bad kit for $300-500 October 24, 2016 12:02AM |
Registered: 11 years ago Posts: 5,780 |
I just got first print from the machine using the 0.7 mm nozzle. Small PLA parts stick to the build plate without glue, and breaks off pretty easily at the end, but long narrow parts warp. I'm trying another print with glue now. There's a bit of Z wobble I attribute to the bouncing of the cantilevered bed. It should improve a bit when the enclosure is in place. The Z=0 switch seems to work well.
Leveling the bed is a little strange. Ordinarily, I would level at the two back of the bed screws, then level the single screw at the front. You can't access the front screw because it's covered by the bed plate, so you have to set the zero position near the front screw, then move the extruder carriage back and adjust the two rear screws for level/zero.
Video here:
[vimeo.com]
Ultra MegaMax Dominator 3D printer: [drmrehorst.blogspot.com]
|
Re: An alternative to buying a bad kit for $300-500 October 24, 2016 01:10AM |
Registered: 7 years ago Posts: 137 |
|
Re: An alternative to buying a bad kit for $300-500 October 24, 2016 06:54AM |
Registered: 7 years ago Posts: 47 |
Quote
the_digital_dentist
I just got first print from the machine using the 0.7 mm nozzle. Small PLA parts stick to the build plate without glue, and breaks off pretty easily at the end, but long narrow parts warp. I'm trying another print with glue now. There's a bit of Z wobble I attribute to the bouncing of the cantilevered bed. It should improve a bit when the enclosure is in place. The Z=0 switch seems to work well.
Leveling the bed is a little strange. Ordinarily, I would level at the two back of the bed screws, then level the single screw at the front. You can't access the front screw because it's covered by the bed plate, so you have to set the zero position near the front screw, then move the extruder carriage back and adjust the two rear screws for level/zero.
Video here:
[vimeo.com]
Looking good!
|
Re: An alternative to buying a bad kit for $300-500 October 24, 2016 07:22AM |
Registered: 10 years ago Posts: 79 |
Quote
Dancook
I don't plan to use the original extruders, but I honestly can't see a reason to keep them... I was trying to find a way to use them as bowens.
Why not just clamp a bowden fitting where the hotend used to go? Seems pretty straightforward to me.
Quote
the_digital_dentist
As you can tell, I like reusing the existing cables as much as possible.
Are you planing on using the stock hotend wires? They seem a little thin to me, and I'm contemplating replacing them. Thought, to be fair, they could be fine and I might just be paranoid from my recent experience with my heated bed wiring.
Edited 1 time(s). Last edit at 10/24/2016 07:28AM by TheJones.
Sorry, only registered users may post in this forum.
