An alternative to buying a bad kit for $300-500
Posted by the_digital_dentist
|
Re: An alternative to buying a bad kit for $300-500 October 29, 2016 09:07AM |
Registered: 11 years ago Posts: 5,780 |
Settings (subject to change), all at 16:1 ustepping
Other operations:
Edited 2 time(s). Last edit at 10/29/2016 12:40PM by the_digital_dentist.
Ultra MegaMax Dominator 3D printer: [drmrehorst.blogspot.com]
- X and Y steps/mm: 87.2 (measured 100 mm print and adjusted)
- Z steps/mm: 1067 (measured 100 mm print and adjusted)
- extruder steps/mm: 80 (measured filament going into extruder with hot-end mounted and heated)
- extruder heater max_pwm: 120 (12V? heater in 24V system - at lower values temperature was bouncing too much)
Other operations:
- Connected the Y axis motors in series and directly to the smoothieboard, set current to 1.4A.
- Installed a MeanWell LRS-200-24 power supply ($24 new with warranty)- only 30 mm high, no fan, easily fits in the bottom of the printer.
- Measured nozzle diameter using carbide drill bits- the extruder I have been assuming was 0.7mm turns out to be about 0.5 mm (0.47 mm drill goes in easily, 0.5 mm drill is tight). If this one is 0.5mm, the other one must be 0.35 or so- TBD.
- More extrusion tweaking to come...
Edited 2 time(s). Last edit at 10/29/2016 12:40PM by the_digital_dentist.
Ultra MegaMax Dominator 3D printer: [drmrehorst.blogspot.com]
|
Extrusion tuning October 29, 2016 11:24AM |
Registered: 11 years ago Posts: 5,780 |
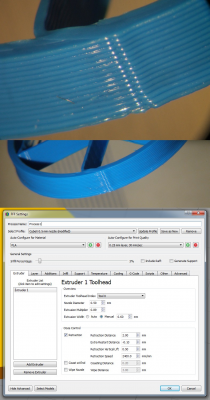
After messing around much too long with this, I have reached the conclusion that there's very little that can be done to improve the appearance of the seam beyond slightly reducing the recovery from retraction distance. Without tuning, the seam is made up of two bumps and a small groove between them. The bump on the left is made by a blob that occurs when extrusion restarts after a retraction. The post-retraction blob is located on the inner perimeter, and when the extruder extrudes past it while printing the outer perimeter, the blob in the inner perimeter forces the plastic on the outer perimeter further outward creating the characteristic left-side bump seen in the picture below. When the extruder path transitions from the inner perimeter to the outer perimeter, it happens just before the post-retraction blob on the inner perimeter. When the outer perimeter ends, it is right at the inner-to-outer perimeter transition point and the transition forces the plastic from the extruder to dam up behind it creating the right side bump at the seam. There is a small gap between the two bumps that is the V of the seam.
The left side bump in the seam can be reduced by using a small negative value for the post retraction extrusion restart distance. Adjusting the wiping distance can further reduce the left side bump in the seam a little by spreading it along the outer perimeter and leaving a flattened appearance that looks worse than the bump. None of the settings, including coasting, seems to improve the right side bump in the seam. The problem is the transition from the inner to the outer perimeter.
This was all tested at one layer height, print speed and temperature. There may be some differences at other settings.
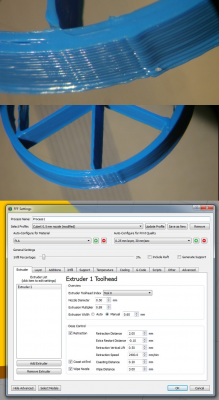
Here it is with a slightly reduced left side of the seam bump by using -0.1 mm post retraction restart distance
Here's what happens with wiping and coasting enabled and tweaked:
Moving on to other things...
Ultra MegaMax Dominator 3D printer: [drmrehorst.blogspot.com]
|
Re: Extrusion tuning October 30, 2016 10:53AM |
Registered: 7 years ago Posts: 55 |
Quote
the_digital_dentist
Moving on to other things...
Other prints or another printer project?
I'm still having issues with my controller... I've got my stepper directions correct, end stops are working... I'm homing to the X,Y,Z endstops correctly... I haven't figured out the soft end stops yet. I have to home the steppers and use G92 to zero the coordinates. My X axis has a positive number when travels right from the end stop, but my Y and Z axes have a negative number when the Z goes down and the Y comes forward.
I did get the steps/mm for X,Y,Z dialed in... but, I'm still lost. There's just no support for the Redeem firmware. I don't want to get a cheap RAMPS, etc... so I'm considering a Smoothieboard.
Do you guys have any suggestions?
Edited 1 time(s). Last edit at 10/30/2016 10:55AM by Dancook.
|
Re: Extrusion tuning October 30, 2016 01:01PM |
Registered: 10 years ago Posts: 14,672 |
The Smoothieboard has a good reputation, but take a look at the Duet series too. The Duet 0.8.5 is technically very similar to the Smoothieboard 5XC but costs less and has a much better web interface, including fast file upload to the SD card. The Duet WiFi is generation later, with an ARM Cortex M4 processor, built-in WiFi, and super-quiet stepper drivers supporting 1/256 microstepping - yet it still cost less than the 5XC last time I compared prices.
Large delta printer [miscsolutions.wordpress.com], E3D tool changer, Robotdigg SCARA printer, Crane Quad and Ormerod
Disclosure: I design Duet electronics and work on RepRapFirmware, [duet3d.com].
Large delta printer [miscsolutions.wordpress.com], E3D tool changer, Robotdigg SCARA printer, Crane Quad and Ormerod
Disclosure: I design Duet electronics and work on RepRapFirmware, [duet3d.com].
|
Re: An alternative to buying a bad kit for $300-500 October 30, 2016 01:33PM |
Registered: 11 years ago Posts: 5,780 |
Other things being getting the second extruder running, final cabling, mounting the power supply, controller board, and filament spool holder. I also want to figure out the necessary gcode to wipe the nozzles on the scraper and add it to the tool-change gcode in the printer profiles in Slic3r, S3D, and Cura.
Reusing the existing cables is possible - I've been doing it- but not optimal. The extruder cables in the machine have the motor wires, heater wires, and thermistor wires all running together (which made sense in the original controller board). On the SmoothieBoard, the motor, heater, and thermistor connections are all on different edges of the board, so reusing the cables looks messy. It is not a very good idea to run the relatively sensitive thermistor leads along side the motor and heater leads that both carry relatively high current that is rapidly switched on and off, especially since none of the wires are twisted.
I heated up the second extruder and checked the nozzle diameter using carbide drill bits and discovered that it too, is a 0.5 mm nozzle, in spite of the way the two looked under the microscope. I still have to decide if there's anything I can/should do about the bent hot-end.
I don't have much to complain about with the SmoothieBoard, other than its price. It is very easy to use, especially easy to configure- edit a single text file and reboot and your configuration is changed- no hunting through multiple config files, no compiling, and no struggling to keep a compiler running through compiler and OS updates. It is happy to run on 24V without any modifications. Motor currents are set by specifying them in the config file- there's no uncertainty about the current, no tiny pots to break, and since the drivers are properly heat-sinked to the ground plane of the circuit board, they are very unlikely to overheat. Microstepping is fixed at 16:1 at all drivers, but this machine runs smoothly and quietly, so 16:1 is fine. If you want to connect external drivers, there's a header with the step, direction, and enable lines ready to go (and I have used it) at each driver.
A friend is using an MKS SBASE board that runs smoothieware, but it has DRV8825 drivers and he has run into the low voltage missing microsteps problem and has had to add diode boards to fix it. The smoothieware people won't support you if you have a problem with an MKS board. The Azteeg X5 board is supported by the smoothieware people, and costs less than the SmoothieBoard, but uses modular drivers. By the time you buy five driver modules and the board the cost is about the same as the smoothieboard. You can get different driver modules to plug in if you want use different microstepping, etc., but you're back to the poor heat sinking problem.
dc42 will no doubt chime in here with details about the Duet boards... oops, looks like he beat me to it...
Edited 2 time(s). Last edit at 10/30/2016 01:43PM by the_digital_dentist.
Ultra MegaMax Dominator 3D printer: [drmrehorst.blogspot.com]
|
Re: An alternative to buying a bad kit for $300-500 October 30, 2016 02:44PM |
Registered: 7 years ago Posts: 363 |
Wow, been trolling these forums for the last month or so and never stopped in the general section to see this thread. I purchased my first printer a couple of months ago. It was a CubeX Solo for $200 off craigslist still in factory packaging.
Having on clue what I was doing, I made every attempt to get it to print reliably with repeatable quality and was quickly disappointed. So, like any good stubborn do-it-yourselfer, I started to convert it.
I decided to make my conversion as cheap as possible so I decided on going with a RAMPS board and DRV8825's. I've been taking my time, but so far I've gutted the electronics, and I was able to reuse most of the wiring (most likely temporary). I also stripped the x-carriage of everything but the LED bar. I then drilled a new hotend mounting hole and mounted a e3d clone to the carriage plate using a brass bowden connector. I relocated the extruder centerd on the top left edge of the acrylic housing and connected it to the hotend with some ptfe tubing.
Having never done a similar project before, I've not yet powered things up to start configuring a firmware just yet. I decided to try out Teacup as I like the principles it was coded with. Clean, readable, efficient and fast. Hopefully I'll have something up and running soon. I'm hoping that removing the extruder from the moving mass of the xcarriage will help with speed and quality of the printer.
Eventually, I am going to try and convert the frame to CoreXY style movement, as I'd like to do so for educational purposes as the design intrigues me. Great to see others finding value in the same printer.

|
Re: An alternative to buying a bad kit for $300-500 October 30, 2016 08:13PM |
Registered: 8 years ago Posts: 318 |
interesting thing about lightening the x carriage by using bowden is it does allow faster printing, but bowden is inferior to direct drive. But if you take the time to calibrate a bowden setup perfectly it will be damn close to direct drive. I had to go to bowden when I went dual extruder on my prusa, while it works the long tubing run causes long retractions and the elasticity of filaments (especially flexible ones like PVA and ninjaflex but still noticeable with PLA) cause trouble, and needs lots of fine tuning
|
Re: An alternative to buying a bad kit for $300-500 October 30, 2016 10:30PM |
Registered: 7 years ago Posts: 363 |
Yeah, I've read about the drawback to bowden setups. If i have excessive problems because of it I'll have to try something else. Thanks for the heads up though.
I've actually been drawing out on paper something along the lines of the Flexidrive. Not sure if I'll end up with a functional prototype or not but I think it's an interesting effort nonetheless.
I've actually been drawing out on paper something along the lines of the Flexidrive. Not sure if I'll end up with a functional prototype or not but I think it's an interesting effort nonetheless.
|
Re: An alternative to buying a bad kit for $300-500 October 31, 2016 04:08AM |
Registered: 10 years ago Posts: 38 |
Hello
I have recently purchased a Cube Pro Duo for $200 plus shipping it is non working condition. Assuming that the worst thing would be a burnt up control board. Its condition doesn't bother me as I am prepared to learn and will be replacing it anyway. Hopefully it will be here in a week. I do have a few questions before getting started with the build but first a question about proper forum etiquette. Would it be be the right thing to do to post questions under this thread or start a new thread under the General heading category. I do not wish to wish to distract others from this one.
Thank you for your help.
|
Re: An alternative to buying a bad kit for $300-500 October 31, 2016 07:29AM |
Registered: 7 years ago Posts: 55 |
Sooo... I finally (after a week) got some help with Redeem last night... finally got my X and Y axes homing to the right location, and XYZ all have positive coordinates now... my Z axis is a little funky... I'm wondering if I have the power setting right for the NEMA 23 stepper. I have all of the 17s set to 0.5 amps, and the 23 as well. I need to adjust the X assembly so that I get X0, Y0 over the bed... right now it's 0,0 at the homing corner... I'm feeling a little better about it though. Maybe the Smoothieboard will have to wait.
As far as adding a case to the printer, couldn't you just use acrylic sheets to make four sides?
Edited 1 time(s). Last edit at 10/31/2016 07:30AM by Dancook.
As far as adding a case to the printer, couldn't you just use acrylic sheets to make four sides?
Edited 1 time(s). Last edit at 10/31/2016 07:30AM by Dancook.
|
Re: An alternative to buying a bad kit for $300-500 October 31, 2016 09:06AM |
Registered: 11 years ago Posts: 5,780 |
0.5A is too low- you'll have problems with layer shifting in X and Y. I'm running 1.34A in X and Y and 1.68A in Z. I ran some tests on the extruders and found the least surface waviness at about 1.5A, though I may tweak it a bit.
You want the home position to be off the bed, so it doesn't melt the plastic print surface of the bed when it heats up. If you're going to use the scraper, Y=0 has to be 15-20 mm behind the edge of the bed because the scraper is about 12 mm behind the edge of the bed. To use the scraper you send the first extruder to X270 Y0, extrude a little plastic, then move to X270 Y15. Scraping the second extruder is done by sending the first nozzle to X220 Y0, extruding, then moving to X220 Y15. The numbers will vary a little depending on where your endstops are set, of course.
Ultra MegaMax Dominator 3D printer: [drmrehorst.blogspot.com]
|
Re: An alternative to buying a bad kit for $300-500 October 31, 2016 09:09AM |
Registered: 11 years ago Posts: 5,780 |
Quote
Kasahabo
Hello
I have recently purchased a Cube Pro Duo for $200 plus shipping it is non working condition. Assuming that the worst thing would be a burnt up control board. Its condition doesn't bother me as I am prepared to learn and will be replacing it anyway. Hopefully it will be here in a week. I do have a few questions before getting started with the build but first a question about proper forum etiquette. Would it be be the right thing to do to post questions under this thread or start a new thread under the General heading category. I do not wish to wish to distract others from this one.
Thank you for your help.
Non working probably means there is some filament stuck in the extruder. By selling it as nonworking they don't have to accept a return. Whatever is making it nonfunctional, you'll want to swap the controller board unless you want to pay $100 for filament cartridges...in that case someone here can probably provide you with an original controller board.
Ultra MegaMax Dominator 3D printer: [drmrehorst.blogspot.com]
|
Re: An alternative to buying a bad kit for $300-500 October 31, 2016 09:18AM |
Registered: 7 years ago Posts: 55 |
Thanks for the reply... my Replicape is using TMC2100 drivers, which are rated for an RMS current per phase of 1.2 A and the peak current is rated at 2.5 A... it does specifically say to run cooling and possibly add heatsinks for anything over 0.5A... I haven't wired in the fans yet, so I'll do that when I get home.
There are also settings for the Decay and Microstepping on my steppers... I'm using default settings at the moment, but do you have any suggestions on which to use?
Thanks again!
Here are the options in my firmware:
There are also settings for the Decay and Microstepping on my steppers... I'm using default settings at the moment, but do you have any suggestions on which to use?
Thanks again!
Here are the options in my firmware:
Decay

There are three settings that are controlled on the TMC2100 by the decay mode or rather "chopper configuration": CFG0, CFG4 and CFG5 in the TMC2100 data sheet.
CFG0: Sets chopper off time (Duration of slow decay phase)
DIS - 140 Tclk (recommended, most universal choice)
EN - 236 Tclk (medium)

CFG4: Sets chopper hysteresis (Tuning of zero crossing precision)
DIS: (recommended most universal choice): low hysteresis with ≈4% of full scale current.
EN: high setting with ≈6% of full scale current at sense resistor.

CFG5: Sets chopper blank time ( Duration of blanking of switching spike )
Blank time (in number of clock cycles)
DIS - 16 (best performance for stealthChop)
EN - 24 (recommended, most universal choice)

0 - DIS_CFG0 | DIS_CFG4 | DIS_CFG5
1 - DIS_CFG0 | DIS_CFG4 | EN_CFG5
2 - DIS_CFG0 | EN_CFG4 | DIS_CFG5
3 - DIS_CFG0 | EN_CFG4 | EN_CFG5
4 - EN_CFG0 | DIS_CFG4 | DIS_CFG5
5 - EN_CFG0 | DIS_CFG4 | EN_CFG5
6 - EN_CFG0 | EN_CFG4 | DIS_CFG5
7 - EN_CFG0 | EN_CFG4 | EN_CFG5

Microstepping

0 - Full step
1 - Half step
2 - Half step, interpolated to 256
3 - Quarter step
4 - 16th step
5 - Quarter step, interpolated to 256 microsteps
6 - 16th step, interpolated to 256 microsteps
7 - Quarter step, StealthChop, interpolated to 256 microsteps
8 - 16th step, StealthChop, interpolated to 256 microsteps
|
Re: An alternative to buying a bad kit for $300-500 October 31, 2016 09:24AM |
Registered: 7 years ago Posts: 55 |
Quote
Kasahabo
Hello
I have recently purchased a Cube Pro Duo for $200 plus shipping it is non working condition. Assuming that the worst thing would be a burnt up control board. Its condition doesn't bother me as I am prepared to learn and will be replacing it anyway. Hopefully it will be here in a week. I do have a few questions before getting started with the build but first a question about proper forum etiquette. Would it be be the right thing to do to post questions under this thread or start a new thread under the General heading category. I do not wish to wish to distract others from this one.
Thank you for your help.
I'll gladly donate the original board from mine, but I agree with TDD... the stock hot ends were horrible at clogging... and in my case, especially when I tried non-proprietary filament. If it were me, I'd go ahead and order an aftermarket controller, etc. and have it en route!

Edited 1 time(s). Last edit at 10/31/2016 09:25AM by Dancook.
|
Re: An alternative to buying a bad kit for $300-500 October 31, 2016 09:34AM |
Registered: 11 years ago Posts: 5,780 |
Quote
obelisk79
I decided to make my conversion as cheap as possible so I decided on going with a RAMPS board and DRV8825's.
You may have problems with those drivers. They don't microstep well at low speeds with low voltage motors. See: [cabristor.blogspot.com.by]
Ultra MegaMax Dominator 3D printer: [drmrehorst.blogspot.com]
|
Re: An alternative to buying a bad kit for $300-500 October 31, 2016 09:51AM |
Registered: 11 years ago Posts: 5,780 |
I've been printing with one of the original extruder/hot-ends and have runs several 4 hour prints with no jams yet. The problem with filament getting stuck in the extruders in the original printer configuration was the long, multiple-bend tubing that the extruder had to pull the filament through. PLA gets brittle when it absorbs moisture and it would break inside the tube and the extruder would keep feeding until the broken piece went past the filament break detector inside the extruder and then you'd have to take it apart to clean it out. I don't know if it was possible to reverse the extruder when a break was detected and have it push the remaining piece of filament back out of the extruder. In some printers the filament would break when it was forced to bend over the pinch roller, just past the filament break detector, and then the only way to load more filament was to take the extruder apart and remove the broken piece.
Ultra MegaMax Dominator 3D printer: [drmrehorst.blogspot.com]
Ultra MegaMax Dominator 3D printer: [drmrehorst.blogspot.com]
|
Re: An alternative to buying a bad kit for $300-500 October 31, 2016 10:00AM |
Registered: 7 years ago Posts: 363 |
Quote
the_digital_dentist
Quote
obelisk79
I decided to make my conversion as cheap as possible so I decided on going with a RAMPS board and DRV8825's.
You may have problems with those drivers. They don't microstep well at low speeds with low voltage motors. See: [cabristor.blogspot.com.by]
I've actually seen that article before, forgot about it though. I have a set of A4988's as well for a backup. I hope I don't experience a lot of issues. Using the datasheets from the steppers I've set the voltage on the drivers for NEMA17's to 0.8V and NEMA23 to 1.0V.
I believe that places me with coil currents at 1.6A for the 17's and 2.0A for the 23. I'm not super experienced with this kind of hardware so if you have any feedback on those settings please let me know. I assumed setting the phase current like that would ensure I am using the motors to their full potential and the increased torque would offset torque losses from the 1/32 micro-stepping. If I'm way off base, slap me now and set me straight before I blow my hardware up please.
I appreciate the feedback.
Edited 2 time(s). Last edit at 10/31/2016 10:07AM by obelisk79.
|
Re: An alternative to buying a bad kit for $300-500 November 01, 2016 04:09AM |
Registered: 10 years ago Posts: 38 |
Thank you for your offer of the control board Dancook. I will keep that in mind. I am not sure what I am going to do. First of all I would like to ask you or the general audience a few questions.
Two years ago I purchased an Azteeg x3 Pro v1.1 and a Viki lcd, I believe it to be version 1. Never used them for the project they were intended. I would like to use them for this project but it seems like there is not much support available or I am not looking hard enough. The answers to the following questions will help me to decide what to do next.
1. Will I be able to get Viki to work with the control board properly? I have seen people with many troubles trying to do so. One said that their print quality suffered because they were using Viki.
2. Assuming the Azteeg Pro is an acceptable choice and Viki will not work properly would I be able to substitute a generic lcd? Maybe a 20x4. I have not yet found any confirmation for this substitution on the web yet.
3. The last question is regarding firmware. Is there a favorite for this Cube build? I have a Rostock Max v2 and have minimal experience with Repetier and even less with Marlin. The only thing I have done with Marlin was to make an E3d v6 spit out some filament while connected the Azteeg Pro with commands given thru Pronterface without Viki. I am a little biased towards Repetier because of its ability for digital control versus manual adjustment when it comes to the trim pot on the steppers. However I am not sure which steppers can be digitally controlled. I haven't figured out if Marlin can do the same but I will not let the firmware's ability to control the trim pot be a deal breaker when it comes the most desirable firmware installation for this build.
Thank you for reading to this point and any help you are willing to give.
|
Re: An alternative to buying a bad kit for $300-500 November 01, 2016 04:19AM |
Registered: 8 years ago Posts: 916 |
Regarding the seam, I've had good results by bumping up the jerk settings.
This has been a long, long series of experiments that have led me to this point. It's been driving me crazy for months.
The problem I was having was that the nozzle was stopping as it finished one perimeter, and started the next perimeter. This slight micropause was causing a bulge in the filament, and the bulge smeared out over the next couple of mm of travel as the next perimeter was being put down. When I finally tried bumping up the jerk settings, that micropause disappeared, and the seam is much reduced. I can't remember the exact settings, but it certainly helped me. Perhaps it helps someone else as well.
I must say, that seam that DD has created looks really really good. I'll try that approach next.
|
Re: An alternative to buying a bad kit for $300-500 November 01, 2016 08:29AM |
Registered: 7 years ago Posts: 55 |
Quote
Kasahabo
Thank you for your offer of the control board Dancook. I will keep that in mind.
Kasahabo, I wish I could help you, but I have very little experience with 3D printers other than the Cubex. The Cubex Duo was my first printer, and I bought it specifically because it has really good bones as a first tinkering 3D printer project. And it was $260!!
In my experience, if you don't have a good knowledge base with your hardware, you're going to have a tough time getting it set up without a good level of support.
1 & 2) Maybe this link will help you with the Azteeg / Viki combo: [www.extrudable.me]
3) When you strip it down, you're left with your typical Cartesian 3D printer... I'd say the firmware is going to be up to your personal taste or experience?
I'm sure these guys will give you a much better answer than I can.
@ DD... I got my brand new aluminum plate yesterday per your recommendations and I have some cork to go under the heated bed... I also have my X, Y, and Z axes homing at 0,0 over the corner of my build plate and 0 at Z print level... Once you wrap your brain around the coordinate system, it gets a little easier... I had to do -0.020 to 0.280 for X and Y... I ended up losing some of my Z because of the heated bed, so it goes from 0 at the top to 0.270 at the bottom... I had to take my hotend apart last night and add my thermocouplers... silly me forgot to put the heating element back into the Chimera before turning it on... almost melted the fan on my cold end, lol... it happens when you're trying to work on these things in the wee hours... now I just need to get the fans installed, clean up the wiring a little, and I'll have the heatsinks for my drivers tomorrow so I can crank up the amps safely.
I can't wait to see this thing printing!
Edited 2 time(s). Last edit at 11/01/2016 08:32AM by Dancook.
|
Re: An alternative to buying a bad kit for $300-500 November 01, 2016 02:52PM |
Registered: 7 years ago Posts: 363 |
Progress update:
I have Teacup running well so far on my RAMPS with the DRV8825's and Pronterface for control. So far I've tested X and Y axis movement and all seems smooth and in order. Z axis is next, I'm hoping I've calculated the correct steps per mm.
So far I have 174.978 steps/mm for X and Y @ 1/32 microsteps for a 2.032 pitch mxl belt on 18T pulleys.
for Z I've calculated 2133.333 steps/mm at 3mm screw pitch.
I'll do some fine tuning of the movement once I've got more of the functionality tested and running properly.
|
Re: An alternative to buying a bad kit for $300-500 November 02, 2016 04:39AM |
Registered: 10 years ago Posts: 38 |
Dancook
Thank you. Any help is valuable to me.
Oblisk79
I did find a calculator on the web and ran your numbers assuming 1.8 degree steppers and ran your configuration. The answers returned were the similar to yours except the calculator must have been designed around two place decimals. Here is the link to the web site.
[prusaprinters.org]
Edited 1 time(s). Last edit at 11/02/2016 04:40AM by Kasahabo.
|
Re: An alternative to buying a bad kit for $300-500 November 03, 2016 01:02AM |
Registered: 11 years ago Posts: 5,780 |
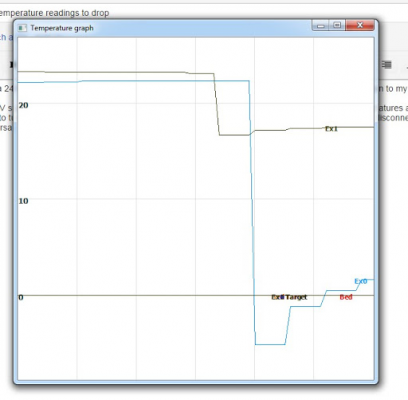
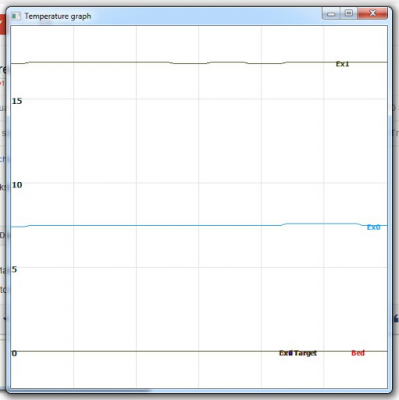
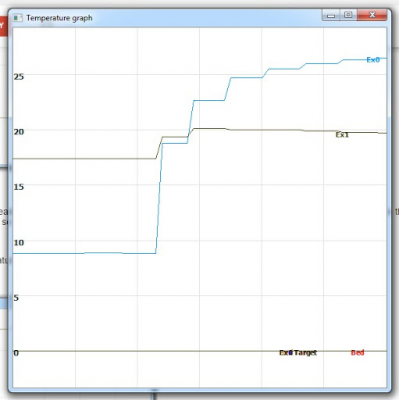
I discovered a problem with my hot-ends. The thermistors are shorted to the heaters- I read 2-5 MegOhms between the heaters and thermistors in both of them. They should be completely isolated. I guess I'll be replacing them after all, but not before a dissection...
This problem was causing the temperature readings to vary when I switched the 24V supply on and off. It's lucky the shorts are high resistance or they might have killed my controller board.
Here's how I noticed the problem- 5V was being supplied by USB, 24V supply was switched on at the transition point:
And here's what it looked like after about 10 minutes:
And here's what it looks like when I kill the 24V:
Check your hot-ends!
Edited 4 time(s). Last edit at 11/03/2016 06:43PM by the_digital_dentist.
Ultra MegaMax Dominator 3D printer: [drmrehorst.blogspot.com]
|
Re: An alternative to buying a bad kit for $300-500 November 03, 2016 05:27AM |
Registered: 7 years ago Posts: 36 |
|
Re: An alternative to buying a bad kit for $300-500 November 03, 2016 07:34PM |
Registered: 10 years ago Posts: 79 |
Hey DD, I just checked my stock hotends and they are reading 185k ohms and 190k ohms across the thermistor, with no continuity to the body.
I'm not using them, and if you want them I can mail them to you. One of them has that slight issue with the heater wire insulation, but that is easily remedied.
Just let me know.
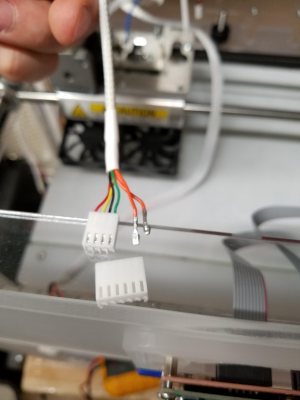
In other news, I got my printer up an running the other day. I rewired it by extracting pins from the original connectors, and re-seating them into some 4 pin connectors that I scavenged from elsewhere on the printer. Also, I followed your que and used a piece of prototyping board to make a terminal connection board for all the things on the carriage.
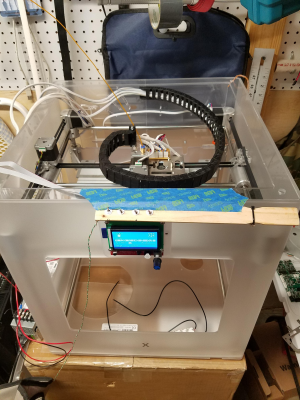
And I apparently reset the damned RAMPS controller somehow when I took it out of my old machine, and I couldn't find a copy of my old config. So that meant that I had to reconfigure Marlin from scratch, which was probably for the best, because I hadn't done it in years. Thanks for those steps-per-mm number by the way, it made everything way easier.
I still need to do a few things, but it's up and running now. However, it does have a weird spazmatic motion in it's x/y moments sometimes. Like a strange rubber-banding effect. I think it might be related to my jerk settings, but I'm not sure. I'll probably troubleshoot it more this weekend. Anyways, Here are a couple pictures for anyone that cares.
Rewiring motor connections. These connectors fit with the standard pin spacing.
IT'S ALIVE! MWA HAHAHAHAHAHA!!!!
I've got some wire clean up and firmware fine tuning to do, and I still want to enclose it for ABS, but it's squirting out plastic in a controlled manner, and that's what matters.
|
Re: An alternative to buying a bad kit for $300-500 November 03, 2016 07:39PM |
Registered: 7 years ago Posts: 363 |
|
Re: An alternative to buying a bad kit for $300-500 November 03, 2016 08:33PM |
Registered: 10 years ago Posts: 79 |
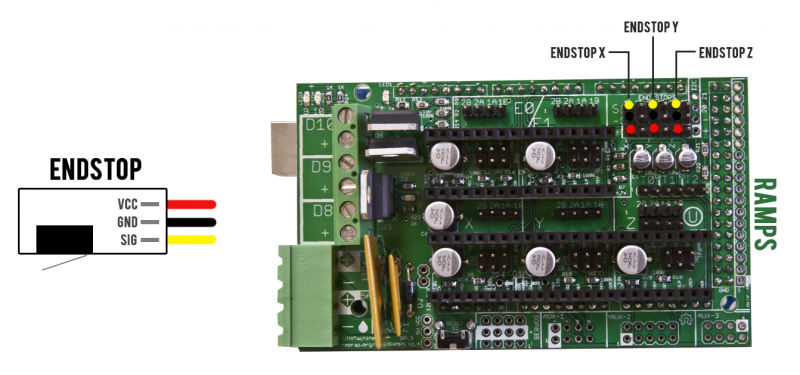
Endstops connect to the yellow and black pins (top and middle). Also, make sure that you have the wires connected to the "common" and "N.C." blades of the micro-switch. That's how the marlin firmware is setup by default.
Edit: That is true for standard micro-switches. Sorry, I misread your message at first. For the mag switches in the CubeX, you will use the same pins (yellow and black), but these switches are "Normally Open" only. That means that you will have to go into the endstop section of you Marlin configuration.h file and set the invert endstop option to "true" for each of the axis that use the mag switches. I apologize for any confusion.
Edited 2 time(s). Last edit at 11/03/2016 08:40PM by TheJones.
|
Re: An alternative to buying a bad kit for $300-500 November 03, 2016 08:40PM |
Registered: 7 years ago Posts: 363 |
TheJones,
Thanks for the help. I actually just figured it out and was coming here to post about it. I also found my firmware config had the switch status reversed. Easily fixed. Have to say, I really am appreciating the fact that there are others doing the same conversion as me. Really helps me out as a newbie to 3d printing and reprap.
-Obelisk
|
Re: An alternative to buying a bad kit for $300-500 November 04, 2016 12:21AM |
Registered: 11 years ago Posts: 5,780 |
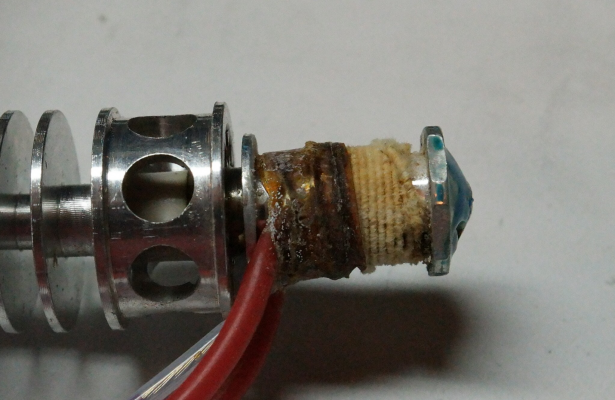
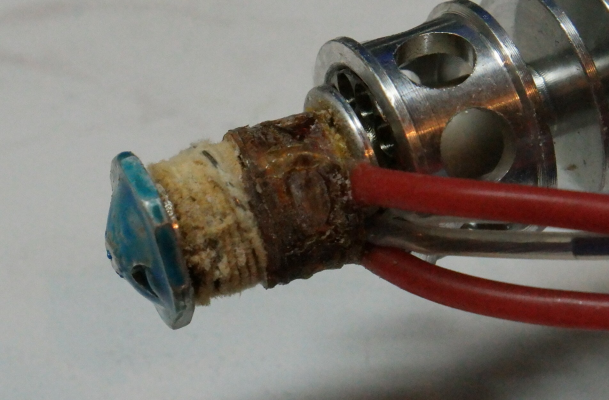
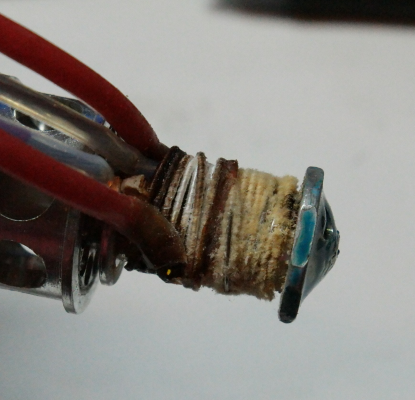
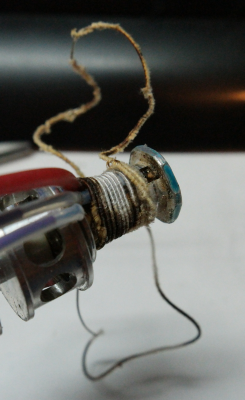
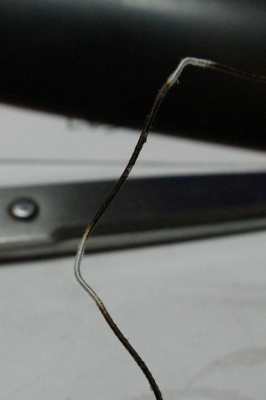
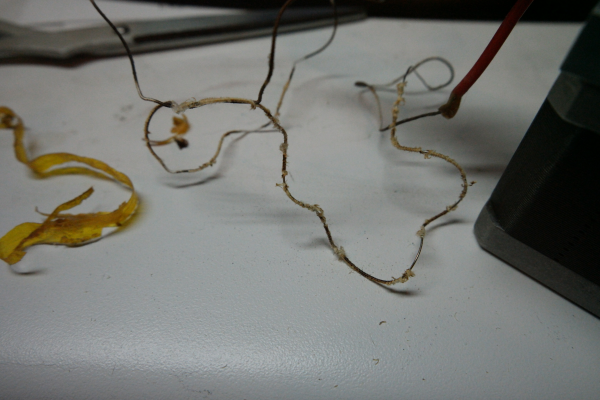
I took apart one of the heaters to see what was going on. Under the thin layer of cement there is a layer of kapton tape covering nichrome wire, all wrapped around the aluminum heater tube. The nichrome wire has some sort of fibrous insulation wrapped around it- maybe glass or rock wool. The nichrome is crimped to copper wires and insulated with red silicone tubing. If you look at the nozzle, there is a small cement filled hole- that's where the thermistor mounts. It has teflon insulation over the leads that fit into a channel cut into the heater tube body. The silicone and teflon sleeves on the wires all appear to be OK, but the insulation on the nichrome wire is burnt in places and flaking off in others. There is a very short space between the thermistor and the teflon sleeves that insulate its leads- I think the short between the heater and the thermistor was occurring at that area.
Ultra MegaMax Dominator 3D printer: [drmrehorst.blogspot.com]
Ultra MegaMax Dominator 3D printer: [drmrehorst.blogspot.com]
|
Re: An alternative to buying a bad kit for $300-500 November 05, 2016 02:21PM |
Registered: 11 years ago Posts: 5,780 |
It's entirely possible that I cooked the hot-ends by setting max_pwm too high for the 24V power supply I am using. They may have been OK running on the stock 15V supply (about 45W to each heater), but when I went to 24V I set the max_pwm to 120 which delivers about 54W to each heater- maybe a bit too much.
Ultra MegaMax Dominator 3D printer: [drmrehorst.blogspot.com]
Ultra MegaMax Dominator 3D printer: [drmrehorst.blogspot.com]
Sorry, only registered users may post in this forum.
