An alternative to buying a bad kit for $300-500
Posted by the_digital_dentist
|
Re: An alternative to buying a bad kit for $300-500 November 29, 2016 05:32PM |
Registered: 11 years ago Posts: 1,049 |
FWIW
My Cube pro duo was new ready to go -- with two carts of filament and tool kit $300
The filament out of the carts I got was real brittle and clogged up the feed tubes.
I did cart replace routine from touch screen and fed in spool PLA from a spool above.
Cart in place without feeding filament.
Used the Cubex software and put file on stick.
Prints like a dream. Whatever the bed is --- holds on to PLA like a barnacle on a boat
sometimes hard to get print to release.
Like the way it wipes the snot off -- with snot wipe routine.
Hard to tear it apart -- when it prints so nice
but I will soon
|
Re: An alternative to buying a bad kit for $300-500 November 29, 2016 05:58PM |
Registered: 7 years ago Posts: 363 |
I've modified my bed leveling mounts in a similar fashion just this afternoon. Seems like it has more stability now. Working on a few test prints as I type.
Out of curiosity what settings are you guys using for acceleration and jerk?
Edit: I've been playing around with the settings, including print speed. I have ringing at the start of each layer on my hollow test object. The only way I've been able to completely eliminate it so far has been to reduce speed down to 20mm/s. I'm going to start tinkering with belt tension. If anyone has any insight to share it would be welcome.
Edited 1 time(s). Last edit at 11/30/2016 01:56PM by obelisk79.
|
Re: An alternative to buying a bad kit for $300-500 December 01, 2016 12:07AM |
Registered: 8 years ago Posts: 105 |
My config has been posted but the Duet probably has a different config to the board you are using. DC42 (Dave) might be able to comment on how the Duet settings transpose to other boards.
However I have found two things that might help.
1. Get some WD40 (or other) ptfe dry lubricant for the bearings. I sprayed this in the bearings and on the rails and it flushed dust and crap out the bearings and made it run smoother. Mine had been used a couple of times then shoved in a cupboard collecting dust, so probably benefited more than the norm!
2. To keep the heat in I put some insulation type material on the top pinned down by a granite plinth, adding this weight ontop (8-10kg) has virtually eliminated all belt noise/ringing from prints, simply stopped it shaking about with the mass movement of the carriage.
I'm running a perimeter speed of around 32mm/s but think it could go faster and still look clean now.
From playing around with the speed and accelerations on the Duet the analogy I would make is to driving a car round a track. You can go hell for leather, braking hard into the corners, or go just as fast taking a better line and holding more corner speed, the latter way seems to give better prints. So less violent acceleration and not too low on minimum speeds.
Jon
Edited 1 time(s). Last edit at 12/01/2016 12:57AM by Firefox3D.
|
Re: An alternative to buying a bad kit for $300-500 December 04, 2016 01:42PM |
Registered: 7 years ago Posts: 45 |
Hey guys, been working on stripping the cubepro and getting the cubex ready to mount into the shell of the pro. The feet and braces are different but no problem swapping.
I do have the heater that came with the pro. I'm sure it will but figured I'd ask, will I be able to configure to work with the smoothie board and the duet?
As you can tell I'm not as familiar with swapping the boards as you all. I'll be soone taking on the adventure. It's the only reason I even bought these.
Edited 1 time(s). Last edit at 12/04/2016 01:42PM by advancedrescue.
|
Re: An alternative to buying a bad kit for $300-500 December 04, 2016 04:32PM |
Registered: 10 years ago Posts: 14,672 |
Quote
advancedrescue
Hey guys, been working on stripping the cubepro and getting the cubex ready to mount into the shell of the pro. The feet and braces are different but no problem swapping.
I do have the heater that came with the pro. I'm sure it will but figured I'd ask, will I be able to configure to work with the smoothie board and the duet?
As you can tell I'm not as familiar with swapping the boards as you all. I'll be soone taking on the adventure. It's the only reason I even bought these.
When you say 'heater', do you mean the hot end heater or the bed heater?
The hot end heater should work ok with any electronics, if you power it with the voltage it was intended for.
The bed heater will be OK as long as the current draw does not exceed the rating of the electronics bed heater output. If you don't know the current draw, measure the heater resistance and divide it into the supply voltage. The Duet WiFi is rated at 15A bed current but we may increase that when the new thermal test results come in. You can control a higher current than the electronics can handle by itself using an appropriate solid state relay.
Large delta printer [miscsolutions.wordpress.com], E3D tool changer, Robotdigg SCARA printer, Crane Quad and Ormerod
Disclosure: I design Duet electronics and work on RepRapFirmware, [duet3d.com].
|
Re: An alternative to buying a bad kit for $300-500 December 04, 2016 09:03PM |
Registered: 7 years ago Posts: 45 |
Quote
dc42
Quote
advancedrescue
Hey guys, been working on stripping the cubepro and getting the cubex ready to mount into the shell of the pro. The feet and braces are different but no problem swapping.
I do have the heater that came with the pro. I'm sure it will but figured I'd ask, will I be able to configure to work with the smoothie board and the duet?
As you can tell I'm not as familiar with swapping the boards as you all. I'll be soone taking on the adventure. It's the only reason I even bought these.
When you say 'heater', do you mean the hot end heater or the bed heater?
The hot end heater should work ok with any electronics, if you power it with the voltage it was intended for.
The bed heater will be OK as long as the current draw does not exceed the rating of the electronics bed heater output. If you don't know the current draw, measure the heater resistance and divide it into the supply voltage. The Duet WiFi is rated at 15A bed current but we may increase that when the new thermal test results come in. You can control a higher current than the electronics can handle by itself using an appropriate solid state relay.
The cube pro comes with a heater to heat up the enclosure. Functions as a normal heater, just heats the air inside the cube.
|
Re: An alternative to buying a bad kit for $300-500 December 05, 2016 02:50AM |
Registered: 10 years ago Posts: 14,672 |
So it's a chamber heater. It's likely to draw a lot of current, so you may need to use a solid state relay to drive it. I presume it has an associated thermistor, which you can connect to a spare thermistor input on the electronics.
RepRapFirmware on Duet supports some gcodes to control chamber heaters, see [reprap.org] and [reprap.org]. You can use one of these in your slicer start gcode to set the chamber temperature at the start of a print.
Large delta printer [miscsolutions.wordpress.com], E3D tool changer, Robotdigg SCARA printer, Crane Quad and Ormerod
Disclosure: I design Duet electronics and work on RepRapFirmware, [duet3d.com].
|
Re: An alternative to buying a bad kit for $300-500 December 05, 2016 11:59AM |
Registered: 7 years ago Posts: 45 |
Quote
dc42
So it's a chamber heater. It's likely to draw a lot of current, so you may need to use a solid state relay to drive it. I presume it has an associated thermistor, which you can connect to a spare thermistor input on the electronics.
RepRapFirmware on Duet supports some gcodes to control chamber heaters, see [reprap.org] and [reprap.org]. You can use one of these in your slicer start gcode to set the chamber temperature at the start of a print.
Ok, I'll try and tackle it when I get going with the swaps. I do have the electronics of the pro, which the heater does have its own board. Wondering if I could use it. I'll take a look at it later as well.
|
Re: An alternative to buying a bad kit for $300-500 December 06, 2016 02:29PM |
Registered: 10 years ago Posts: 1,401 |
|
Re: An alternative to buying a bad kit for $300-500 December 06, 2016 02:45PM |
Registered: 7 years ago Posts: 55 |
Quote
ggherbaz
Have anyone tried to do the same with a cube 3d 3rd. Generation? They are cheap on eBay and thinking on dive with one.
Looks like it would be a fun little project... not sure how the print quality would be, and if they've made it as reliant on proprietary filament as our Cubex's... nothing a new controller won't cure :-)
|
Re: An alternative to buying a bad kit for $300-500 December 06, 2016 03:41PM |
Registered: 7 years ago Posts: 45 |
Quote
Dancook
Quote
ggherbaz
Have anyone tried to do the same with a cube 3d 3rd. Generation? They are cheap on eBay and thinking on dive with one.
Looks like it would be a fun little project... not sure how the print quality would be, and if they've made it as reliant on proprietary filament as our Cubex's... nothing a new controller won't cure :-)
I got one. Haven't modified it really tho. It's just as reliant on the proprietary filament as all their printers. It uses the optical sensor for z height.print quality is nice tho. Plan on keeping mine as is for now due to having a bunch of cartridges I got on the cheap, and also concentrating on building the cubex.
|
Re: An alternative to buying a bad kit for $300-500 December 06, 2016 04:07PM |
Registered: 7 years ago Posts: 55 |
Quote
advancedrescue
I got one. Haven't modified it really tho. It's just as reliant on the proprietary filament as all their printers. It uses the optical sensor for z height.print quality is nice tho. Plan on keeping mine as is for now due to having a bunch of cartridges I got on the cheap, and also concentrating on building the cubex.
I'd love to have one here at the office to tinker with.
|
Re: An alternative to buying a bad kit for $300-500 December 06, 2016 06:48PM |
Registered: 10 years ago Posts: 1,401 |
For $160 it's hard not to get one, I will pull the trigger after Christmas since they have been raising the price in the last two weeks.
I'm planning on change the board once I test it and consume the 2 rolls that comes with.
The main thing to work on is converting the non heated bed to a heated one, then I will be changing stuff as it wears off.
Edited 1 time(s). Last edit at 12/06/2016 06:48PM by ggherbaz.
I'm planning on change the board once I test it and consume the 2 rolls that comes with.
The main thing to work on is converting the non heated bed to a heated one, then I will be changing stuff as it wears off.
Edited 1 time(s). Last edit at 12/06/2016 06:48PM by ggherbaz.
|
Re: An alternative to buying a bad kit for $300-500 December 06, 2016 10:07PM |
Registered: 7 years ago Posts: 363 |
I don't want to discourage you, but based on my own experiences with the CubeX, I cringe at the thought of ever using it the way it was before swapping the controller.
My CubeX printed like trash before I swapped the controller. Just remember you can still use the filament after you've made your conversion if you find yourself struggling to get decent prints. I noticed a significant improvement after switching to ramps, now that I've been tuning the settings more my prints are near perfect.
Edited 1 time(s). Last edit at 12/06/2016 10:14PM by obelisk79.
|
Re: An alternative to buying a bad kit for $300-500 December 07, 2016 10:02AM |
Registered: 7 years ago Posts: 47 |
Hi, I can only confirm what Obelisk79 says, got a Cubex duo for cheap and tried days to get a decent print off it, no luck.
Swapped the hart out with a Ramps 1.4 and get all the info here on this tread (with thanks for it) and within the half hour I manage to get a good print from it with no hassle.
Maybe I was lucky, but now i'm a happy user on my Modded Cubex.
Got some finishing to do but all went well on the Ramps1.4 Mod so far.
Used only one extruder at the moment.
For the extruder/hottend Mod, I used the heater, heaterblok, termistor from a E3D v6 clone, allso a V5 all metal heat break hottend throat, a 0.4 nozzle and the original Cubex hottend body.
No special tools or welding required.
The only thing I must find out is to get my prints in the middle of the original print-bed with Cura automaticly.
Using the original X and Y endstops, my prints start more on the after side off the bed now.
|
Re: An alternative to buying a bad kit for $300-500 December 07, 2016 10:31AM |
Registered: 8 years ago Posts: 318 |
|
Re: An alternative to buying a bad kit for $300-500 December 07, 2016 10:54AM |
Registered: 7 years ago Posts: 55 |
Aye... I replaced all of my end stop switches. It took me a while to figure out the homing and 0,0,0 coordinates... and like DGF said, I had to figure out the negative X,Y coordinates of the front left corner so that 0,0 was at the corner of my build plate. Certainly a hard hobby to figure out all of the little technical things like that on your own!
|
Re: An alternative to buying a bad kit for $300-500 December 07, 2016 11:39AM |
Registered: 7 years ago Posts: 47 |
Quote
DaGameFace
thats because the home position is 0,0 and is off the bed. 0,0 should be at the corner of the bed configure your endstop settings so it knows that its at negative coordinates at its home position
True, as I have no problems with electricity and mechanics, the more I have on programming, no clue where I can change this, In cura or in the Marlin Fw so any help on where and how would be welcome

|
Re: An alternative to buying a bad kit for $300-500 December 07, 2016 11:41AM |
Registered: 7 years ago Posts: 47 |
Quote
Dancook
Aye... I replaced all of my end stop switches. It took me a while to figure out the homing and 0,0,0 coordinates... and like DGF said, I had to figure out the negative X,Y coordinates of the front left corner so that 0,0 was at the corner of my build plate. Certainly a hard hobby to figure out all of the little technical things like that on your own!
Also true

|
Re: An alternative to buying a bad kit for $300-500 December 07, 2016 07:40PM |
Registered: 8 years ago Posts: 105 |
Quote
fg dude
Quote
DaGameFace
thats because the home position is 0,0 and is off the bed. 0,0 should be at the corner of the bed configure your endstop settings so it knows that its at negative coordinates at its home position
True, as I have no problems with electricity and mechanics, the more I have on programming, no clue where I can change this, In cura or in the Marlin Fw so any help on where and how would be welcome
Can't see an option for creating a bed offset in Cura or Slic3r, there is in Simplify3d as I used it before I converted the printer.
However if you want to set the 0,0 to the corner of the build plate, manually move or measure the X,Y values then add this to your Cura start.g file - under Start/End-GCode tab
G1 Z3 ; so nozzle clears the bed - could be more if you want
G1 X (value) Y (value) ; move to measured corner of build plate - eg X25 Y30
G92 X0 Y0 ; zero X and Y
Got used to stuff like this as I haven't implemented a z-limit yet, so get into the habit of moving the Z to 120 when I finish and turn off, then set Z to 120 when I startup again.
Had fun earlier, changed the hot-end fan onto the PWM Duet fan connection as I discovered even with the sealed chamber at nearly 60 degrees it only needs to run about 50% which keeps the draught on the ABS as low as possible. Went to change filament and forgot to switch on the fan, and guess what it jammed during retraction. Found it had thoroughly jammed itself in the inner tube after total disassembly, won't do that again!
After experimenting with 3D-eez and a very quick failed attempt with ABS juice/slurry - discovered if you put it straight on the aluminium bed and heat it up, it all bubbles to hell and is totally useless. I knew PCB material worked well on my Ormerod so managed to get an off-cut of 0.8mm FR4 board which I just clamped to the bed. Works for ABS and pings/cracks off as it cools, ASA sticks almost too well if you give it too much heat and not enough speed on the first layer.
Major benefit is I can unclip the sheet and slide it out diagonally so don't have to take the lid off the printer, and you can flex the FR4 off the print.
Printed fairly large footprint, but not very high parts so far 210mm x 110mm x 15mm tall. Have slowly been increasing the speed on repeated jobs, starting at about 14 hours, going down to about 10 hours. Outside perimeter now printing at 41mm/s and looks perfect, could probably go to 50mm/s at 0.12mm layers. Will post some pics when I have daylight.
Jon
Edited 1 time(s). Last edit at 12/07/2016 07:42PM by Firefox3D.
|
Re: An alternative to buying a bad kit for $300-500 December 08, 2016 03:43AM |
Registered: 10 years ago Posts: 14,672 |
Quote
Firefox3D
Had fun earlier, changed the hot-end fan onto the PWM Duet fan connection as I discovered even with the sealed chamber at nearly 60 degrees it only needs to run about 50% which keeps the draught on the ABS as low as possible. Went to change filament and forgot to switch on the fan, and guess what it jammed during retraction. Found it had thoroughly jammed itself in the inner tube after total disassembly, won't do that again!
Why not configure it as a thermostatic fan? See [reprap.org].
Large delta printer [miscsolutions.wordpress.com], E3D tool changer, Robotdigg SCARA printer, Crane Quad and Ormerod
Disclosure: I design Duet electronics and work on RepRapFirmware, [duet3d.com].
|
Re: An alternative to buying a bad kit for $300-500 December 08, 2016 08:43AM |
Registered: 7 years ago Posts: 47 |
Quote
Firefox3D
Quote
fg dude
Quote
DaGameFace
thats because the home position is 0,0 and is off the bed. 0,0 should be at the corner of the bed configure your endstop settings so it knows that its at negative coordinates at its home position
True, as I have no problems with electricity and mechanics, the more I have on programming, no clue where I can change this, In cura or in the Marlin Fw so any help on where and how would be welcome
Can't see an option for creating a bed offset in Cura or Slic3r, there is in Simplify3d as I used it before I converted the printer.
However if you want to set the 0,0 to the corner of the build plate, manually move or measure the X,Y values then add this to your Cura start.g file - under Start/End-GCode tab
G1 Z3 ; so nozzle clears the bed - could be more if you want
G1 X (value) Y (value) ; move to measured corner of build plate - eg X25 Y30
G92 X0 Y0 ; zero X and Y
Got used to stuff like this as I haven't implemented a z-limit yet, so get into the habit of moving the Z to 120 when I finish and turn off, then set Z to 120 when I startup again.
Jon
Thanks for the help Jon, I'll give it a try
|
Re: An alternative to buying a bad kit for $300-500 December 08, 2016 10:23AM |
Registered: 8 years ago Posts: 105 |
|
Re: An alternative to buying a bad kit for $300-500 December 08, 2016 11:44AM |
Registered: 7 years ago Posts: 55 |
I just set mine up so that when my Y endstop at the left rear triggers, the printer knows it's at 0.270... soft end stop to the front is -0.030... (-0.030 to +0.270 = 300mm)
For X my endstop is on the left side, so it triggers at -0.030 and the soft end stop at far right is +0.270... Also = 300mm...
That puts my X,Y (0,0) @ the front left corner of my plate...
My Z end stop triggers at the bottom, so I set it to approximately 0.280.... the soft end stop is at 0.000... which stops it right at the nozzle at print level.
I just G28 at the end of a print... puts my Z at the bottom, and X,Y at the left rear.
My set up probably isn't the best practice, but since it's been working perfectly, I haven't touched it.
Edited 2 time(s). Last edit at 12/08/2016 11:47AM by Dancook.
|
Re: An alternative to buying a bad kit for $300-500 December 08, 2016 12:45PM |
Registered: 8 years ago Posts: 318 |
Quote
Dancook
My set up probably isn't the best practice, but since it's been working perfectly, I haven't touched it.
IMHO, that is actually best practice, that way any slicer can easily use your printer, rather than correcting for poorly configured firmware in the slicer (I actually use my slicer to set the offesets of my extruders, which isn't best practice, but convenient instead of reflashing the firmware every time I do a tune up)
|
Re: An alternative to buying a bad kit for $300-500 December 08, 2016 01:38PM |
Registered: 8 years ago Posts: 105 |
Quote
dc42
Quote
Firefox3D
Had fun earlier, changed the hot-end fan onto the PWM Duet fan connection as I discovered even with the sealed chamber at nearly 60 degrees it only needs to run about 50% which keeps the draught on the ABS as low as possible. Went to change filament and forgot to switch on the fan, and guess what it jammed during retraction. Found it had thoroughly jammed itself in the inner tube after total disassembly, won't do that again!
Why not configure it as a thermostatic fan? See [reprap.org].
I could do but been so busy concentrating on getting print jobs done I realised all I need to do is add the M106 S120 command to the config file, it looks like the fan running at 50% or so is fine all the time.
|
Re: An alternative to buying a bad kit for $300-500 December 08, 2016 03:08PM |
Registered: 7 years ago Posts: 47 |
Quote
fg dude
Quote
Firefox3D
Quote
fg dude
Quote
DaGameFace
thats because the home position is 0,0 and is off the bed. 0,0 should be at the corner of the bed configure your endstop settings so it knows that its at negative coordinates at its home position
True, as I have no problems with electricity and mechanics, the more I have on programming, no clue where I can change this, In cura or in the Marlin Fw so any help on where and how would be welcome
Can't see an option for creating a bed offset in Cura or Slic3r, there is in Simplify3d as I used it before I converted the printer.
However if you want to set the 0,0 to the corner of the build plate, manually move or measure the X,Y values then add this to your Cura start.g file - under Start/End-GCode tab
G1 Z3 ; so nozzle clears the bed - could be more if you want
G1 X (value) Y (value) ; move to measured corner of build plate - eg X25 Y30
G92 X0 Y0 ; zero X and Y
Got used to stuff like this as I haven't implemented a z-limit yet, so get into the habit of moving the Z to 120 when I finish and turn off, then set Z to 120 when I startup again.
Jon
Thanks for the help Jon, I'll give it a try
Got the numbers figured out and put them in, so far it prints nicely in the middle of the print bed now.
Thanks for the help from you all.
Moving on to the next step.
|
Re: An alternative to buying a bad kit for $300-500 December 09, 2016 01:09AM |
Registered: 7 years ago Posts: 45 |
Quote
Dancook
Quote
advancedrescue
I got one. Haven't modified it really tho. It's just as reliant on the proprietary filament as all their printers. It uses the optical sensor for z height.print quality is nice tho. Plan on keeping mine as is for now due to having a bunch of cartridges I got on the cheap, and also concentrating on building the cubex.
I'd love to have one here at the office to tinker with.
I hear ya. I'm just getting into the modifying printers. I'll get the cubex done and possibly do the cube 3 later. There's a thread elsewhere I have saved where people have swapped theirs with arduino and ramps. One thing I don't like is they don't seem to have end stops. It'll home itself before prints, but when it hits the sides it grinds like hell and the belts go crazy. Read up and that's the norm for them. Don't see why they designed it like that. But honestly it prints great. Tomorrow I may post some pictures of prints done by the cube.
|
Re: An alternative to buying a bad kit for $300-500 December 09, 2016 01:26AM |
Registered: 7 years ago Posts: 45 |
Updates on my activety. Got the new cubex, and the stripped down cubepro. The cubepro has the boards but missing some wires. Also noticed they wired it totally different then the cubex. So far I've had to take the base off the cubex because it was slightly taller than the pro, and wouldn't align up in the pro shell. Put the steel base from the pro on the cubex. Changed out the top front corners(not sure of their names) because the pros have a slight angle cut into them for LEDs. Printer the belt clamps posted in here and installed them. Also the pro has mechanical end stops. So I've put those on with their mounts. I disconnected the magnetic sensors endstops and soldiered the connections to the new mechanical endstops, then tested them.
I also printed out and installed the mount for the z height endstops. The wires run thru the White flex tube going from the back right stepper motor down to the board. I haven't connected it yet tho. Was going to look tomorrow but is it needed before I do the board swap?
I also added the 3rd Bowden tube and extruder wires, the pro had all three so figured why not. Don't have the actual 3rd extruder yet, but plan on doing the E3D swap probably after Christmas.
I'll snap some pictures tomorrow when working on it. I'm a firefighter and only work on it while at work. Thinks so big I'm just leaving it up there.
Without swapping the boards and extruders, all I got left to get it finished is put the metal braces from the cups pro on, find a way to mount the power connection to the side opening of the pro, and also the USB to the other side openings of the pro.
The pro came with the complete outside shell/cover and door. The complete frame except for the extruder carriage(the wires and chain were there). Came with the chamber heater, and board. The main board was there, but don't know how to hook it up and haven't put much effort into it. The the print plate wasn't there, but the print bed frame was. Everything else was intact. So extruders, extruder carriage, power cord and possible a few wires were missing, the front screen, and the print plate were all that wee missing. Hopefully tomorrow I'll wrap it up and get it running until after Christmas when I do the board/extruder swap.
Edited 1 time(s). Last edit at 12/09/2016 01:34AM by advancedrescue.
|
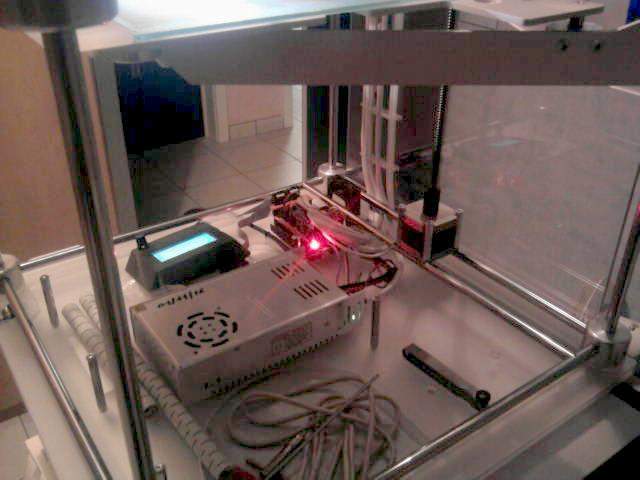
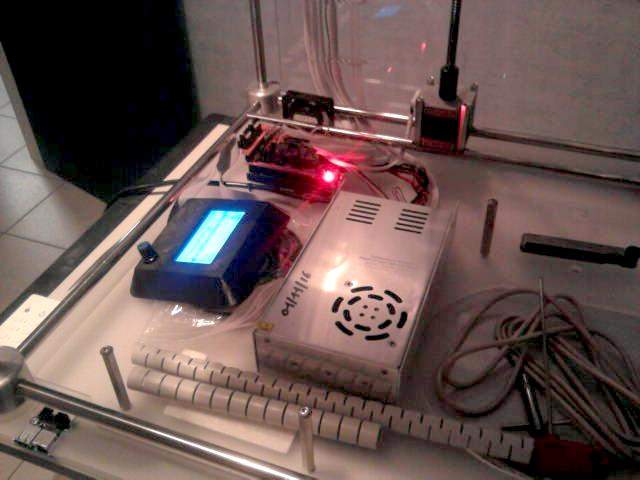
Re: An alternative to buying a bad kit for $300-500 December 11, 2016 07:53AM |
Registered: 11 years ago Posts: 5,780 |
I printed some standoffs for the smoothieboard and power supply, screwed them down to the base plate, cleaned up the wiring, put the case back on the machine (it is surprising how much it improves rigidity), and started designing the filament rack to put on top to feed filament down to the extruders. It's running with one original extruder and hot-end for now until eventual replacement with two extruders. As much as I prefer to print from SD cards, this machine will probably remain connected to a netbook computer (running linux) that hasn't had anything better to do for a couple years, mainly because I don't want to rewire the entire machine so I can move the controller board to the front of the machine where I would mount the LCD.
Some testing found that the original extruders and hot-ends can print with TPU and it sticks to the bed very well without glue and comes off with a little effort. I used 230C for the hot-end and had to limit speed to 20 mm/sec and shut off retraction because the filament kept buckling in the space between the drive gear and the tube at the entrance to the hot-end. The print cooling fan helped maintain print quality even though the printed parts were small (bumpers for the ends of the Z axis of the CoreXY machine I am building).
I noticed that the heatsink in the hot-end because quite warm while it was printing. I think that mounting the cooling fans directly on the hot-end like the E3D approach would keep them a lot cooler and maybe prevent some jams with PLA.
Edited 1 time(s). Last edit at 12/11/2016 08:13PM by the_digital_dentist.
Ultra MegaMax Dominator 3D printer: [drmrehorst.blogspot.com]


Sorry, only registered users may post in this forum.