Overcoming the limitations of support material
Posted by Origamib
|
Overcoming the limitations of support material September 29, 2016 05:31AM |
Registered: 8 years ago Posts: 601 |
When I first started 3D printing, I was quite the believer in avoiding support as much as possible, I was of the opinion that dual extrusion was not necessary most of the time, and that really a model should just be designed and optimised to make use of 3D printing as it is.
But what if it can't? There are many designs out there which can't be split, or don't want to be bound by the overhang rule of 45 degree angles. For example, what if you wanted to print a fork? You can't make it flat, and there are no areas to easily split the model whilst maintaining strength. No matter what the orientation, you will need support. As you delve further into better design, and more fluid design, this problem crops up a lot. Same material support seems lacking to me, S3D has amazing customisable support pillars, but this is still not a solution. Firstly, its quite wasteful (and time consuming) as the support can only grow upwards with no branching, and it still has to have an area of separation causing bad layer registration and adhesion.
So, what are the solutions people have found, and what are the ideas on the horizon? Is there a slicer yet that incorporates realistic support options? I'm looking into dissolvable support material, although an idea that I would like to see is the ability to top off an ABS or PLA support pillar with HIPS/PVA at the point of contact to save on expensive material. So far, this isn't possible with S3D even with its multiple processes. Are there any cheaper alternatives to support material which just don't bond together? I've heard of using PLA support on ABS, and then heat treating it to remove supports but this doesn't sound like a great solution to me as you're going to lose dimensional accuracy.
Anyway, I'd love to hear opinions on this and maybe get some discussion going.
|
Re: Overcoming the limitations of support material September 29, 2016 07:48AM |
Registered: 11 years ago Posts: 5,780 |
I've been experimenting with a modified printing technique to minimize or eliminate support material for some geometries.
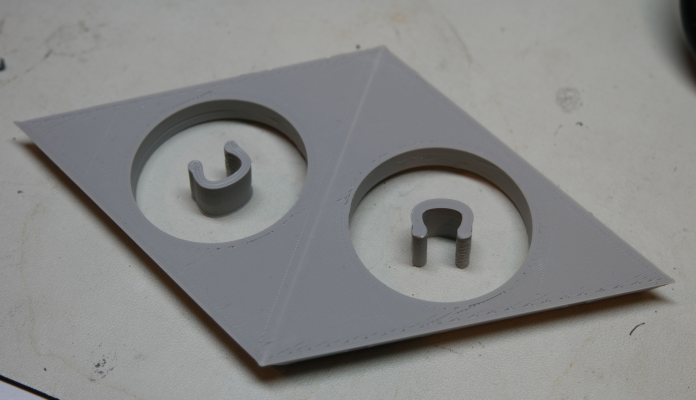
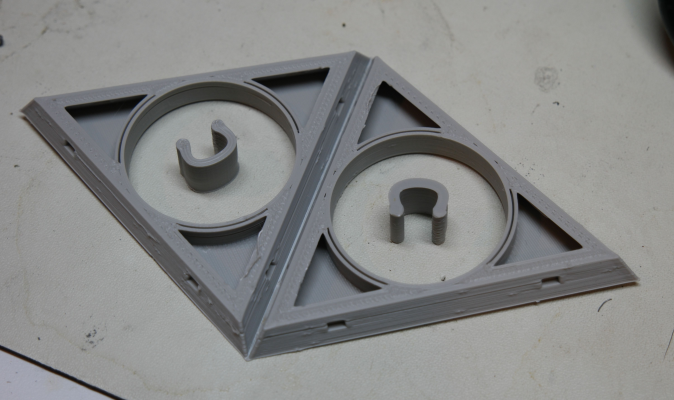
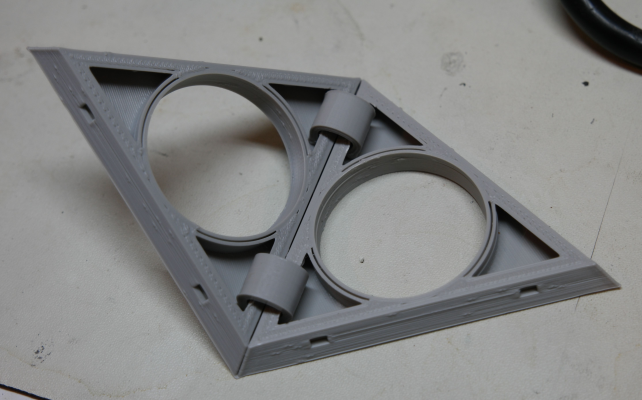
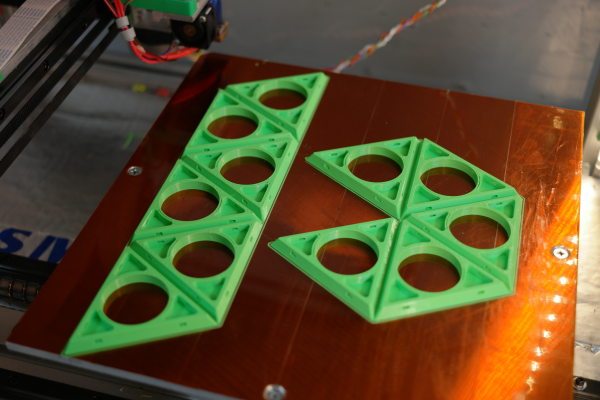
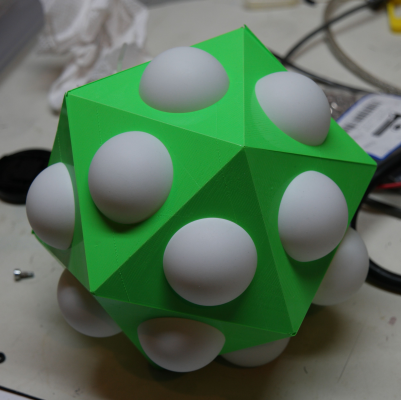
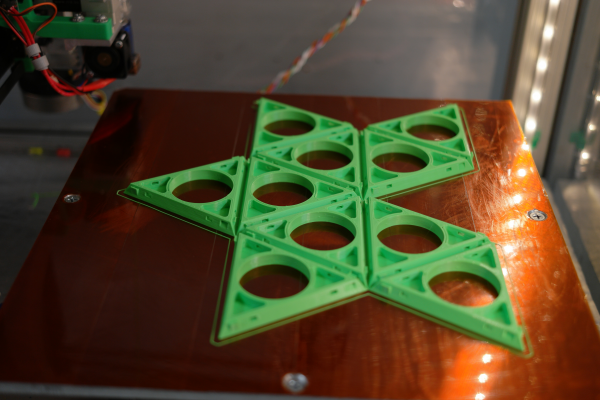
I started by designing a single triangular side piece of a dodecahedron, then calculated the necessary angles and print with the outside surface down on the print bed. A single 0.25 mm print layer connects the faces to each other, then I fold the pieces up. I was using zip ties to hold the folded parts but then redesigned to allow printed spring clips to hold the pieces. I've printed in PLA and ABS and both work fine.
Original version of icosahedron with folds held by zip ties. The icosahedron was printed in 4 pieces. The latest was printed in 2 identical pieces (10 sides each) and uses clips to hold the folds:
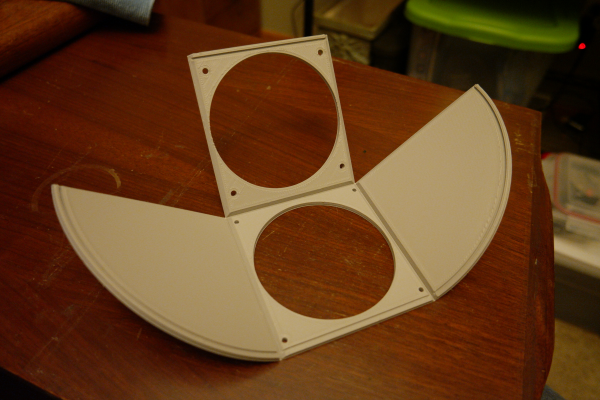
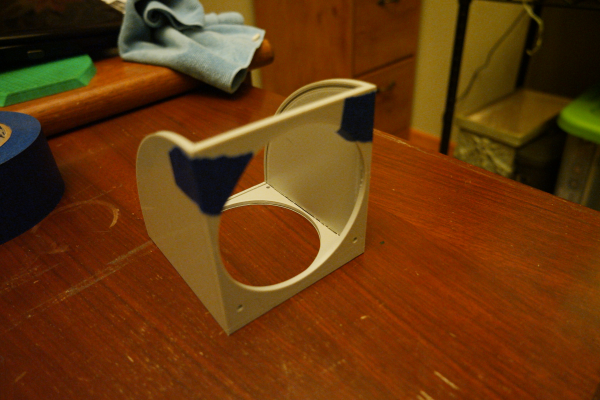
I also made a right angle fan mount for a 92 mm cooling fan that worked perfectly. The whole thing was printed flat then folded and tacked together with superglue. The curved back piece (no photo) was cut from a bleach bottle and fits into slots in the other piece:
Both of these objects would have taken forever to print using support material and would have wasted almost as much plastic as time.
Ultra MegaMax Dominator 3D printer: [drmrehorst.blogspot.com]
|
Re: Overcoming the limitations of support material September 29, 2016 08:19AM |
Registered: 8 years ago Posts: 601 |
Very nice idea, however it still does not defeat the need for support in some designs. I'm a firm believer in optimising designs, as no manufacturing process is without its compromises, but some things cannot be optimised any more then they already are.
This is why I believe the fork is a great example of a design which cannot be changed (not that you would want 3D printed cutlery, but perhaps you would use it for a moulding process or prototype). you could print a flat fork, but that has defeated one of the design goals of the fork to be ergonomic. You could print the fork upright with a strong base, but then you would have weak layering and the fork might not make it through the moulding process. You could also post process the fork to make the ergonomic bends, perhaps bring the fork to glass point and then bend it over a pre-made curve. This could be an acceptable method, but time consuming.
To use support as it is in most slicers, would leave messy layerings, as the fork handle is so thin there may not be enough layers to correct the mess left at the support contact point. To me, an intelligent support system or dis-solvable support is the only way forward.
|
Re: Overcoming the limitations of support material September 29, 2016 12:47PM |
Registered: 8 years ago Posts: 318 |
Slic3r has a different interface material setting separate from support pillar material and also does branching pillar supports to save material.
I use PVA with S3D and just dissolve all the support material in water. Works really well
Edited 1 time(s). Last edit at 09/29/2016 12:48PM by DaGameFace.
If you need some help, or don't understand what I just said, feel free to send me a PM anytime
Printer: Prusa i3, 2 E3D v6 Hotends, Arduino + RAMPS 1.4 with a Bypassed 5V Regulator, 400w Insignia ATX PSU, Custom Designed Bowden Extruders
|
Re: Overcoming the limitations of support material September 29, 2016 01:01PM |
Registered: 8 years ago Posts: 153 |
Quote
DaGameFace
Slic3r has a different interface material setting separate from support pillar material and also does branching pillar supports to save material.
I use PVA with S3D and just dissolve all the support material in water. Works really well
Do you have any albums showing the process and results? I'm about to venture into PVA supports, and I want to know everything I can beforehand.
My idea is to model custom PVA support interfaces that completely touch the model at the points required, and then use s3D support to support those custom elements, with the s3d support being PLA, not PVA.
Thoughts?
Edited 1 time(s). Last edit at 09/29/2016 01:02PM by n8bot.
|
Re: Overcoming the limitations of support material September 29, 2016 01:02PM |
Registered: 10 years ago Posts: 564 |
For FFF type printing, I believe some sort of dissolvable supports are the only real solution because of the way the extrusion process works. Any same-material support system relies on a physical gap between the support and the part, but because the filament coming out of the nozzle needs to be pressed against the layer below to form the proper line thickness and width, the underside will always be ragged.
Having just said that, I now realize there are potentially a couple of ways of creating layer separation other than using a gap:
You could have the slicer modify its line geometry for the part layers that contact the top of the supports. Instead of a wide, flat extrusion line (say, 0.4mm wide by 0.2mm thick) that gets deformed a lot from the natural round profile, the slicer could plan for more of a circular line geometry (say, 0.4mm dia), where only a small bottom sector of the circle contacts the support layer below it. For the most part, this would involve extruding more material but also may require adjusting the line spacing. The smaller contact area and the lessened squishing of the two layers together could weaken the bond enough to allow it to break away cleanly.
The second option I can think of would be when printing the part layer just above the support layer, print at the lowest possible temperature and as fast as possible to get really crappy layer adhesion.
Both of these methods could be tested pretty easily by rigging the slicer settings, or even manually editing the G-code, for a simple rectangular part printed on top of a raft. Maybe if someone had some good result prototyping alternate techniques like these, the might get adopted into some real slicers.
|
Re: Overcoming the limitations of support material October 01, 2016 05:11AM |
Registered: 10 years ago Posts: 580 |
I have also struggled with support, mostly because I want to be able to print tall supported objects like helmets and other things.
The difficulty with Slic3r is it will generate tall thin supports that break off after about 4 inches. Not usable.
The Difficulty with Simplify3D is that I would like to be able to have different densities (they call it infill percentage) for support, and different angles (you can have more than one angle of support generated, making interlocking triangles if you want. Some areas require a fine pitch, but others just need to be tall and strong.
I can easily widen the support were it is tall and thin, so that is very good.
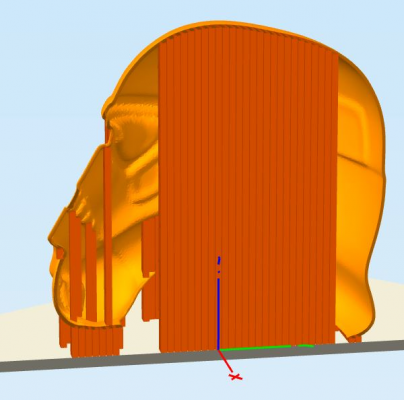
However, for some models, if I have the support dense enough to use for the small areas, it is too dense for the really tall area over 9" tall like this full size helmet:
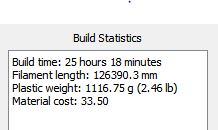
So if I printed it that way it would take over 25 hours and 1116 grams of filament. For this example I have not even beefed up many places where there is the tall thin support that would break. (Yes I could print it upside down, but curves print better this direction, and cleanup will be easier).
As you can see, the support in the center would be quite wasteful.
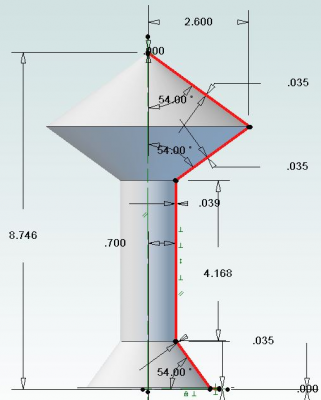
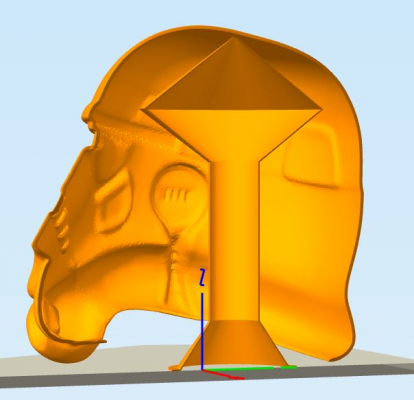
So another way is to add hybrid support. Here I created a support structure in my cad package, and exported it as a STL:
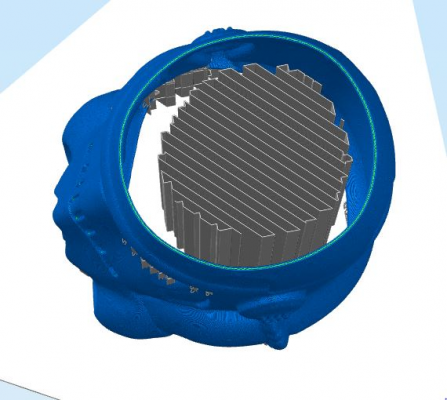
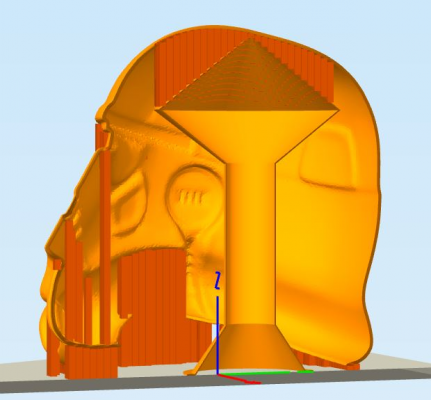
Then I brought both models into S3D and positioned them, selected both, and exported as a single STL. The important part is to then clear your workspace and import that combined STL. That way when S3D adds support it will respect the surface of the inner model, and not try to add support right through it. This is a handy section view that S3D allows you to do (the models are one piece). It looks like the helmet is way off the bed here, but it is only about 1mm.
After clicking to generate automatic support it looks like this. All support settings were the same, no custom support added (I normally would add some). You can see the support is generating properly on top of the cone.
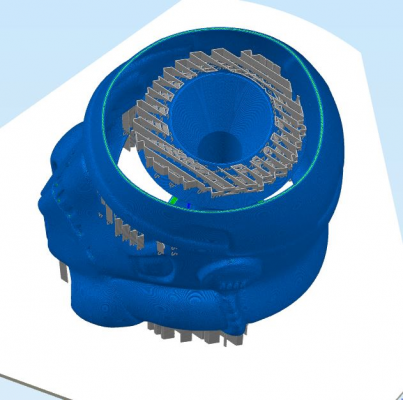
And you can see here that it will fill in its ribbons nicely on top there.
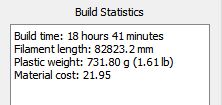
And the build time estimate: 18 hours 40 min and 730 grams.
So it's quite a bit more efficient printing, but I wish it were better. The added support structure will print at the outside perimeter speed, so it still takes longer than it should. The answer as stated is to have either more intelligent support generation - where it takes height into consideration, or the ability to vary the support density, and maybe have combined objects print at different speeds while generating support properly.
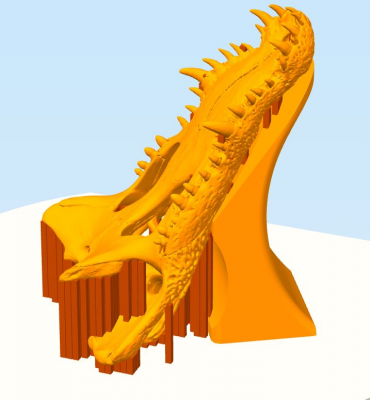
Here is a situation where the automatic support, and then added custom support in S3D would actually be faster - it's a complicated shape and it's just not very easy to make a hybrid support structure that prints efficiently. In this case I set the model (full size crocodile head) at an angle that I thought would print with the least support, with the easiest cleanup, and least issues with the teeth. I tried both auto+custom support in S3d, and also tried the following hybrid support (it was an experiment, and I had time on my hands). The Hybrid support would take over an hour longer to print (due to slow perimeters that the rest of the part needs). Not worth it.
I will print these when I'm able.
Edited 1 time(s). Last edit at 10/01/2016 05:15AM by Paul Wanamaker.
My printer: Raptosaur - Large Format Delta - [www.paulwanamaker.wordpress.com]
Can you answer questions about Calibration, Printing issues, Mechanics? Write it up and improve the Wiki!
|
Re: Overcoming the limitations of support material October 01, 2016 02:58PM |
Registered: 9 years ago Posts: 1,873 |
|
Re: Overcoming the limitations of support material October 02, 2016 01:37AM |
Registered: 9 years ago Posts: 483 |
I've used pieces of PTFE cut to the correct height as supports for flat areas. From Paul's post, it looks like this could replace most of the internal support in the helmet print. ABS doesn't stick to PTFE, so it might be better to use a material that ABS will stick to but still release.
|
Re: Overcoming the limitations of support material October 02, 2016 03:54AM |
Registered: 8 years ago Posts: 312 |
|
Re: Overcoming the limitations of support material October 02, 2016 04:23AM |
Registered: 10 years ago Posts: 580 |
Quote
Lykle
Is there a reason the throw-away core is circular? Or was that just easier to model that way
Calling it a core is good, thanks. In the case of the helmet, the support area that the core is supporting is nearly circular. That was fortunate, yes that is much easier to model. I didn't have to make it the exact height either, as I could tweak the height slightly taller in S3D. I just had to be careful to use a wall thickness for a single wall that would not drop out. A circular profile is also fastest to print, and uses the minimum filament (lowest surface area). Note that the angles used in the core are 1 degree less than the support angle trigger I set.
The support core for the crocodile skull is a complex conformal object that probably took more than 15x as long to construct and tweak (as a test). I tried hard to make it better than the required custom support, but could not. This was partially because the total area that actually needed support was less.
There may be times it is better to make a core - even if it takes a while to model it:
- if it reduces the filament used to less than a roll,
- if it will make the print time less than a time limit, or
- if a lot of that item needs to be printed.
Edited 2 time(s). Last edit at 10/02/2016 04:27AM by Paul Wanamaker.
My printer: Raptosaur - Large Format Delta - [www.paulwanamaker.wordpress.com]
Can you answer questions about Calibration, Printing issues, Mechanics? Write it up and improve the Wiki!
Sorry, only registered users may post in this forum.
