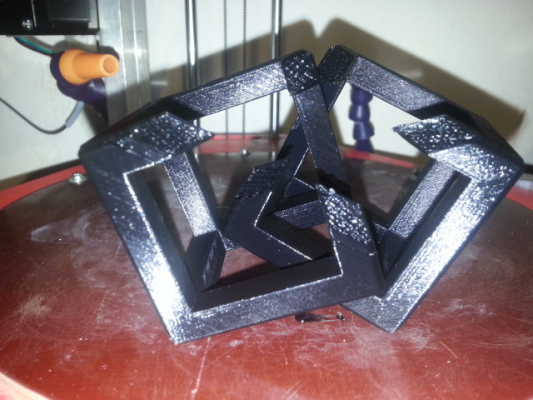
Anyone fancy a challenge?
Posted by JamesK
|
Anyone fancy a challenge? January 15, 2017 09:28PM |
Registered: 9 years ago Posts: 1,873 |
Note - this is intended to be in the spirit of the printing challenges of old, it's not a request for help us such, which is why I haven't given info about the settings I used.
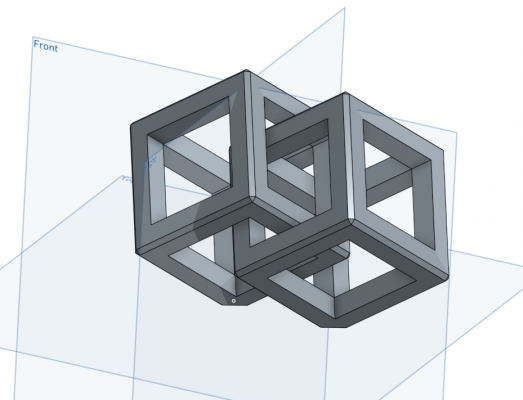
So, this morning I happened upon a random photo of two interlocking cubes on a mendel type printer and thought it looked like an 'interesting' thing to print. Each cube was stood on a corner and apparently printed without support. I had a look on thingiverse but couldn't find the design, although there were a few similar things with larger numbers of interlinked cubes. So moving on from an interesting thing to print to an interesting thing to draw up in CAD, I made a model in OnShape:
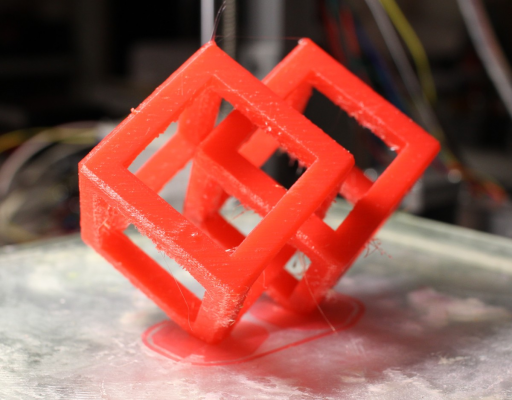
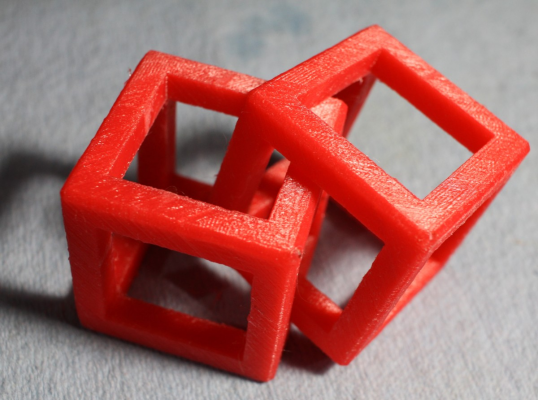
and then tried to print it. And failed. And tried again. And failed again. And that was pretty much the way the day went. I finally got a successful, but pretty messy print out:
(Edit: I forgot to mention that I printed at 80% scale of the stl to get the print time more manageable. Not sure if this makes it easier or not.)
Most of the stuff I print could best be described as big chunks of plastic that I can screw together, so I'm not much good and this sort of artsy thing. I'm curious as to what settings others would use to print this better, so I thought I'd post it here. The stl is attached, and if you're an OnShape user the model is
[cad.onshape.com]
Maybe the model can be made easier to print, or maybe it's already pretty easy and I just used the wrong plastic and settings
If you give it a go post up some pics and tell us how you did it. Be warned though, it can be quite infuriating!
Edited 1 time(s). Last edit at 01/16/2017 06:59AM by JamesK.
So, this morning I happened upon a random photo of two interlocking cubes on a mendel type printer and thought it looked like an 'interesting' thing to print. Each cube was stood on a corner and apparently printed without support. I had a look on thingiverse but couldn't find the design, although there were a few similar things with larger numbers of interlinked cubes. So moving on from an interesting thing to print to an interesting thing to draw up in CAD, I made a model in OnShape:
and then tried to print it. And failed. And tried again. And failed again. And that was pretty much the way the day went. I finally got a successful, but pretty messy print out:
(Edit: I forgot to mention that I printed at 80% scale of the stl to get the print time more manageable. Not sure if this makes it easier or not.)
Most of the stuff I print could best be described as big chunks of plastic that I can screw together, so I'm not much good and this sort of artsy thing. I'm curious as to what settings others would use to print this better, so I thought I'd post it here. The stl is attached, and if you're an OnShape user the model is
[cad.onshape.com]
Maybe the model can be made easier to print, or maybe it's already pretty easy and I just used the wrong plastic and settings

If you give it a go post up some pics and tell us how you did it. Be warned though, it can be quite infuriating!
Edited 1 time(s). Last edit at 01/16/2017 06:59AM by JamesK.
|
Re: Anyone fancy a challenge? January 15, 2017 10:08PM |
Registered: 8 years ago Posts: 1,671 |
|
Re: Anyone fancy a challenge? January 16, 2017 03:22AM |
Registered: 10 years ago Posts: 14,672 |
How about printing it flat on the bed, with support material under the corners of the cube that is raised off the bed?
Large delta printer [miscsolutions.wordpress.com], E3D tool changer, Robotdigg SCARA printer, Crane Quad and Ormerod
Disclosure: I design Duet electronics and work on RepRapFirmware, [duet3d.com].
Large delta printer [miscsolutions.wordpress.com], E3D tool changer, Robotdigg SCARA printer, Crane Quad and Ormerod
Disclosure: I design Duet electronics and work on RepRapFirmware, [duet3d.com].
|
Re: Anyone fancy a challenge? January 16, 2017 03:31AM |
Registered: 9 years ago Posts: 238 |
Quote
dc42
How about printing it flat on the bed, with support material under the corners of the cube that is raised off the bed?
Wouldn't that mean a huge overhand on the cube? IMHO he printed it in pretty much the most efficient manner possible. Any other orientation means bigger overhangs.
Now print a pair of locked icosahedra.
Edited 1 time(s). Last edit at 01/16/2017 03:31AM by anvoice.
|
Re: Anyone fancy a challenge? January 16, 2017 04:55AM |
Registered: 8 years ago Posts: 3,525 |
I'll give this a try on my micro delta it seems to handle overhangs particularly well.
Simon Khoury
Co-founder of [www.precisionpiezo.co.uk] Accurate, repeatable, versatile Z-Probes
Published:Inventions
Simon Khoury
Co-founder of [www.precisionpiezo.co.uk] Accurate, repeatable, versatile Z-Probes
Published:Inventions
|
Re: Anyone fancy a challenge? January 16, 2017 06:57AM |
Registered: 9 years ago Posts: 1,873 |
Quote
dc42
How about printing it flat on the bed, with support material under the corners of the cube that is raised off the bed?
Ah, I hadn't thought of that! Clever. I wonder which of the slicers can auto-generate the best supports for that config in terms both of print success and getting the stuff off afterwards. It turns an over-hang problem into a bridging problem (unless you also support the upper bars), but I prefer bridging to big overhangs every time.
|
Re: Anyone fancy a challenge? January 16, 2017 12:55PM |
Registered: 13 years ago Posts: 1,797 |
i think the print looks pretty good as well. the only things i would suggest would be to reduce print speed and use a raft. the layers will be a little bit uneven if support area is small. this is most likely do to flexing of the part from a narrow support, and flexing between cooling layers that are still at glass transition temp. part is basically moving while you are printing. reduce the speed of print to reduce wobbling, reduce temp and increase cooling to reduce area in glas transition.
a trick i use with narrow support area prints is to add support legs in cad, then clip them off when print is completed. done right this will not ad much print time, and clean up should be a quick as well.
a trick i use with narrow support area prints is to add support legs in cad, then clip them off when print is completed. done right this will not ad much print time, and clean up should be a quick as well.
|
Re: Anyone fancy a challenge? January 17, 2017 04:39AM |
Registered: 8 years ago Posts: 622 |
I tried to reproduce the print in the pic and failed miserably so well done Jamesk.
I thought it would be cocky to do 3 cubes, each one a different colour. It was kind of working but it's the overhangs that screw it for me. I just get a build up of filament that gets bigger and bigger until the head hits and knocks it off the bed. What size are the cubes? I made mine 40mm. This was with cheap shite PLA - maybe something more exotic might work - I have some T glass but it's expensive to waste.
I thought it would be cocky to do 3 cubes, each one a different colour. It was kind of working but it's the overhangs that screw it for me. I just get a build up of filament that gets bigger and bigger until the head hits and knocks it off the bed. What size are the cubes? I made mine 40mm. This was with cheap shite PLA - maybe something more exotic might work - I have some T glass but it's expensive to waste.
|
Re: Anyone fancy a challenge? January 17, 2017 05:48AM |
Registered: 8 years ago Posts: 3,525 |
I tried once and failed, same types of issue, curling and filament build up on overhangs eventually loosening the support at the base.
I suspect this is a case of shielding the print from the heat of the hot end to limit curling, using powerful fans and I suspect there is an optimum layer height for this type of print, I just don't know what it is and I suspect its material-specific.
Simon Khoury
Co-founder of [www.precisionpiezo.co.uk] Accurate, repeatable, versatile Z-Probes
Published:Inventions
|
Re: Anyone fancy a challenge? January 17, 2017 06:22AM |
Registered: 8 years ago Posts: 5,232 |
|
Re: Anyone fancy a challenge? January 17, 2017 07:01AM |
Registered: 9 years ago Posts: 1,873 |
It's surprisingly difficult isn't it? I thought it was going to be easy when I started, so it came as a bit of a shock.
The model was 50mm to a side with 8mm thick beams, but I printed it at 80%, so it should have been 40mm sides with 6.4mm beams. I had lofty plans of making a circle of connected cubes - thank goodness I started with just the two!
I started with PLA thinking it would make for a quick print and I wouldn't have to worry about abs delamination, but I got killed by the overhangs curling up every time. I haven't printed new fan ducts since I converted to dual extruders, so perhaps my part cooling just isn't good enough for this. The successful print was with petg which seems very dimensionally stable during the printing process, but there were some close moments when the second nozzle started hitting the print - I should have taken it off before I started. All I could do during the print was to heat it up to try and soften the impacts
Quote
deckingman
What size are the cubes?
The model was 50mm to a side with 8mm thick beams, but I printed it at 80%, so it should have been 40mm sides with 6.4mm beams. I had lofty plans of making a circle of connected cubes - thank goodness I started with just the two!
I started with PLA thinking it would make for a quick print and I wouldn't have to worry about abs delamination, but I got killed by the overhangs curling up every time. I haven't printed new fan ducts since I converted to dual extruders, so perhaps my part cooling just isn't good enough for this. The successful print was with petg which seems very dimensionally stable during the printing process, but there were some close moments when the second nozzle started hitting the print - I should have taken it off before I started. All I could do during the print was to heat it up to try and soften the impacts

|
Re: Anyone fancy a challenge? January 17, 2017 10:25AM |
Registered: 8 years ago Posts: 916 |
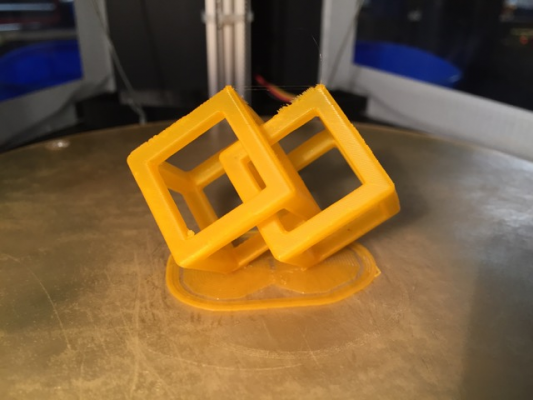
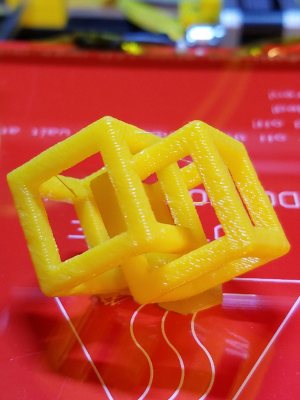
I must admit, it did take me a couple of goes before I got it right. I think I need to tune my retraction settings as you can see a bit of lumpiness where it's going between sections.
Printed at 40% size, in PLA, at 0.2mm layer height on a Kossel Mini, PEI bed, running Repetier on RAMPS.
Printed at 40% size, in PLA, at 0.2mm layer height on a Kossel Mini, PEI bed, running Repetier on RAMPS.
|
Re: Anyone fancy a challenge? January 17, 2017 10:30AM |
Registered: 9 years ago Posts: 1,873 |
Ah, well done! Do you use a part cooling fan, and if so any chance of a photo? I was wondering if poor part cooling was factor in the tips curling up on my first prints. The lower surfaces of your print look a lot better than mine.
Edited 1 time(s). Last edit at 01/17/2017 10:32AM by JamesK.
Edited 1 time(s). Last edit at 01/17/2017 10:32AM by JamesK.
|
Re: Anyone fancy a challenge? January 17, 2017 10:42AM |
Registered: 8 years ago Posts: 916 |
I sure do use a part cooling fan. An enclosure helps as well, you need to cool the plastic quickly, but not too much. It really helps to duct the cooling to be close to the nozzle.
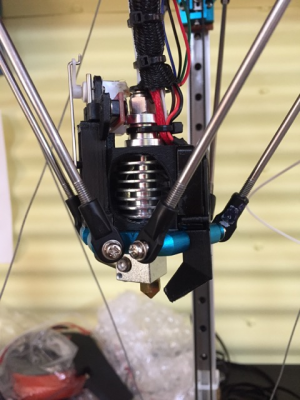
This is a new effector that I have been designing for the past few months. I'm very happy with the performance.
This is a new effector that I have been designing for the past few months. I'm very happy with the performance.
|
Re: Anyone fancy a challenge? January 17, 2017 10:47AM |
Registered: 8 years ago Posts: 3,525 |
Nebbian, nicely done on the print. *reassembling kossel XL so he can have a proper go*
Love the effector that looks superb. How have you made it?
Simon Khoury
Co-founder of [www.precisionpiezo.co.uk] Accurate, repeatable, versatile Z-Probes
Published:Inventions
Love the effector that looks superb. How have you made it?
Simon Khoury
Co-founder of [www.precisionpiezo.co.uk] Accurate, repeatable, versatile Z-Probes
Published:Inventions
|
Re: Anyone fancy a challenge? January 17, 2017 10:53AM |
Registered: 8 years ago Posts: 916 |
Thanks DJ, much appreciated.
I'm still putting together the full writeup of how the effector goes together, but it involves modifying a cheap hotend (quite a lot), printing out a couple of pieces, and screwing it all together. It uses my zero offset Z sensor, (with a 2 gram servo and optical end stop) which performs really well. I'm also using a 30mm axial fan for the hotend, and a 30x10 sunon centrifugal fan for the layer cooling. My marvins have never looked so good!
I'll post in the delta forum once I've got all the documentation together.
Edited 1 time(s). Last edit at 01/17/2017 10:54AM by nebbian.
|
Re: Anyone fancy a challenge? January 22, 2017 10:10AM |
Registered: 8 years ago Posts: 916 |
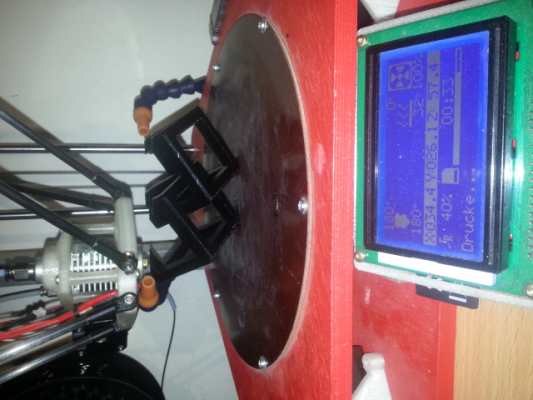
Oh well, since no-one else has stepped up to give this a go, I suppose I'd better share my settings.
The crucial one is this:
Use 1 perimeter.
It stops the warping in its tracks.
You can use infill, but keep it light. Also be careful how many top and bottom surfaces you use, the fewer the better.
The crucial one is this:
Use 1 perimeter.
It stops the warping in its tracks.
You can use infill, but keep it light. Also be careful how many top and bottom surfaces you use, the fewer the better.
|
Re: Anyone fancy a challenge? January 22, 2017 12:32PM |
Registered: 9 years ago Posts: 1,873 |
|
Re: Anyone fancy a challenge? January 25, 2017 12:07AM |
Registered: 10 years ago Posts: 211 |
|
Re: Anyone fancy a challenge? January 25, 2017 03:44AM |
Registered: 8 years ago Posts: 3,525 |
Nice.
Simon Khoury
Co-founder of [www.precisionpiezo.co.uk] Accurate, repeatable, versatile Z-Probes
Published:Inventions
Simon Khoury
Co-founder of [www.precisionpiezo.co.uk] Accurate, repeatable, versatile Z-Probes
Published:Inventions
|
Re: Anyone fancy a challenge? January 25, 2017 11:04AM |
Registered: 9 years ago Posts: 1,873 |
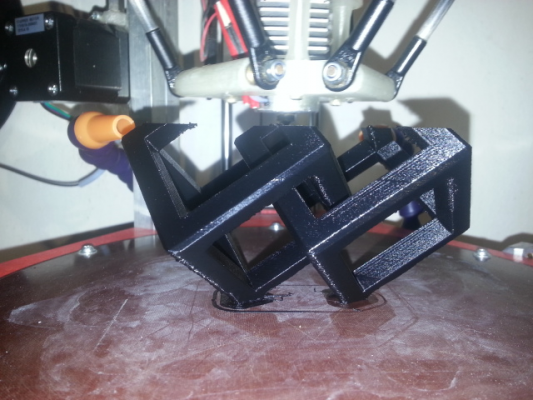
That looks great! You're all making it look easy now 
I did a half sized version using nebbian's suggestion of a single perimeter and got a successful print with pla, but I was still having problems with the tips curling that reduced the print quality. I'm pretty sure I need to improve my part cooling setup.

I did a half sized version using nebbian's suggestion of a single perimeter and got a successful print with pla, but I was still having problems with the tips curling that reduced the print quality. I'm pretty sure I need to improve my part cooling setup.
|
Re: Anyone fancy a challenge? January 26, 2017 02:37AM |
Registered: 8 years ago Posts: 5,232 |
I made three unsuccessful attempt up to now and the best result was with "seam random" setting. That way the tip of the parts do not curl so often.
The worst result was with 1 perimeter @0.125 layer and infill at 22% . I'd set "combine infill every 2 layers" which messed it all up.
Edited 1 time(s). Last edit at 01/26/2017 02:39AM by o_lampe.
The worst result was with 1 perimeter @0.125 layer and infill at 22% . I'd set "combine infill every 2 layers" which messed it all up.
Edited 1 time(s). Last edit at 01/26/2017 02:39AM by o_lampe.
|
Re: Anyone fancy a challenge? January 26, 2017 07:25AM |
Registered: 9 years ago Posts: 1,873 |
I've never managed to get that combine infill option to work well in any print. It's a shame, one of the things I was hoping to do with dual extrusion is to use a small nozzle for perimeters and a big one for infill, and only printing the infill every second or 3rd layer (imagine a 0.4mm nozzle for perimeters printing 0.2mm layers and a 1mm for the infill printing 0.6mm layers). It should really cut print time down for large parts, but the infill has always been a disaster. Maybe I should try again with one of the fully printed fill patterns like grid. It seemed to me that Slic3r wasn't adding enough extra extrusion when the layers were merged.
|
Re: Anyone fancy a challenge? January 27, 2017 03:00AM |
Registered: 8 years ago Posts: 5,232 |
I've set infill extrusion width to 0.5 for a 0.4 nozzle and had good results with combined infill. Even at layer height 0.1mm and three combined infill layers.
Your idea with the bigger infill nozzle is interesting. But it will only work, when the outline of the big nozzle is the same. Otherwise it would get in contact with the freshest perimeter layer and push/drag it away.
Edited 1 time(s). Last edit at 01/27/2017 03:00AM by o_lampe.
Your idea with the bigger infill nozzle is interesting. But it will only work, when the outline of the big nozzle is the same. Otherwise it would get in contact with the freshest perimeter layer and push/drag it away.
Edited 1 time(s). Last edit at 01/27/2017 03:00AM by o_lampe.
|
Re: Anyone fancy a challenge? January 27, 2017 10:47AM |
Registered: 10 years ago Posts: 239 |
Tried it too, but it has become detached after a while. Maybe i´ll give it another try with more brim and better air-nozzles.
Edited 1 time(s). Last edit at 01/27/2017 10:47AM by Kolbi.
Homepage
Edited 1 time(s). Last edit at 01/27/2017 10:47AM by Kolbi.
Homepage
|
Re: Anyone fancy a challenge? January 27, 2017 11:06AM |
Registered: 9 years ago Posts: 1,873 |
Sorry, only registered users may post in this forum.
