300x300 ALU heatbed wiring
Posted by tgmorris99
|
300x300 ALU heatbed wiring April 16, 2017 01:05PM |
Registered: 7 years ago Posts: 45 |
New to the forum so any help is greatly appreciated.
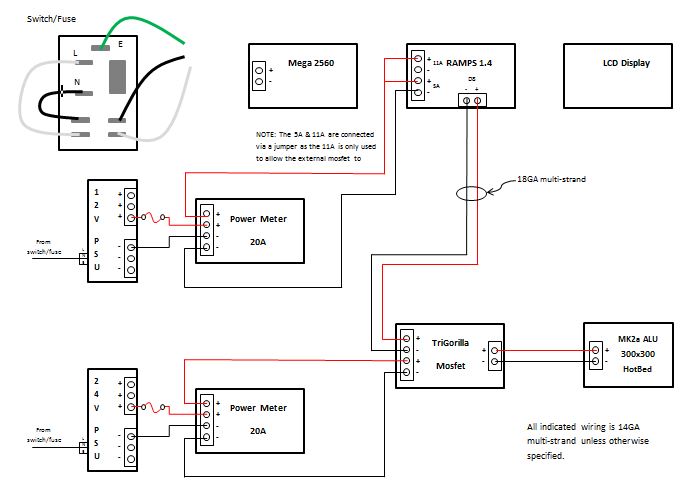
I've had a Wanhao I3 clone for a few months now and have decided to build a 300x300x300 Hypercube while keeping the I3 clone. I've selected an MK2a Aluminum heatbed and due to the power requirements I'll be building this as a dual PSU system using a 24V 14.6A PSU for the heatbed. I'm making some progress on the build as parts are finally starting to trickle in from China, eBay and Amazon. As such I did a bench test on wiring some of the parts up.
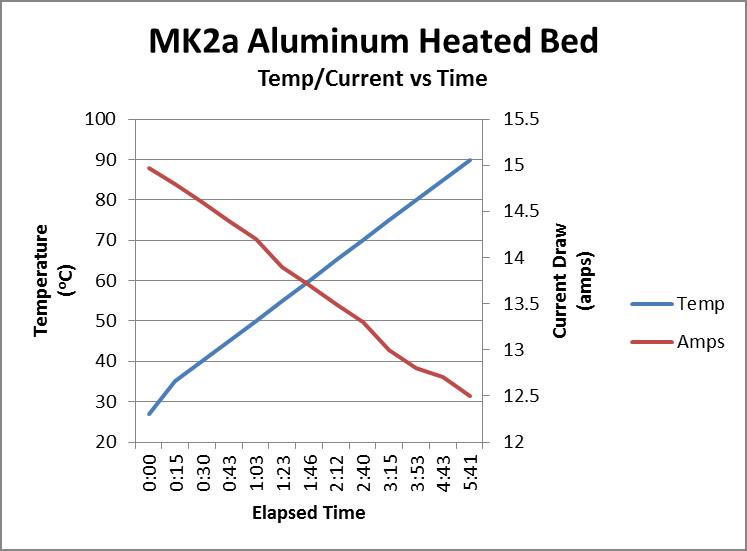
As noted above, my heatbed is an MK2a 300x300 Aluminum and was a bear to solder the leads. Based on what others have done I wound up using a 60 watt soldering iron with a large tip in conjunction with a heat gun in order for the bed to not suck all the heat away. During my research everything I read indicated 14GA wiring should be OK so that's what I used. I'm running the 24V PSU for this at 20V because at 24V it exceeded the PSU current rating according to the Digital LCD Voltmeter I have wired in to the system as shown in the attachment. At 20V it pulls just under 15A at ambient but gets to 50 degrees C in 1 minute and begins to drop pretty quickly as seen in the curves attachment. All this testing is in open air. The performance seems pretty linear as once the bed hits 35 C the current drops roughly 0.2A for every 5 degree rise.
For this test the heatbed was wired directly to the 24V 14.6A PSU so it's not quite how it will be in operation as once fully built I'll actually be driving the heatbed via an external mosfet controlled by the RAMPS.
My concern is that the 14GA wires (quality multi-strand speaker wiring) feel warmer than ambient but definitely were not hot. Not sure if this will be OK or not once I'm driving it properly. I know that according to the specs 14GA should be OK for the short distance being used but I really haven't gotten into how Marlin/RAMPS controls the power to the heatbed.
I've had a Wanhao I3 clone for a few months now and have decided to build a 300x300x300 Hypercube while keeping the I3 clone. I've selected an MK2a Aluminum heatbed and due to the power requirements I'll be building this as a dual PSU system using a 24V 14.6A PSU for the heatbed. I'm making some progress on the build as parts are finally starting to trickle in from China, eBay and Amazon. As such I did a bench test on wiring some of the parts up.
As noted above, my heatbed is an MK2a 300x300 Aluminum and was a bear to solder the leads. Based on what others have done I wound up using a 60 watt soldering iron with a large tip in conjunction with a heat gun in order for the bed to not suck all the heat away. During my research everything I read indicated 14GA wiring should be OK so that's what I used. I'm running the 24V PSU for this at 20V because at 24V it exceeded the PSU current rating according to the Digital LCD Voltmeter I have wired in to the system as shown in the attachment. At 20V it pulls just under 15A at ambient but gets to 50 degrees C in 1 minute and begins to drop pretty quickly as seen in the curves attachment. All this testing is in open air. The performance seems pretty linear as once the bed hits 35 C the current drops roughly 0.2A for every 5 degree rise.
For this test the heatbed was wired directly to the 24V 14.6A PSU so it's not quite how it will be in operation as once fully built I'll actually be driving the heatbed via an external mosfet controlled by the RAMPS.
My concern is that the 14GA wires (quality multi-strand speaker wiring) feel warmer than ambient but definitely were not hot. Not sure if this will be OK or not once I'm driving it properly. I know that according to the specs 14GA should be OK for the short distance being used but I really haven't gotten into how Marlin/RAMPS controls the power to the heatbed.
|
Re: 300x300 ALU heatbed wiring April 16, 2017 02:11PM |
Registered: 9 years ago Posts: 517 |
|
Re: 300x300 ALU heatbed wiring April 16, 2017 02:11PM |
Registered: 11 years ago Posts: 5,780 |
Wire current is always spec'd as a function of temperature rise. There are two conditions- wire in free air and wire in a bundle. As long as the temperature doesn't exceed the rating for the wire in use (usually a function of the insulation on the wire, but also a potential burn hazard if people might touch it), it's OK if the wire gets warm. Wires with teflon or silicone insulation can get pretty hot without being a problem. However, the wire getting warm indicates resistance, and the power dissipated in the wire is power that's not getting dissipated in the bed.
There are a couple problems with low voltage bed heaters. If you intend to print ABS, you should use a heater that delivers about 0.4-0.5W per cm^2, otherwise, you'll be waiting a long time for it to reach ABS bed temp of 105C, if it gets there at all. You can play with insulation under the bed to try to get the top side hotter, but that will increase the cool down time as it reduces the heat-up time. Another problem is requiring a second or higher current power supply to run the heater. If you use a line powered heater you don't need another power supply or a higher current supply. Then there's switching power to the bed. A DC-DC type SSR that is efficient is sort of expensive, and will require a heat sink and maybe some air flow. A DC-AC SSR is cheap, and doesn't usually heat up in 3D printer use, so a heat sink is usually not required.
For reference, I have one printer with a 317 x 305 x 6.35 mm aluminum bed with a 450W heater that gets to 105C in 5-6 minutes, depending on ambient temperature. Another machine has a 300x 300x8mm aluminum bed with a 750W heater that gets to 105C in about 4.5 minutes. Neither machine has insulation under the bed. If you want heat-up times like those, that's the sort of power that's required.
Edited 1 time(s). Last edit at 04/16/2017 02:12PM by the_digital_dentist.
Ultra MegaMax Dominator 3D printer: [drmrehorst.blogspot.com]
|
Re: 300x300 ALU heatbed wiring April 16, 2017 02:40PM |
Registered: 8 years ago Posts: 3,525 |
Re. Your 14GA wire, whilst on paper it should be enough using thicker wire isn't a bad thing (apart from soldering it but I've a 200x300 mk2 type dc heatbed on one machine which I soldered with a 45w iron no problem).
I was using wires just on the limit in terms of thickness for that heater and in some places they got hot. Changed for thicker wires, no heat anywhere except the bed, which also heats up quicker.
But on another machine I have a 240v heater and it's a world apart. There is a reason why heaters are generally mains/line powered and better for it.
Simon Khoury
Co-founder of [www.precisionpiezo.co.uk] Accurate, repeatable, versatile Z-Probes
Published:Inventions
|
Re: 300x300 ALU heatbed wiring April 16, 2017 04:16PM |
Registered: 7 years ago Posts: 45 |
Thanks for the replies.
The wire is rated for 75 C so it's probably OK as it was nowhere near that, just warmer than ambient. I'll have to see if I can actually measure the temp with the infrared thermometer I used when measuring the bed temps.
I don't plan on using ABS but do print PETG frequently. That sticks for me fine on the I3 @ 70 C using the BuildTak clone it comes supplied with so I'm thinking I'll be OK. I also bought a 300x300 FR4 bed which does run at the full 24V as it's spec'd at 1.6 ohms. Based on the current draw, assuming the inline voltmeter is accurate, I'm guessing the ALU bed is closer to 1.3 ohms even though my multi-meter reads 1.5. I'd need a better meter or build something to measure that low accurately.
Depending on what build surface I actually use the time to temperature on the ALU bed isn't bad based on the posted chart as it made 90 C in under 6 minutes with open air on both sides.
|
Re: 300x300 ALU heatbed wiring April 17, 2017 06:49AM |
Registered: 7 years ago Posts: 103 |
|
Re: 300x300 ALU heatbed wiring April 17, 2017 08:21AM |
Registered: 7 years ago Posts: 45 |
My plan is to up the voltage to the full 24V so long as Marlin can control the power output so I don't exceed the PSU rating. For this test the bed was really a direct connect to the PSU so it was taking all the power it wanted, which was more than the PSU rating. I don't have any plans to do ABS I'm hoping I'll be OK since the bed hit's 90 C in under 6 minutes. Other than PLA & PETG the only other filament I'll likely be using is one of the flexible filaments like TPU, which also uses a relatively low bed temp.
If need be I can swap in a larger PSU or switch to an AC powered heat source.
If need be I can swap in a larger PSU or switch to an AC powered heat source.
|
Re: 300x300 ALU heatbed wiring April 17, 2017 08:24AM |
Registered: 9 years ago Posts: 517 |
Quote
tgmorris99
My plan is to up the voltage to the full 24V so long as Marlin can control the power output so I don't exceed the PSU rating. For this test the bed was really a direct connect to the PSU so it was taking all the power it wanted, which was more than the PSU rating. I don't have any plans to do ABS I'm hoping I'll be OK since the bed hit's 90 C in under 6 minutes. Other than PLA & PETG the only other filament I'll likely be using is one of the flexible filaments like TPU, which also uses a relatively low bed temp.
If need be I can swap in a larger PSU or switch to an AC powered heat source.
Don't expect the MOSFETs on the board to be able to handle that much current. You will need to use external heat sinked MOSFETs or a heat sinked DC/DC SSR. You could also use a relay, but then you won't be able to use PWM.
|
Re: 300x300 ALU heatbed wiring April 17, 2017 09:58AM |
Registered: 7 years ago Posts: 270 |
450W 24V bed will be performing same as 450W 'mains' bed (except that you are wasting about 20% of electricity). I would discourage mains powered bed for safety reasons especially if you have a moving bed (delta printers maybe ok but I would still attach leads mechanically not just by soldering).
First thing to do is to measure voltage at PSU and hotbed (when powered) and make sure that voltage drop is less than 5% (if you measure 24V at PSU you should get >22.8V at hotbed). If voltage drop is higher - shorten the cable or get one with thicker conductors.
For reference, I have 12V, 300W 300x300mm bed and I have no issues keeping it at 90degC.
Edited 1 time(s). Last edit at 04/17/2017 10:01AM by newbob.
|
Re: 300x300 ALU heatbed wiring April 17, 2017 10:05AM |
Registered: 7 years ago Posts: 45 |
|
Re: 300x300 ALU heatbed wiring April 17, 2017 12:30PM |
Registered: 9 years ago Posts: 517 |
|
Re: 300x300 ALU heatbed wiring April 17, 2017 12:40PM |
Registered: 8 years ago Posts: 3,525 |
Quote
tgmorris99
@newbob - Thanks for the suggestion. Do you have an example of how to attach the leads mechanically? I was thinking they should offer that on the aluminum beds by default but anything I can think of involves drilling which raises the possibility of shorting things out.
I think it depends on how you have it setup. My mains bed on my kossel Xl is a silicone heater 300mm diameter 240v 700w attached (3M adhesive) to the underside of a 6mm aluminium tooling plate with a diameter of 330mm. I drilled two holes near the edge of the aluminium bed and fixed the cable from the heater with a cable tie going through the holes. I also drilled and tapped a 3rd hole which is the electrical earth. The lead to the heater has a thermal fuse for 150 deg C in line with the 240v live lead which is tucked under the silicone heater about 30mm.
The earth lead then goes back into the electronics compartment which has an aluminium plate base and it is attached to the screw holding the ssr to that plate,it then goes to the mains socket. There is an Rcd protecting the supply, and I checked all over the frame to ensure it is all earthed. So now no real risk of runaway heating or electric shock.
Edited 1 time(s). Last edit at 04/17/2017 02:28PM by DjDemonD.
Simon Khoury
Co-founder of [www.precisionpiezo.co.uk] Accurate, repeatable, versatile Z-Probes
Published:Inventions
|
Re: 300x300 ALU heatbed wiring April 17, 2017 12:50PM |
Registered: 7 years ago Posts: 270 |
|
Re: 300x300 ALU heatbed wiring April 17, 2017 01:07PM |
Registered: 9 years ago Posts: 517 |
Quote
newbob
Quote
ElmoC
I'm curious where that 20% waste came from?
Quote
newbob
450W 24V bed will be performing same as 450W 'mains' bed (except that you are wasting about 20% of electricity).
I'm assuming 80% SMPS efficacy.
You're saying the loss is in the DC method, not AC? Thought you were saying it was in AC.
|
Re: 300x300 ALU heatbed wiring April 17, 2017 05:46PM |
Registered: 7 years ago Posts: 270 |
|
Re: 300x300 ALU heatbed wiring April 17, 2017 06:35PM |
Registered: 7 years ago Posts: 45 |
Ah, then I'll likely just use a tie wrap to secure things. I thought you were referring to a physical clamp of some sort to help make the connection. I've got plenty of solder on the bottom and the wire is well tinned. In fact, it wicked quite a ways up the wire due to the amount of overall heat needing to be applied.
|
Re: 300x300 ALU heatbed wiring April 22, 2017 01:51PM |
Registered: 7 years ago Posts: 7 |
Attach them the way the wires in your car are attached to the battery: bolted and with a ring cable shoe attached to the wire.Quote
tgmorris99
@newbob - Thanks for the suggestion. Do you have an example of how to attach the leads mechanically? I was thinking they should offer that on the aluminum beds by default but anything I can think of involves drilling which raises the possibility of shorting things out.
But as also mentioned by others: go with a silicone heater pad sticking under a slab of aluminum.
Silicone heater pads are probably a lot more affordable too. for instance: [www.ebay.com]
110/220V so no extra PSU needed.
Edited 2 time(s). Last edit at 04/22/2017 02:25PM by robb_nl.
|
Re: 300x300 ALU heatbed wiring April 22, 2017 02:32PM |
Registered: 7 years ago Posts: 45 |
Most of my goodies from China have started arriving so I replaced the speaker wire with 14GA silicone wire. I came of with a trick to get the old wires off the heatbed and attach the new ones. We've got a glass top electric stove so I set the edge of the bed where the wires attach on the small burner and turned it up to act as the primary heat source. Worked great and left my hands free to do the soldering of the new wires. I've got everything running on the bench and it seems pretty good at the moment.
The only issue I'm chasing now is the accuracy of the thermistor vs. the temperature reported via my infrared thermometer. It's not vastly off but it does differ up to a few degrees depending on the target temp. I'm currently using Marlin table 11 for the cheap one I bought on eBay but don't know if there's any better table to use. I tried 13 and it was slightly worse. My Wanhao reads accurately at 40, 50, 60 & 70 while the new system is 3,1,3 & 3 higher than target at those values. It's certainly not the end of the world but it would be nice to get it to agree.
Might this be due to the fact that I have the thermistor only kapton taped to the face of bed as there's no pre-drilled hole for it and no way to drill one as the traces cover the area? Would I be better off using a high temp silicone or JB Weld - though the latter seems too permanent?
|
Re: 300x300 ALU heatbed wiring April 22, 2017 02:41PM |
Registered: 9 years ago Posts: 517 |
|
Re: 300x300 ALU heatbed wiring April 22, 2017 02:58PM |
Registered: 7 years ago Posts: 45 |
Quote
ElmoC
I wouldn't trust the reading from an IR thermometer. They are not very accurate. Use a thermocouple based thermometer for better accuracy.
I tend to agree with you. However I'm really using it as a relative comparison since I'm basing the difference off of the Wanhao readings - which do seem to be accurate. Based on that I feel that the deltas I'm seeing are probably real. I'm going to pick up some high-temp silicone to see if that solves it.
|
Re: 300x300 ALU heatbed wiring April 22, 2017 03:10PM |
Registered: 8 years ago Posts: 3,525 |
A bit of black high temp paint certainly helps if measuring the hotend temp with an IR.
Simon Khoury
Co-founder of [www.precisionpiezo.co.uk] Accurate, repeatable, versatile Z-Probes
Published:Inventions
Simon Khoury
Co-founder of [www.precisionpiezo.co.uk] Accurate, repeatable, versatile Z-Probes
Published:Inventions
|
Re: 300x300 ALU heatbed wiring April 22, 2017 07:10PM |
Registered: 8 years ago Posts: 601 |
Sorry, only registered users may post in this forum.