E3D mount modification (with watercooling now!)
Posted by tech-raton
|
E3D mount modification (with watercooling now!) January 16, 2018 11:58AM |
Registered: 6 years ago Posts: 22 |
Long time lurker, first time poster...
I must admit, I don't like the groovemount.
For me, it's too big and it add 20mm to the hotend.
So I found another way to attach the hotend to my effector without the groovemount...
The Deltaprintr Hotend uses this and I think it's effective.
You'll need a saw, a drill, a 2,5mm drill bit and a M3 taper.
You'll need a jig like this, too:
guide.stl
First, you can cut the Groovemount
You drill 6 holes (4 mm deep is enough) in the hotend and Voilà:
Your hotend is 20mm shorter.
You'll need to modify your effector to match the new mount.
Edited 2 time(s). Last edit at 01/17/2018 08:22AM by tech-raton.
I must admit, I don't like the groovemount.
For me, it's too big and it add 20mm to the hotend.
So I found another way to attach the hotend to my effector without the groovemount...
The Deltaprintr Hotend uses this and I think it's effective.
You'll need a saw, a drill, a 2,5mm drill bit and a M3 taper.
You'll need a jig like this, too:
guide.stl
First, you can cut the Groovemount
You drill 6 holes (4 mm deep is enough) in the hotend and Voilà:
Your hotend is 20mm shorter.

You'll need to modify your effector to match the new mount.

Edited 2 time(s). Last edit at 01/17/2018 08:22AM by tech-raton.
|
Re: E3D mount modification January 16, 2018 01:47PM |
Registered: 6 years ago Posts: 1,007 |
|
Re: E3D mount modification January 16, 2018 02:20PM |
Registered: 6 years ago Posts: 22 |
|
Re: E3D mount modification January 16, 2018 03:21PM |
Registered: 10 years ago Posts: 14,672 |
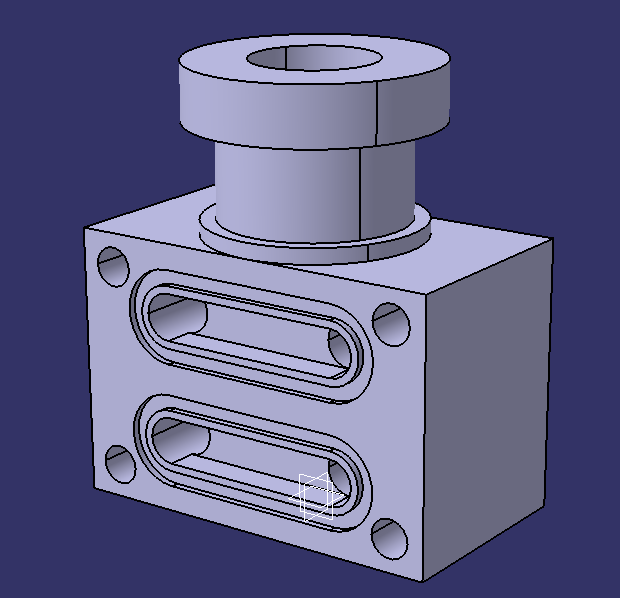
I don't like groove mount either. For the Smart Effector, E3D makes us a modified heatsink with a screw top:
which makes it straightforward to fit:
E3D has said that they are going to offer this heatsink variant as a standard option sometime in the future.
Large delta printer [miscsolutions.wordpress.com], E3D tool changer, Robotdigg SCARA printer, Crane Quad and Ormerod
Disclosure: I design Duet electronics and work on RepRapFirmware, [duet3d.com].

which makes it straightforward to fit:

E3D has said that they are going to offer this heatsink variant as a standard option sometime in the future.
Large delta printer [miscsolutions.wordpress.com], E3D tool changer, Robotdigg SCARA printer, Crane Quad and Ormerod
Disclosure: I design Duet electronics and work on RepRapFirmware, [duet3d.com].
|
Re: E3D mount modification January 16, 2018 03:52PM |
Registered: 6 years ago Posts: 1,007 |
Quote
dc42
I don't like groove mount either. For the Smart Effector, E3D makes us a modified heatsink with a screw top:
E3D has said that they are going to offer this heatsink variant as a standard option sometime in the future.
A quick detach system and less bulky too would come handy.
Considering the nozzle/bed contact set the Z0, no issue about repeatability of the mount when changing the head.
"A comical prototype doesn't mean a dumb idea is possible" (Thunderf00t)
|
Re: E3D mount modification January 17, 2018 02:55AM |
Registered: 8 years ago Posts: 5,232 |
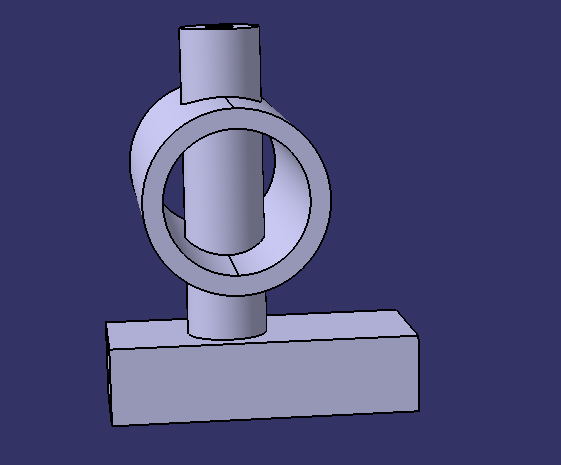
Here's my approach:
machine down the lowest heatsink fin to 13mm and fit it on top of an aluminum effector. The direct drive extruder is optional...
machine down the lowest heatsink fin to 13mm and fit it on top of an aluminum effector. The direct drive extruder is optional...

|
Re: E3D mount modification January 17, 2018 04:41AM |
Registered: 6 years ago Posts: 1,007 |
Quote
dc42
I don't like groove mount either. For the Smart Effector, E3D makes us a modified heatsink with a screw top:
which makes it straightforward to fit:
E3D has said that they are going to offer this heatsink variant as a standard option sometime in the future.
You should replace the hex nut by a tall knurled nut that could be turned by hand. Easy and no need to use a monkey wrench in such a tight place

"A comical prototype doesn't mean a dumb idea is possible" (Thunderf00t)
|
Re: E3D mount modification January 17, 2018 04:55AM |
Registered: 10 years ago Posts: 97 |
Quote
o_lampe
Here's my approach:
machine down the lowest heatsink fin to 13mm and fit it on top of an aluminum effector. The direct drive extruder is optional...
[attachment 101600 cycloid_delta.jpg]
I like the direct drive extruder on the delta platform, is it your design, are there details on how to build ?
www.andornot.co.uk, selling new products, including smoothie boards and other useful parts for 3D Printers:
AndOrNot buildplate launched, available in 6 inch, 8 inch, 12 inch and 17 inch square introductory discount code "20reprap"
And Or Not Build Plates
|
Re: E3D mount modification (with watercooling now!) January 17, 2018 08:31AM |
Registered: 6 years ago Posts: 22 |
After reading a lot of informations there:
[well-engineered.net]
[www.thingiverse.com]
[forums.reprap.org]
[www.instructables.com]
[forum.e3d-online.com]
I remixed all these good ideas to create my own watercooling block.
The prototype was made without a lathe.
What you need:
•A E3DV6 heatsink (or a clone…).
•Some cold solder joint.
•A B20 jacket ( 5 euros on Ebay…).
•A M7 bolt (kinda hard to find… In france, you’ll find some in old hinges.
•A 2,5 drill bit and a M3 taper.
•A lathe (or a cheap drill that you can destroy)
•A file
•Some sand paper
•A saw
•Some knowledge about lathing.
The operations are easy:
•Cut the head of the bolt
•Cut the groovemount (if you want to use my kind of mount)
•Screw the bolt in the heatsink
•Attach the bolt in the drill chuck
•Attach the drill to your work bench
Check if your drill turn in the
•Turn the part like in a lathe (This part is the most difficult) You should be careful for this part.
•Check the external diameter of the part (It should have a 20 mm diameter)
•When the part is done, fill the 20mm fins with some cold solder joint (I mean really fill it!, you should have too much material but it’s nice
•Put the part back in the drill and turn it back to 20 mm
•Drill the heatsink with the drill jig
•Wash the part with demineralized water
•Put on the B20 jacket , fill it with with water and let it sit one night (to check the sealing)
[www.thingiverse.com]
Edited 2 time(s). Last edit at 01/17/2018 01:18PM by tech-raton.
[well-engineered.net]
[www.thingiverse.com]
[forums.reprap.org]
[www.instructables.com]
[forum.e3d-online.com]
I remixed all these good ideas to create my own watercooling block.

The prototype was made without a lathe.
What you need:
•A E3DV6 heatsink (or a clone…).
•Some cold solder joint.
•A B20 jacket ( 5 euros on Ebay…).
•A M7 bolt (kinda hard to find… In france, you’ll find some in old hinges.
•A 2,5 drill bit and a M3 taper.
•A lathe (or a cheap drill that you can destroy)
•A file
•Some sand paper
•A saw
•Some knowledge about lathing.
The operations are easy:
•Cut the head of the bolt
•Cut the groovemount (if you want to use my kind of mount)

•Screw the bolt in the heatsink
•Attach the bolt in the drill chuck
•Attach the drill to your work bench
Check if your drill turn in the
•Turn the part like in a lathe (This part is the most difficult) You should be careful for this part.

•Check the external diameter of the part (It should have a 20 mm diameter)
•When the part is done, fill the 20mm fins with some cold solder joint (I mean really fill it!, you should have too much material but it’s nice
•Put the part back in the drill and turn it back to 20 mm

•Drill the heatsink with the drill jig

•Wash the part with demineralized water

•Put on the B20 jacket , fill it with with water and let it sit one night (to check the sealing)
[www.thingiverse.com]
Edited 2 time(s). Last edit at 01/17/2018 01:18PM by tech-raton.
|
Re: E3D mount modification (with watercooling now!) January 17, 2018 11:06AM |
Registered: 6 years ago Posts: 1,007 |
Water cooling ? What is the advantage ?
Even in a heated chamber, is it required ?
In a production machine eventually but then, none of the amateur machines fit the bill.
An extruder, hot end has to be small, light. Easy to remove, install without loosing adjustment. (One screw or one lever plus electric connections.)
Edited 5 time(s). Last edit at 01/17/2018 11:26AM by MKSA.
"A comical prototype doesn't mean a dumb idea is possible" (Thunderf00t)
|
Re: E3D mount modification (with watercooling now!) January 17, 2018 01:05PM |
Registered: 6 years ago Posts: 22 |
The main advantage is the noise.
And I wanted to do it...
I'm using a Duetwifi to reduce the noise too.
Water cooling is not necessarily required, you can use a fan. with an heated enclosure, you'll need a fan a little bit more powerful but it's will be noisier.
My version is smaller than the standard E3DV6. also, it's easy to remove.
It's just another way of cool your heatsink. I'm not saying it's better or necessary. It's overkill for sure. but I chose this way...
|
Re: E3D mount modification January 18, 2018 03:06AM |
Registered: 8 years ago Posts: 5,232 |
The shape of the heatsink fins isn't optimal for good water flow. The main stream will just take the shortest path.
I'd cut out a small gap in every other fin, so the water has to flow through a zig-zag maze.
Watercooling a single extruder isn't worth it except you'd build it extra small. But on multi nozzle extruders it helps a lot to prevent oozing. Water chills down the unused tool faster.
@andornot The cycloidal extruder isn't my design, but I was the only one, who built it from aluminum and POM. The main problem was the slower retraction speed and the weight in combination with the Traxxas rod ends. I will give it another try, when my compact carrier Delta is suited with Mag-arms. ( No more collisions between motor and rods )
Edited 1 time(s). Last edit at 01/18/2018 03:10AM by o_lampe.
|
Re: E3D mount modification January 18, 2018 04:04AM |
Registered: 6 years ago Posts: 22 |
I agree with the "shortest path logic"
But the hotter liquid will be on the upper side of the heatsink, no?
and the heat will be transmitted to the whole liquid?
I was looking at a way to make it "maze like" with cold solder to block the path and dremel to drill some holes.
But because the watercooling is overkill, i can live with an unoptimized part.
The second thing is the load loss. I'll use a little pump and a maze would become harder to pass through.
For me, the main idea was to have fins to increase the surface.
The coldest liquid will be pushed in front of the lowest fins, it should be nice.
The volume of liquid in the hotend will be 4ml
With the smallest pump found (300l/h), and 50% loss,
I'll still have 4cl per second from the pump. so the heatsink will receive 10 times his volume.
One of my solutions was something like that
14 x 25 x 17 mm
But this solution is way to much over complicated for a 3d printer. There were no real need to do it.
So I prefer to use the E3d hotend and modify it.
Edited 1 time(s). Last edit at 01/18/2018 05:14AM by tech-raton.
But the hotter liquid will be on the upper side of the heatsink, no?
and the heat will be transmitted to the whole liquid?
I was looking at a way to make it "maze like" with cold solder to block the path and dremel to drill some holes.
But because the watercooling is overkill, i can live with an unoptimized part.
The second thing is the load loss. I'll use a little pump and a maze would become harder to pass through.
For me, the main idea was to have fins to increase the surface.

The coldest liquid will be pushed in front of the lowest fins, it should be nice.
The volume of liquid in the hotend will be 4ml
With the smallest pump found (300l/h), and 50% loss,
I'll still have 4cl per second from the pump. so the heatsink will receive 10 times his volume.
One of my solutions was something like that
14 x 25 x 17 mm
But this solution is way to much over complicated for a 3d printer. There were no real need to do it.
So I prefer to use the E3d hotend and modify it.
Edited 1 time(s). Last edit at 01/18/2018 05:14AM by tech-raton.
|
Re: E3D mount modification January 18, 2018 04:26AM |
Registered: 6 years ago Posts: 1,007 |
Quote
o_lampe
The shape of the heatsink fins isn't optimal for good water flow. The main stream will just take the shortest path.
I'd cut out a small gap in every other fin, so the water has to flow through a zig-zag maze.
Watercooling a single extruder isn't worth it except you'd build it extra small. But on multi nozzle extruders it helps a lot to prevent oozing. Water chills down the unused tool faster.
@andornot The cycloidal extruder isn't my design, but I was the only one, who built it from aluminum and POM. The main problem was the slower retraction speed and the weight in combination with the Traxxas rod ends. I will give it another try, when my compact carrier Delta is suited with Mag-arms. ( No more collisions between motor and rods )
- Watercooling: Indeed, indeed. In fact considering water properties, one (or two ?) loop of 6mm copper tube silver soldered to the heatbreak should be enough. Simple, light etc.. About the same weight as ONE tube coupling. !
- This extruder has been dismissed here: [forums.reprap.org] , notably the retraction speed due to the high reduction ratio.
"A comical prototype doesn't mean a dumb idea is possible" (Thunderf00t)
|
Re: E3D mount modification January 18, 2018 04:28AM |
Registered: 6 years ago Posts: 1,007 |
Quote
tech-raton
I agree with the "shortest path logic"
But the hotter liquid will be on the upper side of the heatsink, no?
and the heat will be transmitted to the whole liquid?
I was looking at a way to make it "maze like" with cold solder to block the path and dremel to drill some holes.
But because the watercooling is overkill, i can live with an unoptimized part.
The second thing is the load loss. I'll use a little pump and a maze would become harder to pass through.
For me, the main idea was to have fins to increase the surface.
The coldest liquid will be pushed in front of the lowest fins, it should be nice.
The volume of liquid in the hotend will be 4ml
With the smallest pump found (300l/h), and 50% loss,
I'll still have 4cl per second from the pump. so the heatsink will receive 10 times his volume.
One of my solutions was something like that
14 x 25 x 17 mm
But this solution is way to much over engineered. There were no real need to do it.
So I prefer to use the E3d hotend and modify it.
The solution has been invented more than a hundred years ago for the MG08
[www.quora.com]
Edited 1 time(s). Last edit at 01/18/2018 04:30AM by MKSA.
"A comical prototype doesn't mean a dumb idea is possible" (Thunderf00t)
|
Re: E3D mount modification January 18, 2018 05:13AM |
Registered: 6 years ago Posts: 22 |
The MG08 was made to over-kill... 
For the tubes, the number of tubes depend of the pump's flowrate.
We could simply use a tube like that:
the heatbreak (vertical) goes trough the tube. (horizontal)
With a sufficient flowrate, this solution is possible.
For the tubes, the number of tubes depend of the pump's flowrate.
We could simply use a tube like that:
the heatbreak (vertical) goes trough the tube. (horizontal)
With a sufficient flowrate, this solution is possible.
|
Re: E3D mount modification January 18, 2018 11:57AM |
Registered: 8 years ago Posts: 5,232 |
Flowrate is not important with a low energy heat source like a hotend. Water can absorb so much energy, you might see no temperature difference between in- and out- tube. The fluid needs to be accelerated and the fastest current should be were the heat comes from. ( Bernouil's law IIRC )
In our case this is the lowest part of the heatsink, BTW.
In our case this is the lowest part of the heatsink, BTW.
|
Re: E3D mount modification January 18, 2018 12:15PM |
Registered: 6 years ago Posts: 1,007 |
Quote
tech-raton
The MG08 was made to over-kill...
For the tubes, the number of tubes depend of the pump's flowrate.
We could simply use a tube like that:
the heatbreak (vertical) goes trough the tube. (horizontal)
With a sufficient flowrate, this solution is possible.
Again, why make it complex and wrong (yes, it will work because there is not that much heat to extract anyway) when it can be made simple and efficient ?????
One or two loops ! Less bulk and weight than just ONE coupler
To illustrate here: [www.amazon.com]
The moving print head must be kept LIGHT.
Edited 2 time(s). Last edit at 01/18/2018 12:22PM by MKSA.
"A comical prototype doesn't mean a dumb idea is possible" (Thunderf00t)
|
Re: E3D mount modification January 19, 2018 01:39AM |
Registered: 6 years ago Posts: 22 |
Sorry, only registered users may post in this forum.