Makerbase MKS Rumba+
Posted by tyros
|
Makerbase MKS Rumba+ March 04, 2018 05:22AM |
Registered: 7 years ago Posts: 85 |
Hi, I bought the new Makerbase MKS Rumba+ V1.0, and the MKS PWC V1.0, and the TFT32.
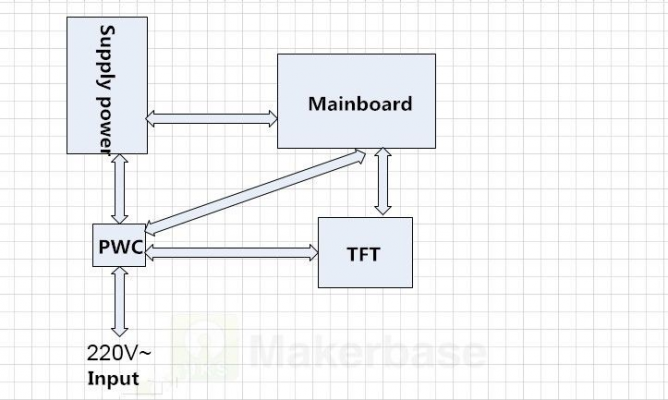
Can someone give me a wiring diagram between the Mks RUMBA+ and the MKS PWC (V1.0 or V2.0)?
I already have the .pdf document available on Github, but it does not mention the MKS Rumba +
I will be very grateful to you.
Tyros.
Can someone give me a wiring diagram between the Mks RUMBA+ and the MKS PWC (V1.0 or V2.0)?
I already have the .pdf document available on Github, but it does not mention the MKS Rumba +
I will be very grateful to you.
Tyros.
|
Re: Makerbase MKS Rumba+ March 04, 2018 05:53AM |
Admin Registered: 13 years ago Posts: 6,998 |
So Makerbase has stolen yet another open source design and isnt supporting any one silly enough to buy it..
No change at all there then....
The TFT32 needs GND +5v TX0 and RX0, It looks like they have designed it so it just plugs into AUX-1, Then all you have to do it set the baud rate configuration for the screen to match the baud rate in your firmware.
(Its even in the description)
No idea on the auto power off thing, never seen that before today
This page seems to have lots of info
[www.ebay.com]
Edited 1 time(s). Last edit at 03/04/2018 06:00AM by Dust.
No change at all there then....
The TFT32 needs GND +5v TX0 and RX0, It looks like they have designed it so it just plugs into AUX-1, Then all you have to do it set the baud rate configuration for the screen to match the baud rate in your firmware.
(Its even in the description)
Quote
Advantages in Comparision to Original Rumba
1. Add Aux-1 interface, compatible with MKS TFT24,MKS TFT28 as well as MKS TFT32 touch screen.
No idea on the auto power off thing, never seen that before today
This page seems to have lots of info
[www.ebay.com]
Edited 1 time(s). Last edit at 03/04/2018 06:00AM by Dust.
|
Re: Makerbase MKS Rumba+ March 04, 2018 06:05AM |
Registered: 7 years ago Posts: 85 |
The TFT32 connected into Aux-1 works beautifully.
But I will want to connect the Mks Pwc to use the on / off button and be able to turn off the printer at the end of its work.
It's a shame to leave us without support, because there is potential with this material, but how to wire without any technical documentation ...
But I will want to connect the Mks Pwc to use the on / off button and be able to turn off the printer at the end of its work.
It's a shame to leave us without support, because there is potential with this material, but how to wire without any technical documentation ...
|
Re: Makerbase MKS Rumba+ March 04, 2018 07:00AM |
Admin Registered: 13 years ago Posts: 6,998 |
Since you cant seem to follow urls...
and
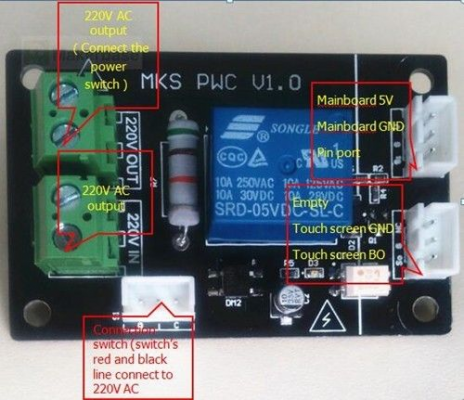
Now In and out for mains is clearly labled on the PCB, even if their red overlay is wrong...
The switch clearly goes in the lower plug
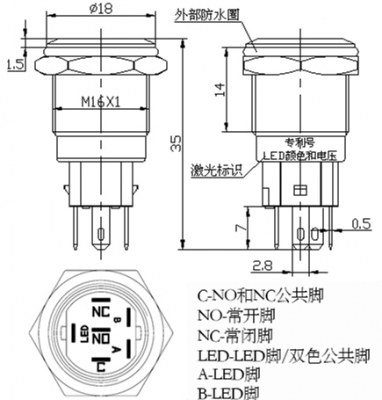
Show the wiring of the switch, I would ignore the LED's for now, leaving C (common) NO (Normally Open), NC (Normally closed)
On the plugs seems to be labled 0,1 and C C is obvious... and if you get 0 or 1 wrong... It will just have on/off postilions switched...
They do say red and black wires on the switch.
Love how they dont seem to provide the plug for this...
Just be darn careful here, your playing with mains voltage here, Im not responsible if you kill yourself or anyone else!
Leaving the connectors on the right, which look obvious...
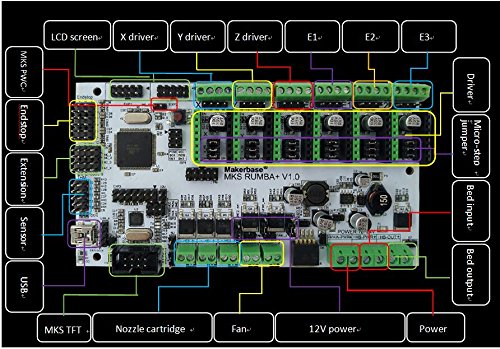
The PS-ON pin i clearly labled on the controller and seem to be identical to the orriginal rumba, so PS-On pin and a gnd pin.
Just leaving you a 5v to find... Should be on Exp2 pin 10, if they have followed the orriginal.
You still need to provide 5v to the rumba board, with ATX, some people use standby power. Or just plug the usb in a computer or charger.
Edited 3 time(s). Last edit at 03/04/2018 07:15AM by Dust.
|
Re: Makerbase MKS Rumba+ March 04, 2018 11:22AM |
Registered: 8 years ago Posts: 5,232 |
The PS_ON pin is the header next to the reset switch. You'd need 5V and GND from somewhere on the board. It's all labelled.
|
Re: Makerbase MKS Rumba+ February 04, 2019 10:35AM |
Registered: 5 years ago Posts: 11 |
I have purchased the same setup except i have the makerbase tft35. I have it all connected almost completely working. If you are still having a hardtime with the wiring let me know and i can help. i am having a problem getting the smoothie board setup file to work. I am trying to change the steps per mm setting in the mks_config.txt file. when i put the line in and boot up there is no change to the steps per mm. have you had any luck with the settings? this is my first controller using smoothieware.
|
Re: Makerbase MKS Rumba+ February 04, 2019 12:26PM |
Registered: 10 years ago Posts: 14,672 |
According to the descriptions I found, the MKS Rumba+ is an 8-bit ATMEGA2560 board, like the original Rumba. So it doesn't run Smoothieware.
Large delta printer [miscsolutions.wordpress.com], E3D tool changer, Robotdigg SCARA printer, Crane Quad and Ormerod
Disclosure: I design Duet electronics and work on RepRapFirmware, [duet3d.com].
Large delta printer [miscsolutions.wordpress.com], E3D tool changer, Robotdigg SCARA printer, Crane Quad and Ormerod
Disclosure: I design Duet electronics and work on RepRapFirmware, [duet3d.com].
|
Re: Makerbase MKS Rumba+ February 05, 2019 02:39PM |
Registered: 5 years ago Posts: 11 |
@dc42
Thanks for the hint in the right direction. The package I bought included the TFT35 and part of the description reads as shown below. But You give me the idea that only the TFT35 is smoothie programmable not the Rumba+ board. if i look at buying the rumba+ alone it says nothing about smoothie. I will connect to the main board and try to put marlin on it using Arduino just like my other Rumba board. Hopefully that is the clue I needed. I also got the wifi module included. haven't tried to set that up yet .
Name: MKS TFT35 Touch Screen
Features
1. 7 type languages online switching.
2. Preview G-code model, display model on printing. (this requires a plug in for CURA you can find on git hub)
3. Inbuilt 32 bit high speed ARM chip.
4. 3.5 inch touch screen, simple operating interface, high sensitivity.
5. Support WIFI remote control, you may monitor via APP or PC. Available for Android and IOS system.
6. Easy to update firmware by SD card.
7. Easy to replace into your logo and customize 13 commands .
8. Support printing from breakpoint,power cut detecting,printing save, outage detecting and auto off function.
9. Supports Marlin, Smoothieware.
Found it on Ebay bought it cheaper on ali express
|
Re: Makerbase MKS Rumba+ February 06, 2019 05:44AM |
Registered: 6 years ago Posts: 1,007 |
As said above, TFT32 35 etc talk Gcode over a serial/USB interface.
Does in a fancy, colorful but elementary way what a PC running Pronterface does far better.
OK to have as you can do basic stuff, home, heat, move, start a job from the SD...stand alone.
Wifi , Sure but I wouldn't trust it. The SD card is enough.
Yes you can change the language, the color, the icons shape but who cares ? It is a god damn 3D printer, not a playstation.
When it becomes serious, you connect the PC.
Of course, you can't run smoothieware on this "terminal", just "talk" to it !
Edited 3 time(s). Last edit at 02/06/2019 11:25AM by MKSA.
"A comical prototype doesn't mean a dumb idea is possible" (Thunderf00t)
|
Re: Makerbase MKS Rumba+ February 06, 2019 11:01AM |
Registered: 11 years ago Posts: 528 |
the clue to configuring the TFT 32, is in the config file first line.
one assumes its the same for the tft35
Edited 1 time(s). Last edit at 02/06/2019 11:01AM by jinx.
one assumes its the same for the tft35
Edited 1 time(s). Last edit at 02/06/2019 11:01AM by jinx.
|
Re: Makerbase MKS Rumba+ February 08, 2019 02:35AM |
Registered: 5 years ago Posts: 11 |
I am trying to use the latest marlin software (1.1.9) and setup dual extruders. when I try to compile I get an error
In file included from /tmp/928740351/build/sketch/MarlinConfig.h:42:0,
from /tmp/928740351/build/sketch/power_loss_recovery.cpp:27:
/tmp/928740351/build/sketch/SanityCheck.h:1606:1: error: static assertion failed: DEFAULT_AXIS_STEPS_PER_UNIT has too many elements.
static_assert(COUNT(sanity_arr_1) <= NUM_AXIS_N, "DEFAULT_AXIS_STEPS_PER_UNIT has too many elements.");
I cant find any place where NUM_AXIS_N is set
From my Configuration.h
#ifndef MOTHERBOARD
#define MOTHERBOARD BOARD_RUMBA // 80 // Rumba //was #define MOTHERBOARD BOARD_RAMPS_14_EFB
#endif
// @section extruder
// This defines the number of extruders
// :[1, 2, 3, 4, 5]
#define EXTRUDERS 2
// Offset of the extruders (uncomment if using more than one and relying on firmware to position when changing).
// The offset has to be X=0, Y=0 for the extruder 0 hotend (default extruder).
// For the other hotends it is their distance from the extruder 0 hotend.
#define HOTEND_OFFSET_X {0.0, 25.40} // (in mm) for each extruder, offset of the hotend on the X axis
#define HOTEND_OFFSET_Y {0.0, 0.00} // (in mm) for each extruder, offset of the hotend on the Y axis
#define X_DRIVER_TYPE DRV8825
#define Y_DRIVER_TYPE DRV8825
#define Z_DRIVER_TYPE DRV8825
//#define X2_DRIVER_TYPE A4988
//#define Y2_DRIVER_TYPE A4988
//#define Z2_DRIVER_TYPE DRV8825
#define E0_DRIVER_TYPE DRV8825
#define E1_DRIVER_TYPE DRV8825
//#define E2_DRIVER_TYPE A4988
//#define E3_DRIVER_TYPE A4988
//#define E4_DRIVER_TYPE A4988
//#define DISTINCT_E_FACTORS
/**
* Default Axis Steps Per Unit (steps/mm)
* Override with M92
* X, Y, Z, E0 [, E1[, E2[, E3[, E4]]]]
*/
#define DEFAULT_AXIS_STEPS_PER_UNIT { 200,200, 3200, 189,189}
am I missing something? I am using windows but using arduino web editor
|
Re: Makerbase MKS Rumba+ February 08, 2019 02:51AM |
Registered: 5 years ago Posts: 11 |
I like them to be stand alone. but your saying I should just use an old laptop with pronterface or simplify 3d connected directly to the motherboard? Can I set steps per mm in pronterface? I still have to set that stuff with marlin or start up gcode right? I actually have an old laptop I could use. Any other pitfalls to look for? Another option is Buying a raspberry pi and installing octoprint right? not sure how that setup works. Any opinions or input is welcome.
|
Re: Makerbase MKS Rumba+ February 08, 2019 03:48AM |
Registered: 6 years ago Posts: 1,007 |
|
Re: Makerbase MKS Rumba+ February 08, 2019 07:59PM |
Registered: 5 years ago Posts: 11 |
I was asking here because there are very few makerbase Rumba+ users. I am wondering if I should use a different motherboard type if I have dual extruders. Maybe other Rumba+ users have had success setting two extruders. I will try searching for a dual extruder thread. I have gotten dual extruders to work on two of my other printers using older Marlin code but I am trying to use the latest marlin for this Build. Thanks for your help.
|
Re: Makerbase MKS Rumba+ February 11, 2019 04:36PM |
Registered: 5 years ago Posts: 11 |
|
Re: Makerbase MKS Rumba+ May 09, 2020 05:57PM |
Registered: 3 years ago Posts: 1 |
Hi there, not sure if this thread is still active... I too purchased a MKS Rumba+ and TFT28 and up until this point the board has performed very well (this is my first RepRap project, so I don't know alot about the different brands of boards out there and what stuff to avoid). Unfortunately, finding a power supply able to provide the juice necessary to heat my extruders and steppers has been a challenge of its own; but that is not what my post is regarding. I too purchased the MKS PWC auto-off module (V2.0 version) and wired it up as-per the diagram here, modifying the original power cord that came with my printer (a 3D systems Cube 3rd Generation). Everything worked much better than with my ATX supply that I was previously using, but I was unable to turn on or off my printer as I wanted and had to manually unplug it once it was on. I read on the ebay link posted above that I needed to make a few changes to Marlin to accommodate the module, and was planning on doing so, only to find out that my laptop was no longer detecting my board when I plugged it in. I would later read that this is a known problem that occurred with the original Rumba board (not so sure about Rumba+) and tried the troubleshooting method listed on the Rumba page on RepRap Wiki (jumping the GND and RST pins on the ISCP connector for the ATmega16U2) to put it into DFU mode. I had no luck with this, so I tried a more direct approach, using my USB asp programmer to hook up to the ISCP pins for the ATmega2560 itself, following the wiring guide provided in the youtube video at . I then tried to upload my firmware this way through IDE, but this failed, and unfortunately it also wiped my bootloader from my ATmega2560. Essentially, I have a bricked board, and have been looking for any resource available to recover it. I first flashed the bootloader back onto the ATmega16U2 using the USB asp via AVR dude, which seemed to be successful, but I tried flashing the ATmega2560 Bootloader to no avail, getting the error 'address 0x3e010 out of range' (I downloaded both of these hex files from the Rumba page on RepRap wiki). I then grabbed my other laptop, which has a newer version of Arduino IDE on it, and used it to flash bootloader onto my Rumba+ through my usb asp, which it said was successful, though I received a warning that it could not set the SCK frequency. I then returned to my original laptop and tried uploading Marlin through this route again (using the 'upload using programmer' function), which again was apparently successful minus setting the SCK. However, I see no apparent change in my board and it still doesn't respond to my commands.
A noteworthy detail is I uploaded a new firmware as recently as last weekend with no problems. After trying to use the PWC module, this is when my problems occurred, though I made sure all of my connections were extra-secure and were in the right spot. Is it sounding like I fried my CPU, or is there a way to recover my board based on the information above? I am willing to live with not being able to upload via serial, as I don't plan on having to make too many firmware changes in the future, I just need to get my firmware back on it somehow. Has anyone here had experience fixing a bricked board (not necessarily a Rumba, as I know alot of other printer boards out there run off of ATmega2560; but that would be a bonus). Thanks in advance.
A noteworthy detail is I uploaded a new firmware as recently as last weekend with no problems. After trying to use the PWC module, this is when my problems occurred, though I made sure all of my connections were extra-secure and were in the right spot. Is it sounding like I fried my CPU, or is there a way to recover my board based on the information above? I am willing to live with not being able to upload via serial, as I don't plan on having to make too many firmware changes in the future, I just need to get my firmware back on it somehow. Has anyone here had experience fixing a bricked board (not necessarily a Rumba, as I know alot of other printer boards out there run off of ATmega2560; but that would be a bonus). Thanks in advance.
Sorry, only registered users may post in this forum.


