3DprinTor : an other reprap
Posted by Alvon3DprinTor
|
3DprinTor : an other reprap August 04, 2018 09:39AM |
Registered: 6 years ago Posts: 39 |
Hi everybody,
I would like to present you my project of reprap 3D printer.
It is a revisit of other reprap, I'm working on it for 2 years, I am working on the third version.
Main characteristics of my machine are :
- tray bed (in the length of your wish 400 mm to 1000mm)
- rack gear and pinion driving mounted on flexible guide system
- based on common , easily accessible and long existence material (roller bearing / drawer runner / plywood frame / common bolt & nuts & co)
- Minimal mechanics simple, robust and well thought
- electronic based on arduino / ramps 1.4 / pololu / nema 17 (big classic)
- low cost
- ease of fabrication and maintenance for DIYers and handyman/woman
- compact and easy to put aside or use
- free surfaces available for personal decoration & customization
All the conception has been done with FreeCAD. The first version, entirely done with plywood was cut with my own CNC driven with LinuxCNC. Pieces of version 2 were done with version1. Pieces of version 3 with version 2.
I hope you'll find the concept interesting.
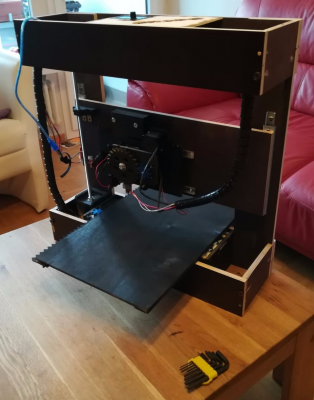
3DprinTor V1 :
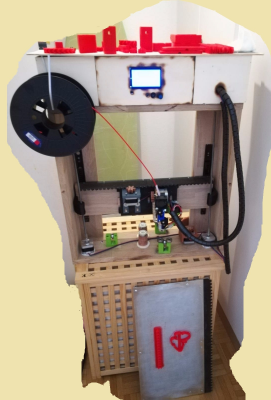
3DprinTor V2 :
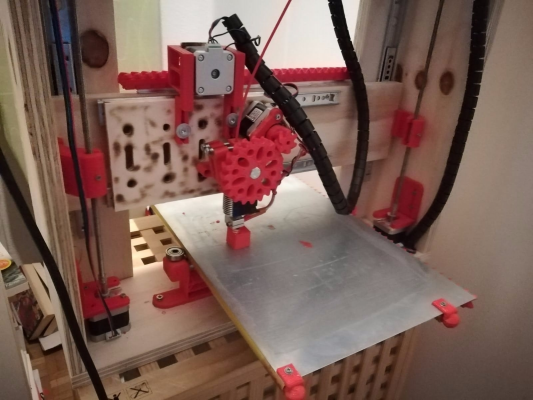
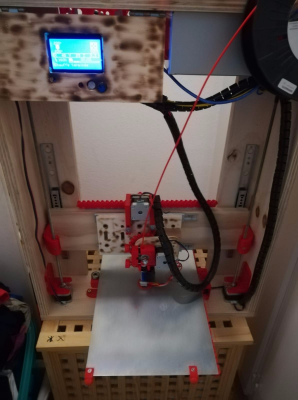
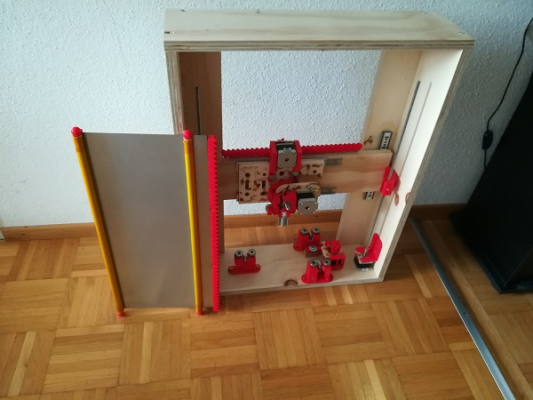
3DprinTor V3 :
Best regards
Alain
Edited 1 time(s). Last edit at 08/04/2018 02:56PM by Alvon3DprinTor.
|
Re: 3DprinTor : an other reprap August 05, 2018 08:14PM |
Registered: 7 years ago Posts: 507 |
|
Re: 3DprinTor : an other reprap August 06, 2018 04:31PM |
Registered: 6 years ago Posts: 39 |
Hi Trakyan,
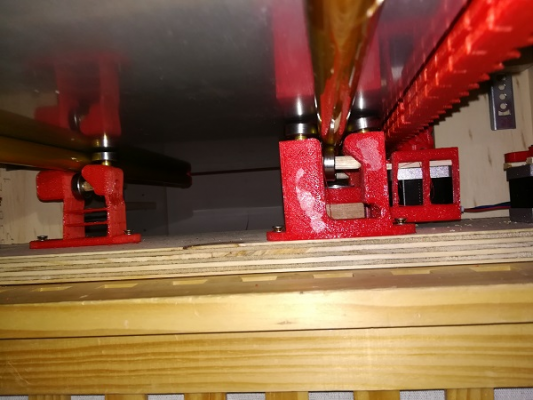
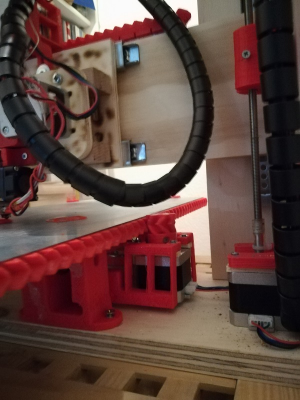
Here are a few more details about the tray bed axes mechanism. I only show here the version 3. At the end it is very simple and very stable. Two tubes are fixed under the bed (theoretically parallel). The right one is guided by two rigid bearing "clamp". On this left clamp, the left bearing is firmly fixed, the right bearing is mounted on a flexible guide. When you insert the bed in the machine, you push back the right bearing and the tube is clamped. On the left side of the tray bed I have only have one guide mounted on a flexible guide so the direction is only given by the right tube of the bed (in case they are not perfectly parallel). Moreover the gear rack mechanism press also the bed on the fixed bearing. The z positioning is done by the 3 bearing blocking the position in z in the three clamps.
For the history, in version 1 & 2 my bearing were flat and I had strong magnets to press down the tray bed. In version 3, I simply took a bigger tube diameter 16mm and give an angle to the two bearing.
Look the images it is clearer than my explanations, I hope.
The advantages of my system are :
- That the machine is very compact to put in the closet when you are not printing.
- You can work on the bed outside the machine for instance to prepare the surface with wood glue and to take off the pieces when your printing are finished.
- You can make your bed in the length of your wish, if you want to print very long piece with the polymer fiber oriented in the best direction for mechanical properties.
- In the future I imagine to have many machines and make an operation in a first machine, and a second operation in a second machine and so on
|
Re: 3DprinTor : an other reprap August 08, 2018 01:15PM |
Registered: 6 years ago Posts: 109 |
|
Re: 3DprinTor : an other reprap August 08, 2018 02:25PM |
Registered: 9 years ago Posts: 465 |
Ease of fabrication is a good thing, but I don't have a CNC router to cut my pieces on (yet -- it's in the planning)
Plans would still be nice.
though my printer never really seems to spend any time in "storage" I really like the compactness of it, so that it can be out of the way quickly and easily, but still ready to be deployed on a moment's notice.
Are the rack and pinion system printed modularly, or do you need to do the rack as a single monolithic print?
MBot3D Printer
MakerBot clone Kit from Amazon
Added heated bed.
Leadscrew self-built printer (in progress)
Duet Wifi, Precision Piezo parts
|
Re: 3DprinTor : an other reprap August 08, 2018 10:59PM |
Registered: 7 years ago Posts: 507 |
Ahh, I see, thanks for the clarification. I think this is similar to how some lathes have their ways setup. One rail is a "fixed" or "rigid" rail, with some sort of profile for the making slide/bushing to lock onto. The second rail is a "floating" rail which has a flat surface for the other bushing/slide to rest on is just there to prevent rotation about the axis of the first rail, but the second bushing can move along top surface of the tail perpendicular to the direction of travel to compensate for lack of parallel as you said.
My solidoodle has a similar setup on the X and Y axis. Unfortunately it doesn't work so well on the x axis since the top heavy extruder causes the floating slide to lift off the rail as the X axis is jerked back and forth by the Y axis. I don't imagine it's a problem in your design since it doesn't experience these types of forces though.
EDIT: Just wanted to add, you really seem to know your stuff and what you're doing judging just by the design of that Y axis. Great to see such a well thought out and engineered machine.
Edited 1 time(s). Last edit at 08/08/2018 11:26PM by Trakyan.
|
Re: 3DprinTor : an other reprap August 09, 2018 04:38PM |
Registered: 6 years ago Posts: 39 |
Hi everybody,
First of all thank a lot for your feedbacks and interest. I had in mind since a few weeks to begin to publish gpl or with equivalent the concept, but I wanted to look before if somebody would eventually be interested in it. You have given me a first answer. If other are interested, please tell it, it is motivating.
For publishing :
- I wanted first to make a page on the reprap wiki [www.reprap.org], including BOM / mounting instructions / 3D files / and so on
- Then a little website, I just start it. www.3dprintor.net
Please be patient and tolerant, between crazy engineering job and father's life of three children I haven't all the time I would to work my reprap project...
Concerning this publishing question, I'm a bit lost with all these question of licences. There are so many gpl 1,2 / CC and so on. Personally I'd like to make the project available free for all / I only want have feedback if somebody use it / improve it and have always the right to exploit the evolution. What do you advice me ? Is there somewhere a good guide on this thematic somewhere ?
-------------------------
@orbitalair :
Like I'm working on a line, for bed leveling and adjustements I only play with the right and left Z thread. Note that the quality of the aluminum/steel plate is important (no curvature). In the future I want to had a Z probe and let it done automatically trough Marlin.
You don't need to be a wood worker to make the frame. I did the three frames in the same way : 1) go to the DIY/hardware store 2) order the 7 plywood boards in the wished dimension 3) preassemble them with a few point of hot glue 4) firmly assemble them with a drill and a few woodscrews. [Details coming soon in the wiki]
-----------------------
@ SupraGuy :
for the version 3 You don't need anymore a CNC router. The last pieces done like that are the command panel and the Y wagon, both can be done either with 3Dprinter or with a simple little circular saw or even hand saw.
The racks are not printed in a monolithic way, but in ~180mm blocks. The blocks are glued then with contact glue. The spacing in between is done pressing a third rack against the two that are gluing [mounting detail coming soon in the wiki]
-----------------------------
@Trakyan :
You have very well understood. The right tube is fixed in two points along X axe in Y,Z directions. The left tube is fixed in one point in Z, with X,Y floating.
ADG AKA GA3D_tech ------ [www.instagram.com]------ [www.reprap.org] ------ [ga3d.tech]
Sorry, only registered users may post in this forum.
