Squiggly Prints
Posted by vegetable
|
Squiggly Prints May 02, 2019 05:15PM |
Registered: 5 years ago Posts: 16 |
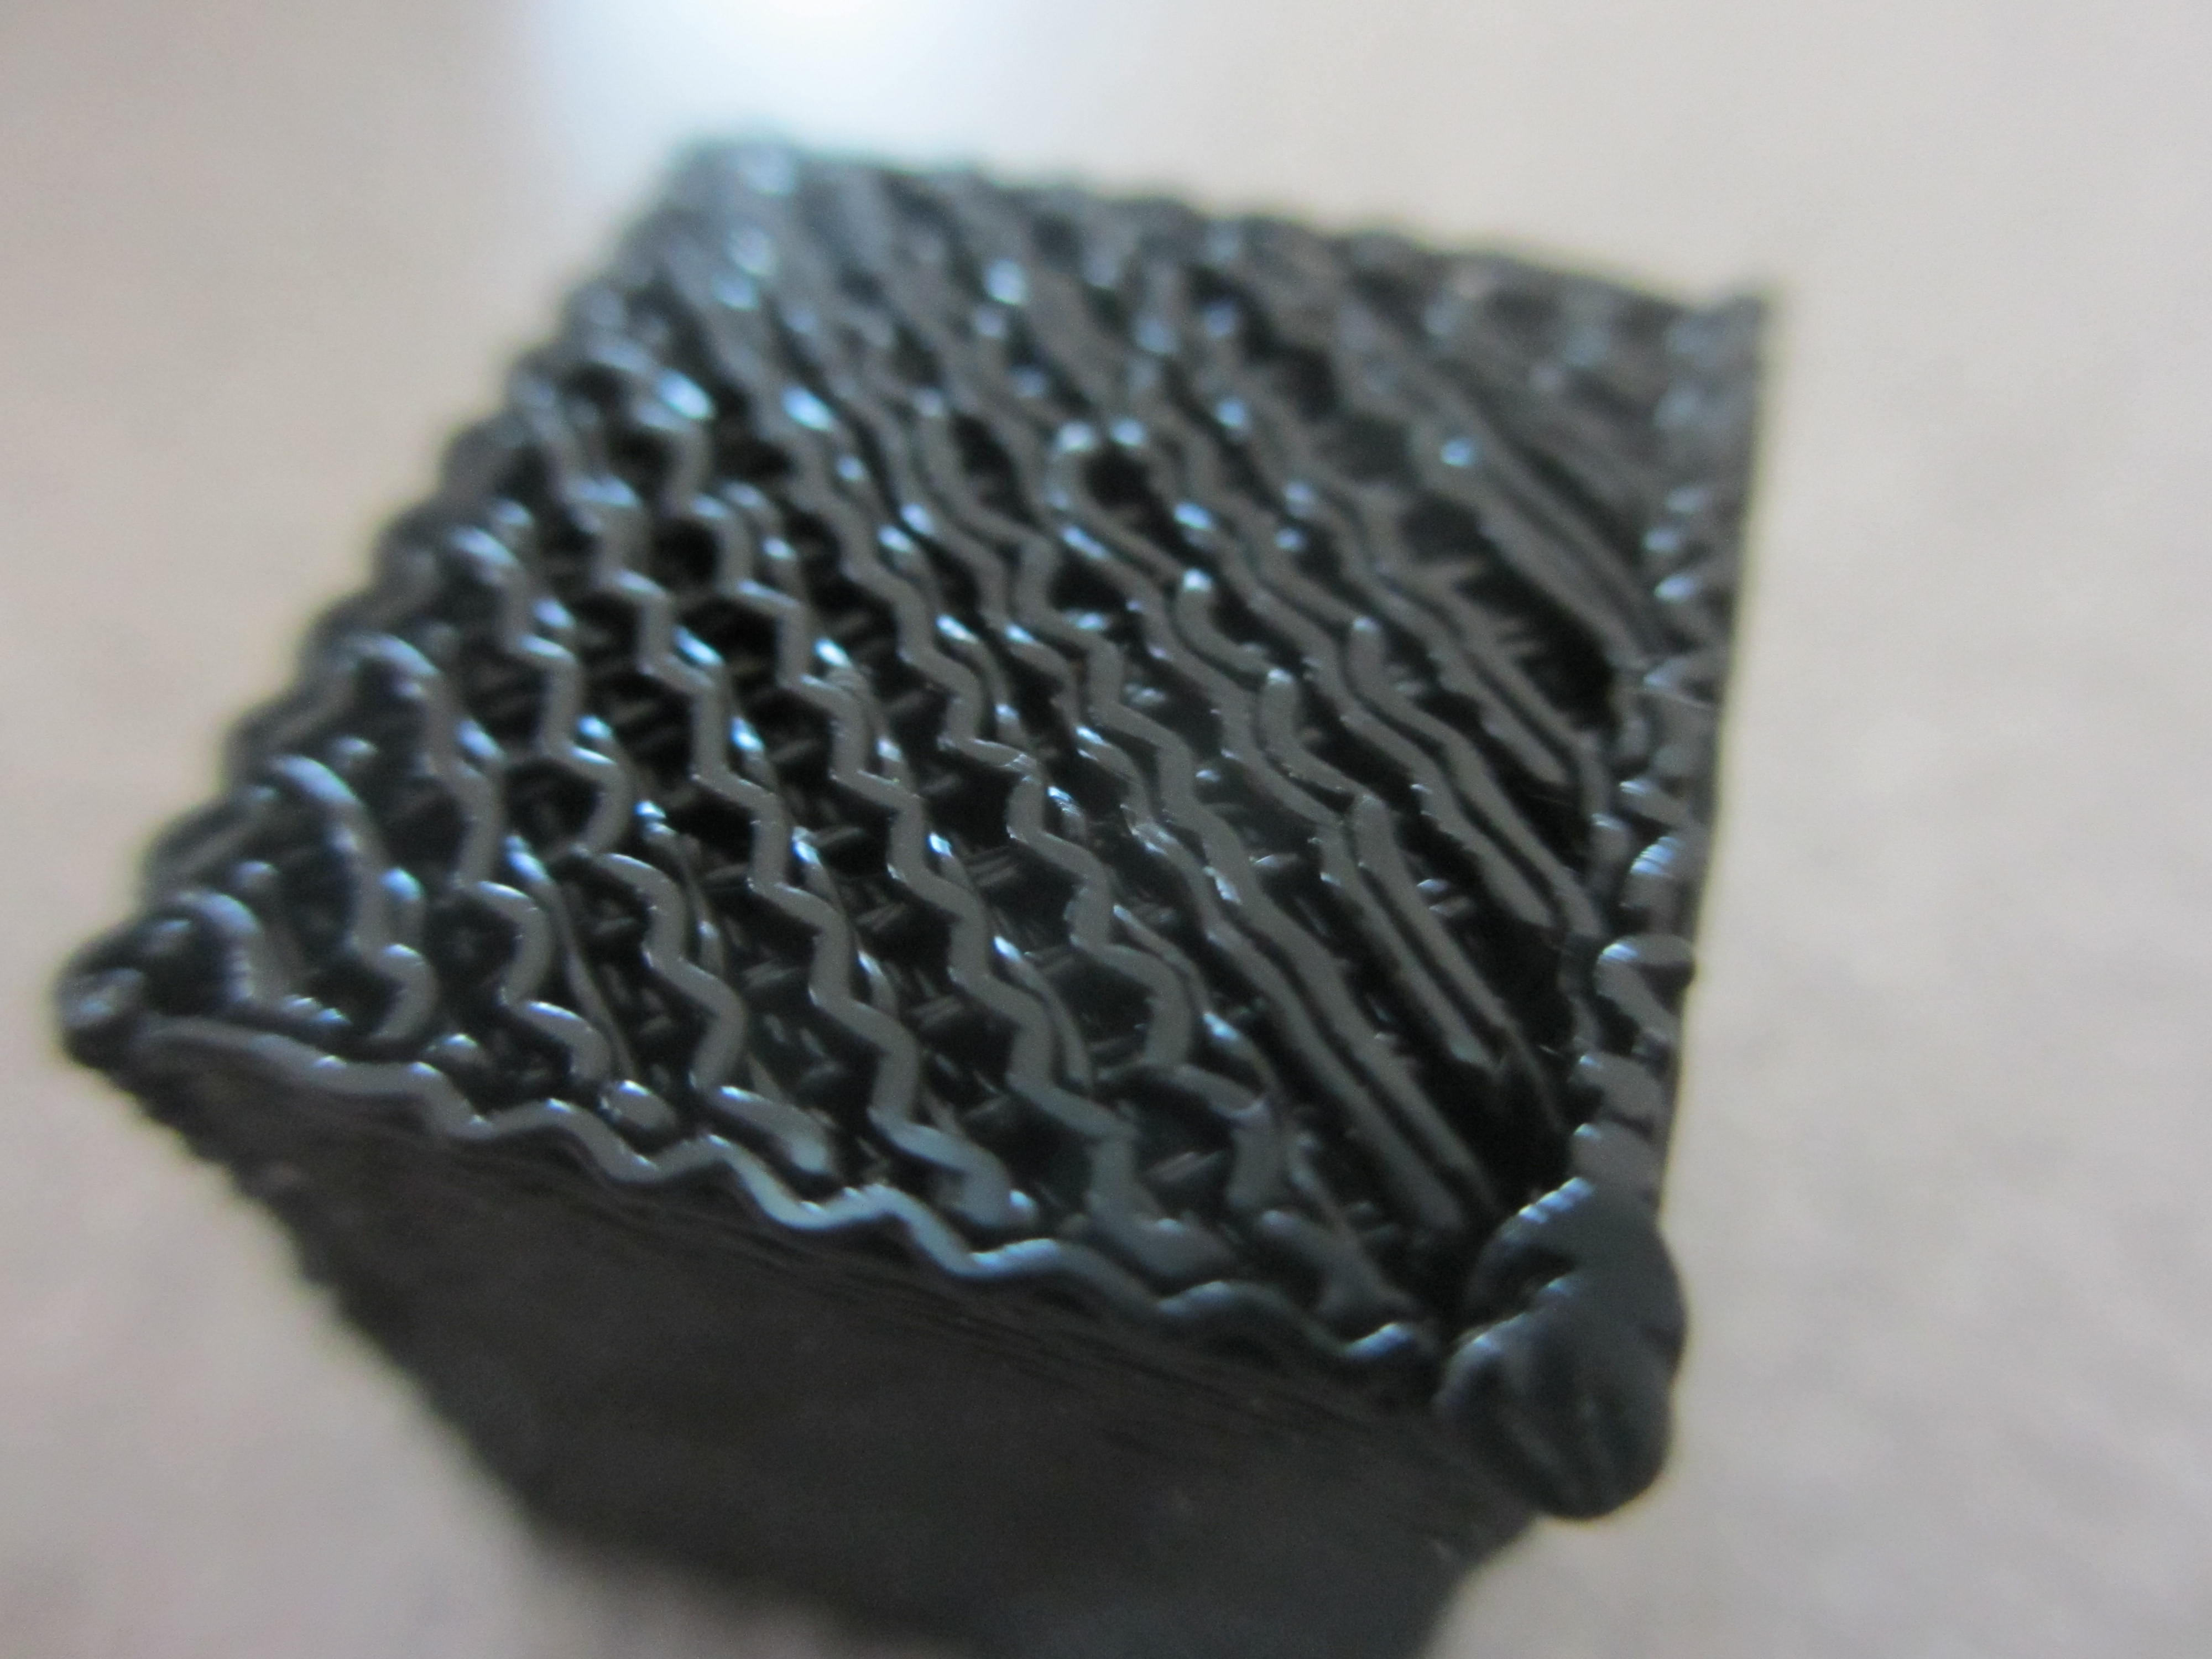
I have begun the calibration process for my scratchbuilt cartesian printer, and my test cube looks like this.
When I ordered my filament (PLA), I made the mistake of opening the package and leaving the spool exposed to the air. Could that be causing this? If so, is there a way to salvage moist filament? Or could this be caused by axis wobble?
When I ordered my filament (PLA), I made the mistake of opening the package and leaving the spool exposed to the air. Could that be causing this? If so, is there a way to salvage moist filament? Or could this be caused by axis wobble?
|
Re: Squiggly Prints May 02, 2019 09:20PM |
Registered: 6 years ago Posts: 1,863 |
To answer you question need more information.
What was the intended size of the model vs the size of the actual printed model.
What slicer was use and the setting on the slicer when the model was sliced.
It appears that this model was printed on a 3D Printer with 1.75mm filament and it was sliced with 3mm settings,
though this is only a guess an I would need more information before a definitive answer could be given.
Computer Programmer / Electronics Technician
|
Re: Squiggly Prints May 02, 2019 10:27PM |
Registered: 5 years ago Posts: 16 |
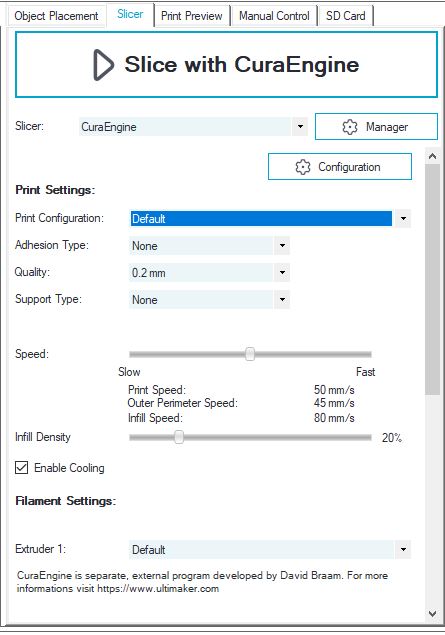
You are correct in that I am using 1.75mm filament. I am using the CuraEngine slicer that is built into repetier host. The model was intended to be 20mm on each side, the printed model is 19.61mm by 19.66mm by 22.46mm high.
Settings are shown.
Settings are shown.
|
Re: Squiggly Prints May 02, 2019 11:39PM |
Admin Registered: 13 years ago Posts: 7,000 |
|
Re: Squiggly Prints May 03, 2019 08:26AM |
Registered: 13 years ago Posts: 1,797 |
not much info to go on here. it would be better seeing the system that part came off of with resolution to show mechanics, and not just the part.
also if this is a raft layer or not?
is this a core x-y, (delta usually not cartesian), what motion system? cartesian does not specifically state its motion system just the direction of the mechanics
from info provided:
this seems to be a mechanical failure, seems like slop in the carriage, or tool head. how much wobble is in hot end? how much play when power setup to machine (how tight are belts, or cables, or whatever is keeping positioning?)
Edited 2 time(s). Last edit at 05/03/2019 08:29AM by jamesdanielv.
|
Re: Squiggly Prints May 04, 2019 02:29PM |
Registered: 8 years ago Posts: 318 |
|
Re: Squiggly Prints May 06, 2019 08:56AM |
Registered: 9 years ago Posts: 752 |
If the axis wobble that much it would be visible and maybe audible too. Is the printer shaking to bits? When you extrude freely doed the extruded filament come out in a straight line, straight down?
Please show us the mechanics, steppers used, drivers etc. It may well be under extrusion or layer heights that are too large or something like that.
All plastics absorb moisture to some extent but pla doesn't really have aproblem with tgat unless you're in an exceptionally humid location. Did you check if dust could be an issue, partially blocked nozzle?
--
Kind regards
Imqqmi
NFAN CoreXY printer:
[reprap.org]
|
Re: Squiggly Prints May 06, 2019 10:39PM |
Registered: 5 years ago Posts: 16 |
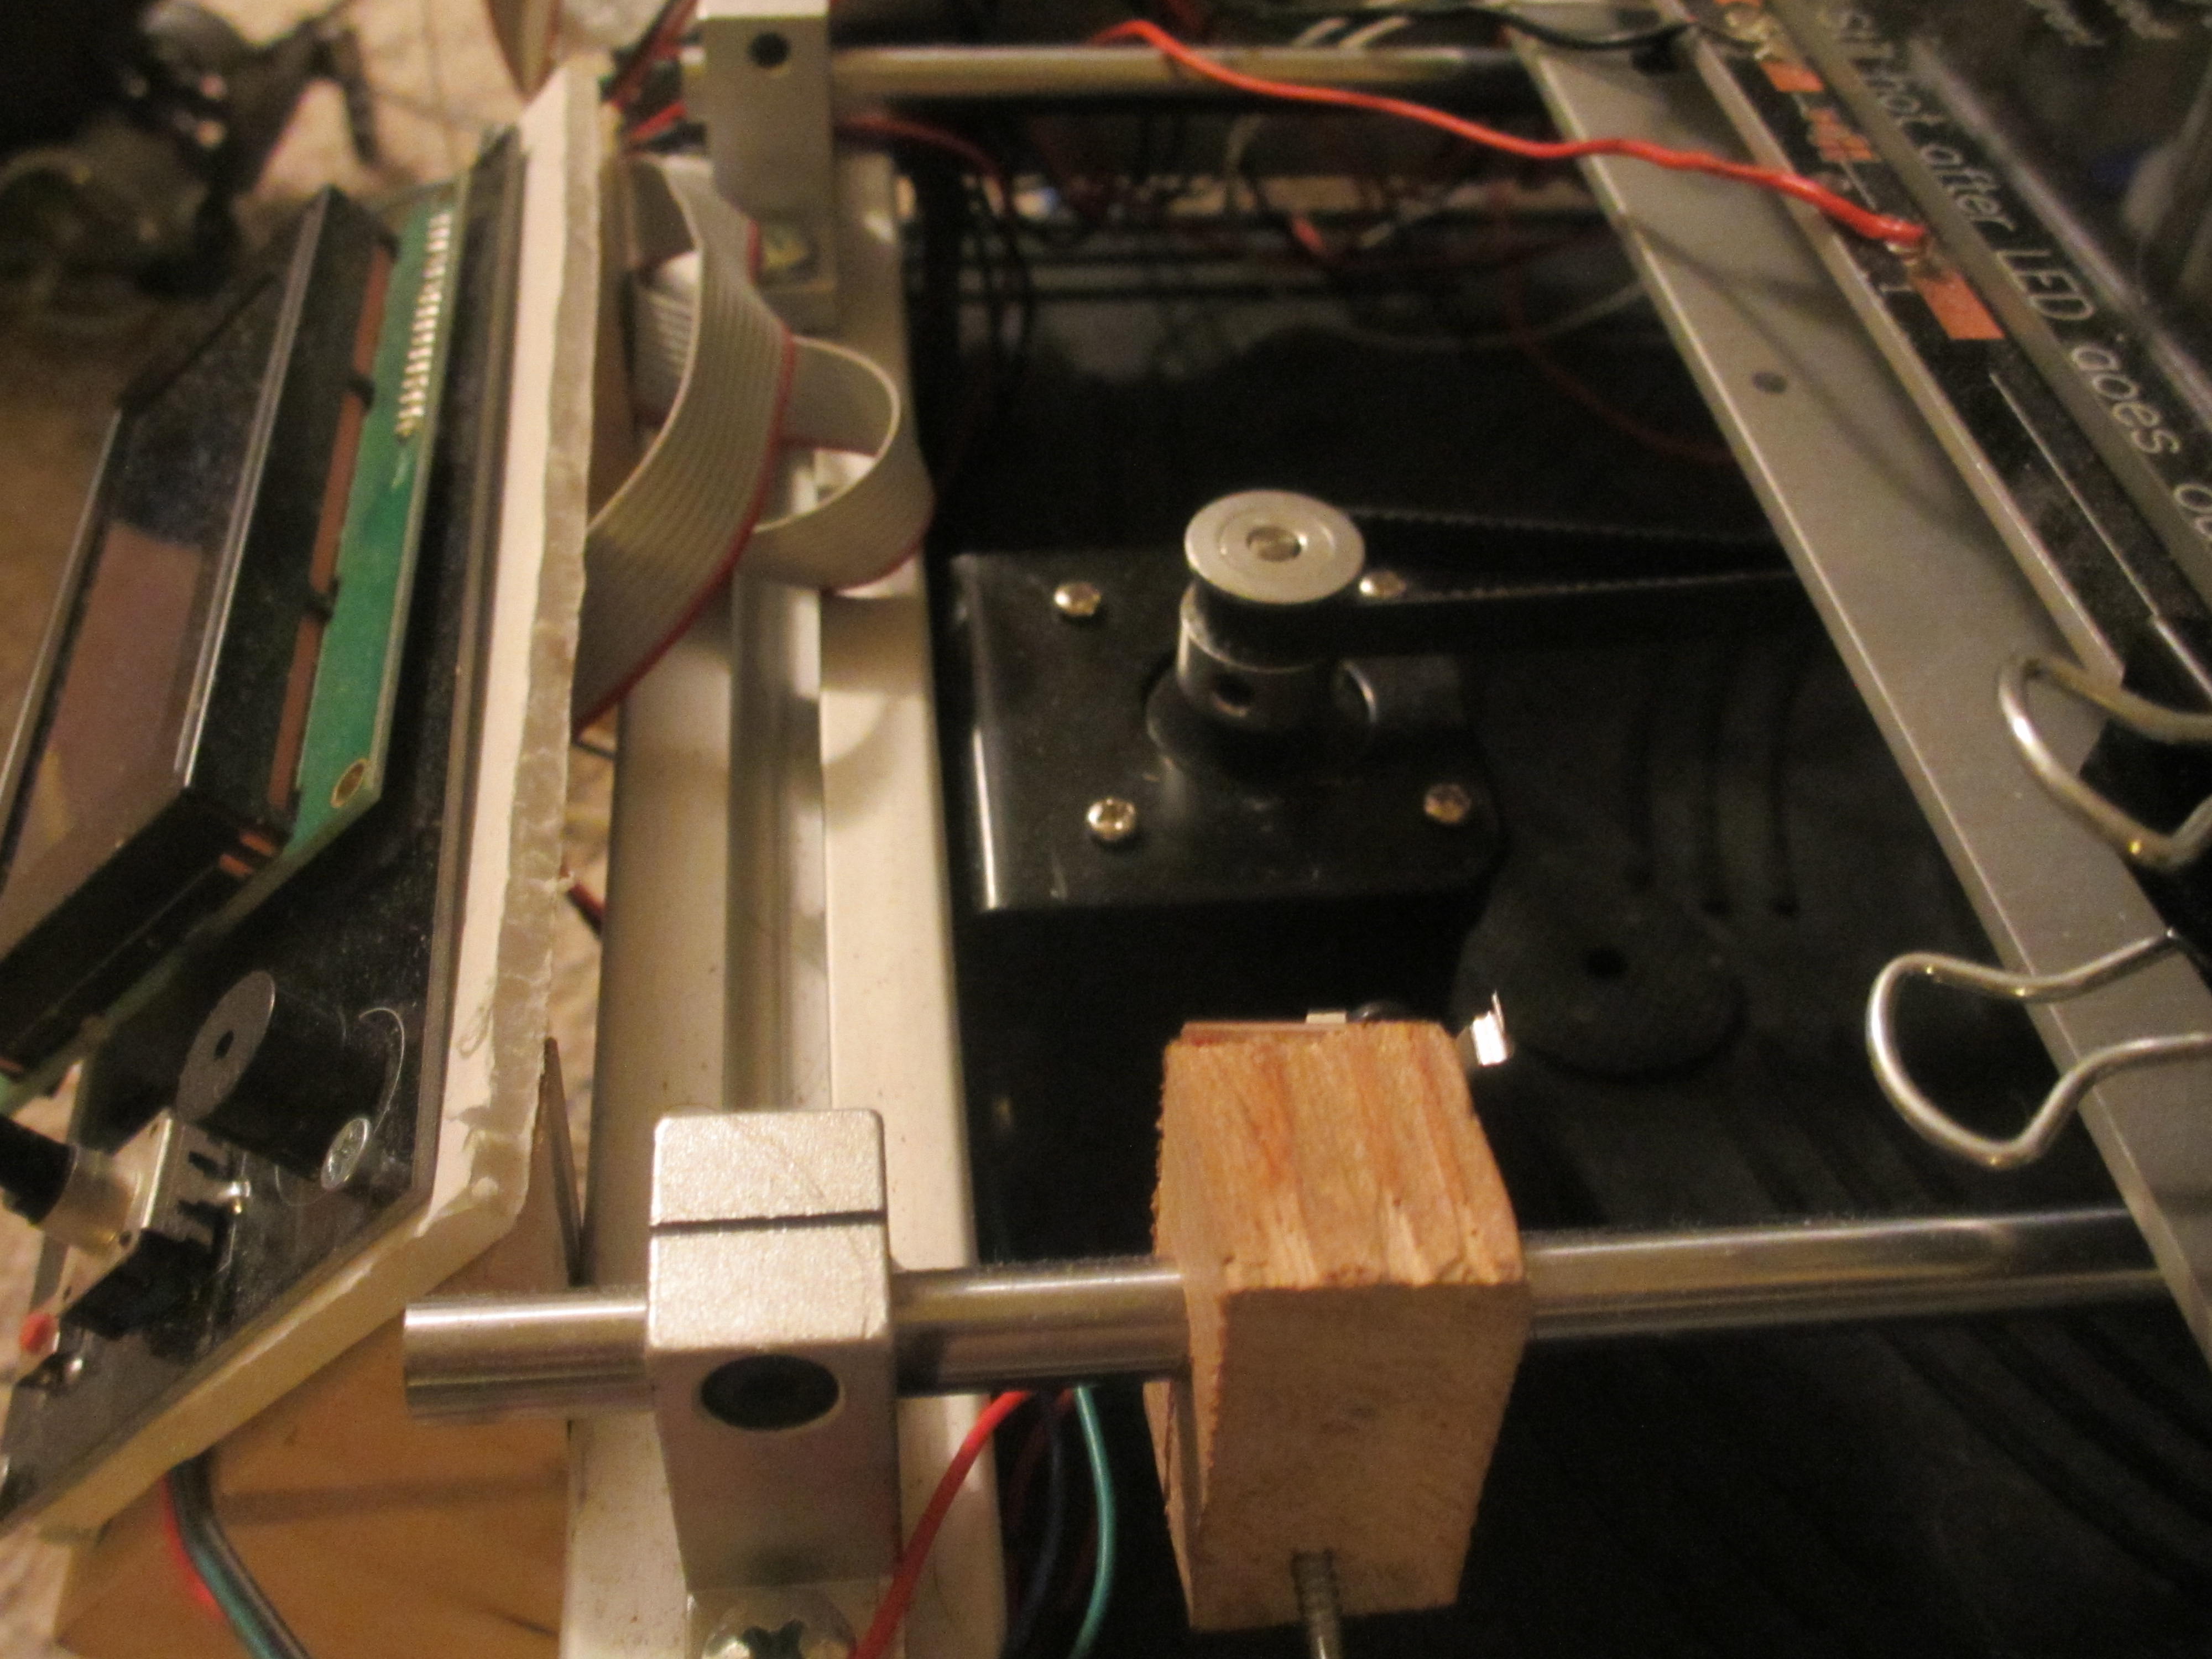
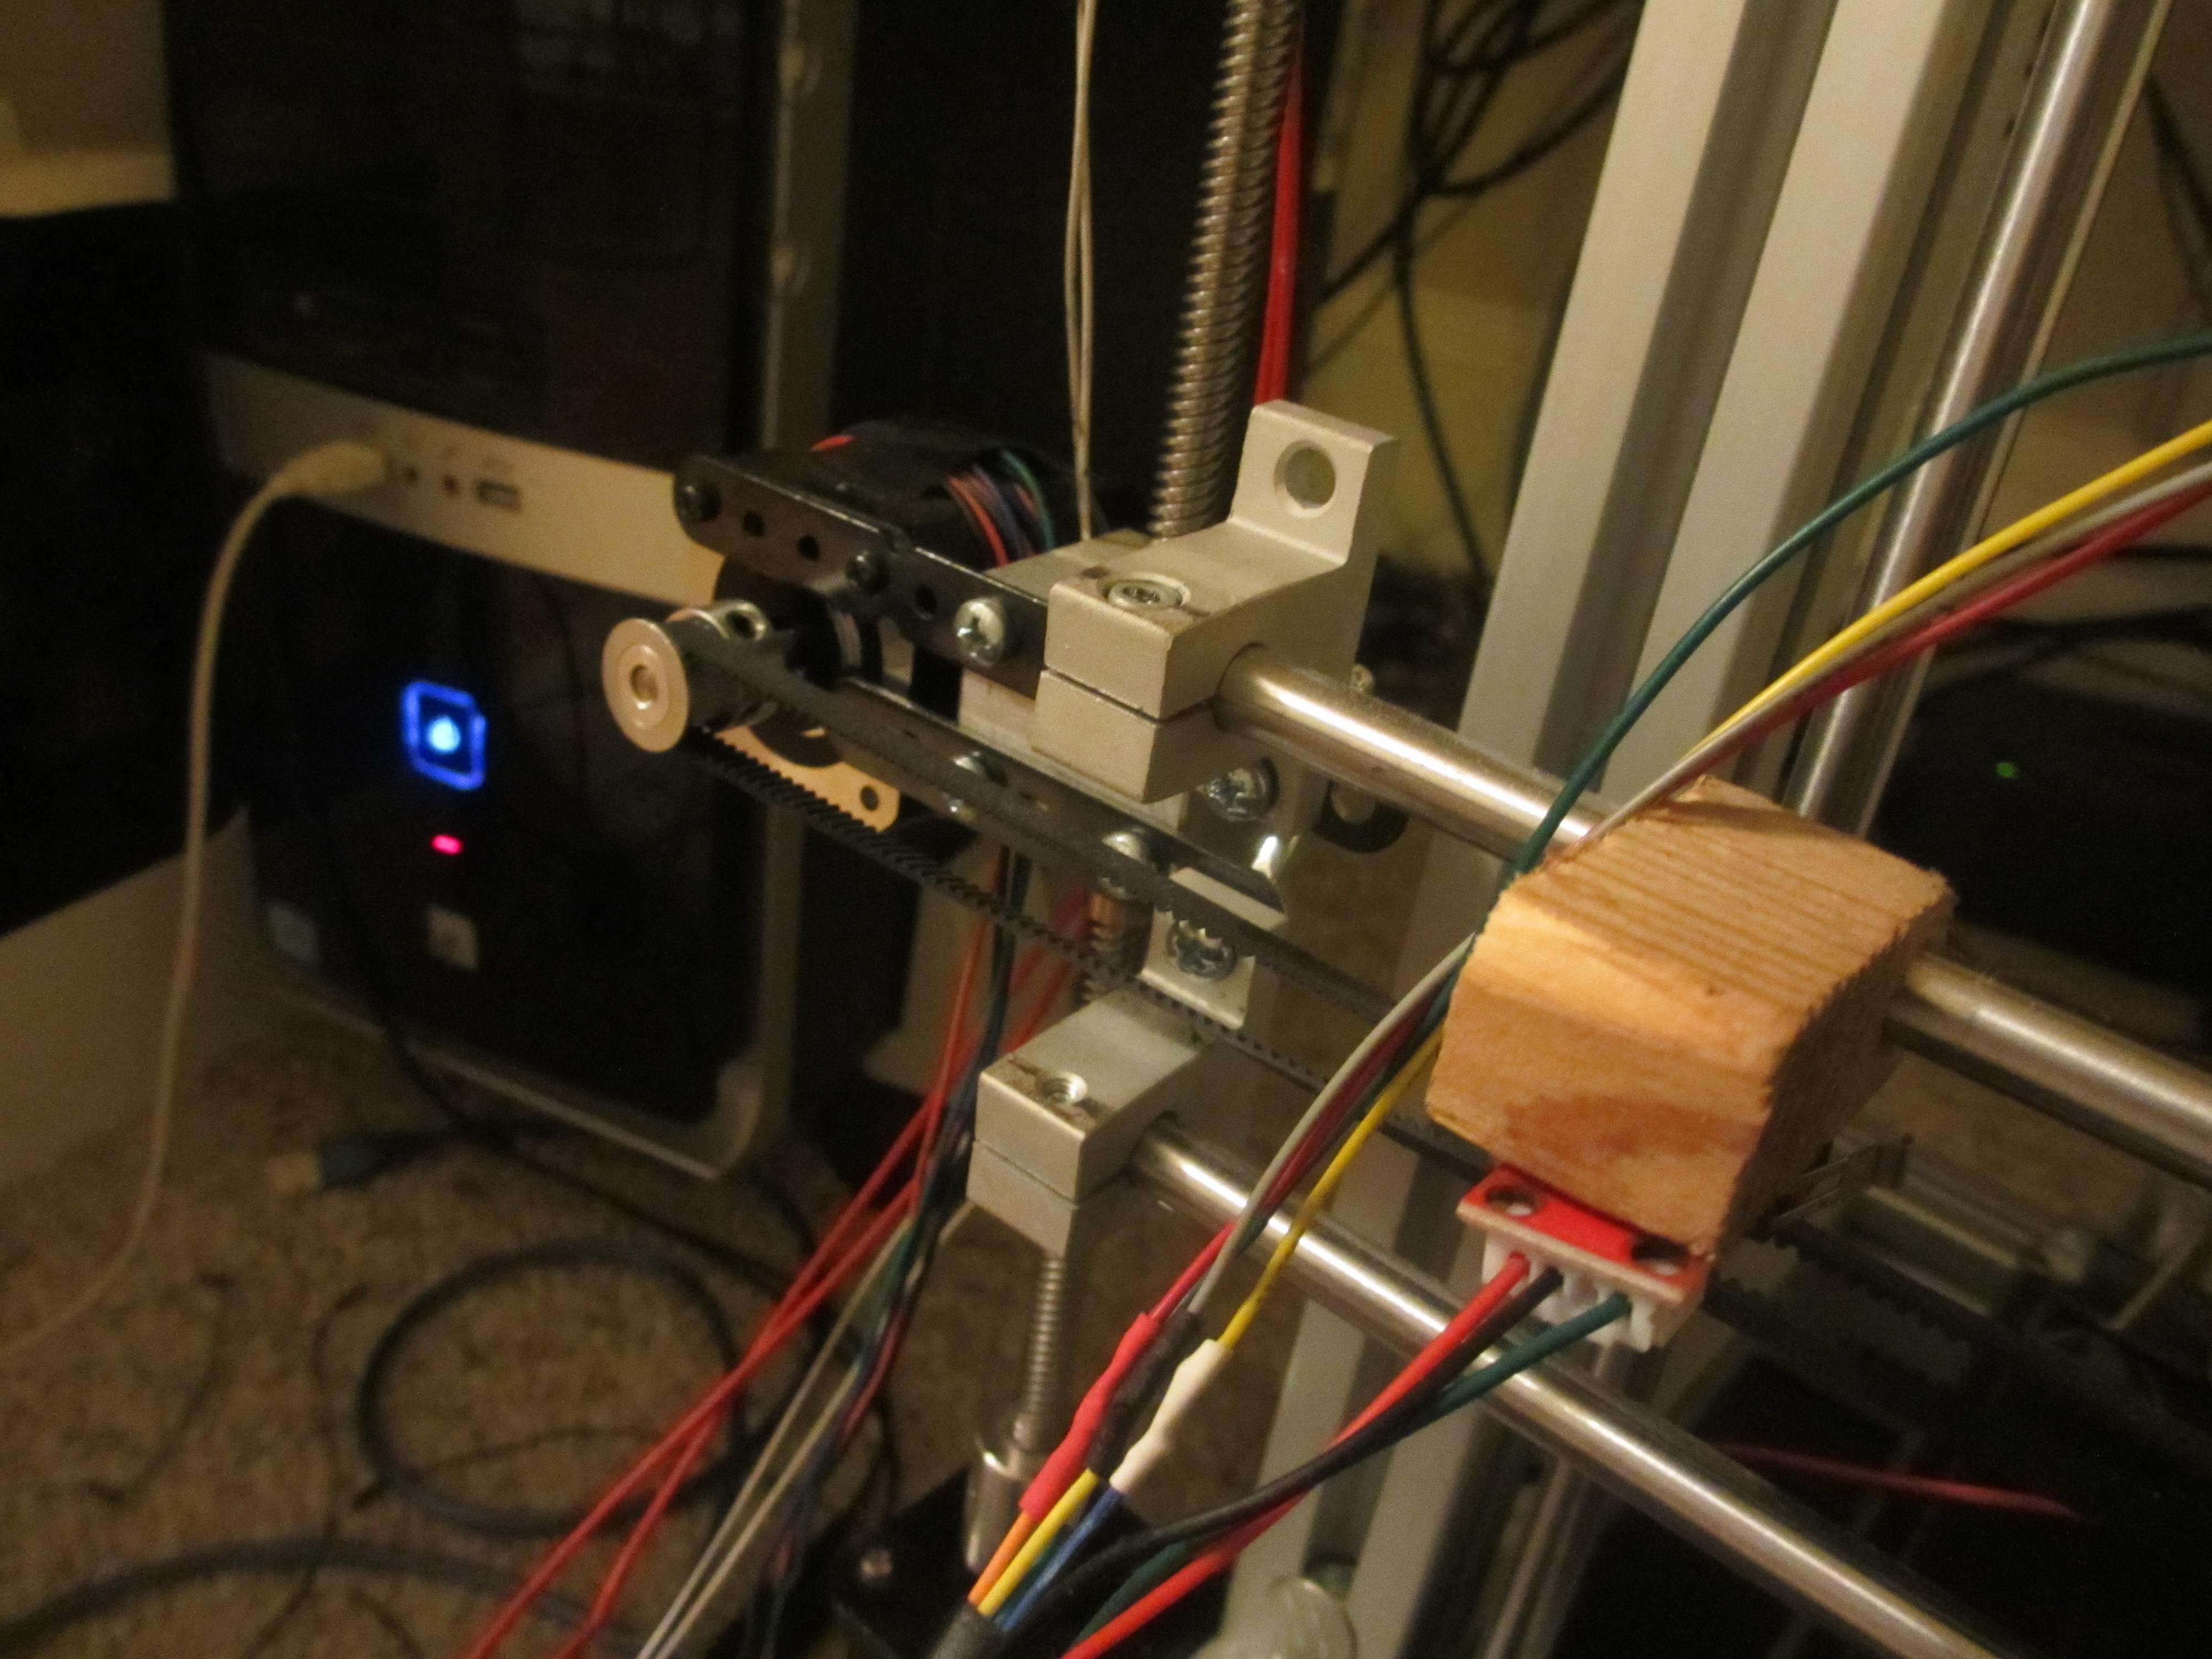
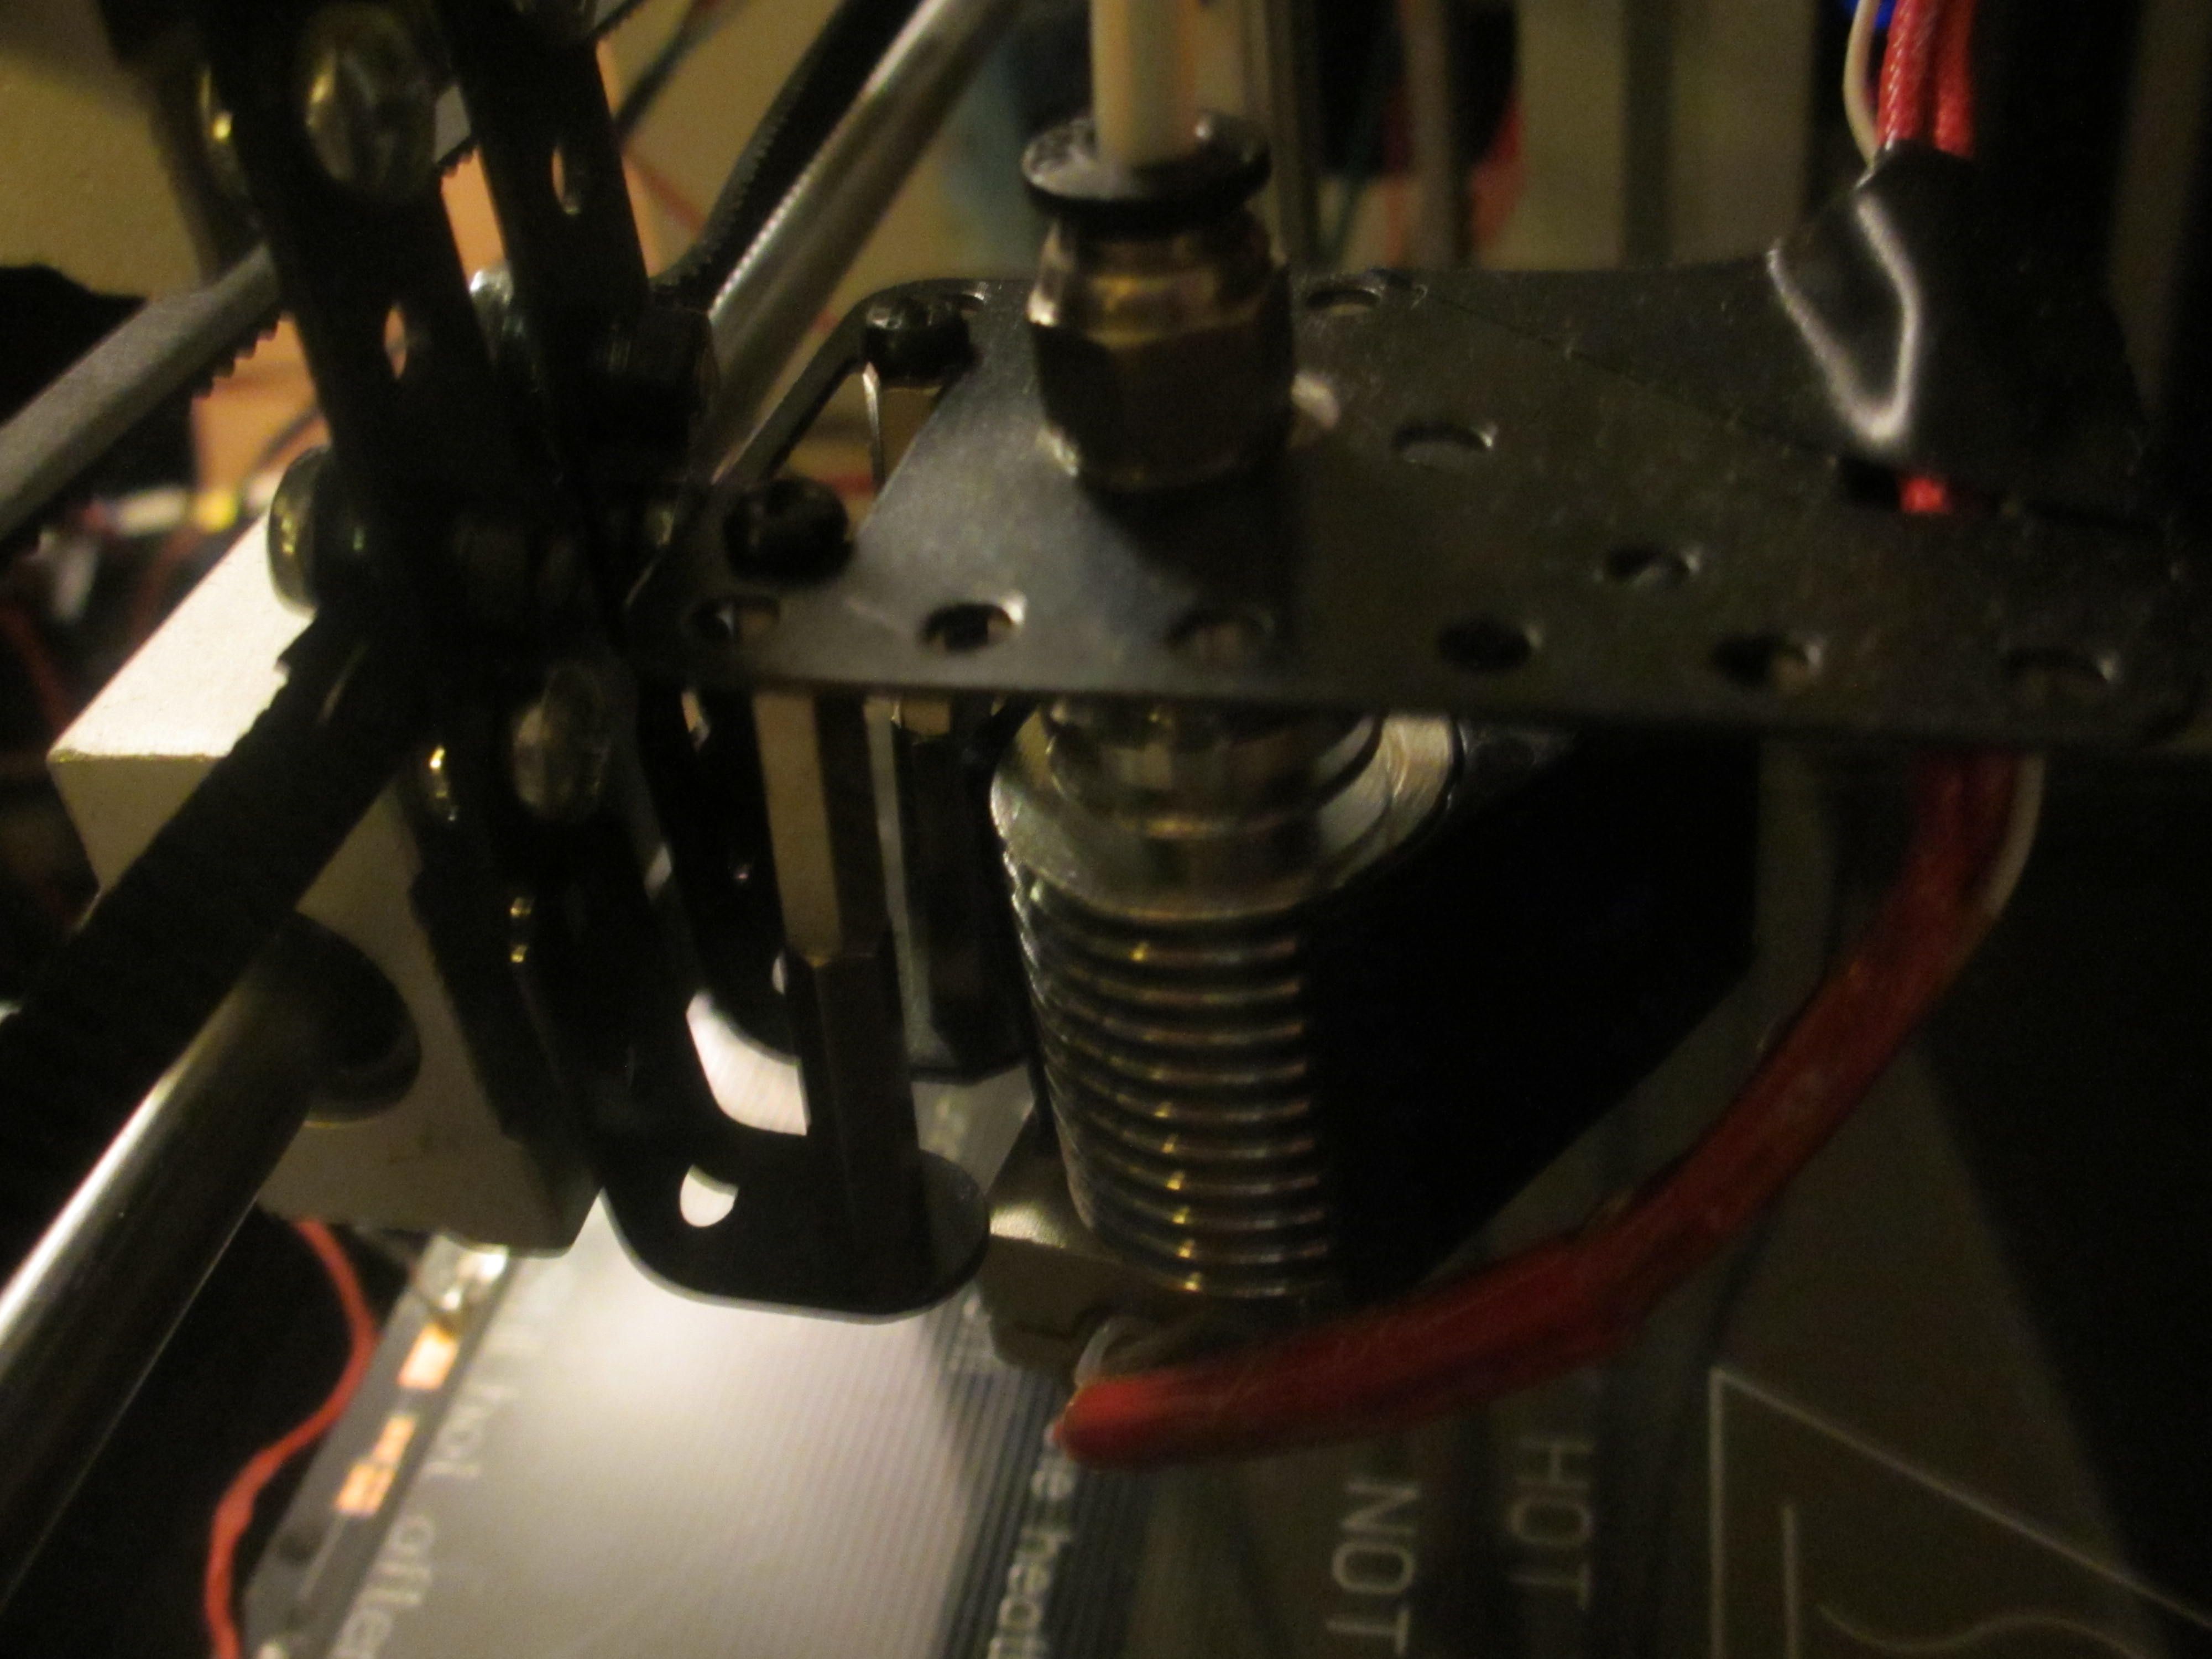
It is not a raft layer. The print bed moves on the Y axis, I have lead screws on the Z axis to move the X carriage up and down.
Here are some photos.
The problem is probably in the tool head, which is only connected to the X carriage by 2 screws.
Here are some photos.
The problem is probably in the tool head, which is only connected to the X carriage by 2 screws.
|
Re: Squiggly Prints May 07, 2019 06:35AM |
Admin Registered: 11 years ago Posts: 3,096 |
Yes, well, that tool head is of such a terrible design... I would definitely blame that and try to make a better one first. Also the way the hotend is fixed leaves much room for improvement. There is a good reason why they added a wider collar on the E3D when compared to the older J-heads > more surface area to grip onto, as these hotends need to be fixed quite well.
http://www.marinusdebeer.nl/
http://www.marinusdebeer.nl/
|
Re: Squiggly Prints May 08, 2019 02:12AM |
Registered: 9 years ago Posts: 752 |
Agreed, the U bend mounting plate acts as a spring. Remove any form of springiness in the whole system. Just push and pull on the toolhead without moving the stepper motors. If it moves you need to fix 5hat first.
My guess is that when the hotend moves, the bowden tube starts swinging to and fro causing the U profile to bend in the same motion. If it's not rigid enough you'll see it in the print to varying degrees.
Two screws is not necessarily bad, it depends on the materials used, thickness and rigidness, and the two mating parts should have a solid, flat surface and maybe a notch for alignment and to prevent any lateral movement.
I use an 6mm aluminium plate on the x carriage and a 3mm mounting plate to be screwed into the 6mm plate tapped holes using 3 bolts. The hot end mounts to the 3mm plate. That way I can easily mount different toolheads. I also have a 10 pin connector on the toolhead for power and sensors. Eventually I'd like to add a toolchanger at some point. See my NFAN build in the signature.
Also make sure the belts are tight.
--
Kind regards
Imqqmi
NFAN CoreXY printer:
[reprap.org]
|
Re: Squiggly Prints May 08, 2019 04:15AM |
Admin Registered: 11 years ago Posts: 3,096 |
Quote
imqqmi
Agreed, the U bend mounting plate acts as a spring. Remove any form of springiness in the whole system. Just push and pull on the toolhead without moving the stepper motors. If it moves you need to fix 5hat first.
My guess is that when the hotend moves, the bowden tube starts swinging to and fro causing the U profile to bend in the same motion. If it's not rigid enough you'll see it in the print to varying degrees.
Two screws is not necessarily bad, it depends on the materials used, thickness and rigidness, and the two mating parts should have a solid, flat surface and maybe a notch for alignment and to prevent any lateral movement.
I use an 6mm aluminium plate on the x carriage and a 3mm mounting plate to be screwed into the 6mm plate tapped holes using 3 bolts. The hot end mounts to the 3mm plate. That way I can easily mount different toolheads. I also have a 10 pin connector on the toolhead for power and sensors. Eventually I'd like to add a toolchanger at some point. See my NFAN build in the signature.
Also make sure the belts are tight.
Sorry to be slightly offtopic. but what 10-pin connector did you use? I ordered a crimping tool last week together with a bunch of dupont connectors both male and female but I expect that Dupont connectors cannot handle the current from the hotend.
http://www.marinusdebeer.nl/
|
Re: Squiggly Prints May 08, 2019 08:04AM |
Registered: 9 years ago Posts: 752 |
I use screw connectors like these and use it with 24V psu and 12V heater cartridge (unsafe, I know, but it heats up nice and quick in 20-30 secs, but can melt the aluminium block at 700+ degrees C). No issues after 100+ hours of printing.
No crimping required, but some soldering is necessary on the male side. I've found it to be really handy servicing the hot end, being able to detach it completely by undoing 3 bolts an the connector and filament/bowden tube, if the nozzle is blocked and needs disassembly or replacement for example.
I have a second E3D hotend and am planning to make a spare hotend so I have a drop in replacement.
I've wired all 10 wires through a dragchain even though I use only 6 of them for 3D printing. I've got a couple of ground wires, +12V for the coldbreak fan, hot end heater, 2 for thermo couple. Other 4 could be for led lighting, laser module and/or probe. I got another connector on the other end for easy rewiring without having to remove the wires from the drag chain.
The connectors are rated for 8 amps but I don't think I'll use more than 4A max.
Used parts:
Male straight
[www.aliexpress.com]
Male 90 degrees
[www.aliexpress.com]
Female
[www.aliexpress.com]
--
Kind regards
Imqqmi
NFAN CoreXY printer:
[reprap.org]
Sorry, only registered users may post in this forum.