Calibrating a MakerBot Cupcake...
Posted by ZOMGVTEK
|
Calibrating a MakerBot Cupcake... July 08, 2011 05:46PM |
Registered: 12 years ago Posts: 13 |
I got a Cupcake Ultimate kit 5 days ago, and making the thing print decent parts is really feeling brutal. I'm trying to print out the x-y lowrider, and the parts are coming out very mediocre compared to everyone else's. The tall parts tend to fall over on the HBP, which is a thick piece of aluminum with recessed bolts, heated to 110ºC, with kapton tape, then blue painters tape. The best results I have gotten to date are the result of about 40 hours of messing with skienforge, and they're just barely acceptable. The head starts digging into parts, the higher it goes. I can increase the layer thickness, but then the parts have holes. If I increase the infill, it makes it worse.
I really dont know what im doing, I just got the thing and cant really find much help anywhere. I'm looking for basic stuff, like what version of skienforge to run, what layer thickness is best with my .40 nozzle, about what speeds should I expect to use, temps, etc...
Can anyone help me out?
I really dont know what im doing, I just got the thing and cant really find much help anywhere. I'm looking for basic stuff, like what version of skienforge to run, what layer thickness is best with my .40 nozzle, about what speeds should I expect to use, temps, etc...
Can anyone help me out?
|
Re: Calibrating a MakerBot Cupcake... July 08, 2011 05:56PM |
Registered: 16 years ago Posts: 824 |
|
Re: Calibrating a MakerBot Cupcake... July 08, 2011 06:06PM |
Registered: 12 years ago Posts: 13 |
Everything I'm doing is mostly very time consuming trial and error. Its not really getting any better, and I nearly used 1LB of ABS filament screwing around. I spent about 20 hours reading assorted guides and whatnot, and its not helping. Most of the stuff is for older skienforge versions, and the names and locations of things have seemingly changed.
Is there any reason not to run a older skienforge version? I got the best results with the one thats called (standard) in RepG, I think its 0006 or something? The newer versions all have very a very hard to use and slow configuration window, the buttons are REALLY slow to show up, and its a little screwed up. This issue mostly goes away when I run it in Windows, but then theres other issues. Should the OS X version of RepG be avoided?
Is there any reason not to run a older skienforge version? I got the best results with the one thats called (standard) in RepG, I think its 0006 or something? The newer versions all have very a very hard to use and slow configuration window, the buttons are REALLY slow to show up, and its a little screwed up. This issue mostly goes away when I run it in Windows, but then theres other issues. Should the OS X version of RepG be avoided?
|
Re: Calibrating a MakerBot Cupcake... July 08, 2011 06:21PM |
Registered: 12 years ago Posts: 13 |
Lately, theres been 'shifts' as the part is being built. I highly doubt its the belt skipping, its fairly tight. Its PROBABLY not the servo driver current being too low, since its already a bit higher than it probably needs to be. It appears like it does it after a hole or something like that. In the taller pice, you can see it does it after every hole, always shifted in the same direction. Smaller basic parts don't do this, larger or complicated ones always do.
Any comments or suggestions?


Any comments or suggestions?
|
Re: Calibrating a MakerBot Cupcake... July 08, 2011 06:42PM |
Registered: 13 years ago Posts: 1,797 |
what is your feedrate max set too for firmware. this is the max feedrate shown when moving the sliders in the jog menu? makerbot homes and does G0 speeds when extruder is off.
look for machines.xml file in your my documents/replicatorg folder (it may be hidden show show hidden folders)
in that file look for the current driver you are using and inside that file lower max speed to something like 2500
for z lower it to 125
from there test your prints. it looks to me like your having issues with misalignment from stepper skipping. this often occures when the nozzle has not been raised and the machine goes at what it is told max speed is, 1 such operation i think of is clip.
edit: what you can also do is turn off Comb as Comb feature drags the nozzle across the object when extruder is off, and this causes G0 speed to be used (max speed) and ignores feedrate specified for the move. lowering the max speed of printer in machines.xml file will allow you to enable clip again.
Edited 1 time(s). Last edit at 07/11/2011 12:16AM by jamesdanielv.
|
Re: Calibrating a MakerBot Cupcake... July 08, 2011 06:51PM |
Registered: 12 years ago Posts: 13 |
So, thats what clip does? I noticed that the head was just moving around, smashing into the plastic, often knocking the part off the HBP. When properly configured, it results in better prints when clip is used? I have the 'travel feedrate' set to 26mm/s, just like the normal feedrate. I was having issues with the parts being knocked off when it was dragging the head, so I lowered that down from the 60 or so it was, and it helped a lot.
Is it not a big deal to just leave clip off? Im printing a new Z Axis knob now, ill try to print part 3 of this guy again... The first two prints fell off the platform.
[www.thingiverse.com]
Is it not a big deal to just leave clip off? Im printing a new Z Axis knob now, ill try to print part 3 of this guy again... The first two prints fell off the platform.
[www.thingiverse.com]
|
Re: Calibrating a MakerBot Cupcake... July 08, 2011 07:09PM |
Registered: 12 years ago Posts: 13 |
My biggest problems to date are...
1) Small features dont print well, at all, or get filled in. This is probable oozebane setup? I spent several hours tweaking that, and nothing really makes little holes print well, regardless of if the extruder turns on WAY early, and does not turn off early. It just makes a mess, the small features still don't print well.
2) The build gets worse as it gets higher. Every time I print a tall object, it continues to get worse layer by layer. I think killing clip might help with this, now that I know what it does. I continued to increase the layer height, and its helping. My best prints yet are with a 0.48 layer height.
3) The 'fill' tends to not go all the way to the edges of the layer, leaving gaps or holes in some spots at the edges.

|
Re: Calibrating a MakerBot Cupcake... July 08, 2011 07:22PM |
Registered: 12 years ago Posts: 13 |
I turned clip off, and it looks like the head was dragging assorted ooze and junk over, then getting the first bit of the feed jammed up, causing poor adhesion. Also, normally the first few layers have perfect infill, then it gets increasingly worse with height.
The z-knob I printed looks nice on the surface...
It got horrible by the time it finished.

The z-knob I printed looks nice on the surface...

It got horrible by the time it finished.
|
Re: Calibrating a MakerBot Cupcake... July 08, 2011 09:44PM |
Registered: 13 years ago Posts: 301 |
You are actually doing great for only 5 days of experience. The tricky part is getting the first layer down near perfect. The rest is a matter of fiddling with skeinforge. Have you tried setting extra shells to zero? They make things more difficult in my experience.
Most importantly.. If you're using the regular MK5 brushed motor then print out a stepper extruder mount and get a stepper and a stepper driver. 100 times more important than a z-rider.
Most importantly.. If you're using the regular MK5 brushed motor then print out a stepper extruder mount and get a stepper and a stepper driver. 100 times more important than a z-rider.
|
Re: Calibrating a MakerBot Cupcake... July 08, 2011 10:12PM |
Registered: 12 years ago Posts: 13 |
Currently its a stock cupcake. Fairly well assembled, fairly well lubricated. The X stage jerks a little at low speeds, the Y stage is quite smooth. Z has almost no wobble in it, which I hear is common. I don't like how the extruder head is essentially held in by gravity, it can wiggle a little. Im going to bolt it down. The ABP didn't work out for me, the kapton roller wasn't flat enough and caused minor warpage and issues with adhesion. I cut out a fairly thick chunk of aluminum 4x4 and lapped it flat, put it on top of the spare platform with the ABP heater and some thermal paste. The aluminum is too thick and takes much longer than the extruder to warm up to only 110ºC. I will be replacing it with some 1/8" aluminum, and making the platform 4.25x4.25, since the machine can physically support this additional size in both directions, and even print on the extra surface in the X direction.
The stepper extruder is something I was considering. I almost pulled the trigger on the MakerBot MK6 upgrade kit. Its $112, any better options for less, or is this a solid kit? Its FAR superior to run the stepper extruder? I am having serious ooze problems, the stepper head, combined with 1.75mm filament to reduce pressure, and reversal support, means almost no ooze?
Any other mods I should look into? I was trying to print out the new XY stage since they look EXTREMELY smooth with ball bearings, and extra Z space is nice. Its cheap enough, and gives me something to print. The bearings for it are on the way regardless. I will get this thing printed and put together, hopefully before I run out of ABS.
I'm also likely going to replace the XYZ steppers with pololu drivers, but dont quite feel like dealing with finding all of the parts required and etching the board myself. Is there a easy and cheap kit available? I've been looking around, and the info is hard to find.
I got the cupcake last Saturday, around 10:30AM. I finished most assembly around 11PM, and actually got it printing around 1-2AM. Since then, any free time aside from work has been dedicated to screwing around with it, which is quite a bit of time. I still have no idea what most any of the settings do, why I should change what, etc... This stuff is new to me, and making VERY good prints is important to me. Cant I just drop in someone else's calibration and see how it does? I would imagine someone else has a well calibrated late gen Cupcake with MK5 extruder... Does most everyone run a stepper extruder? The brushed one looks to be worse than I would have imagined. It sounds like its about it fail, to be honest.
Edited 1 time(s). Last edit at 07/08/2011 10:17PM by ZOMGVTEK.
|
Re: Calibrating a MakerBot Cupcake... July 09, 2011 12:33AM |
Registered: 13 years ago Posts: 1,797 |
your settings will be unique unless your temp/pressure/ humidity and parts tolerances are within 1/1000th of an inch of the main calibrated one . sounds expensive? yes. there are generic settings that are in the ballpark, but unless your extruder is stepper, the motor speed varies by 10% per makerbot. the easiest way to compensate is to change z height.
turn off ooze bane for now! it is not calibrated correctly!
the other issue is temp. what temp are you running at?
and finally your layer height is not correct.
print these calibration parts first. [www.thingiverse.com]
last print should be tower print, and that print you calculate z height. skein forge z height is possibly too high
Edited 3 time(s). Last edit at 07/09/2011 12:42AM by jamesdanielv.
|
Re: Calibrating a MakerBot Cupcake... July 09, 2011 12:51AM |
Registered: 12 years ago Posts: 13 |
I was running temps from 215 to 245 with no real difference in the quality. The most recent ones were run at 240/110. I just found those calibration prints, nice guide as well. I was getting horrible results with oozebane initially, and didn't use it. I started messing with the settings and got it to print better with it on than off. It definitely is adding more complexity into the situation. I reinstalled RepG and went back to default settings, I'll use the Windows version which appears to render the settings box fine. I will be starting off with SF35, Cupcake MK5, HBP.
What should I turn on/off? Is this stock profile OK out of the box?
What should I turn on/off? Is this stock profile OK out of the box?
|
Re: Calibrating a MakerBot Cupcake... July 09, 2011 12:53AM |
Registered: 13 years ago Posts: 301 |
Yes. Your brushed motor is probably going to die and soon. My first one died around a pound of plastic. They are junk. Buy a stepper extruder or make one. All the other upgrades are useless until you get reliable flow control. This gives you the extremely important ability to run your first layer slowly (in the raft settings).
|
Re: Calibrating a MakerBot Cupcake... July 09, 2011 01:04AM |
Registered: 12 years ago Posts: 13 |
It never got warm to the touch, but it sounds QUITE different now compared to new. Unloaded, forward at full speed sounds concerningly rough, and almost as if its turning quite a bit slower than new. Reverse at full speed sounds fine, however.
They really fail that early? Thats quite poor. What would be the 'best' stepper upgrade? Cheap is good, but I suppose the $112 MK6 kit isnt that bad.
I wonder if some of the issues are a result of my extruder motor slowing down?
Edited 1 time(s). Last edit at 07/09/2011 01:05AM by ZOMGVTEK.
They really fail that early? Thats quite poor. What would be the 'best' stepper upgrade? Cheap is good, but I suppose the $112 MK6 kit isnt that bad.
I wonder if some of the issues are a result of my extruder motor slowing down?
Edited 1 time(s). Last edit at 07/09/2011 01:05AM by ZOMGVTEK.
|
Re: Calibrating a MakerBot Cupcake... July 09, 2011 10:59AM |
Registered: 13 years ago Posts: 301 |
Even if you buy the MK6 upgrade kit you will still need to wire it up to your gen3 and get new firmware. If you poke around, the makerbot wiki has instructions.
For months I have been running..
[www.thingiverse.com] + [www.thingiverse.com] + sparkfun stepper motor + polulu stepper driver on my cupcake.
I only specifically mention the sparkfun stepper to give you a specific stepper that does work.
While you're waiting for parts you could install a tensioner. I found it improved my print quality even with the brushed motor.
|
Re: Calibrating a MakerBot Cupcake... July 09, 2011 11:40AM |
Registered: 12 years ago Posts: 13 |
I installed a Y tensioner, since that one was nearly impossible to tension well without it. Also put a HUGE washer in, top and bottom. The belt is tight, and the bolt is super tight and has two nuts on it. I printed out a dozen or so X axis tensioners messing with settings, that one would be nice, I just never installed it yet.
I found the MK6 stepstruder on Gen 3 electronics instructions, they dont look bad at all. What I'm wondering, is what would be the absolute best stepper upgrade I can do to the cupcake. Does it not make a big difference? The direct drive big stepper from MBI looks interesting, compared to the geared solutions. The little steppers geared down work fine? No issues with the gears meshing loosely?
Does everyone DIY the polulu drivers? Whats the best bet there? I can etch boards no problem, double sided is no fun, however.
|
Re: Calibrating a MakerBot Cupcake... July 09, 2011 02:04PM |
Registered: 13 years ago Posts: 301 |
I only have experience with the stepper extruder I linked. I've replacement my gears once after about 5 pounds of plastic. However when I printed the first set my brushed extruder was dying again and the print was pretty poor.
I just slapped my pololu driver on proto board. The adapter cable I made uses the same IDC connector and pinout that the default stepper drivers use. That allows me to plug it into the motherboard slot as well as the hacked extruder controller location.
I just slapped my pololu driver on proto board. The adapter cable I made uses the same IDC connector and pinout that the default stepper drivers use. That allows me to plug it into the motherboard slot as well as the hacked extruder controller location.
|
Re: Calibrating a MakerBot Cupcake... July 09, 2011 03:05PM |
Registered: 12 years ago Posts: 13 |
|
Re: Calibrating a MakerBot Cupcake... July 09, 2011 05:18PM |
Registered: 13 years ago Posts: 301 |
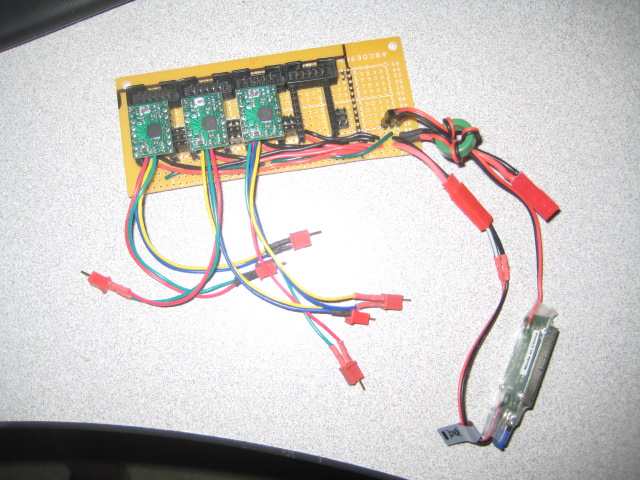
The first rats nest is my usual cupcake extruder stepper driver. I tried to take a picture showing all the connectors, but it only kinda worked out. IDC can plug into either the extruder controller (which I still need to print a IDC housing for) or into the motherboard. This is the pololu driver with the voltage regulator. That tiny connector is a for a fan for the driver that I never needed to use since the chip stays plenty cool. The four stepper wires are paired to two polarized micro-deans. That allows me to swap motor direction by swapping wires. 12V power comes from the power supply molex via an adapter to a JST connector. If I were to do this one again I would of put another IDC housing on the board itself instead of using a pigtail.
The second one I use for my other printer that is in progress. It also can plug into the motherboard via IDC connectors. This one uses the non-voltage regulated boards. In theory I could of grabbed 5V from somewhere, but at the moment I have a BEC. The jumpers select the step resolution.
Going with 4 pololu drivers will cut down on the noise, but they are not necessary for good prints. Saying that you can probably sell those makerbot drivers for twice what you can buy polulu drivers for if trading is your thing.
|
Re: Calibrating a MakerBot Cupcake... July 09, 2011 05:19PM |
Registered: 13 years ago Posts: 301 |
|
Re: Calibrating a MakerBot Cupcake... July 10, 2011 09:12PM |
Registered: 12 years ago Posts: 13 |
|
Re: Calibrating a MakerBot Cupcake... July 11, 2011 12:17AM |
Registered: 13 years ago Posts: 1,797 |
i edited my post earlier. Comb is what you want to disable temporarily.
all clip is is how far out the end of a loop cuts off.
here is a wiki on the different settings.
[wiki.bitsfrombytes.com]
all clip is is how far out the end of a loop cuts off.
here is a wiki on the different settings.
[wiki.bitsfrombytes.com]
|
Re: Calibrating a MakerBot Cupcake... July 12, 2011 12:49AM |
Registered: 12 years ago Posts: 13 |
I turned clip, comb, and oozebane off, and moved the cupcake into the basement. I used to have it in the hottest room of the house, its now in the coldest. It used to read in the 24-25ºC range cold, now its saying 16ºC, lol. Supposedly cold isnt great for prints? Reguardless, things are working well enough now to print out a X Y lowrider to test out.
I printed out parts 1-10, and it worked out OK. The bulk of the stuff is printed very well, layers are generally aligned very well. This is with .42mm layer thickness, so things are a bit rough. Fine details are still messy with oozebane off and 240ºC extrusion temps, but it will do. The bulk solid parts have no issues at all with holes. So long as the extruder has been running extremely recently, the details print. The problem is in small areas where the extruder is turning off and on, or moving long distances and not getting up to speed fast enough. This should be able to be handled with oozebane? The stepstruder will be here Wednesday, but the 1.75mm ABS wont ship until next week.
With quality flow control and reversal, it should print well. I will spend some time and get the calibration down well, hopefully I can get it down to very clean .2 or .25mm layers.
Edited 1 time(s). Last edit at 07/12/2011 12:54AM by ZOMGVTEK.
Sorry, only registered users may post in this forum.