Plateau 25x25 ou 30x30 alimentation ?
Posted by sv650s
|
Re: Plateau 25x25 ou 30x30 alimentation ? February 05, 2017 05:36PM |
Registered: 7 years ago Posts: 85 |
|
Re: Plateau 25x25 ou 30x30 alimentation ? February 06, 2017 03:35AM |
Registered: 10 years ago Posts: 629 |
Je suis d'accord avec tyros, par contre j'ai installé un klixon 70°C (c'est en fait un interrupteur thermique mécanique qui s'ouvre lorsque la temperature dépasse 70°C, donc ça coupe mon alimentation générale sur l'imprimante)
Mon plateau je ne le chauffe jamais a plus de 60°C, je suis toujours a 55°C max, je n'imprime que du PLA et je n'imprimerais jamais d'ABS donc 70°C pour mon cas c'est bien
Cela permet que si jamais il y a un emballement du plateau pour x raison, l'alimentation générale sera coupée par le klixon
Le klixon est installé sous le plateau, en contact avec le plateau silicone
|
Re: Plateau 25x25 ou 30x30 alimentation ? December 14, 2017 04:00AM |
Registered: 8 years ago Posts: 85 |
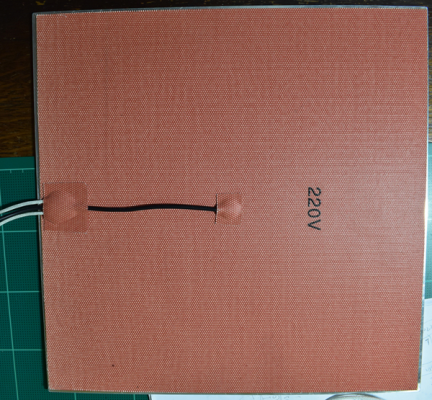
j'ai un soucis avec mon patch silicone 200v 300w.
voici le lien
je viens de brancher directement le patch chauffant sur le 220v sur un temps de 15 secondes, pas de chaleur dégagée (portant il est neuf et acquis en chine)
un idée du problème?
merci pour l'aide
voici le lien
je viens de brancher directement le patch chauffant sur le 220v sur un temps de 15 secondes, pas de chaleur dégagée (portant il est neuf et acquis en chine)
un idée du problème?
merci pour l'aide
|
Re: Plateau 25x25 ou 30x30 alimentation ? December 14, 2017 03:32PM |
Registered: 10 years ago Posts: 101 |
Salut,
T'as brancher directement sur le 220v sans relais et t'as rien ?
As tu testé la continuité du fils resistif à l'ohmmetre ?
Ça sent le fils cassé à l'intérieur pour moi ....
Projet : Delta Reverse, CoreXY
Google+ : [plus.google.com]
Youtube : [www.youtube.com]
T'as brancher directement sur le 220v sans relais et t'as rien ?
As tu testé la continuité du fils resistif à l'ohmmetre ?
Ça sent le fils cassé à l'intérieur pour moi ....
Projet : Delta Reverse, CoreXY
Google+ : [plus.google.com]
Youtube : [www.youtube.com]
|
Re: Plateau 25x25 ou 30x30 alimentation ? December 14, 2017 08:45PM |
Registered: 8 years ago Posts: 85 |
voici le silicone
le prob vient d'une des soudures du fil alimentation.
La température est montée en le branchant directement en 220v.
Par contre la thermistor n'est pas reconnue sous marlin avec ID=11 (11 is 100k beta 3950 1% thermistor (4.7k pullup))
POur gérer le silicone via ssr da40 en mode bang band, il sufit de commenter la ligne
// #define PIDTEMPBED
// #define BED_LIMIT_SWITCHING
dans la section [PID BED]?
voici le code
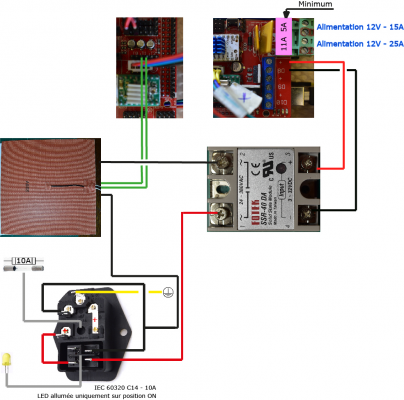
voici mon schéma de connexion
le prob vient d'une des soudures du fil alimentation.
La température est montée en le branchant directement en 220v.
Par contre la thermistor n'est pas reconnue sous marlin avec ID=11 (11 is 100k beta 3950 1% thermistor (4.7k pullup))
POur gérer le silicone via ssr da40 en mode bang band, il sufit de commenter la ligne
// #define PIDTEMPBED
// #define BED_LIMIT_SWITCHING
dans la section [PID BED]?
voici le code
===== MArlin ===========

//================================================== =========================
//========= Paramétrage Thermiques - Général =============
//================================================== =========================

// This defines the number of extruders
// :[1,2,3,4]
#define EXTRUDERS 1

// Offset of the extruders (uncomment if using more than one and relying on firmware to position when changing).
// The offset has to be X=0, Y=0 for the extruder 0 hotend (default extruder).
// For the other hotends it is their distance from the extruder 0 hotend.
//#define EXTRUDER_OFFSET_X {0.0, 20.00} // (in mm) for each extruder, offset of the hotend on the X axis
//#define EXTRUDER_OFFSET_Y {0.0, 5.00} // (in mm) for each extruder, offset of the hotend on the Y axis

//
//--NORMAL IS 4.7kohm PULLUP!-- 1kohm pullup can be used on hotend sensor, using correct resistor and table
//
//// Temperature sensor settings:
// -3 is thermocouple with MAX31855 (only for sensor 0)
// -2 is thermocouple with MAX6675 (only for sensor 0)
// -1 is thermocouple with AD595
// 0 or 999 is not used
// 1 is 100k thermistor - best choice for EPCOS 100k (4.7k pullup)
// 2 is 200k thermistor - ATC Semitec 204GT-2 (4.7k pullup)
// 3 is Mendel-parts thermistor (4.7k pullup)
// 4 is 10k thermistor !! do not use it for a hotend. It gives bad resolution at high temp. !!
// 5 is 100K thermistor - ATC Semitec 104GT-2 (Used in ParCan & J-Head) (4.7k pullup)
// 6 is 100k EPCOS - Not as accurate as table 1 (created using a fluke thermocouple) (4.7k pullup)
// 7 is 100k Honeywell thermistor 135-104LAG-J01 (4.7k pullup)
// 71 is 100k Honeywell thermistor 135-104LAF-J01 (4.7k pullup)
// 8 is 100k 0603 SMD Vishay NTCS0603E3104FXT (4.7k pullup)
// 9 is 100k GE Sensing AL03006-58.2K-97-G1 (4.7k pullup)
// 10 is 100k RS thermistor 198-961 (4.7k pullup)
// 11 is 100k beta 3950 1% thermistor (4.7k pullup)
// 12 is 100k 0603 SMD Vishay NTCS0603E3104FXT (4.7k pullup) (calibrated for Makibox hot bed)
// 13 is 100k Hisens 3950 1% up to 300°C for hotend "Simple ONE " & "Hotend "All In ONE"
// 20 is the PT100 circuit found in the Ultimainboard V2.x
// 60 is 100k Maker's Tool Works Kapton Bed Thermistor beta=3950
// 70 is the 100K thermistor found in the bq Hephestos 2
//
// 1k ohm pullup tables - This is not normal, you would have to have changed out your 4.7k for 1k
// (but gives greater accuracy and more stable PID)
// 51 is 100k thermistor - EPCOS (1k pullup)
// 52 is 200k thermistor - ATC Semitec 204GT-2 (1k pullup)
// 55 is 100k thermistor - ATC Semitec 104GT-2 (Used in ParCan & J-Head) (1k pullup)
//
// 1047 is Pt1000 with 4k7 pullup
// 1010 is Pt1000 with 1k pullup (non standard)
// 147 is Pt100 with 4k7 pullup
// 110 is Pt100 with 1k pullup (non standard)
// 998 and 999 are Dummy Tables. They will ALWAYS read 25°C or the temperature defined below.

// Etat désactivé = Valeur 0
#define TEMP_SENSOR_0 999
#define TEMP_SENSOR_1 0
#define TEMP_SENSOR_2 0
#define TEMP_SENSOR_3 0
#define TEMP_SENSOR_BED 11

// This makes temp sensor 1 a redundant sensor for sensor 0. If the temperatures difference between these sensors is to high the print will be aborted.
//#define TEMP_SENSOR_1_AS_REDUNDANT
#define MAX_REDUNDANT_TEMP_SENSOR_DIFF 10

// Actual temperature must be close to target for this long before M109 returns success
#define TEMP_RESIDENCY_TIME 10 // (seconds)
#define TEMP_HYSTERESIS 3 // (degC) range of +/- temperatures considered "close" to the target one
#define TEMP_WINDOW 1 // (degC) Window around target to start the residency timer x degC early.

// The minimal temperature defines the temperature below which the heater will not be enabled It is used
// to check that the wiring to the thermistor is not broken.
// Otherwise this would lead to the heater being powered on all the time.
#define HEATER_0_MINTEMP 5
#define BED_MINTEMP 5

// When temperature exceeds max temp, your heater will be switched off.
// This feature exists to protect your hotend from overheating accidentally, but *NOT* from thermistor short/failure!
// You should use MINTEMP for thermistor short/failure protection.
#define HEATER_0_MAXTEMP 250
#define BED_MAXTEMP 120

// If you want the M105 heater power reported in watts, define the BED_WATTS, and (shared for all extruders) EXTRUDER_WATTS
//#define EXTRUDER_WATTS (12.0*12.0/6.7) // P=U^2/R
//#define BED_WATTS (12.0*12.0/1.1) // P=U^2/R


//================================================== =========================
//========== Paramétres Thermique - PID Extruders ============
//================================================== =========================
// PID Tuning Guide here: [reprap.org]

// Comment the following line to disable PID and enable bang-bang.
#define PIDTEMP
#define BANG_MAX 255 // limits current to nozzle while in bang-bang mode; 255=full current
#define PID_MAX BANG_MAX // limits current to nozzle while PID is active (see PID_FUNCTIONAL_RANGE below); 255=full current
#if ENABLED(PIDTEMP)
//#define PID_AUTOTUNE_MENU // Add PID Autotune to the LCD "Temperature" menu to run M303 and apply the result.
//#define PID_DEBUG // Sends debug data to the serial port.
//#define PID_OPENLOOP 1 // Puts PID in open loop. M104/M140 sets the output power from 0 to PID_MAX
//#define SLOW_PWM_HEATERS // PWM with very low frequency (roughly 0.125Hz=8s) and minimum state time of approximately 1s useful for heaters driven by a relay
//#define PID_PARAMS_PER_EXTRUDER // Uses separate PID parameters for each extruder (useful for mismatched extruders)
// Set/get with gcode: M301 E[extruder number, 0-2]
#define PID_FUNCTIONAL_RANGE 10 // If the temperature difference between the target temperature and the actual temperature
// is more then PID_FUNCTIONAL_RANGE then the PID will be shut off and the heater will be set to min/max.
#define PID_INTEGRAL_DRIVE_MAX PID_MAX //limit for the integral term
#define K1 0.95 //smoothing factor within the PID

// Prusia M505 - Perso
#define DEFAULT_Kp 17.46
#define DEFAULT_Ki 1.13
#define DEFAULT_Kd 67.38

// Pour PID
// #define DEFAULT_Kp 22.2
// #define DEFAULT_Ki 1.08
// #define DEFAULT_Kd 114

// Autotune PID --> "M303 E0 C8 S220"
#endif // PIDTEMP


//this prevents dangerous Extruder moves, i.e. if the temperature is under the limit
//can be software-disabled for whatever purposes by
// Permet l'extrusion lorsque la tête chauffante à atteinds la valeur de température indique à EXTRUDER_MINTEMP
#define PREVENT_DANGEROUS_EXTRUDE
//if PREVENT_DANGEROUS_EXTRUDE is on, you can still disable (uncomment) very long bits of extrusion separately.
// Evite à l’extrudeur de pousser plus qu’une certaines longueur de filament par commande Gcode (souvent plus de 200mm).
#define PREVENT_LENGTHY_EXTRUDE

// Température minimum à laquelle le moteur est autorisé à fonctionner –
// Cela évite toutes destructions de la buse encore froide et d'endommager le filament.
#define EXTRUDE_MINTEMP 170
#define EXTRUDE_MAXLENGTH (X_MAX_LENGTH+Y_MAX_LENGTH) //prevent extrusion of very large distances.

// Sens de rotation du moteur Extruder
#define INVERT_E0_DIR false
// #define INVERT_E1_DIR false
// #define INVERT_E2_DIR false
// #define INVERT_E3_DIR false

// - Désactive tous les extruder
#define DISABLE_E false
//- Désactive les extruder inactif
#define DISABLE_INACTIVE_EXTRUDER true


//================================================== =========================
//========== Paramétres Thermique - PID Plateau chauffant ============
//================================================== =========================
// Select PID or bang-bang with PIDTEMPBED. If bang-bang, BED_LIMIT_SWITCHING will enable hysteresis
//
// Uncomment this to enable PID on the bed. It uses the same frequency PWM as the extruder.
// If your PID_dT is the default, and correct for your hardware/configuration, that means 7.689Hz,
// which is fine for driving a square wave into a resistive load and does not significantly impact you FET heating.
// This also works fine on a Fotek SSR-10DA Solid State Relay into a 250W heater.
// If your configuration is significantly different than this and you don't understand the issues involved, you probably
// shouldn't use bed PID until someone else verifies your hardware works.
// If this is enabled, find your own PID constants below.

// Active le contrôleur PID
// #define PIDTEMPBED
//#define BED_LIMIT_SWITCHING

// This sets the max power delivered to the bed, and replaces the HEATER_BED_DUTY_CYCLE_DIVIDER option.
// all forms of bed control obey this (PID, bang-bang, bang-bang with hysteresis)
// setting this to anything other than 255 enables a form of PWM to the bed just like HEATER_BED_DUTY_CYCLE_DIVIDER did,
// so you shouldn't use it unless you are OK with PWM on your bed. (see the comment on enabling PIDTEMPBED)
// Limite de puissance de chauffe (limits duty cycle to bed; 255=full current)
#define MAX_BED_POWER 255

#if ENABLED(PIDTEMPBED)

//#define PID_BED_DEBUG // Sends debug data to the serial port.

#define PID_BED_INTEGRAL_DRIVE_MAX MAX_BED_POWER //limit for the integral term

// MK2B - Perso
#define DEFAULT_bedKp 64.09
#define DEFAULT_bedKi 8.81
#define DEFAULT_bedKd 116.56

// Pour PID
//#define DEFAULT_bedKp 266.49
//#define DEFAULT_bedKi 49.29
//#define DEFAULT_bedKd 360.23

// Autotune PID --> "M303 E-1 C8 S90"
#endif // PIDTEMPBED


//================================================== =========================
//======================== Thermal Runaway Protection =======================
//================================================== =========================

/**
* Thermal Protection protects your printer from damage and fire if a
* thermistor falls out or temperature sensors fail in any way.
*
* The issue: If a thermistor falls out or a temperature sensor fails,
* Marlin can no longer sense the actual temperature. Since a disconnected
* thermistor reads as a low temperature, the firmware will keep the heater on.
*
* If you get "Thermal Runaway" or "Heating failed" errors the
* details can be tuned in Configuration_adv.h
*/

// Si le firmware détecte une baisse anormale de la température pendant une période de temps trop élevée,
// un message d’erreur 'THERMAL RUNAWAY' apparaitra à l’écran LCD. L’impression s’arrêtera et les éléments chauffant aussi.
#define THERMAL_PROTECTION_HOTENDS // Enable thermal protection for all extruders
#define THERMAL_PROTECTION_BED // Enable thermal protection for the heated bed


===== MArlin End ===========
voici mon schéma de connexion
|
Re: Plateau 25x25 ou 30x30 alimentation ? January 15, 2018 08:10PM |
Registered: 8 years ago Posts: 85 |
Bonjour,
Le Silicone est en 220v 300W et sera branché via un SSR DA 45
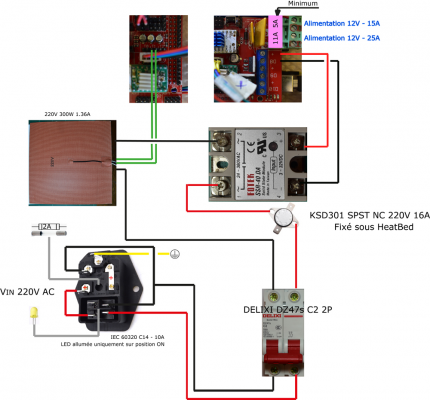
j'aimerai poser un interrupteur thermique mécanique en plus du disjoncteur 2A.
ce model conviendrai bien?
peux tu, svp, indiquer son placement dans le schéma ? merci
Concernant le branchement de la mise à terre, je tire un câble sur la plaque alu du bed et/ou sur le cadre alu de l'imprimante.
je conçois moi même mon imprimante. la base est une planche en bois de 2cm sur laquelle vient être visé le cadre en alu etc ...
merci pour ton temps...
|
Re: Plateau 25x25 ou 30x30 alimentation ? January 16, 2018 04:51AM |
Registered: 8 years ago Posts: 85 |
Bonjour
merci pour ton schéma.
Je pense m'être planter au niveau du choix du disjoncteur. J'ai pris 1P qui est forcément 1 pôle. Le modèle est le suivant : Delixi CDB6s1C2
Ton schéma montre bien un bipôle.
Si j'ai bien capté, soit il faut un deuxième 1P ou dircetement acquérir le model suivant Delixi CDB6s2C2 par lequel je passe le cesteur 220v (entrée) par le haut puis SSR et lit par le bas.
merci pour ton aide
|
Re: Plateau 25x25 ou 30x30 alimentation ? February 13, 2018 02:03AM |
Registered: 8 years ago Posts: 85 |
j'ai enfin reçu le disjoncteur 2P et le thermostat mécanique
Comme je suis nul en électricité, je vient ici poser moult questions
J'ai lu sur cet article
- Solid State Relay or Solid State Switch -
à la section "Solid State Relay AC Input Circuit" qu'il est necessaire d'un ajout d'une résistance et d'un condensateur concernant :
"Le problème ici est que ces les impulsions de tension commencent et finissent à partir de zéro volt, ce qui signifie qu'elles tomberont en dessous des exigences minimales de tension de
Le seuil d'entrée du SSR provoque l'activation et la désactivation de la sortie tous les demi-cycles."
Sur le schema suivant, il y a la sécurité
- de surcharge via le disjoncteur et le petit fusible de la prise femelle 220v
- coupe circuit mécanique lors de dépassement du taux de chaleur du bed
quel est procédé adéquat pour couper automatiquement l'alimentation 220v dédié au Heatbed ou carrément l'alimentaion principla de l'imp 3d? Via un relais?
|
Re: Plateau 25x25 ou 30x30 alimentation ? February 13, 2018 08:47AM |
Registered: 8 years ago Posts: 85 |
|
Re: Plateau 25x25 ou 30x30 alimentation ? March 01, 2018 02:24AM |
Registered: 8 years ago Posts: 6 |
Sorry, only registered users may post in this forum.


