Hello Thingy, my Mendelmax printer build
Posted by aprilstorm
|
Hello Thingy, my Mendelmax printer build November 10, 2012 02:10AM |
Registered: 11 years ago Posts: 21 |
I just thought I would post up my progress into the world of 3D printing.
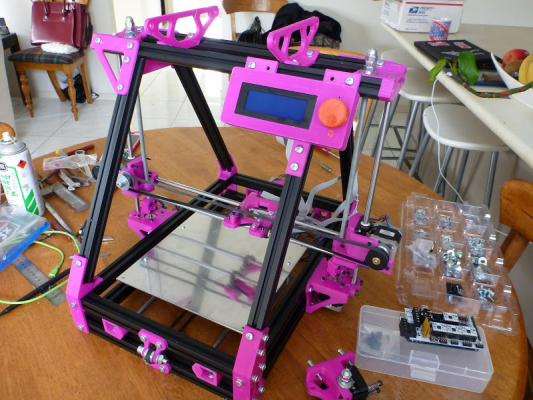
I ordered a Mendalmax kit off ebay, it arrived on thursday night and I have started to assemble the frame, this is where I got up to today.
Im calling her "Hello Thingy" because of her colour, and also as a collector of all things Hello Kitty, I'd like to customise her a little bit more once I get her up and running.
So far, my only problem has been with the quality of the printed parts, most seem to need some filing to square off properly. Also some seem to split far too easily, but I have been able to repair what did with plumbers PVC glue.
|
Re: Hello Thingy, my Mendelmax printer build November 10, 2012 05:34PM |
Registered: 14 years ago Posts: 1,092 |
|
Re: Hello Thingy, my Mendelmax printer build November 10, 2012 07:14PM |
Registered: 13 years ago Posts: 241 |
|
Re: Hello Thingy, my Mendelmax printer build November 14, 2012 07:46AM |
Registered: 11 years ago Posts: 21 |
Thanks for the offer guys, but I will chase the maker first.
Overall, the labing and packaging from these people was excellent. They provided a youtube video which helped enormously to get started, only they have changed the design of the new printer so some things just are not the same. The main difference being the (up and down) motors? Z ?? are at the bottom now, which makes more sense anyway.
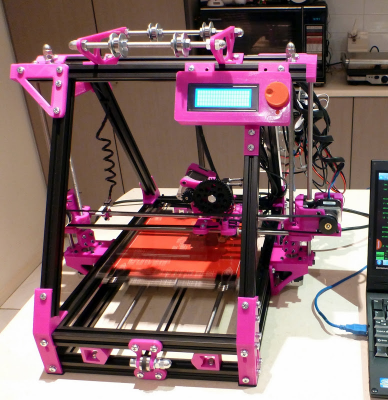
Anyway Did some more work on Hello Thingy. Installed the Z and Y axis rods and motors and lower plate.
I think my biggest problem with the printed parts is that they may have shrunk a little, perhaps its the colour of this ABS filament but some screw holes are just a tad on the small side and others require a bit of filing with a dremel to make things fit. But so far its all come together well.
|
Re: Hello Thingy, my Mendelmax printer build November 17, 2012 05:20PM |
Registered: 11 years ago Posts: 21 |
Last night I came to the realisation that perhaps the reason some of the holes in the printed parts are not big enough for some of the nuts and need some filing is that they where probably printed for imperial nuts and bolts and I ordered the kit with metric everything.
My other problem has been that the videos for 3DPrinterTEK on youtube have ended at the point where the wiring begins. So I decided to finish the parts that I knew would only go in a certain way. Im reasonably confident that I can work out the rest my self and perhaps with some guidance from the lovely peeps at CCHS.
Anyway, this is where I left it on friday. At least she is starting to look pretty.
Edited 1 time(s). Last edit at 11/17/2012 05:30PM by aprilstorm.
|
Re: Hello Thingy, my Mendelmax printer build November 27, 2012 01:20AM |
Registered: 11 years ago Posts: 21 |
Well I got it all assembled and wired up this last weekend. I powered it on the first time and It went into some sort of demo mode with all the axis firing off in sequence back and forth.
It all moved and it didnt catch on fire. I was able to use the display to control the fans and heat the heat beds so good to know that all worked.
Next I need to work out the software side of this: I was really happy to make it this far believe me.
It all moved and it didnt catch on fire. I was able to use the display to control the fans and heat the heat beds so good to know that all worked.
Next I need to work out the software side of this: I was really happy to make it this far believe me.
|
Re: Hello Thingy, my Mendelmax printer build November 29, 2012 03:25PM |
Registered: 11 years ago Posts: 21 |
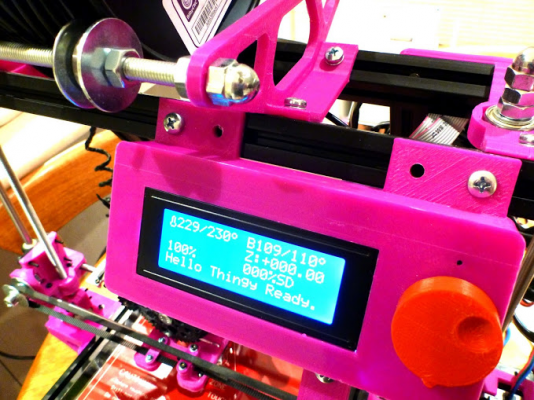
Once I got everything together one of the first problems I had was that the contrast on the LCD Display for the RAMPS 1.4 was up so high it was really hard to make out what was on the screen. I later discovered that there is a small little trim pot adjustment screw located right next to the SD card reader that just needed to be adjusted.
So now I can see everything on the display.
The next step after this was to load and configure Marlin. To do this I need to install Arduino IDE
[www.arduino.cc]
And then download the latest Marlin from here:
[github.com]
There seem to be heaps of instructions out there for the Ramps 1.4 boards and basically the commenting in the configuration.h section was really all I needed to go on to get the thing going.
Once I had a working firmware: I then installed Pronterface.
Everything seemed to work, I tuned the firmware so that the endstops where in the right direction etc, but I just couldnt get the extruder motor to fire up. What was wrong was the driver board was installed in the second extruder port, not the first. The cards had come pre-populated like this so I just assumed it was in the right position. Once I changed this, it worked, and the extruder stepper started doing its business. Well almost.
|
Re: Hello Thingy, my Mendelmax printer build December 02, 2012 04:42AM |
Registered: 11 years ago Posts: 21 |
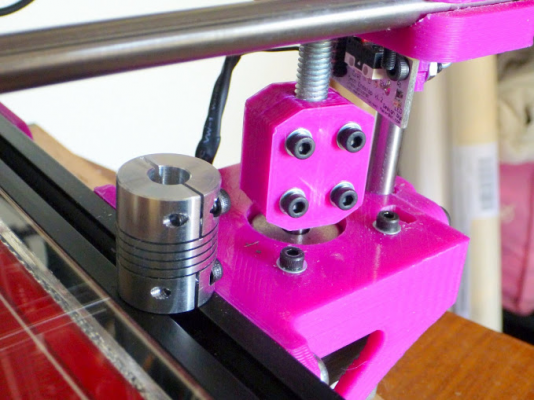
As I wasnt terribly happy with the way the Z Axis plastic couplers that came with the kit came to hitting the endstop I thought I would look at alternatives. So I ended up getting these Z axis couplers from ebay
[www.ebay.com]
Firstly, even though they say they will fit an 8mm rod, they dont. there is far too much slippage so you end up having to line the rod before you clamp in it.
But after playing with it over the weekend I am going back to the older plastic ones because the aluminium are just too flexible and springy and it is making it next to impossible to level the extruder over the bed, as the friction in the rods sometimes means that even though the motor moves, the coupler absorbs the movement as the joint stretches, then on the next level it jumps back. I just found this really hard to work with, and every time I tried to level the extruder after homing it ended up slightly differently.
|
Re: Hello Thingy, my Mendelmax printer build December 12, 2012 06:29PM |
Registered: 11 years ago Posts: 21 |
I have had a good deal of success printing with PLA with my 0.35mm J-head. But noticed that I have to run the head at 197 degrees Celsius for it to flow correctly. I have a feeling that my thermostat is not properly tuned.
I also had some success with printing with ABS once I changed my j-Head for a 0.5mm nozzle. Printing with ABS with the smaller nozzle was just too hard.
Here are some of the things Hello Thingy has printed:
The light purple is ABS, the other two colours are PLA.
I also had some success with printing with ABS once I changed my j-Head for a 0.5mm nozzle. Printing with ABS with the smaller nozzle was just too hard.
Here are some of the things Hello Thingy has printed:
The light purple is ABS, the other two colours are PLA.
|
Re: Hello Thingy, my Mendelmax printer build May 06, 2013 05:45PM |
Registered: 11 years ago Posts: 21 |
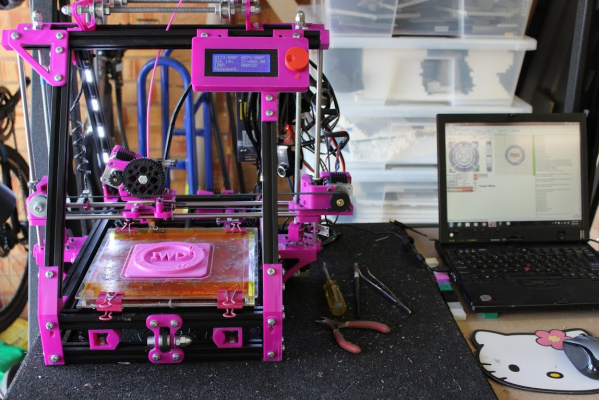
6 Months later I thought I would update this thread. Overall, couldnt be happier with this printer, its truely excellent:
For others who may be interested in a complete ebay kit that is actually reasonable quality: [stores.ebay.com.au] is where I got this from.
My current setup looks a little different. I have the printer out in the garage as I exclusively print in ABS. Im using some heavy duty industral rack mount shelving to house the printer and have it sitting on a rubberised anti-vibration matt to reduce vibrations the printer can suffer from at high speed.
This also allows me to string up coils of filament on the rack mount shelves and have various colours on hand.
Some of the things I have printed and designed can be found here: [www.thingiverse.com]
|
Re: Hello Thingy, my Mendelmax printer build May 10, 2013 02:52AM |
Registered: 10 years ago Posts: 14 |
Hey there, thanks for the great pics and updates... I've actually been inspired to buy a printer from these guys based on your posts. I think I'll even get the same colour.
Overall can you offer any advice before I take the plunge? Is there anything you'd do different?
I'm pretty confident I can get the frame built also based on their videos, but did you already have a background in wiring etc? Was it difficult?
Overall can you offer any advice before I take the plunge? Is there anything you'd do different?
I'm pretty confident I can get the frame built also based on their videos, but did you already have a background in wiring etc? Was it difficult?
|
Re: Hello Thingy, my Mendelmax printer build May 10, 2013 09:29AM |
Registered: 11 years ago Posts: 21 |
Hiya.
There is a video to assemble most of the physical components, but there is also a PDF wireing guide for the electronics.
there is some soldering, and I would recommend getting some more heat shrink plastic and a heat gun and good soldering iron, but nothing is too complex.
The only part I have since changed is the J-head. It came with a 0.35 mm nozzle which is great for PLA, but terrible with ABS. I would get either a 0.5 or 0.4mm if you intend to print in ABS, especially when you start.
Tom from www.extrude3d.com Hot ends are better than the ones which come with the unit in my opinion, even though they dont look as good, they just work better.
April
|
Re: Hello Thingy, my Mendelmax printer build May 14, 2013 07:17PM |
Registered: 10 years ago Posts: 14 |
|
Re: Hello Thingy, my Mendelmax printer build May 19, 2013 07:52PM |
Registered: 11 years ago Posts: 21 |
|
Re: Hello Thingy, my Mendelmax printer build May 19, 2013 11:27PM |
Registered: 10 years ago Posts: 14 |
Hey yeah thanks I am in Melbourne (north-west). I'll take you up on your offer if I get stuck!
I'm getting a bit nervous on the order actually, I haven't heard anything from them yet and the money has already come out. I paid through google wallet on their website but only have the google confirmation.
How long did it take with yours? Was their communication good?
I'm getting a bit nervous on the order actually, I haven't heard anything from them yet and the money has already come out. I paid through google wallet on their website but only have the google confirmation.
How long did it take with yours? Was their communication good?
|
Re: Hello Thingy, my Mendelmax printer build May 21, 2013 09:44AM |
Registered: 11 years ago Posts: 21 |
generally yeah pretty good this is there email if you want to contact them: ericwhite515@comcast.net
Also I just ordered a bunch of parts from them again, as Im making a second printer and wanted it to be the same. if that makes you feel any better
Edited 1 time(s). Last edit at 05/21/2013 09:46AM by aprilstorm.
Also I just ordered a bunch of parts from them again, as Im making a second printer and wanted it to be the same. if that makes you feel any better
Edited 1 time(s). Last edit at 05/21/2013 09:46AM by aprilstorm.
|
Re: Hello Thingy, my Mendelmax printer build June 26, 2013 12:11AM |
Registered: 10 years ago Posts: 14 |
rather than start a new thread, figured I'd continue in this one - hope you dont mind. I received my kit, although their communication was slow, it came and very happy with the quality of it all.
I got purple and black, not unlike your pink and black. I got to working on putting it together using their videos, like you said the videos are slightly different to the kit (the main thing being the Z axis is upside down), but it's pretty easy to work out. I also received the metal z-axis couplers instead of the 3d printed ones, and a couple of the screws are different, and I think I used the wrong ones in some places.
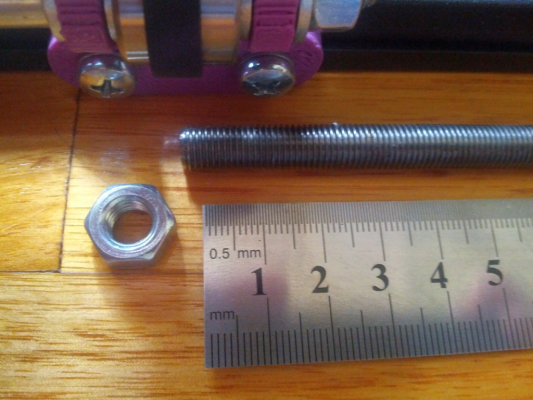
Only thing is, the threaded rod they gave me doesn't fit with the M8 nuts! the thread pitch is much finer (about double I reckon) than the pitch in the nuts, so they don't screw on
I'm going to get in touch with 3dprintertek, and hopefully they can help me out.
If anyone is considering buying a printer from them, I recommend them. Their videos are very helpful, and the quality of the parts was excellent.
I'll post some pics soon.
I got purple and black, not unlike your pink and black. I got to working on putting it together using their videos, like you said the videos are slightly different to the kit (the main thing being the Z axis is upside down), but it's pretty easy to work out. I also received the metal z-axis couplers instead of the 3d printed ones, and a couple of the screws are different, and I think I used the wrong ones in some places.
Only thing is, the threaded rod they gave me doesn't fit with the M8 nuts! the thread pitch is much finer (about double I reckon) than the pitch in the nuts, so they don't screw on

I'm going to get in touch with 3dprintertek, and hopefully they can help me out.
If anyone is considering buying a printer from them, I recommend them. Their videos are very helpful, and the quality of the parts was excellent.
I'll post some pics soon.
|
Re: Hello Thingy, my Mendelmax printer build August 08, 2013 02:52AM |
Registered: 11 years ago Posts: 21 |
|
Re: Hello Thingy, my Mendelmax printer build October 13, 2013 01:38AM |
Registered: 10 years ago Posts: 14 |
Hey there aprilstorm and anyone following this thread - sorry for the long delay, but I've been disheartened by the whole wrong part saga with my printer and haven't made any more progress since June.
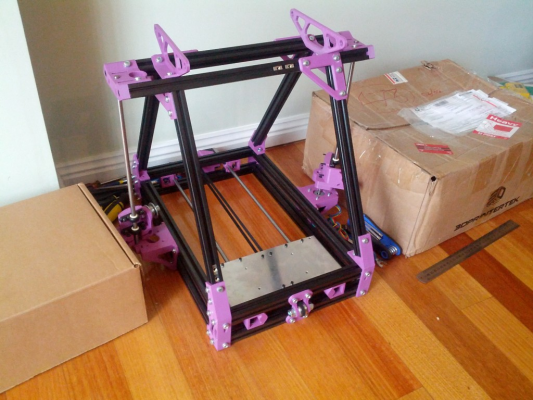
I've been re-motivated however to get it going again so I've emailed 3dprintertek and await their response, but in the mean time here are some photos of my problem (and a bonus shot of the printer):
So you can't really tell without much context, but the thread is too fine to fit the M8 nut over it. I think they sent me the wrong part.
Where in Melb can I get replacement parts?
Here is what the printer looks like right now:
The rest of the photos are here: google drive folder
If anyone's got any ideas I'd be keen to hear them.
|
Re: Hello Thingy, my Mendelmax printer build October 13, 2013 05:27PM |
Moderator Registered: 14 years ago Posts: 1,092 |
Sounds like they sent you 5/16" threaded rod.
You can either buy new M8 threaded rod (dearer) or buy some 5/16" nuts (cheap).
Pros/Cons: If you buy new M8 threaded rods, you'll be able to keep the calibration as is. If you buy 5/16" nuts, you'll have to change the calibration of that axis.
For suppliers of threaded rod, check the wiki for a list: [reprap.org]
I've used Metro Bolts (nearest to me) and Cost Less Bolts (was near work) a lot. Both places sell by the metre, so you'll have to cut the pieces to length yourself. I personally buy Stainless Steel, as I don't want parts rusting on me.
FWIW: If you're cutting threaded rod. Put a few nuts on it locked (tightened) against each other. You should then be able to put it in a vice, or clamp it to a bench without damaging the thread. ALWAYS cut 1-2mm longer than you want, then trim it down. You can always make something shorter, but you can't make it longer. I personally use an angle grinder with a cutting disk to cut the rod, but a drop saw with a suitable blade will work too (MUST be good for cutting thin steel rod).
|
Re: Hello Thingy, my Mendelmax printer build November 06, 2013 06:48PM |
Registered: 10 years ago Posts: 14 |
I thought you all might like to know I now have a working Mendelmax 1.5. Thanks to all.
I'm amazed I even got the thing going, but it's working now. Still having a few calibration issues, bubbles under the tape on the bed, levelling, etc. But I have some prints already. Still got a fair bit of work to do tidying up the cables too.
I'll start a new thread and post pics etc soon.
I'm amazed I even got the thing going, but it's working now. Still having a few calibration issues, bubbles under the tape on the bed, levelling, etc. But I have some prints already. Still got a fair bit of work to do tidying up the cables too.
I'll start a new thread and post pics etc soon.
|
Re: Hello Thingy, my Mendelmax printer build February 04, 2015 09:21PM |
Registered: 10 years ago Posts: 14 |
Hi April, I saw your article in The Age.
I assumed it was you since I recognised the MendelMax 1.5!
Congratulations on getting the exposure, it's great for girl geeks and 3d printing in general!
Here's the article for anyone interested: link
Unfortunately since my last post I haven't done a lot more with mine. I started printing the parts for a smartrap. I'll have to get back into it.
|
Re: Hello Thingy, my Mendelmax printer build February 10, 2015 01:34AM |
Registered: 9 years ago Posts: 50 |
Sorry, only registered users may post in this forum.

