Gen. 2 Stepper Driver single sided
Posted by flaex
|
Gen. 2 Stepper Driver single sided August 13, 2008 05:09PM |
Registered: 16 years ago Posts: 7 |
|
Re: Gen. 2 Stepper Driver single sided August 13, 2008 06:48PM |
Registered: 17 years ago Posts: 550 |
Well,
First thing : two of the bridges are not necessary, just reroute a bit
You may reroute so that a third bridge gets unnecessary, but that's somewhat harder guess.
But one question I don't get out of my mind:
"Why must it be a single sided board" ?
You can easily etch doublesided boards at home with a pretty good result
(check instructables.com to see how it's done)
And to be honest:
Why the fuzz when you can buy professional boards from the rrrf store for cheap?
I'm sorry I don't get it,
but please go ahead ;9
'sid
|
Re: Gen. 2 Stepper Driver single sided August 14, 2008 02:59AM |
Registered: 16 years ago Posts: 361 |
Quote
"Why must it be a single sided board" ?
Because etching or milling double sided boards isn't a trivial matter? Its *fiddly*. Single sided stuff is easy and quick by comparison.
And ordering bits from RRRF is fine but given as they're on the wrong side of the atlantic I for one pay a bit of a premium for postage, and things do take some time to actually get here.
So if you need a board *right now* or you're trying to save every penny you possibly can and happen to have PCB making equipment to hand, why shouldn't you do it this way?
Besides, its nice to be able to make things yourself
|
Re: Gen. 2 Stepper Driver single sided August 14, 2008 03:55AM |
Registered: 17 years ago Posts: 550 |
then etch the doublesided board yourself,
as I said earlier, its not hard to do.
[www.instructables.com]
I already did, and it was easier than I thought, I'm sure you can do this too.
milling is even simpler than that.
Okay it's a mess in your kitchen afterwards, but hey, you're the one that wanted to do this at home
'sid
as I said earlier, its not hard to do.
[www.instructables.com]
I already did, and it was easier than I thought, I'm sure you can do this too.
milling is even simpler than that.
Okay it's a mess in your kitchen afterwards, but hey, you're the one that wanted to do this at home
'sid
|
Re: Gen. 2 Stepper Driver single sided August 14, 2008 09:29AM |
Registered: 15 years ago Posts: 100 |
While it may cause some problems having multiple versions, single and double sided, they are a product of the different priorities between providing a cheap ready made board and a simple home manufactured board.
As far as I know the main advantages of double sided PCBs are higher component densities and reduced assembly complexity (by removing wire bridges).
When mass manufacturing PCBs, the size of the board is a large factor in the price. For home production waste from un-usable PCBs is often greater than that from a less dense board.
Sometimes without using an extra layer a design requires lots of wire jumpers that add plenty of opportunity for confusion and mistakes. From Flaex's work that doesn't seem to be the case here, 4 or possibly just 2 isn't a big problem.
For DIY the only real reason to prefer a double sided design is that it can be the same as the mass manufactured one, benefiting from the experience already gained. If the boards share the same schematic the problems should be limited to physical placement and interference between components.
I don't see these requirements converging in the near future; The obvious next step for the RRRF boards is to start using SMT components partially for board size but mostly for the wider component range, such as with the magnetic rotary encoder. Unfortunately the small feature size needed for SMT chips would be difficult to reproduce at home.
Obviously this is all just until a RepRap can cut/etch a board and then populate it ;-}>
|
Re: Gen. 2 Stepper Driver single sided August 14, 2008 09:59AM |
Registered: 16 years ago Posts: 7 |
I want to thank you all for your answers.
I thought a bit on the single-double sided problem and finally came to the conclusion, that a single sided board is just nice here, because the raw materuial is cheaper and the time i need to do a few wire bridges is much less than making a double sided board and doing all the vias.
Why not rrf? Well, first it
|
Re: Gen. 2 Stepper Driver single sided August 14, 2008 10:13AM |
Registered: 16 years ago Posts: 361 |
Quote
then etch the doublesided board yourself,
as I said earlier, its not hard to do.
But it does require additional hassle. So why bother?
There are other, eminently sensible reasons for using double sided boards. But in the absense of any other restrictions, there's no reason not to go for the simplest approach possible.
I'm just playing devil's advocate here... I'm quite happy with the boards I purchased from RRRF
I'm also pondering interesting ways to make use a 4-axis mill to do '3.5 axis' double sided PCB milling without manual intervention. Should be a fun little project, though time constraints mean it probably won't show any fruit for a while yet...
|
Re: Gen. 2 Stepper Driver single sided August 14, 2008 11:33AM |
Admin Registered: 17 years ago Posts: 1,915 |
If you know how to etch your own boards there is much less of an obstacle to your making changes to the board designs and distributing copies to your colleagues. That means that innovation and evolution of the reprap Darwin design can move much faster without the constraints of inadvertant control of by the rrrf which manages the distribution of parts. 
|
Re: Gen. 2 Stepper Driver single sided August 14, 2008 03:49PM |
Registered: 16 years ago Posts: 213 |
Flaex, great work on the boards. Many have talked about how useful it would be to have a single sided board, and you actually did it!
For those who wonder why, single sided means one less procedure when making a board. So people can make them faster and with fewer mistakes. Also we know we can use Darwin to make one sided boards, as Greenarrow described here:
[builders.reprap.org]
but no one has used a Darwin to make two sided boards. So given that making a one sided board is just place the board on a Darwin then press a button, while making a two sided board is at least one manual procedure extra; with current technique, making a one sided board takes way less effort than making a two sided board.
|
Re: Gen. 2 Stepper Driver single sided August 15, 2008 06:58AM |
Registered: 15 years ago Posts: 78 |
I like surface Mount 
It is very fiddly until you get the hang of it (but you need good lighting, tidy workspace and good eyes) and I use two soldering irons to get both ends of small parts in one hit - no toombstoning.
Another fringe benefit is you end up working on one side of the board - which lays flat and there isnt any legs to cut. No flipping the board over and holding parts in place 'till they are soldered.
|
Re: Gen. 2 Stepper Driver single sided August 15, 2008 07:07AM |
Admin Registered: 16 years ago Posts: 13,884 |
... i'm soldering SMD and/or 'conventional' occasionally, but for SMD you need serious training and reworking isn't so easy.
So for the average reprapper SMD isn't optional - try to design for single-sided PCB's with conventional parts and through-holes without vias.
But with time and reprap more matured this should change
Viktor
So for the average reprapper SMD isn't optional - try to design for single-sided PCB's with conventional parts and through-holes without vias.
But with time and reprap more matured this should change
Viktor
|
Re: Gen. 2 Stepper Driver single sided March 26, 2009 08:50AM |
Registered: 15 years ago Posts: 3 |
|
Re: Gen. 2 Stepper Driver single sided March 30, 2009 09:33PM |
Registered: 15 years ago Posts: 478 |
The data sheet for L297 & L298 devices has a single sided layout that’s worth a look.
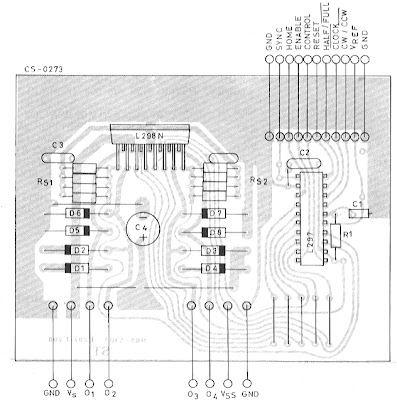
There is another single sided layout here though this design has 4 extra components to compensate for the ringing produced by 0.5 ohm wire wound resistors for the current sense. Reading the data sheets it specifically states “do not use” wire wound resistors.
I did try to etch my own PCBs using various instructions found on line I was not satisfied with the results. The idea of home etching double side PCBs is not within my comfort zone. I have made them in a lab using photo resist. The idea of using laser print transfer to produce a DS PCB is not inspiring. Post from the RRRF to the UK is quick the PCBs are A1 quality as I said in my for 1st blog it was cheaper on time and components to use the RRRF boards.
It may be down to the specific printer paper you use for the laser transfer method I have not found a good paper here in the UK to use yet. I bought a second hand HP2100M laser printer to re-try laser transfer for my own prototypes on Saturday.
So if any one in the UK can tell me the paper to try I will re-try.
My first experience etching PCBs was in 1970 during my apprenticeship where I made many double sided PCBs. This was process after cleaning both cooper sides of the fibreglass bd you dipped the board in photo resist let it dry, exposed it with a negative film to UV. The films held together with odd scraps of PCB , then you developed the photo resist then etched the boards.
For an electronics engineer surface mount board are fun to do even if your eye sight is not so good. See my second Blog entry.
I still think if the route forward is SM components we must have pre-built boards for those who want the 3D printer experience with out the electronics learning curve to climb.
Edited 6 time(s). Last edit at 03/30/2009 10:18PM by BodgeIt.
Bodge It [reprap.org]
=======================================
My rep strap: [repstrapbertha.blogspot.com]
Buy the bits from B&Q pipestrap [diyrepstrap.blogspot.com]
How to Build a Darwin without any Rep Rap Parts [repstrapdarwin.blogspot.com]
Web Site [www.takeaway3dtech.com]
|
Re: Gen. 2 Stepper Driver single sided March 31, 2009 03:21AM |
bodgeit
I built the boards from the L297 datasheet 10 or 15 years ago for a small cnc machine and they are still working, I now use my own design for simple stuff using a pic programmed with JAL and octal darlingtons, the pic chip takes the pulse and direction and outputs to the darlington, it has a low component count and things can easily be replaced.
John
Sorry, only registered users may post in this forum.