AZSMZ Connection Issues... Again
Posted by InspecteurSpie
|
AZSMZ Connection Issues... Again July 23, 2015 04:21PM |
Registered: 9 years ago Posts: 28 |
Hi, After getting my AZSMZ board, I took the following actions:
- Updated the smoothieboard driver
- Disabled USB SD card control (Said to be a reason for connection issues)
- Successfully hooked up thermistors, displaying proper temperatures
- Added a 24V 20A Power supply
After all this, I plugged in a NEMA17 stepper motor where it locked (current and voltage was flowing) and connected it to pronterface, managed to move it 2 times, then the board disconnected and would not connect until the board and computer were completely restarted. After I connected it again, stepper didn't lock, and pronterface gave me this error:
Traceback (most recent call last):
File "printrun\pronterface.pyc", line 1053, in connect
File "printrun\pronsole.pyc", line 720, in connect_to_printer
File "printrun\printcore.pyc", line 46, in inner
File "printrun\printcore.pyc", line 197, in connect
File "serial\serialwin32.pyc", line 31, in __init__
File "serial\serialutil.pyc", line 261, in __init__
File "serial\serialwin32.pyc", line 71, in open
File "serial\serialwin32.pyc", line 186, in _reconfigurePort
ValueError: Cannot configure port, some setting was wrong. Original message: [Error 31] A device attached to the system is not functioning.
I tried different steppers, but no luck, they wouldn't lock anymore. (When it was working, the driver and motor did NOT get hot, only warm, their current was only 1.2A flowing through it so I definitely didn't blow a driver) - My Nema17 motor is rated 1.2A and my stepper drivers can handle up to 1.7A
I will paste my configuration in the case that I did make a mistake
#leveling-strategy.three-point-leveling.probe_offsets 0,0,0 # the probe offsets from nozzle, must be x,y,z, default is no offset# Robot module configurations : general handling of movement G-codes and slicing into moves
default_feed_rate 4000 # Default rate ( mm/minute ) for G1/G2/G3 moves
default_seek_rate 4000 # Default rate ( mm/minute ) for G0 moves
mm_per_arc_segment 0.5 # Arcs are cut into segments ( lines ), this is the length for these segments. Smaller values mean more resolution, higher values mean faster computation
mm_per_line_segment 5 # Lines can be cut into segments ( not usefull with cartesian coordinates robots ).
# Arm solution configuration : Cartesian robot. Translates mm positions into stepper positions
alpha_steps_per_mm 320 # Steps per mm for alpha stepper
beta_steps_per_mm 320 # Steps per mm for beta stepper
gamma_steps_per_mm 4535.44 # Steps per mm for gamma stepper
# Planner module configuration : Look-ahead and acceleration configuration
planner_queue_size 32 # DO NOT CHANGE THIS UNLESS YOU KNOW EXACTLY WHAT YOUR ARE DOING
acceleration 3000 # Acceleration in mm/second/second.
#z_acceleration 500 # Acceleration for Z only moves in mm/s^2, 0 disables it, disabled by default. DO NOT SET ON A DELTA
acceleration_ticks_per_second 1000 # Number of times per second the speed is updated
junction_deviation 0.05 # Similar to the old "max_jerk", in millimeters, see : [github.com]
# and [github.com] . Lower values mean being more careful, higher values means being faster and have more jerk
# Stepper module configuration
microseconds_per_step_pulse 1 # Duration of step pulses to stepper drivers, in microseconds
base_stepping_frequency 100000 # Base frequency for stepping, higher gives smoother movement
# Stepper module pins ( ports, and pin numbers, appending "!" to the number will invert a pin )
alpha_step_pin 2.0 # Pin for alpha stepper step signal
alpha_dir_pin 0.5 # Pin for alpha stepper direction
alpha_en_pin 0.4 # Pin for alpha enable pin
#alpha_current 1.2 # X stepper motor current
x_axis_max_speed 30000 # mm/min
alpha_max_rate 30000.0 # mm/min actuator max speed
beta_step_pin 2.1 # Pin for beta stepper step signal
beta_dir_pin 0.11 # Pin for beta stepper direction
beta_en_pin 0.10 # Pin for beta enable
#beta_current 1.2 # Y stepper motor current
y_axis_max_speed 30000 # mm/min
beta_max_rate 30000.0 # mm/min actuator max speed
gamma_step_pin 2.2 # Pin for gamma stepper step signal
gamma_dir_pin 0.20 # Pin for gamma stepper direction
gamma_en_pin 0.19 # Pin for gamma enable
#gamma_current 1.2 # Z stepper motor current
z_axis_max_speed 300 # mm/min
gamma_max_rate 300.0 # mm/min actuator max speed
# Serial communications configuration ( baud rate default to 9600 if undefined )
uart0.baud_rate 115200 # Baud rate for the default hardware serial port
second_usb_serial_enable false # This enables a second usb serial port (to have both pronterface and a terminal connected)
#msd_disable true # disable the MSD (USB SDCARD) when set to true
# Extruder module configuration
extruder_module_enable true # Whether to activate the extruder module at all. All configuration is ignored if false
extruder_steps_per_mm 2315 # Steps per mm for extruder stepper
extruder_default_feed_rate 600 # Default rate ( mm/minute ) for moves where only the extruder moves
extruder_acceleration 500 # Acceleration in mm/sec^2, only used for retracts
extruder_max_speed 1000 # mm/sec NOTE only used for retracts
extruder_step_pin 2.3 # Pin for extruder step signal
extruder_dir_pin 0.22 # Pin for extruder dir signal
extruder_en_pin 0.21 # Pin for extruder enable signal
#delta_current 1.2 # Extruder stepper motor current
# Laser module configuration
laser_module_enable false # Whether to activate the laser module at all. All configuration is ignored if false.
#laser_module_pin 2.7 # this pin will be PWMed to control the laser
#laser_module_max_power 0.8 # this is the maximum duty cycle that will be applied to the laser
#laser_module_tickle_power 0.0 # this duty cycle will be used for travel moves to keep the laser active without actually burning
# Hotend temperature control configuration
temperature_control.hotend.enable true # Whether to activate this ( "hotend" ) module at all. All configuration is ignored if false.
temperature_control.hotend.thermistor_pin 0.23 # Pin for the thermistor to read
temperature_control.hotend.heater_pin 2.4 # Pin that controls the heater
temperature_control.hotend.thermistor RRRF100K # see [smoothieware.org]
#temperature_control.hotend.beta 4066 # or set the beta value
temperature_control.hotend.set_m_code 104 #
temperature_control.hotend.set_and_wait_m_code 109 #
temperature_control.hotend.designator T #
temperature_control.hotend.p_factor 13.7 #
temperature_control.hotend.i_factor 0.097 #
temperature_control.hotend.d_factor 24 #
temperature_control.bed.enable true #
temperature_control.bed.thermistor_pin 0.24 #
temperature_control.bed.heater_pin 2.5 #
temperature_control.bed.thermistor RRRF100K # see [smoothieware.org]
#temperature_control.bed.beta 4066 # or set the beta value
temperature_control.bed.set_m_code 140 #
temperature_control.bed.set_and_wait_m_code 190 #
temperature_control.bed.designator B #
# Switch module for fan control
switch.fan.enable true #
switch.fan.input_on_command M106 #
switch.fan.input_off_command M107 #
switch.fan.output_pin 2.7 #
switch.misc.enable false #
switch.misc.input_on_command M42 #
switch.misc.input_off_command M43 #
switch.misc.output_pin 2.4 #
# automatically toggle a switch at a specified temperature. Different ones of these may be defined to monitor different temperatures and switch different swithxes
# useful to turn on a fan or water pump to cool the hotend
#temperatureswitch.hotend.enable true #
#temperatureswitch.hotend.designator T # first character of the temperature control designator to use as the temperature sensor to monitor
#temperatureswitch.hotend.switch misc # select which switch to use, matches the name of the defined switch
#temperatureswitch.hotend.threshold_temp 60.0 # temperature to turn on (if rising) or off the switch
#temperatureswitch.hotend.heatup_poll 15 # poll heatup at 15 sec intervals
#temperatureswitch.hotend.cooldown_poll 60 # poll cooldown at 60 sec intervals
# Switch module for spindle control
#switch.spindle.enable true #
# Endstops
endstops_enable true # the endstop module is enabled by default and can be disabled here
#corexy_homing false # set to true if homing on a hbit or corexy
alpha_min_endstop 1.24^ # add a ! to invert if endstop is NO connected to ground
#alpha_max_endstop 1.24^ #
alpha_homing_direction home_to_min # or set to home_to_max and set alpha_max
alpha_min 0 # this gets loaded after homing when home_to_min is set
alpha_max 200 # this gets loaded after homing when home_to_max is set
beta_min_endstop 1.26^ #
#beta_max_endstop 1.26^ #
beta_homing_direction home_to_min #
beta_min 0 #
beta_max 200 #
gamma_min_endstop 1.28^ #
#gamma_max_endstop 1.28^ #
gamma_homing_direction home_to_min #
gamma_min 0 #
gamma_max 200 #
# optional enable limit switches, actions will stop if any enabled limit switch is triggered
#alpha_limit_enable false # set to true to enable X min and max limit switches
#beta_limit_enable false # set to true to enable Y min and max limit switches
#gamma_limit_enable false # set to true to enable Z min and max limit switches
#probe endstop
#probe_pin 1.29 # optional pin for probe
alpha_fast_homing_rate_mm_s 50 # feedrates in mm/second
beta_fast_homing_rate_mm_s 50 # "
gamma_fast_homing_rate_mm_s 4 # "
alpha_slow_homing_rate_mm_s 25 # "
beta_slow_homing_rate_mm_s 25 # "
gamma_slow_homing_rate_mm_s 2 # "
alpha_homing_retract_mm 5 # distance in mm
beta_homing_retract_mm 5 # "
gamma_homing_retract_mm 1 # "
#endstop_debounce_count 100 # uncomment if you get noise on your endstops, default is 100
# optional Z probe
zprobe.enable false # set to true to enable a zprobe
zprobe.probe_pin 1.29!^ # pin probe is attached to if NC remove the !
zprobe.slow_feedrate 5 # mm/sec probe feed rate
#zprobe.debounce_count 100 # set if noisy
zprobe.fast_feedrate 100 # move feedrate mm/sec
zprobe.probe_height 5 # how much above bed to start probe
# associated with zprobe the leveling strategy to use
#leveling-strategy.three-point-leveling.enable true # a leveling strategy that probes three points to define a plane and keeps the Z parallel to that plane
#leveling-strategy.three-point-leveling.point1 100.0,0.0 # the first probe point (x,y) optional may be defined with M557
#leveling-strategy.three-point-leveling.point2 200.0,200.0 # the second probe point (x,y)
#leveling-strategy.three-point-leveling.point3 0.0,200.0 # the third probe point (x,y)
#leveling-strategy.three-point-leveling.home_first true # home the XY axis before probing
#leveling-strategy.three-point-leveling.tolerance 0.03 # the probe tolerance in mm, anything less that this will be ignored, default is 0.03mm
#leveling-strategy.three-point-leveling.probe_offsets 0,0,0 # the probe offsets from nozzle, must be x,y,z, default is no offset
#leveling-strategy.three-point-leveling.save_plane false # set to true to allow the bed plane to be saved with M500 default is false
# Pause button
pause_button_enable true #
# Panel See [smoothieware.org]
panel.enable true # set to true to enable the panel code
# Example viki2 config for an azteeg miniV2 with IDC cable
panel.lcd viki2 # set type of panel
panel.spi_channel 0 # set spi channel to use P0_18,P0_15 MOSI,SCLK
panel.spi_cs_pin 1.22 # set spi chip select
panel.encoder_a_pin 1.25!^ # encoder pin
panel.encoder_b_pin 1.27!^ # encoder pin
panel.click_button_pin 3.26!^ # click button
panel.a0_pin 2.6 # st7565 needs an a0
#panel.contrast 8 # override contrast setting (default is 9)
panel.contrast 20
#panel.encoder_resolution 4 # override number of clicks to move 1 item (default is 4)
#panel.button_pause_pin 1.22^ # kill/pause set one of these for the auxilliary button on viki2
#panel.back_button_pin 1.22!^ # back button recommended to use this on EXP1
panel.buzz_pin 1.30 # pin for buzzer on EXP2
#panel.red_led_pin 2.8 # pin for red led on viki2 on EXP1
#panel.blue_led_pin 4.29 # pin for blue led on viki2 on EXP1
panel.reverse 1
panel.external_sd true # set to true if there is an extrernal sdcard on the panel
panel.external_sd.spi_channel 0 # set spi channel the sdcard is on
panel.external_sd.spi_cs_pin 0.16 # set spi chip select for the sdcard
panel.external_sd.sdcd_pin 3.25!^ # sd detect signal (set to nc if no sdcard detect)
panel.menu_offset 1 # some panels will need 1 here
# Example miniviki2 config
#panel.lcd mini_viki2 # set type of panel
#panel.spi_channel 0 # set spi channel to use P0_18,P0_15 MOSI,SCLK
#panel.spi_cs_pin 0.16 # set spi chip select
#panel.encoder_a_pin 3.25!^ # encoder pin
#panel.encoder_b_pin 3.26!^ # encoder pin
#panel.click_button_pin 2.11!^ # click button
#panel.a0_pin 2.6 # st7565 needs an a0
##panel.contrast 18 # override contrast setting (default is 18)
##panel.encoder_resolution 2 # override number of clicks to move 1 item (default is 2)
#panel.menu_offset 1 # here controls how sensitive the menu is. some panels will need 1
panel.alpha_jog_feedrate 6000 # x jogging feedrate in mm/min
panel.beta_jog_feedrate 6000 # y jogging feedrate in mm/min
panel.gamma_jog_feedrate 200 # z jogging feedrate in mm/min
panel.hotend_temperature 185 # temp to set hotend when preheat is selected
panel.bed_temperature 60 # temp to set bed when preheat is selected
# Example of a custom menu entry, which will show up in the Custom entry.
# NOTE _ gets converted to space in the menu and commands, | is used to separate multiple commands
custom_menu.power_on.enable true #
custom_menu.power_on.name Power_on #
custom_menu.power_on.command M80 #
custom_menu.power_off.enable true #
custom_menu.power_off.name Power_off #
custom_menu.power_off.command M81 #
# Azteeg specific settings do not change
currentcontrol_module_enable false #
#digipot_max_current 2.4 # max current
#digipot_factor 106.0 # factor for converting current to digipot value
return_error_on_unhandled_gcode false #
Any Feedback is greatly appreciated!
|
Re: AZSMZ Connection Issues... Again July 23, 2015 08:00PM |
Registered: 9 years ago Posts: 55 |
# NOTE Lines must not exceed 132 characters
# Robot module configurations : general handling of movement G-codes and slicing into moves
default_feed_rate 4000 # Default rate ( mm/minute ) for G1/G2/G3 moves
default_seek_rate 4000 # Default rate ( mm/minute ) for G0 moves
mm_per_arc_segment 0.5 # Arcs are cut into segments ( lines ), this is the length for
# these segments. Smaller values mean more resolution,
# higher values mean faster computation
#mm_per_line_segment 0.5 # Lines can be cut into segments ( not useful with cartesian
# coordinates robots ).
delta_segments_per_second 100 # for deltas only same as in Marlin/Delta, set to 0 to disable
# and use mm_per_line_segment
# Arm solution configuration : Cartesian robot. Translates mm positions into stepper positions
arm_solution linear_delta # selects the delta arm solution
alpha_steps_per_mm 100 # Steps per mm for alpha stepper
beta_steps_per_mm 100 # Steps per mm for beta stepper
gamma_steps_per_mm 100 # Steps per mm for gamma stepper
arm_length 196.8 # this is the length of an arm from hinge to hinge
arm_radius 101.9 # this is the horizontal distance from hinge to hinge
# when the effector is centered
# Planner module configuration : Look-ahead and acceleration configuration
planner_queue_size 32 # DO NOT CHANGE THIS UNLESS YOU KNOW EXACTLY WHAT YOU ARE DOING
acceleration 3000 # Acceleration in mm/second/second.
acceleration_ticks_per_second 1000 # Number of times per second the speed is updated
junction_deviation 0.05 # Similar to the old "max_jerk", in millimeters,
# Lower values mean being more careful, higher values means being
# faster and have more jerk
#minimum_planner_speed 0.0 # sets the minimum planner speed in mm/sec
# Stepper module configuration
microseconds_per_step_pulse 1 # Duration of step pulses to stepper drivers, in microseconds
minimum_steps_per_minute 1200 # Never step slower than this
base_stepping_frequency 100000 # Base frequency for stepping, higher gives smoother movement
# Cartesian axis speed limits
x_axis_max_speed 30000 # mm/min
y_axis_max_speed 30000 # mm/min
z_axis_max_speed 30000 # mm/min
# Stepper module pins ( ports, and pin numbers, appending "!" to the number will invert a pin )
alpha_step_pin 2.0 # Pin for alpha stepper step signal
alpha_dir_pin 0.5 # Pin for alpha stepper direction
alpha_en_pin 0.4 # Pin for alpha enable pin
alpha_max_rate 30000.0 # mm/min
beta_step_pin 2.1 # Pin for beta stepper step signal
beta_dir_pin 0.11 # Pin for beta stepper direction
beta_en_pin 0.10 # Pin for beta enable
beta_max_rate 30000.0 # mm/min
gamma_step_pin 2.2 # Pin for gamma stepper step signal
gamma_dir_pin 0.20 # Pin for gamma stepper direction
gamma_en_pin 0.19 # Pin for gamma enable
gamma_max_rate 30000.0 # mm/min
# Serial communications configuration ( transmission rate default to 9600 if undefined )
uart0.baud_rate 115200 # Baud rate for the default hardware serial port
# Serial communications configuration ( baud rate default to 9600 if undefined )
Serial.baud_rate 115200 # Baud rate for the default hardware serial port
second_usb_serial_enable false # This enables a second usb serial port (to have both pronterface
# and a terminal connected)
leds_disable false # disable using leds after config loaded
#msd_disable true # disable the MSD (USB SDCARD) when set to true
#disable_msd true
dfu_enable false
# Extruder module configuration
extruder.hotend.enable true # Whether to activate the extruder module at all. All configuration is ignored if false
extruder.hotend.steps_per_mm 506 # Steps per mm for extruder stepper
extruder.hotend.default_feed_rate 600 # Default rate ( mm/minute ) for moves where only the extruder moves
extruder.hotend.acceleration 500 # Acceleration for the stepper motor, as of 0.6, arbitrary ratio
extruder.hotend.max_speed 200 # mm/s
extruder.hotend.step_pin 2.3 # Pin for extruder step signal
extruder.hotend.dir_pin 0.22 # Pin for extruder dir signal
extruder.hotend.en_pin 0.21 # Pin for extruder enable signal
# extruder offset
#extruder.hotend.x_offset 0 # x offset from origin in mm
#extruder.hotend.y_offset 0 # y offset from origin in mm
#extruder.hotend.z_offset 0 # z offset from origin in mm
# firmware retract settings when using G10/G11, these are the defaults if not defined, must be defined for each extruder if not using the defaults
#extruder.hotend.retract_length 3 # retract length in mm
#extruder.hotend.retract_feedrate 45 # retract feedrate in mm/sec
#extruder.hotend.retract_recover_length 0 # additional length for recover
#extruder.hotend.retract_recover_feedrate 8 # recover feedrate in mm/sec (should be less than retract feedrate)
#extruder.hotend.retract_zlift_length 0 # zlift on retract in mm, 0 disables
#extruder.hotend.retract_zlift_feedrate 6000 # zlift feedrate in mm/min (Note mm/min NOT mm/sec)
#delta_current 1.5 # First extruder stepper motor current
# Second extruder module configuration example
extruder.hotend2.enable true # Whether to activate the extruder module at all. All configuration is ignored if false
extruder.hotend2.steps_per_mm 140 # Steps per mm for extruder stepper
extruder.hotend2.default_feed_rate 600 # Default rate ( mm/minute ) for moves where only the extruder moves
extruder.hotend2.acceleration 500 # Acceleration for the stepper motor, as of 0.6, arbitrary ratio
extruder.hotend2.max_speed 50 # mm/s
extruder.hotend2.step_pin 2.8 # Pin for extruder step signal
extruder.hotend2.dir_pin 2.13 # Pin for extruder dir signal
extruder.hotend2.en_pin 4.29 # Pin for extruder enable signal
#extruder.hotend2.x_offset 0 # x offset from origin in mm
#extruder.hotend2.y_offset 25.0 # y offset from origin in mm
#extruder.hotend2.z_offset 0 # z offset from origin in mm
#epsilon_current 1.5 # Second extruder stepper motor current
# Laser module configuration
laser_module_enable false # Whether to activate the laser module at all. All configuration is
# ignored if false.
#laser_module_pin 2.5 # this pin will be PWMed to control the laser. Only P2.0 - P2.5
# can be used since laser requires hardware PWM
#laser_module_max_power 0.8 # this is the maximum duty cycle that will be applied to the laser
#laser_module_tickle_power 0.0 # this duty cycle will be used for travel moves to keep the laser
# active without actually burning
#laser_module_pwm_period 20 # this sets the pwm frequency as the period in microseconds
# Hotend temperature control configuration
temperature_control.hotend.enable true # Whether to activate this ( "hotend" ) module at all.
# All configuration is ignored if false.
temperature_control.hotend.thermistor_pin 0.23 # Pin for the thermistor to read
temperature_control.hotend.heater_pin 2.4 # Pin that controls the heater
temperature_control.hotend.thermistor EPCOS100K # see
#temperature_control.hotend.beta 4066 # or set the beta value
temperature_control.hotend.set_m_code 104 #
temperature_control.hotend.set_and_wait_m_code 109 #
temperature_control.hotend.designator T #
#temperature_control.hotend.p_factor 13.7 # permanently set the PID values after an auto pid
#temperature_control.hotend.i_factor 0.097 #
#temperature_control.hotend.d_factor 24 #
#temperature_control.hotend.max_pwm 64 # max pwm, 64 is a good value if driving a 12v resistor with 24v.
# Hotend2 temperature control configuration
temperature_control.hotend2.enable true # Whether to activate this ( "hotend" ) module at all.
# All configuration is ignored if false.
temperature_control.hotend2.thermistor_pin 0.24 # Pin for the thermistor to read
temperature_control.hotend2.heater_pin 2.7 # Pin that controls the heater
temperature_control.hotend2.thermistor EPCOS100K #
##temperature_control.hotend2.beta 4066 # or set the beta value
#temperature_control.hotend2.set_m_code 884 #
#temperature_control.hotend2.set_and_wait_m_code 889 #
#temperature_control.hotend2.designator T1 #
#temperature_control.hotend2.p_factor 13.7 # permanently set the PID values after an auto pid
#temperature_control.hotend2.i_factor 0.097 #
#temperature_control.hotend2.d_factor 24 #
#temperature_control.hotend2.max_pwm 64 # max pwm, 64 is a good value if driving a 12v resistor with 24v.
temperature_control.bed.enable true #
temperature_control.bed.thermistor_pin 0.25 #
temperature_control.bed.heater_pin 2.5 #
temperature_control.bed.thermistor EPCOS100K # see
#temperature_control.bed.beta 4066 # or set the beta value
#temperature_control.bed.set_m_code 140 #
#temperature_control.bed.set_and_wait_m_code 190 #
#temperature_control.bed.designator B #
#temperature_control.bed.bang_bang false # set to true to use bang bang control rather than PID
#temperature_control.bed.hysteresis 2.0 # set to the temperature in degrees C to use as hysteresis
# when using bang bang
# Switch module for fan control
switch.fan.enable true #
switch.fan.input_on_command M106 #
switch.fan.input_off_command M107 #
#switch.fan.output_pin 2.7 #
switch.fan.output_pin 0.26 #
switch.fan.output_type pwm # pwm output settable with S parameter in the input_on_comand
#switch.fan.max_pwm 255 # set max pwm for the pin default is 255
#switch.misc.enable true #
#switch.misc.input_on_command M42 #
#switch.misc.input_off_command M43 #
#switch.misc.output_pin 2.4 #
#switch.misc.output_type digital # just an on or off pin
# automatically toggle a switch at a specified temperature. Different ones of these may be defined to monitor different temperatures and switch different swithxes
# useful to turn on a fan or water pump to cool the hotend
#temperatureswitch.hotend.enable true #
#temperatureswitch.hotend.designator T # first character of the temperature control designator to use as the temperature sensor to monitor
#temperatureswitch.hotend.switch misc # select which switch to use, matches the name of the defined switch
#temperatureswitch.hotend.threshold_temp 60.0 # temperature to turn on (if rising) or off the switch
#temperatureswitch.hotend.heatup_poll 15 # poll heatup at 15 sec intervals
#temperatureswitch.hotend.cooldown_poll 60 # poll cooldown at 60 sec intervals
# Switch module for spindle control
#switch.spindle.enable false #
# Endstops
endstops_enable true # the endstop module is enabled by default and can be disabled here
delta_homing true # forces all three axis to home a the same time regardless of
# what is specified in G28
alpha_min_endstop nc #
alpha_max_endstop 1.24^ # add ! to invert pullup if switch is NO to ground
alpha_homing_direction home_to_max # Home up
alpha_max 0 #
beta_min_endstop nc #
beta_max_endstop 1.26^ #
beta_homing_direction home_to_max #
beta_max 0 #
gamma_min_endstop nc #
gamma_max_endstop 1.28^ #
gamma_homing_direction home_to_max #
gamma_max 236 #
alpha_fast_homing_rate_mm_s 200 # homing feedrates in mm/second
beta_fast_homing_rate_mm_s 200 #
gamma_fast_homing_rate_mm_s 200 #
alpha_slow_homing_rate_mm_s 20 #
beta_slow_homing_rate_mm_s 20 #
gamma_slow_homing_rate_mm_s 20
alpha_homing_retract_mm 5 # retract/bounce distance after homing in mm
beta_homing_retract_mm 5 #
gamma_homing_retract_mm 5 #
alpha_trim -5 # software trim for alpha stepper endstop (in mm)
beta_trim -5 # software trim for beta stepper endstop (in mm)
gamma_trim -5 # software trim for gamma stepper endstop (in mm)
#endstop_debounce_count 100 # uncomment if you get noise on your endstops
# optional Z probe
zprobe.enable true # set to true to enable a zprobe
zprobe.probe_pin 1.29^ # pin probe is attached to if NC remove the !
zprobe.slow_feedrate 5 # mm/sec probe feed rate
#zprobe.debounce_count 100 # set if noisy
zprobe.fast_feedrate 100 # move feedrate mm/sec
zprobe.probe_height 5 # how much above bed to start probe
#gamma_min_endstop nc # normally 1.28. Change to nc to prevent conflict,
# associated with zprobe the leveling strategy to use
#leveling-strategy.delta-calibration.enable true # basic delta calibration
#leveling-strategy.delta-calibration.radius 100 # the probe radius
# Pause button
#pause_button_enable true # Pause button enable
#pause_button_pin 2.12 # pause button pin. default is P2.12
#kill_button_enable false # set to true to enable a kill button
#kill_button_pin 2.11 # kill button pin. default is same as pause button 2.12 (2.11 is another good choice)
# Panel
panel.enable true # set to true to enable the panel code
#panel.lcd smoothiepanel # set type of panel
#panel.encoder_a_pin 0.26!^ # encoder pin
#panel.encoder_b_pin 2.6!^ # encoder pin
# Example for reprap discount GLCD
# on glcd EXP1 is to left and EXP2 is to right, pin 1 is bottom left, pin 2 is top left etc.
# +5v is EXP1 pin 10, Gnd is EXP1 pin 9
# panel.lcd reprap_discount_glcd #
panel.lcd viki2 # st7565_glcd
panel.spi_channel 0 # spi channel to use ; GLCD EXP1 Pins 3,5 (MOSI, SCLK)
panel.spi_cs_pin 1.22 # spi chip select ; GLCD EXP1 Pin 4
panel.a0_pin 2.6
panel.encoder_a_pin 1.25!^ # encoder pin ; GLCD EXP2 Pin 3
panel.encoder_b_pin 1.27!^ # encoder pin ; GLCD EXP2 Pin 5
#panel.click_button_pin 1.22!^ # click button ; GLCD EXP1 Pin 2
#panel.buzz_pin 3.25 # pin for buzzer ; GLCD EXP1 Pin 1
panel.click_button_pin 3.26!^
panel.buzz_pin 1.30
#panel.pause_button_pin 1.23!^ # kill/pause ; GLCD EXP2 Pin 8 either
panel.reverse 1
panel.external_sd true # set to true if there is an extrernal sdcard on the panel
panel.external_sd.spi_channel 0 # set spi channel the sdcard is on
panel.external_sd.spi_cs_pin 0.16 # set spi chip select for the sdcard
# panel.external_sd.sdcd_pin 3.25!^ # sd detect signal (set to nc if no sdcard detect)
#panel.button_pause_pin 2.10!^ # kill/pause ; GLCD EXP2 Pin 8 either
#panel.button_pause_pin 1.23!^ # kill/pause ; GLCD EXP2 Pin 8 either
#panel.back_button_pin 1.23!^ # back button ; GLCD EXP2 Pin 8 or
panel.contrast 19
# pins used with other panels
#panel.up_button_pin 0.1! # up button if used
#panel.down_button_pin 0.0! # down button if used
#panel.click_button_pin 1.22! # click button if used
panel.menu_offset 0 # some panels will need 1 here
panel.encoder_resolution 4
panel.alpha_jog_feedrate 6000 # x jogging feedrate in mm/min
panel.beta_jog_feedrate 6000 # y jogging feedrate in mm/min
panel.gamma_jog_feedrate 6000 # z jogging feedrate in mm/min
panel.hotend_temperature 185 # temp to set hotend when preheat is selected
panel.bed_temperature 60 # temp to set bed when preheat is selected
# Example of a custom menu entry, which will show up in the Custom entry.
# NOTE _ gets converted to space in the menu and commands, | is used to separate multiple commands
custom_menu.power_on.enable true #
custom_menu.power_on.name Power_on #
custom_menu.power_on.command M80 #
custom_menu.power_off.enable true #
custom_menu.power_off.name Power_off #
custom_menu.power_off.command M81 #
custom_menu.fan_on.enable true #
custom_menu.fan_on.name Fan_on #
custom_menu.fan_on.command M106 #
custom_menu.fan_off.enable true #
custom_menu.fan_off.name Fan_off #
custom_menu.fan_off.command M107 #
# Only needed on a smoothieboard
currentcontrol_module_enable false #
return_error_on_unhandled_gcode false #
# Switch module for servo control
switch.servo.enable true #
switch.servo.input_on_command M280 # M280 S7.5 would be midway
switch.servo.input_off_command M281 # same as M280 S0 0% duty cycle, effectively off
switch.servo.output_pin 0.26 # 2.11 or 2.12
switch.servo.output_type pwm # H/W pwm output settable with S parameter in the input_on_comand
switch.servo.is_servo true
|
Re: AZSMZ Connection Issues... Again July 23, 2015 08:08PM |
Registered: 9 years ago Posts: 55 |
Please use a digital camera or mobile phone to format your TF card.
After the AZSMZ is connected to the computer, don't connect the pronterface immediately, you must see the USB disk content in the compute, then you able to connect pronterface , otherwise it will appear the connection error. Thanks.
New 32 bit ARM based Motion controller for 3D printers, CNC Machines and Laser cutters. Like Azteeg x5 mini or smoothieboard(no network).
AZSMZ Mini [www.ebay.com] [bancuit.aliexpress.com]
AZSMZ 12864 LCD [www.ebay.com] [bancuit.aliexpress.com] [azsmz.aliexpress.com]
SMART RAMPS [www.ebay.com] [bancuit.aliexpress.com] [azsmz.aliexpress.com]
[www.facebook.com]
|
Re: AZSMZ Connection Issues... Again July 31, 2015 11:22PM |
Registered: 9 years ago Posts: 28 |
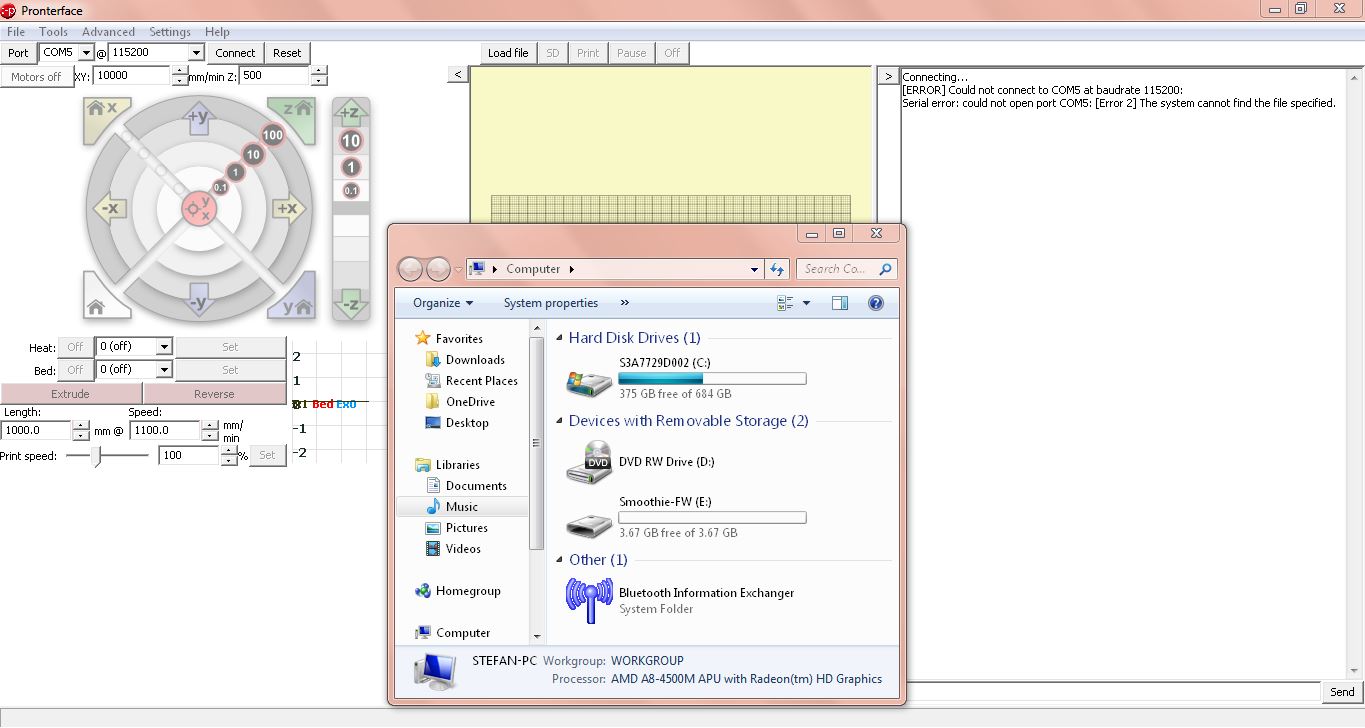
Not the case, it shows the sdcard connected but it still doesn't connect to pronterface, sometimes it does, sometimes it doesn't.
I formatted the sdcard and no difference after adding the config again
In the picture you see the sd card connected and the pronterface attempting connection. I have done everything from powering off the board and using different cables to restarting, reinstalling drivers. 10% of the time it connects
Edited 1 time(s). Last edit at 08/01/2015 12:00AM by InspecteurSpie.
|
Re: AZSMZ Connection Issues... Again August 01, 2015 06:02AM |
Registered: 9 years ago Posts: 55 |
Baud rate error, Thanks.
# Serial communications configuration ( baud rate default to 9600 if undefined )
Serial.baud_rate 115200 # Baud rate for the default hardware serial port
Edited 1 time(s). Last edit at 08/01/2015 06:08AM by cxandy.
New 32 bit ARM based Motion controller for 3D printers, CNC Machines and Laser cutters. Like Azteeg x5 mini or smoothieboard(no network).
AZSMZ Mini [www.ebay.com] [bancuit.aliexpress.com]
AZSMZ 12864 LCD [www.ebay.com] [bancuit.aliexpress.com] [azsmz.aliexpress.com]
SMART RAMPS [www.ebay.com] [bancuit.aliexpress.com] [azsmz.aliexpress.com]
[www.facebook.com]
|
Re: AZSMZ Connection Issues... Again August 01, 2015 08:03PM |
Registered: 9 years ago Posts: 28 |
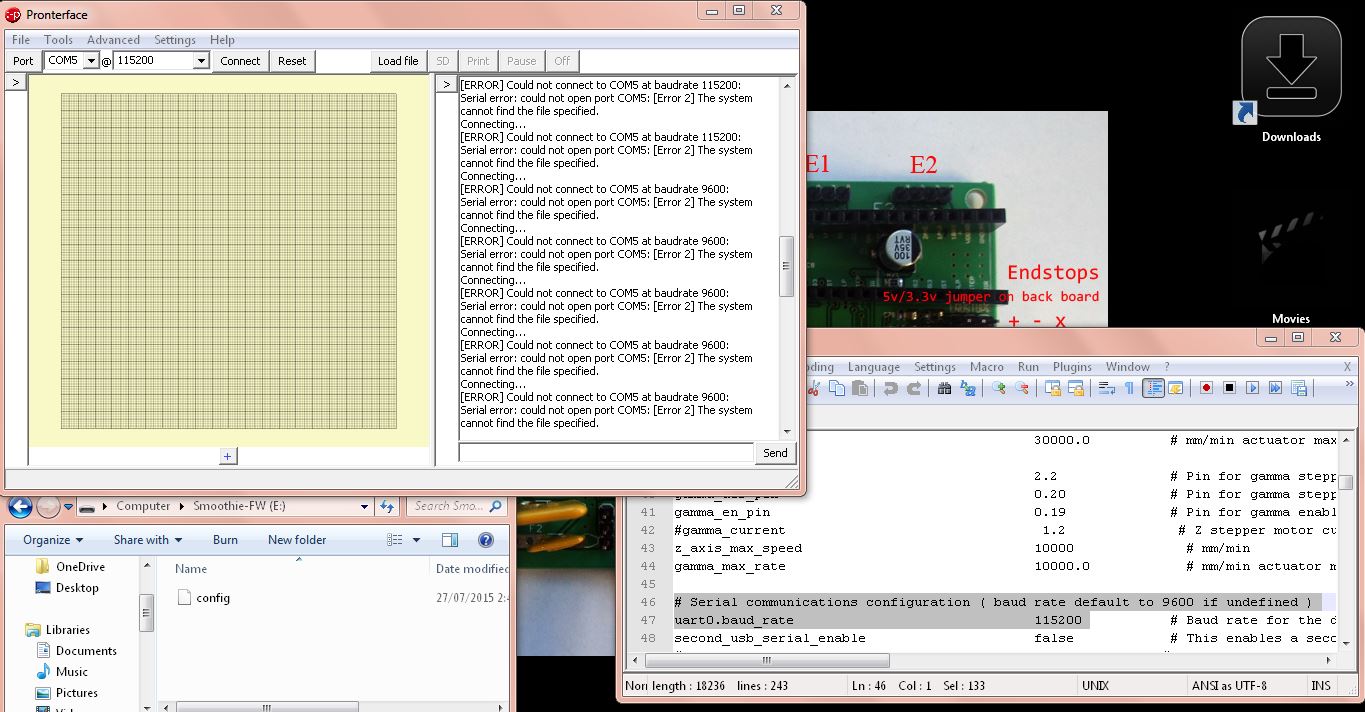
I changed baudrate and used different micro usb cables, I still haven't been able to connect.
I can also edit and work with the config file, view the second photo, I have access to config and changes, but I can't connect it to my computer, I used to, but not anymore.
Edited 1 time(s). Last edit at 08/01/2015 08:08PM by InspecteurSpie.
I can also edit and work with the config file, view the second photo, I have access to config and changes, but I can't connect it to my computer, I used to, but not anymore.
Edited 1 time(s). Last edit at 08/01/2015 08:08PM by InspecteurSpie.
|
Re: AZSMZ Connection Issues... Again August 02, 2015 06:51AM |
Registered: 9 years ago Posts: 55 |
Not uart0.baud_rate
Is serial.baud_rate
Thanks.
New 32 bit ARM based Motion controller for 3D printers, CNC Machines and Laser cutters. Like Azteeg x5 mini or smoothieboard(no network).
AZSMZ Mini [www.ebay.com] [bancuit.aliexpress.com]
AZSMZ 12864 LCD [www.ebay.com] [bancuit.aliexpress.com] [azsmz.aliexpress.com]
SMART RAMPS [www.ebay.com] [bancuit.aliexpress.com] [azsmz.aliexpress.com]
[www.facebook.com]
Sorry, only registered users may post in this forum.