RepStrippa, my plans on a multifunction 3D printer  Comments are welcome, let me know your thoughts
Posted by Gordie
|
RepStrippa, my plans on a multifunction 3D printer Comments are welcome, let me know your thoughts February 21, 2014 06:33AM |
Admin Registered: 11 years ago Posts: 954 |
Hello everyone, I'm here to discuss with you and to present my multifunction 3D printer.
First of all thanks in advance for reading this and commenting; I'm an italian guy with the DIY "mindview" and with the artisan lifestyle, I like to recycle but, most important, to change people mind on recycling everything they can.
In this way I started some years ago an artist/music project with handmade musical instruments ripped off from wasted electronics stuff. I also love hardware and toys hacking (aka circuit bending).
While building up mine own instruments I find some difficulties on having some parts with the shape I wanted. Also, I'm a student and I cannot afford the costs of third parts productions. So one day I decided to build a CNC router, then I discoverred the 3D printing world and now I'm here with my ideas.
RepStrippa features:
b) With a servo motor there will be a rolling plate, for objects to be scanned. With simple internal walls as background and a photocamera, some leds to light up and a classic laser pointer.
c) First of all I'll print a Dremel mount My goal is to engrave wood, plexiglass and maybe, again maybe, Alu; I'm not pretending to mill as a CNC router, just engrave untill 5mm deepness by taking slowly more passagges, once by one. The Repstrippa will have vacuum cleaner mount to the Dremel and to the bottom/base for debris.
d) A simple 1W diode not for cutting but simply to engrave leather. With fans and exaust way for smokes. So no CO2 system here.
e) A rotary cut bit to cut paper, vinyl and leather. Paper and vinyl will stay in position thanks to strong magnets (inside printed handles). I thought about a vacuum system for holding the paper but isn't so simple...
Materials:
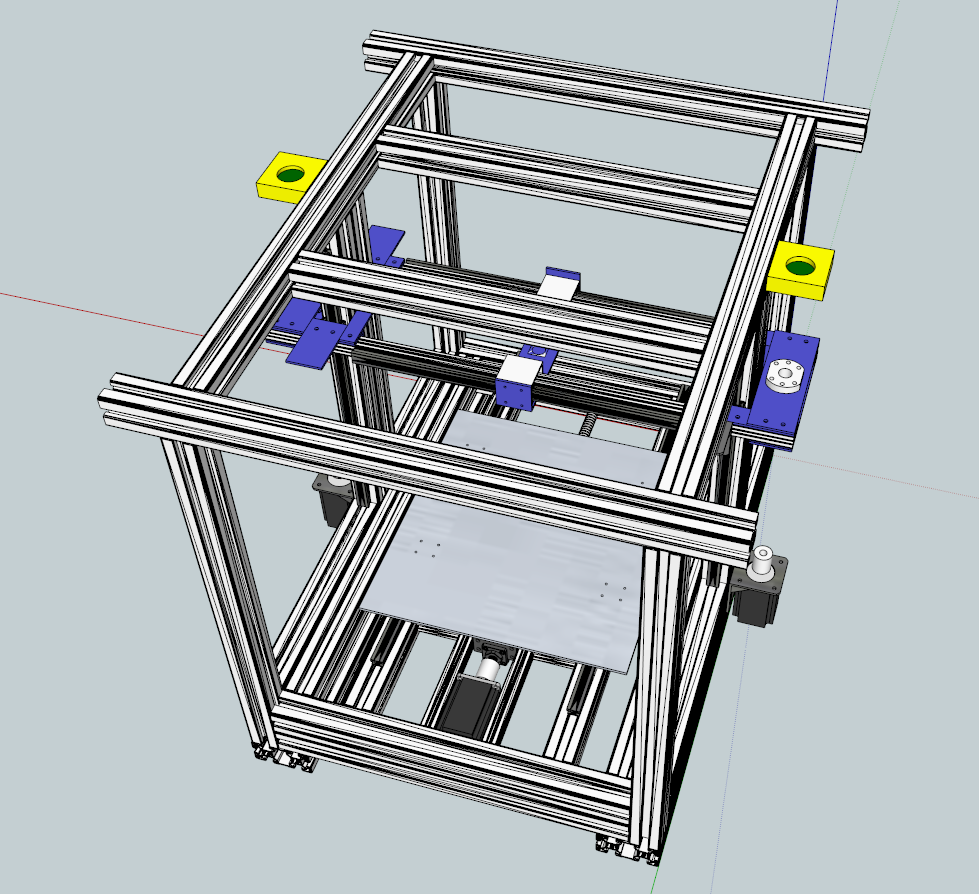
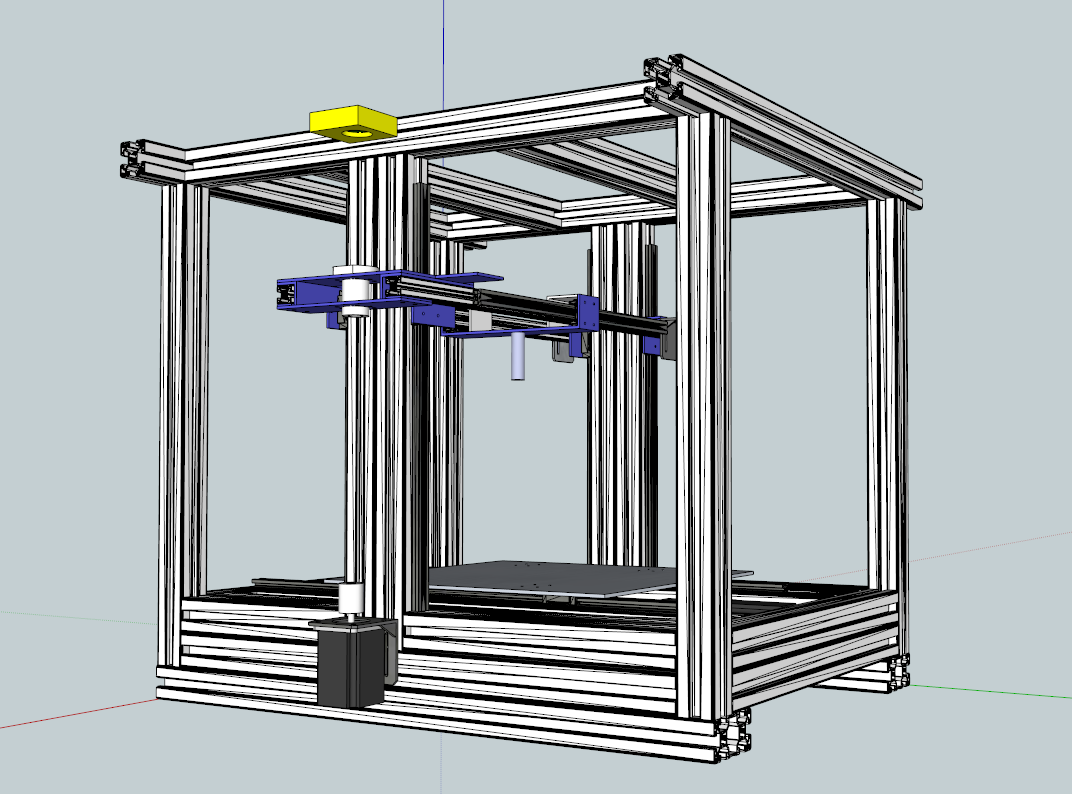
As you can see the structure is made of aluminum extrusions 40x40. There will be fasteners inside the extrusions at the corners and L plates, also 90° mounters. The overall dimensions are 750x650mm but can vary. On top the extrusions are longer because they will support the enclosure chamber. The linear guides used are IGUS Drylin T more specs here: [www.igus.com] and here: [www.igus.com]
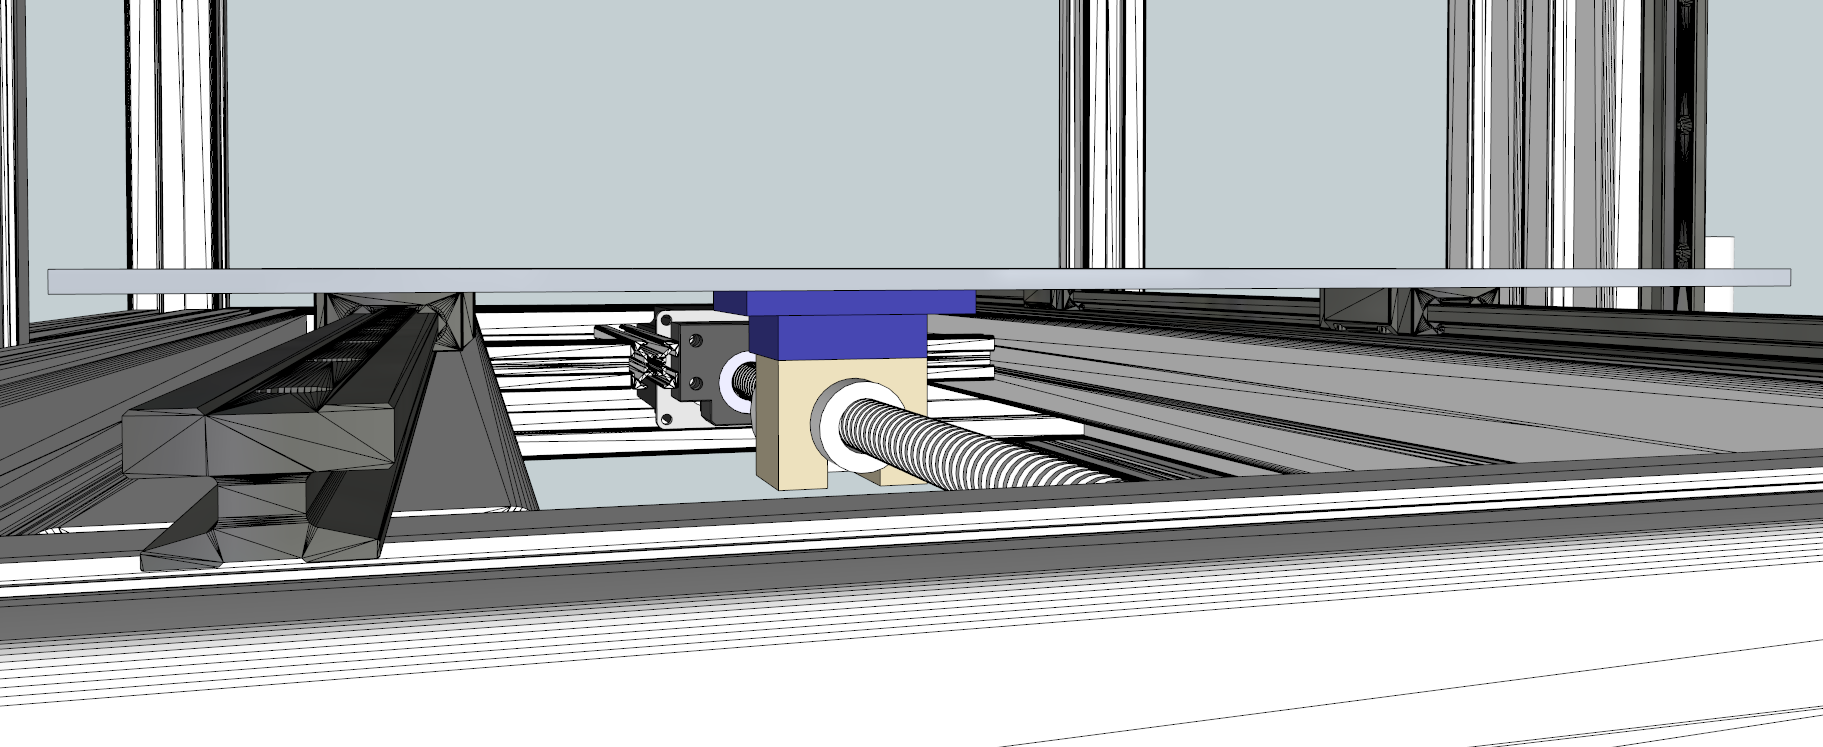
Y AXIS: 16mm dia. 10mm step 520mm lenght ballscrew with a NEMA23 15kg.cm holding torque 3A. Alu plate 4mm. When printing: Silicone hotbed 300x300mm with cork and a 0,5 alu plate at the bottom, on top I'll experiment
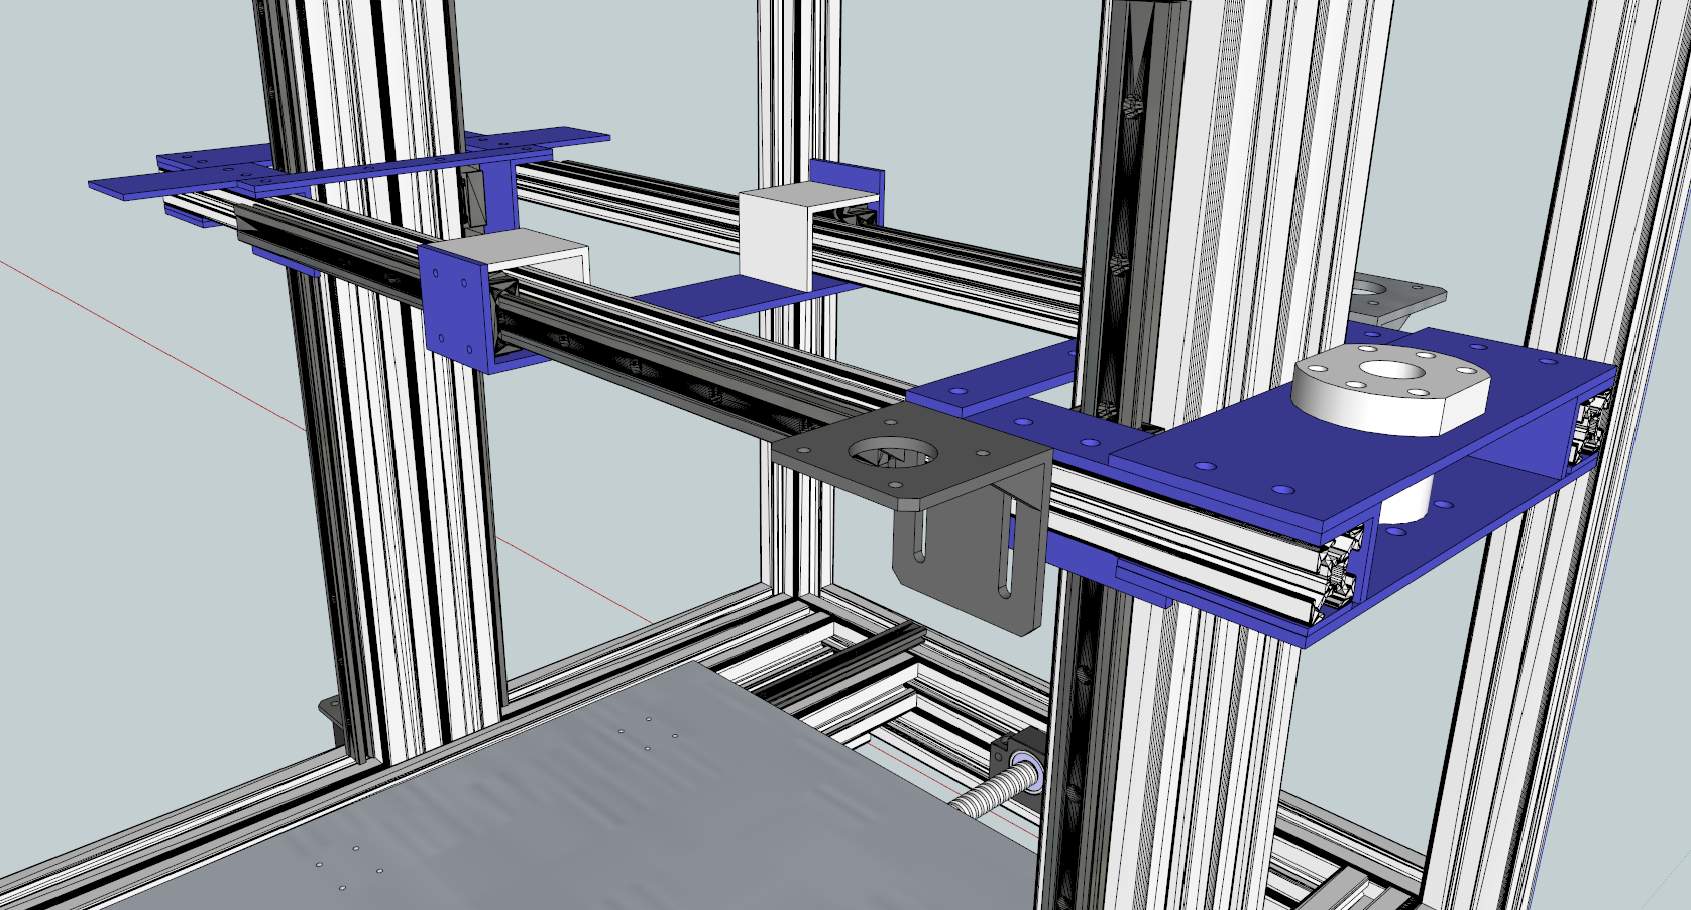
Z AXIS: Two 20x20 alu extrusions are lifted by 16mm dia. 10mm step leadscrew, delrin nut. Two NEMA23 15kg.cm holding torque 3A.
X AXIS: My idea is to use two NEMA 17 6.5Kg.cm holding torque with pulleys and belts.
Electronics: I'm waiting the RAMPS-FD of bobc and I'm also in contact with an user that can give me some step drivers for the 3A demanding motors. I will use Udoo or Arduino Due. ImmaginaECrea extruder or the E3D. Bowden system.
From the images attached: the blue parts are the one made by a factory, they will be rectified, as the extrusions holding the linear guides. The yellow are the 3D printed by a friend of mine.
So, the main stuff has explained, I hope you understood everything, sorry for my bad English
Another word just to say that after the printer will be ready I would like to start modelling and printing plastic parts to help building the same printer as corners and 90° angles, bushing holders and so on... Also I'm plannig (just an idea) to build this printer in a modular way so that it can be expanded along the X and Y axises only for printing, lasering and cutting NOT milling.
Here are my doubts and my questions to you mates:
Again thanks and best printings to everyone! Please ask if you have questions.
Edited 1 time(s). Last edit at 02/21/2014 02:20PM by Gordie.
First of all thanks in advance for reading this and commenting; I'm an italian guy with the DIY "mindview" and with the artisan lifestyle, I like to recycle but, most important, to change people mind on recycling everything they can.
In this way I started some years ago an artist/music project with handmade musical instruments ripped off from wasted electronics stuff. I also love hardware and toys hacking (aka circuit bending).
While building up mine own instruments I find some difficulties on having some parts with the shape I wanted. Also, I'm a student and I cannot afford the costs of third parts productions. So one day I decided to build a CNC router, then I discoverred the 3D printing world and now I'm here with my ideas.
RepStrippa features:
- 3D printing
- 3D scanning
- Dremel engraving/milling
- Laser engraving
- Paper/vinyl cutting
b) With a servo motor there will be a rolling plate, for objects to be scanned. With simple internal walls as background and a photocamera, some leds to light up and a classic laser pointer.
c) First of all I'll print a Dremel mount
My goal is to engrave wood, plexiglass and maybe, again maybe, Alu; I'm not pretending to mill as a CNC router, just engrave untill 5mm deepness by taking slowly more passagges, once by one. The Repstrippa will have vacuum cleaner mount to the Dremel and to the bottom/base for debris.d) A simple 1W diode not for cutting but simply to engrave leather. With fans and exaust way for smokes. So no CO2 system here.
e) A rotary cut bit to cut paper, vinyl and leather. Paper and vinyl will stay in position thanks to strong magnets (inside printed handles). I thought about a vacuum system for holding the paper but isn't so simple...
Materials:
As you can see the structure is made of aluminum extrusions 40x40. There will be fasteners inside the extrusions at the corners and L plates, also 90° mounters. The overall dimensions are 750x650mm but can vary. On top the extrusions are longer because they will support the enclosure chamber. The linear guides used are IGUS Drylin T more specs here: [www.igus.com] and here: [www.igus.com]
Y AXIS: 16mm dia. 10mm step 520mm lenght ballscrew with a NEMA23 15kg.cm holding torque 3A. Alu plate 4mm. When printing: Silicone hotbed 300x300mm with cork and a 0,5 alu plate at the bottom, on top I'll experiment
Z AXIS: Two 20x20 alu extrusions are lifted by 16mm dia. 10mm step leadscrew, delrin nut. Two NEMA23 15kg.cm holding torque 3A.
X AXIS: My idea is to use two NEMA 17 6.5Kg.cm holding torque with pulleys and belts.
Electronics: I'm waiting the RAMPS-FD of bobc and I'm also in contact with an user that can give me some step drivers for the 3A demanding motors. I will use Udoo or Arduino Due. ImmaginaECrea extruder or the E3D. Bowden system.
From the images attached: the blue parts are the one made by a factory, they will be rectified, as the extrusions holding the linear guides. The yellow are the 3D printed by a friend of mine.
So, the main stuff has explained, I hope you understood everything, sorry for my bad English
Another word just to say that after the printer will be ready I would like to start modelling and printing plastic parts to help building the same printer as corners and 90° angles, bushing holders and so on... Also I'm plannig (just an idea) to build this printer in a modular way so that it can be expanded along the X and Y axises only for printing, lasering and cutting NOT milling.
Here are my doubts and my questions to you mates:
- Look here, at the IGUS page, they talk about floating bearings in Y and Z axises, what do you think? Shuold I use those bearings for compensate misalignment? If so where? Should I lost precision when engraving by using those floating bearing? (I know one fixed and one floating, I'm not saying "every bearing must be floating")
- What do you think about the X axis concept?
- What are your suggestions?
- More to come...
Again thanks and best printings to everyone! Please ask if you have questions.
Edited 1 time(s). Last edit at 02/21/2014 02:20PM by Gordie.
| ---- "Let me make my move" ---- |
Sorry, only registered users may post in this forum.