Milling and laser engraving on one machine
Posted by o_lampe
|
Re: Milling and laser engraving on one machine June 21, 2017 02:51PM |
Registered: 8 years ago Posts: 5,232 |
Here's a little progress report:
I found the distance between 2040 extrusion and leadscrew is a bit too small for mgn12 rails. It would fit with a 0.5mm gap between sheetmetall and screw.
But that is with metric M10 leadscrews instead of 1204 ballscrews.
So I got "creative" and made a poor-mens linear rail from PETG. It runs pretty smooth, but it has definitely more wiggle in it than real carriers. Two of them in a wide distance made a tight and playfree ( for now ) carrier.
Another part from PETG to clamp the M10 nut was designed and builds a sandwich for the sheetmetal bracket.
The pulleys will increase torque, so I may be able to use two NEMA17 steppers for Y.
Furthermore I made a drill-aid for the spindle bracket.
Edited 1 time(s). Last edit at 06/21/2017 02:57PM by o_lampe.
I found the distance between 2040 extrusion and leadscrew is a bit too small for mgn12 rails. It would fit with a 0.5mm gap between sheetmetall and screw.
But that is with metric M10 leadscrews instead of 1204 ballscrews.

So I got "creative" and made a poor-mens linear rail from PETG. It runs pretty smooth, but it has definitely more wiggle in it than real carriers. Two of them in a wide distance made a tight and playfree ( for now ) carrier.


Another part from PETG to clamp the M10 nut was designed and builds a sandwich for the sheetmetal bracket.

The pulleys will increase torque, so I may be able to use two NEMA17 steppers for Y.
Furthermore I made a drill-aid for the spindle bracket.

Edited 1 time(s). Last edit at 06/21/2017 02:57PM by o_lampe.
|
Re: Milling and laser engraving on one machine June 23, 2017 03:32AM |
Registered: 8 years ago Posts: 32 |
|
Re: Milling and laser engraving on one machine June 23, 2017 03:56AM |
Registered: 8 years ago Posts: 32 |
|
Re: Milling and laser engraving on one machine June 23, 2017 09:15AM |
Registered: 7 years ago Posts: 142 |
Quote
o_lampe
Here's a little progress report:
I found the distance between 2040 extrusion and leadscrew is a bit too small for mgn12 rails. It would fit with a 0.5mm gap between sheetmetall and screw.
But that is with metric M10 leadscrews instead of 1204 ballscrews.
[attachment 95445 mgn12_too-close.jpg]
So I got "creative" and made a poor-mens linear rail from PETG. It runs pretty smooth, but it has definitely more wiggle in it than real carriers. Two of them in a wide distance made a tight and playfree ( for now ) carrier.
[attachment 95446 poor_mens_linear-rail-unten.jpg]
[attachment 95447 Y-Achse-sandwich.jpg]
Another part from PETG to clamp the M10 nut was designed and builds a sandwich for the sheetmetal bracket.
[attachment 95449 Y-Achse-seite.jpg]
The pulleys will increase torque, so I may be able to use two NEMA17 steppers for Y.
Furthermore I made a drill-aid for the spindle bracket.
[attachment 95448 spindle_bracket-drill-aid.jpg]
Gutted to hear you're struggling to fit the ballscrews you could always use the machine when you have it working to make your own mounting plates with the correct modifications and then fit the ballscrew in. I'm pretty certain if you take it very slowly with decent cobalt bits you can drill hole patterns easily in steel with your machine then take to a machine shop and buy them breakfast to chop the corners out on a guillotine

Looking good there but I'm confused on your PET G linear rail?
I'm intending to use my machine to upgrade herself to keep my costs down as material costs are a lot lower than machining costs.
Not long now and you're going to be cutting
Edited 1 time(s). Last edit at 06/23/2017 09:16AM by Desertboy.
|
Re: Milling and laser engraving on one machine June 24, 2017 05:12AM |
Registered: 8 years ago Posts: 5,232 |
Here is another shot of the linear rail surrogate. It took a few tests to make it right. I hope it lasts long enough to mill my own brackets.
Good idea to drill the holes and let someone else cut the shape.
Luckily the X-axis is able to run with real linear rails, because there are oval holes to adjust the distance between lead screw and extrusions.
Edited 1 time(s). Last edit at 06/24/2017 05:20AM by o_lampe.
Good idea to drill the holes and let someone else cut the shape.

Luckily the X-axis is able to run with real linear rails, because there are oval holes to adjust the distance between lead screw and extrusions.
Edited 1 time(s). Last edit at 06/24/2017 05:20AM by o_lampe.
|
Re: Milling and laser engraving on one machine June 25, 2017 04:13AM |
Registered: 7 years ago Posts: 142 |
Quote
o_lampe
Here is another shot of the linear rail surrogate. It took a few tests to make it right. I hope it lasts long enough to mill my own brackets.
Good idea to drill the holes and let someone else cut the shape.
[attachment 95531 poor_mens_linear-rail-2.jpg]
Luckily the X-axis is able to run with real linear rails, because there are oval holes to adjust the distance between lead screw and extrusions.
Something I forgot mate mentioned last night most drill bits are only suitable at 3000rpm and less and you might struggle to get the spindle that slow, what my mate suggested was using you cnc to mark indents where you want the holes and then use a drill press (Or dewalt at a push) to drill through. I think though if you set to 50hz you might be ok.
I'm adding a pot to my spindle.
[www.ebay.co.uk]
You can then configure it easily to work either via speed control from grbl or the pot and at £1 seems too cheap not to.
|
Re: Milling and laser engraving on one machine June 25, 2017 01:38PM |
Registered: 8 years ago Posts: 5,232 |
My spindle ran at less than 1Hz with full torque control ( torque untested of course )
If all goes wrong, I can clamp a felt pen in the spindle and use it as plotter, but I think drilling some holes will work.
The problem with a potmeter to set the speed is, it doesn't follow the feed rate. As it seems, there is a "golden rule" for tool diameter, spindle speed and gantry feed rate to produce the best result. Fusion360 takes care of that in the CAM module, but if you overrule spindle speed with a potmeter you can easily break the tool or overheat it.
|
Re: Milling and laser engraving on one machine June 26, 2017 09:32AM |
Registered: 8 years ago Posts: 5,232 |
Inspired by a conversation of VDX and Desertboy, i started to sand/epoxy fill one of the 2040 extrusions. Before I did that, I measured the deviation in the middle of the beam with a 5kg weight and got 0.1-0.15mm sag.
I filled the cavity with dry sand, knocked it on the floor to compress the sand and then emptied it in a plastic cup. I filled another cup with estimated 10% epoxy resin and rinsed the sand in the epoxy cup while mixing it with a wooden stick. The result was a muddy mess.
With the help of a funnel I started to fill the mud in the cavity, using the wooden stick to push it down the beam. In between I knocked it on the floor again a few times and to my surprise the whole sand-resin mix disappeared in the extrusion. It took ~15min for one extrusion.
Will test tomorrow how much less the extrusion sags under weight. I hope it was worth the mess
Without funnel and the wooden stick it wouldn't have worked, also the ( quarz-) sand is very fine which helped filling the corners and probably needs less resin that coarse sand. It's also worth buying slow curing resin. ( 2h cure time )
Edited 1 time(s). Last edit at 06/26/2017 09:44AM by o_lampe.
|
Re: Milling and laser engraving on one machine June 26, 2017 11:24AM |
Registered: 7 years ago Posts: 142 |
Nice one will be interested to see how you get on with the epoxy
I'm not using fusion360 so need to work out my cadcam solution yet but I worry about putting the bits together now lol and my Z axis is still a vague plan lol. Once I finish the machine going to invest in a new pc as my decent one went bang and my cad program doesn't render properly on my old pc it's doing my head in but it's not a show stopper to being able to use it. A couple of hours in wireframe with this extrusion and you're heads hurting lol.
Interested to hear the spindle can run that low, be glad you got a water cooled spindle I was reading that if the spindle isn't spinning at least 6000rpm it won't spin the fan quick enough to cool the spindle head but with water cooled this isn't an issue.
Edited 1 time(s). Last edit at 06/26/2017 11:25AM by Desertboy.
|
Re: Milling and laser engraving on one machine June 26, 2017 11:29AM |
Admin Registered: 16 years ago Posts: 13,884 |
... you'll get even better results, when mixing different grain sizes - so the finer particles can fill and "solidify" the spaces betweend bigger ones.
With other tests in a German CNC-forum they found volume percentages of 4% to 6% of the resin best ... but then you have to mix longer, to get all the sand particles wetted, so the connection will be best ...
Viktor
--------
Aufruf zum Projekt "Müll-freie Meere" - [reprap.org] -- Deutsche Facebook-Gruppe - [www.facebook.com]
Call for the project "garbage-free seas" - [reprap.org]
|
Re: Milling and laser engraving on one machine June 27, 2017 02:55AM |
Registered: 8 years ago Posts: 5,232 |
The resin I used gets pretty thin before it cures. I hope capillar forces help filling out all the gaps.
If I'd try to construct the mill in CAD, I'd use simplified rectangular extrusions.
To be fair, the spindle doesn't like to work at 1Hz, cooling still is an issue with water, but way less than fan cooled. Also the inverter is at it's current limit.
Edited 1 time(s). Last edit at 06/27/2017 02:58AM by o_lampe.
Quote
Desertboy
Nice one will be interested to see how you get on with the epoxy
I'm not using fusion360 so need to work out my cadcam solution yet but I worry about putting the bits together now lol and my Z axis is still a vague plan lol. Once I finish the machine going to invest in a new pc as my decent one went bang and my cad program doesn't render properly on my old pc it's doing my head in but it's not a show stopper to being able to use it. A couple of hours in wireframe with this extrusion and you're heads hurting lol.
Interested to hear the spindle can run that low, be glad you got a water cooled spindle I was reading that if the spindle isn't spinning at least 6000rpm it won't spin the fan quick enough to cool the spindle head but with water cooled this isn't an issue.
If I'd try to construct the mill in CAD, I'd use simplified rectangular extrusions.
To be fair, the spindle doesn't like to work at 1Hz, cooling still is an issue with water, but way less than fan cooled. Also the inverter is at it's current limit.
Edited 1 time(s). Last edit at 06/27/2017 02:58AM by o_lampe.
|
Re: Milling and laser engraving on one machine June 27, 2017 03:45AM |
Registered: 7 years ago Posts: 142 |
Quote
o_lampe
If I'd try to construct the mill in CAD, I'd use simplified rectangular extrusions.
To be fair, the spindle doesn't like to work at 1Hz, cooling still is an issue with water, but way less than fan cooled. Also the inverter is at it's current limit.
I use turbocad it's nippy in wireframe on my pc and the good thing about using the cad files directly from Bosch Rexroth's site is you know everything is correct but it's not hard to make your own versions. Nearly all the design for my plates came from drawing lines in cad and not from the actual cad models lol. I could easily have done it with a piece of paper and a pencil to get the figures I needed for a milling machine without a calculator in fact would have took less time but having a play in cad is always a good idea.
I find wireframe is a zone when I was a kid on my Amiga and I saw wireframe in magazines I thought it was impossible to ever make sense of it but when you work with a model it sort of all peels away and you can see what you're working on as good as if it was a solid model. Go for a cup of tea and everything is a mess again and you have to zone back in.
Extrusion is easy because the centre of the channel is 1/2 the width of the extrusion making everything simple at least in theory lol.
Edited 3 time(s). Last edit at 06/27/2017 04:23AM by Desertboy.
|
Re: Milling and laser engraving on one machine June 27, 2017 12:11PM |
Registered: 8 years ago Posts: 5,232 |

|
Re: Milling and laser engraving on one machine June 27, 2017 12:32PM |
Registered: 7 years ago Posts: 142 |
Quote
o_lampe
I liked to play "mercenary" on my Amiga. It was a 3D-game with just a few vector lines, but it was incredible back then.Quote
I find wireframe is a zone when I was a kid on my Amiga
Mercenary was excellent with the spaceship sort of like an early GTA without the violence lol. I was big into hunter as well
Edited 1 time(s). Last edit at 06/27/2017 12:33PM by Desertboy.
|
Re: Milling and laser engraving on one machine June 28, 2017 01:44PM |
Registered: 11 years ago Posts: 1,049 |
|
Re: Milling and laser engraving on one machine June 28, 2017 02:02PM |
Registered: 7 years ago Posts: 142 |
Quote
cozmicray
Hard for me to understand how this cast plastic trolley
is better than a circulating ball rider on a steel rail?
Your motor will expend all torque just over coming friction
What lube is good for plastic on aluminum?
Leadscrew to rail spacing could have been made to work.
He's doing the absolute minimum he needs to get it to work so he can then remake the plates to fit the proper rail this is an incredibly temporary solution.
As he said worst case he can always fit a pen as use it as a plotter to make his plates.
|
Re: Milling and laser engraving on one machine June 28, 2017 02:16PM |
Registered: 7 years ago Posts: 142 |
Quote
VDX
... you'll get even better results, when mixing different grain sizes - so the finer particles can fill and "solidify" the spaces betweend bigger ones.
With other tests in a German CNC-forum they found volume percentages of 4% to 6% of the resin best ... but then you have to mix longer, to get all the sand particles wetted, so the connection will be best ...
Going to order some epoxy would this be suitable?
[www.mbfg.co.uk]
at 6% at guess I only need the 750g's at most, it's 4l's to fill it.
Can you send us a link to the German forum thread please.
|
Re: Milling and laser engraving on one machine June 29, 2017 03:06AM |
Registered: 8 years ago Posts: 5,232 |
Quote
cozmicray
Hard for me to understand how this cast plastic trolley
is better than a circulating ball rider on a steel rail?
Your motor will expend all torque just over coming friction
What lube is good for plastic on aluminum?
Leadscrew to rail spacing could have been made to work.
The plastic trolley is not better of course. When I realized the shapeoko-trapez metal corners weren't suited for the linear rails, I didn't want to spend $$$ on the V-roller, just to replace them with linear rails soon after.
I haven't lubed them yet. After a few moves back and forth they slide from their own weight. I carefully adjusted them, when I assembled the X-gantry bracket.
|
Re: Milling and laser engraving on one machine June 29, 2017 11:37AM |
Registered: 8 years ago Posts: 5,232 |
The deviation test of the sand/resin filled extrusion brought no difference!
It still sags 0.15mm with a 5kg weight.
Maybe the resin was too old ( +3 years ) or my test setup is wrong. Anyway, I leave the extrusions unfilled and get the machine running. There's always time to improve things later...
It still sags 0.15mm with a 5kg weight.
Maybe the resin was too old ( +3 years ) or my test setup is wrong. Anyway, I leave the extrusions unfilled and get the machine running. There's always time to improve things later...
|
Re: Milling and laser engraving on one machine June 29, 2017 05:13PM |
Registered: 7 years ago Posts: 142 |
Quote
o_lampe
The deviation test of the sand/resin filled extrusion brought no difference!
It still sags 0.15mm with a 5kg weight.
Maybe the resin was too old ( +3 years ) or my test setup is wrong. Anyway, I leave the extrusions unfilled and get the machine running. There's always time to improve things later...
I was initially looking at polyurethane resin mix only because my background is plastics and I know how hard this shit is with carbon fibre and aluminium powder I might go with that instead.
[www.mbfg.co.uk]
Edited 1 time(s). Last edit at 06/29/2017 05:14PM by Desertboy.
|
Re: Milling and laser engraving on one machine June 29, 2017 08:15PM |
Registered: 11 years ago Posts: 1,049 |
|
Re: Milling and laser engraving on one machine June 30, 2017 03:28AM |
Registered: 8 years ago Posts: 5,232 |
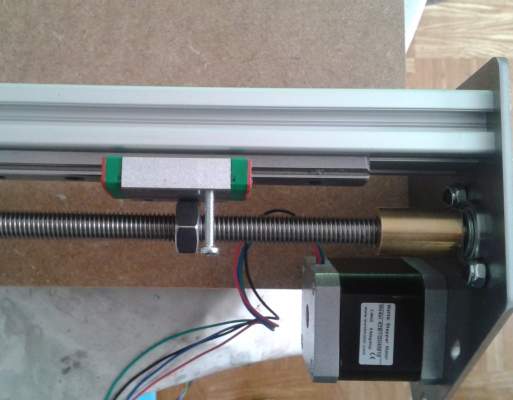
Quote
cozmicray
In first post - he has linear rail?
What is wrong with that rail?
As you can see the carrier of the linear rail is pretty close to the M10 Nut. The 3mm steel sheet would just fit between lead screw and carrier.
I had no idea how to clamp the nut to the sheet metal, so I went for the sliders.
Of course I will use metal T-Nuts for the linear rail later.
|
Re: Milling and laser engraving on one machine June 30, 2017 03:47PM |
Registered: 11 years ago Posts: 1,049 |
A printed block fastened to the linear rail trolley would work nicely
to capture nut?

to capture nut?

|
Re: Milling and laser engraving on one machine July 01, 2017 03:19AM |
Registered: 8 years ago Posts: 5,232 |
Cozmicray, thanks for the sketch.
The main problem is the 3mm sheet metal that goes between screw and trolley. I'd have to cut it to allow the nut being placed in the middle of the trolley.
I almost wanted to weld the nut to the side of the sheetmetal, but that could have ruined the thread. Also only one nut has a bit of backlash, I'll have to use two nuts.
Edited 1 time(s). Last edit at 07/01/2017 03:19AM by o_lampe.
|
Re: Milling and laser engraving on one machine July 01, 2017 03:48PM |
Registered: 11 years ago Posts: 1,049 |
|
Re: Milling and laser engraving on one machine July 05, 2017 03:56AM |
Registered: 8 years ago Posts: 5,232 |
I really have a hard time mounting the spindle. I can pry open the bracket, but there are still places where it doesn't widen.
I think, I have to unmount it and put it in the oven....
I think, I have to unmount it and put it in the oven....

|
Re: Milling and laser engraving on one machine July 08, 2017 05:51AM |
Registered: 7 years ago Posts: 142 |
|
Re: Milling and laser engraving on one machine July 09, 2017 02:01AM |
Registered: 8 years ago Posts: 5,232 |
Maybe I haven't found the right tool to open the mount. I tried with a wooden wedge.
Prying open the gap of the mount only widens in X-direction but not in Y-direction. I can wiggle the spindle back and forth, but it get's stuck when I wiggle left to right. The aluminum is very soft and the watercooling jacket diggs into the aluminum.
I'll try to heat it up with a hotair gun and find something else to pry it open.
Edited 1 time(s). Last edit at 07/09/2017 02:03AM by o_lampe.
|
Re: Milling and laser engraving on one machine July 09, 2017 03:53AM |
Registered: 7 years ago Posts: 142 |
Mine barely opens it was tight to get the spindle in I will grab a pic today, They never included screws with mine but wasn't an issue as they're standard M6 A2's and I have a bucket of A2's
You don't have any screws in it do you it doesn't look like it but sometimes it pays to start with the simple stuff lol.
You don't have any screws in it do you it doesn't look like it but sometimes it pays to start with the simple stuff lol.
|
Re: Milling and laser engraving on one machine July 25, 2017 05:32AM |
Registered: 7 years ago Posts: 142 |
How you getting along? Any updates/pics?
I was wondering what bits you bought for your spindle?
I bought a cheap ass router set
[www.aldi.co.uk]
some 2 flute carbide endmills, 2mm, 3mm, 6mm, an engraving set 0.5mm to 3mm (6) and a ball mill set from Banggood.
Edited 1 time(s). Last edit at 07/25/2017 05:49AM by Desertboy.
I was wondering what bits you bought for your spindle?
I bought a cheap ass router set
[www.aldi.co.uk]
some 2 flute carbide endmills, 2mm, 3mm, 6mm, an engraving set 0.5mm to 3mm (6) and a ball mill set from Banggood.
Edited 1 time(s). Last edit at 07/25/2017 05:49AM by Desertboy.


Sorry, only registered users may post in this forum.