V1 Engineering's Piper
Posted by Roberts_Clif
|
V1 Engineering's Piper April 29, 2019 11:32AM |
Registered: 6 years ago Posts: 1,863 |
I have decided to build the V1 Engineering Piper.
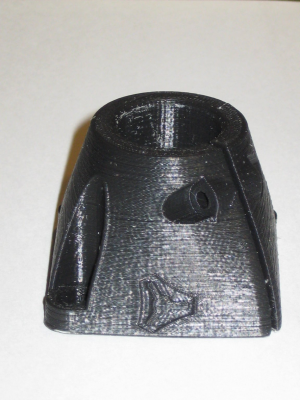
First C-Foot 3D Print in ABS looks promising, with ABS shrinkage the ID for the Feet is 23.37 the conduit measurement is 23.5.
This means that very little finish work will need to be done in order to assemble the Piper 3D Printer.
I setup the Printer nozzle to 228C with a bed temperature of 98C, first layer print speed 40 all remaining layers 76 percent.
This calculates to 8.5mm^3 per secound.
With a layer height of .28 an infill at 40% the First model for my new 3D Printer/CNC looks great unfinished.
Using the parts cooling fan at 40% full speed (102/256).
Room temp 72.7
Heated enclosure left side 37.87C
Enclosure Vent Fans speed 60%
I have 3D Printer all the smaller parts and a couple of the larger parts with very good luck using ABS filament.
The more I print with the ABS at the higher bed temperature, noticed that the 3mm aluminum bed is bowing.
The perimeter of the bed is lower while the center is getting higher and higher. The auto bed leveling is somewhat taking care of it.
But I wander how much it will take before parts will get affected by the bowing an become Unusable.
Want to try an heat the bed while placing a heavy object center bed, then allow it too cool with weight remaining in the center.
Hoping that this action might allow the bed to return to a more level state. It appears may need a Borosilicate Glass Build Plate.
Not looking forward to this as my Proximity sensors will not allow for leveling a Borosilicate Glass Build Plate.
Edited 2 time(s). Last edit at 04/29/2019 02:01PM by Roberts_Clif.
Computer Programmer / Electronics Technician
|
Re: V1 Engineering's Piper April 29, 2019 11:58AM |
Registered: 11 years ago Posts: 5,780 |
228C is a bit low for ABS. I usually run 240C first layer, then 235 for the rest of the print. Prusa defaults to 255C throughout a print.
Don't use a print cooling fan on ABS. It will make prints pull themselves apart. You got away with it because it was a small print.
The edges of the bed are cooler than the center, so the center expands more and has to go either up or down. That sort of problem is minimal with thicker cast tooling plate.
If you put glass on a warped bed plate it will heat unevenly and you may have problems getting prints to stick properly. Where the glass touches the bed it will get hot and where it doesn't it will be quite a bit cooler because glass and air are both thermal insulators. What you really need is a flat plate that stays that way. Try cast aluminum tooling plate.
Ultra MegaMax Dominator 3D printer: [drmrehorst.blogspot.com]
|
Re: V1 Engineering's Piper April 29, 2019 12:33PM |
Registered: 9 years ago Posts: 204 |
|
Re: V1 Engineering's Piper April 29, 2019 01:16PM |
Registered: 6 years ago Posts: 134 |
Robert, You have mixed up a little with namesQuote
Roberts_Clif
I have decided to build the V1 Engineering Piper.
First C-Foot 3D Print in ABS looks promising, with ABS shrinkage the ID for the Feet is 23.37 the conduit measurement is 23.5.
This means that very little finish work will need to be done in order to assemble the Piper 3D Printer.
 . Ryan's MPCNC is at www.v1engineering.com.
 My Piper 3d Printer is at https://piper3dprinters.com/
|
Re: V1 Engineering's Piper April 29, 2019 02:05PM |
Registered: 6 years ago Posts: 1,863 |
Quote
piper3d
Robert, You have mixed up a little with names. Ryan's MPCNC is at www.v1engineering.com.
My Piper 3d Printer is at https://piper3dprinters.com/
Most sorry It is made with Pipes got confused with the V1 Engineering MPCNC forgive me!!!
Quote
Shank man
Why not use PETG?
Just a thought.
Long story short I purchased 12 Rolls of ABS before I knew could Print PET-g so need to use it up first.
Quote
the_digital_dentist
I usually run 240C first layer, then 235 for the rest of the print. Prusa defaults to 255C throughout a print.
Don't use a print cooling fan on ABS. It will make prints pull themselves apart.
I know but after doing a Temperature Tower in was deturmined that this material best printed at 228C.
I have printed with a low speed cooling fan from day one, have had no problems. Thank for the reminder if one fails I can always try without the cooling fan.
Have a belief that if it work don't mess with it, though I am always listening and learning.
Edited 3 time(s). Last edit at 04/29/2019 02:15PM by Roberts_Clif.
Computer Programmer / Electronics Technician
|
Re: V1 Engineering's Piper April 29, 2019 02:09PM |
Registered: 11 years ago Posts: 5,780 |
Most printers can't print ABS because they aren't made to do it.
If you can print ABS, there's little reason to print anything else...
Ultra MegaMax Dominator 3D printer: [drmrehorst.blogspot.com]
If you can print ABS, there's little reason to print anything else...
Ultra MegaMax Dominator 3D printer: [drmrehorst.blogspot.com]
|
Re: V1 Engineering's Piper April 29, 2019 02:37PM |
Registered: 6 years ago Posts: 1,863 |
Quote
the_digital_dentist
Most printers can't print ABS because they aren't made to do it.
If you can print ABS, there's little reason to print anything else...
Was told that PET-g was the up and coming best material to print. And may try a single roll to see how it work out.
In my enclosure I have vent fans to exhaust the fumes outside for the most part works pretty well.
Though my 12 Volt Hictop 3DP11 works it take longer to the heat the bed, but nothing like some I have read posted here taking much longer.
Computer Programmer / Electronics Technician
|
Re: V1 Engineering's Piper April 29, 2019 03:27PM |
Registered: 11 years ago Posts: 5,780 |
I printed a couple spools of PETG. It has to be printed a bit slower than ABS, and it tends to make hairy prints. The biggest problem I found was that it sucks moisture out of the air. I left one spool on the printer for a couple days of almost continuous printing and by the end the surface quality became unacceptable. It was hissing and popping while printing.
I don't know if it can hold up to being left in a hot car without deforming or melting.
Ultra MegaMax Dominator 3D printer: [drmrehorst.blogspot.com]
I don't know if it can hold up to being left in a hot car without deforming or melting.
Ultra MegaMax Dominator 3D printer: [drmrehorst.blogspot.com]
|
Re: V1 Engineering's Piper April 29, 2019 03:40PM |
Registered: 6 years ago Posts: 134 |
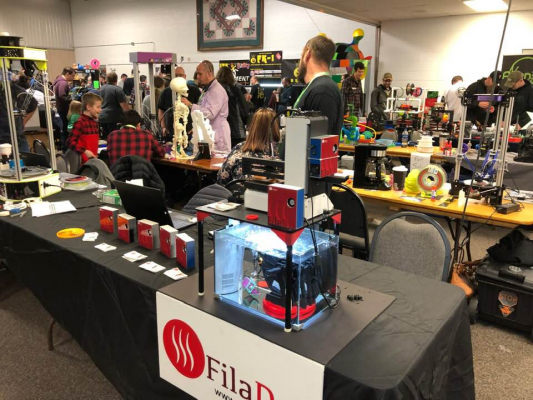
You may want to look at "FilaDry" device. It promises to dry filament as it moves it from the spool to the extruder. It was shown at MRRF and it was feeding the filament from the spool drawn in the aquarium tank full of water to the extruder.Quote
the_digital_dentist
The biggest problem I found was that it sucks moisture out of the air.
|
Re: V1 Engineering's Piper April 29, 2019 05:12PM |
Registered: 11 years ago Posts: 5,780 |
Thanks, but I'd rather just print ABS.
Ultra MegaMax Dominator 3D printer: [drmrehorst.blogspot.com]
Ultra MegaMax Dominator 3D printer: [drmrehorst.blogspot.com]
|
Re: V1 Engineering's Piper April 29, 2019 07:50PM |
Registered: 6 years ago Posts: 1,863 |
Quote
the_digital_dentist
228C is a bit low for ABS. I usually run 240C first layer, then 235 for the rest of the print. Prusa defaults to 255C throughout a print.
Don't use a print cooling fan on ABS. It will make prints pull themselves apart. You got away with it because it was a small print.
Went back an examined the ABS Models that have printed under a Magnifying glass lamp, other than a little lead-screw Z-Banding they look perfectly except-able.
Computer Programmer / Electronics Technician
|
Re: V1 Engineering's Piper April 30, 2019 05:44AM |
Registered: 9 years ago Posts: 204 |
|
Re: V1 Engineering's Piper April 30, 2019 09:51AM |
Registered: 6 years ago Posts: 1,863 |
OK,
I am slowly printing the STL models have about half 3D Printed already, most the smaller models have been printed now will start on the larger models.
I do not foresee any problems with printing them, tho may have problems with the 40% fan on the larger models, Basic foot print is the same they are taller.
The Minor problems I have been having is the tightening of nuts and bolts, Need to think about changing to aviation anti vibration nuts.
This has caused bad layer adhesion, layer shifting Y - Carriage loose - I know slow the printer down you are shaking it apart.
No!!! It works good, just need to change a few parts and using Aircraft nuts and bolts will hold it together to run at the speed that I want it too.
Loctite Threadlocker may be used on a standard fastener with Two removable strengths for large and small applications.
The foreseeable problems include finding the smoothest EMT conduit possible, have never thought about smooth conduit before.
Keeping the weight down of the hardware may not be a problem with dual XY steppers, though may come into consideration for other reasons...
Computer Programmer / Electronics Technician
|
Re: V1 Engineering's Piper April 30, 2019 11:03AM |
Registered: 7 years ago Posts: 363 |
Quote
Roberts_Clif
The foreseeable problems include finding the smoothest EMT conduit possible, have never thought about smooth conduit before.
Keeping the weight down of the hardware may not be a problem with dual XY steppers, though may come into consideration for other reasons...
I had previously considered doing one of these builds. There is always the option of buying stainless steel tubing. The website lists the cost of stainless for a standard MPCNC build to be approx $43USD.
|
Re: V1 Engineering's Piper April 30, 2019 08:28PM |
Registered: 6 years ago Posts: 1,863 |
Quote
obelisk79
I had previously considered doing one of these builds. There is always the option of buying stainless steel tubing. The website lists the cost of stainless for a standard MPCNC build to be approx $43USD.
Could not locate any Stainless steel tubing for that low of a price. Could you post the link.
Down to the wire with 0nly 8 pieces remaining to print. looking for the other hardware will need to complete the MPCNC.
I have found some very important information about the Hotbed warping.
With the bed leveling perfectly Marlin 2.0.x is having major problems setting down the 1st layer, wander if something happened to mess it up.
Will check when I return. May need to invest in a new hotbed or epoxy a thicker aluminum plate above the thinner 3mm aluminum Heat-bed.
Today I was in the in the process of printing one of the larger parts when boss called said Got work for you Today.
Shut down the printers as do not like them running unsupervised, call it a phobia still makes me nervous when not around!!!
The model was laying so perfectly flat.
Well may factory reset 2nd printer make sure the slicer and G-Code have Bed leveling data turned on.
Just finding a set of the screws is raising the build price can not believe how much they want for a single M8x130mm.
Edited 1 time(s). Last edit at 05/01/2019 03:09PM by Roberts_Clif.
Computer Programmer / Electronics Technician
|
Re: V1 Engineering's Piper May 05, 2019 08:26PM |
Registered: 6 years ago Posts: 1,863 |
6 Hours of printing left.
Here is the largest ABS Print video printed on a Hictop 3DP12 24volt
Nozzle Temp 228
Bed Temp 96C
Fan Speed 100/256 "about 42%"
Printed in a homemade Enclosure venting fumes Outside using a Bathroom fan at 65% full Speed.
[youtu.be]
Now I have to hurry up an wait, I have no hardware to start the assembly.
Computer Programmer / Electronics Technician
|
Re: V1 Engineering's Piper May 06, 2019 03:47PM |
Registered: 6 years ago Posts: 1,863 |
Boss called today with bad news no work, so started to printing the last few models for my V1 Engineering MPCNC.
Being the last of the Large ABS models wanted to record using Octolapse and noticed that the print time was extended by 30 minutes.
Decided to time each time-lapsed photo and measured about 5 secound multiplied by # of layers (349 * 5 = 1745)/60 = 29.083 minutes.
Quite a long time just for taking a single photo per layer or 349 photos.
Time-lapse video
Edited 2 time(s). Last edit at 05/06/2019 06:38PM by Roberts_Clif.
Computer Programmer / Electronics Technician
|
Re: V1 Engineering's Piper May 07, 2019 08:07AM |
Registered: 6 years ago Posts: 1,863 |
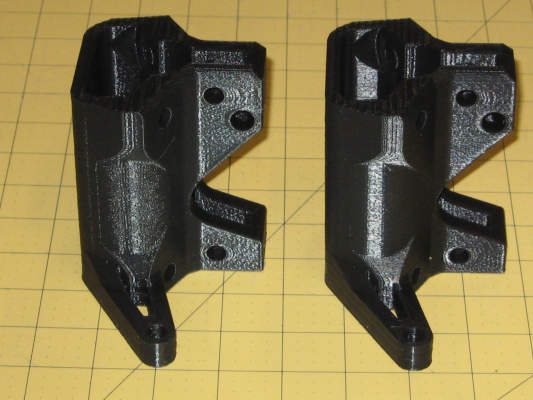
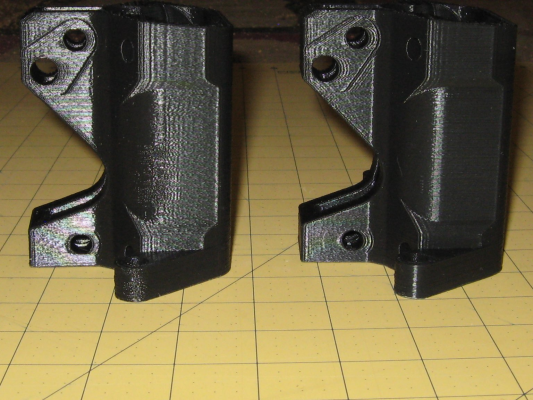
I have noted a distinctive difference between the SD card Print and the OctoLapse Print textures.
Noted: in the Photos above the model on right was printed with the SD Card While Model on the left within OctoPrint's Octolapse.
You will note a distinct texture difference. Will print another model using same ABS filament with SD card to verify if smoothness returns.
Computer Programmer / Electronics Technician
|
Re: V1 Engineering's Piper May 07, 2019 12:10PM |
Registered: 9 years ago Posts: 204 |
|
Re: V1 Engineering's Piper May 07, 2019 01:42PM |
Registered: 7 years ago Posts: 363 |
|
Re: V1 Engineering's Piper May 08, 2019 05:06AM |
Registered: 5 years ago Posts: 148 |
|
Re: V1 Engineering's Piper May 08, 2019 09:31AM |
Registered: 6 years ago Posts: 1,863 |
Quote
Shank man
Irregardless those are some damn nice prints. I really need to make some enclosures for my printers.
Thank You!!!
Quote
Pippy
Yes interesting.
You'll have to show us the whole printer in your next video.
What printer controller board & stepper drivers are you using I wonder ?
My Controller is MPX.3. The replacement is Here thou the Board shown is not correct it is a MPK V1 my controllers are Base v1.3, and MPX.3 the difference is the newer controller has onboard SD card reader mine does not.
You are going to be Floored!
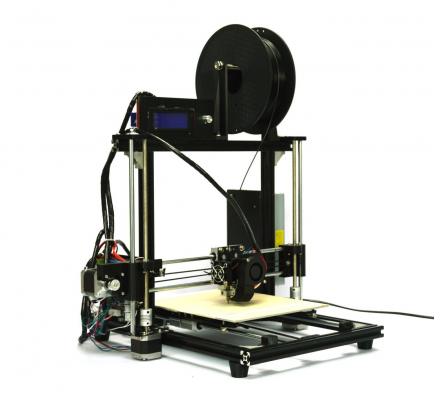
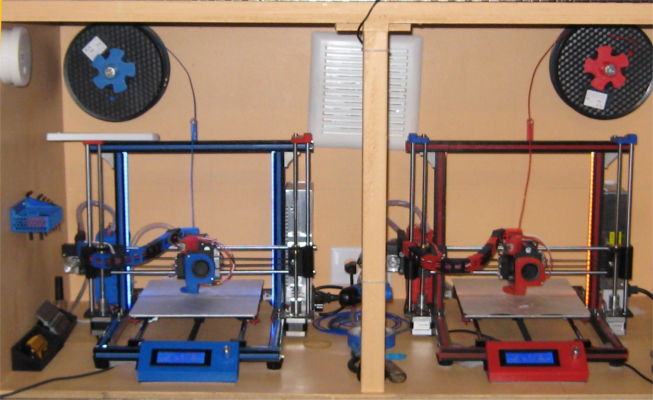
I have Two Hictop's A 3DP11 an 3DP12 3D Printers shown above without modifications.
Here are the Twins in their single sheet 4X8 Plywood enclosure. With a bathroom fan vent to exhaust the fumes outside on rear of enclosure, controlled with light dimmer.
The opening is covered with sheets of clear plastic 1/8 inch using a dual top hinge.
For reference have attached a thermometer behind each printer in the rear wall. The Case temp normally stays around 100F when printing ABS.
Nothing fancy. A video was posted above "Time-lapse video"
Not Sure what is suppose to work and what is not, I try everything weight the results...
Will Start a new thread for MPCNC to show progress an request help when needed. Sure you want to know how it works.
Edited 7 time(s). Last edit at 05/08/2019 10:19AM by Roberts_Clif.
Computer Programmer / Electronics Technician
|
Re: V1 Engineering's Piper May 08, 2019 10:42PM |
Registered: 6 years ago Posts: 1,863 |
Looked every where trying to find the best deal on nuts an bolts hardware for the MPCNC 3D Printer
E-Bay averaged 55-75 dollars the other online store were close to the same prices.
Went to Home Depot for work related Hardware notice the bolt section and purchased all the Nuts and Bolts Plus a few not on my list.
Ended Up paying 18.44 + 1.59 tax for a grand total of $20.03
This means I will start Building the Frame this weekend Still would Like to Order 5 Stepper Motors an cabling.
Computer Programmer / Electronics Technician
|
Re: V1 Engineering's Piper May 10, 2019 05:23AM |
Registered: 5 years ago Posts: 148 |
|
Re: V1 Engineering's Piper May 12, 2019 05:06PM |
Registered: 6 years ago Posts: 1,863 |
Today started to Assemble the MPCNC, I do not believe any of the measurements of the Hardware match the hardware purchased.
Will have to take the parts assembly to the Hardware store then match what is needed.
The measurements are wrong or the Store has all hardware in the wrong parts bins, or they measure the bolts differently somehow.
Edited 1 time(s). Last edit at 05/12/2019 05:11PM by Roberts_Clif.
Computer Programmer / Electronics Technician
|
Re: V1 Engineering's Piper May 12, 2019 06:41PM |
Registered: 5 years ago Posts: 148 |
Quote
piper3d
You may want to look at "FilaDry" device. It promises to dry filament as it moves it from the spool to the extruder. It was shown at MRRF and it was feeding the filament from the spool drawn in the aquarium tank full of water to the extruder.Quote
the_digital_dentist
The biggest problem I found was that it sucks moisture out of the air.
I'd maybe not ..
FilaDry test
|
Re: V1 Engineering's Piper May 12, 2019 08:42PM |
Registered: 6 years ago Posts: 1,863 |
Quote
Pippy
Quote
piper3d
You may want to look at "FilaDry" device. It promises to dry filament as it moves it from the spool to the extruder. It was shown at MRRF and it was feeding the filament from the spool drawn in the aquarium tank full of water to the extruder.Quote
the_digital_dentist
The biggest problem I found was that it sucks moisture out of the air.
I'd maybe not ..
FilaDry test
Thank You very Much;
However A long time ago I found these and store my Filament in a large Moisture safe Rubbermaid container.
[www.dollartree.com]
So I have never had any problems the moisture in my Filament in almost 3 years of 3D Printing.
Computer Programmer / Electronics Technician
|
Re: V1 Engineering's Piper May 14, 2019 11:03PM |
Registered: 6 years ago Posts: 1,863 |
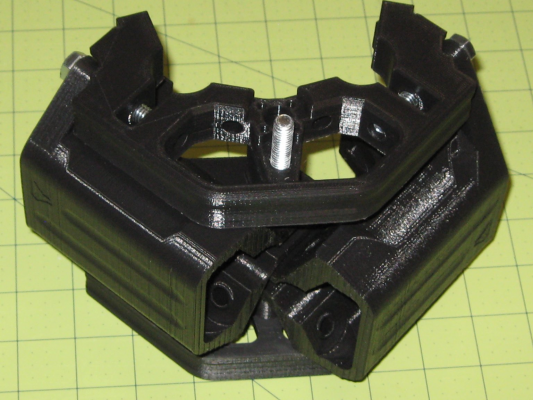
Assembled the Middle Assembly today still need the conduit to assembly the remaining frame Assemblies.
Computer Programmer / Electronics Technician
Computer Programmer / Electronics Technician
|
Re: V1 Engineering's Piper May 15, 2019 02:21AM |
Registered: 5 years ago Posts: 148 |
|
Re: V1 Engineering's Piper May 16, 2019 11:14PM |
Registered: 6 years ago Posts: 1,863 |
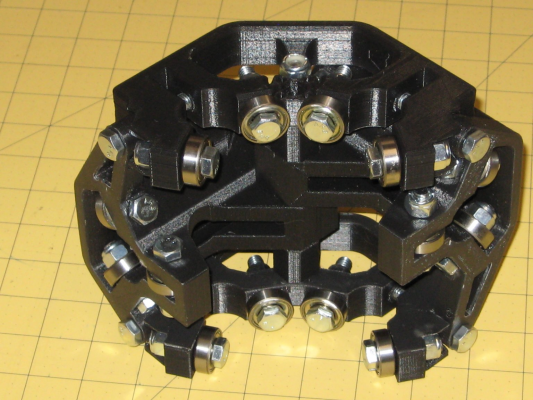
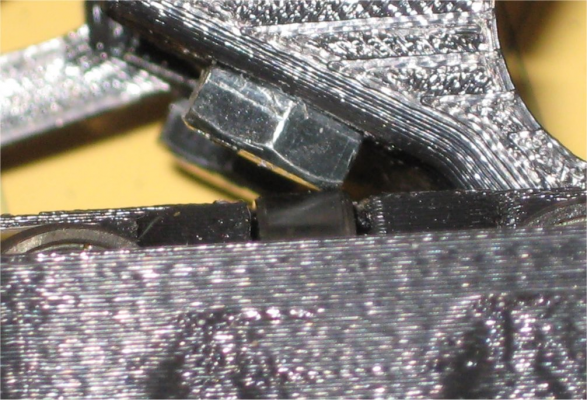
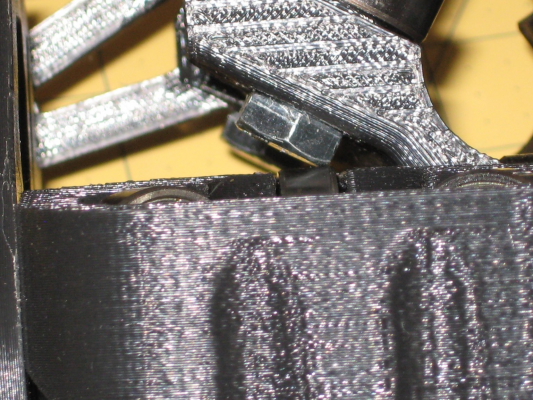
Found a problem with the MPCNC Design.
You can see in the middle assembly, that the 5/16 bolt head and the Bearing are touching, This will have to have thinner Bolt Head.
Will be Grinding about 1/2 the thickness of the bolt head away to allow the bearing to freely spin...
Computer Programmer / Electronics Technician
You can see in the middle assembly, that the 5/16 bolt head and the Bearing are touching, This will have to have thinner Bolt Head.
Will be Grinding about 1/2 the thickness of the bolt head away to allow the bearing to freely spin...
Computer Programmer / Electronics Technician
Sorry, only registered users may post in this forum.
