First printer build
Posted by melb_maker
|
First printer build March 02, 2016 07:03AM |
Registered: 8 years ago Posts: 34 |
Hay every one
I am attempting to get into 3d printing and am in the process of building my first machine. Other than 1 year of playing around with my cnc router I am a complete novice when it comes to 3d printing so I have come here to find some advice and support.
I probably should have joined up and checked my idea before getting my parts. . . . but I tend to rush into things. This is what I was thinking and have so far
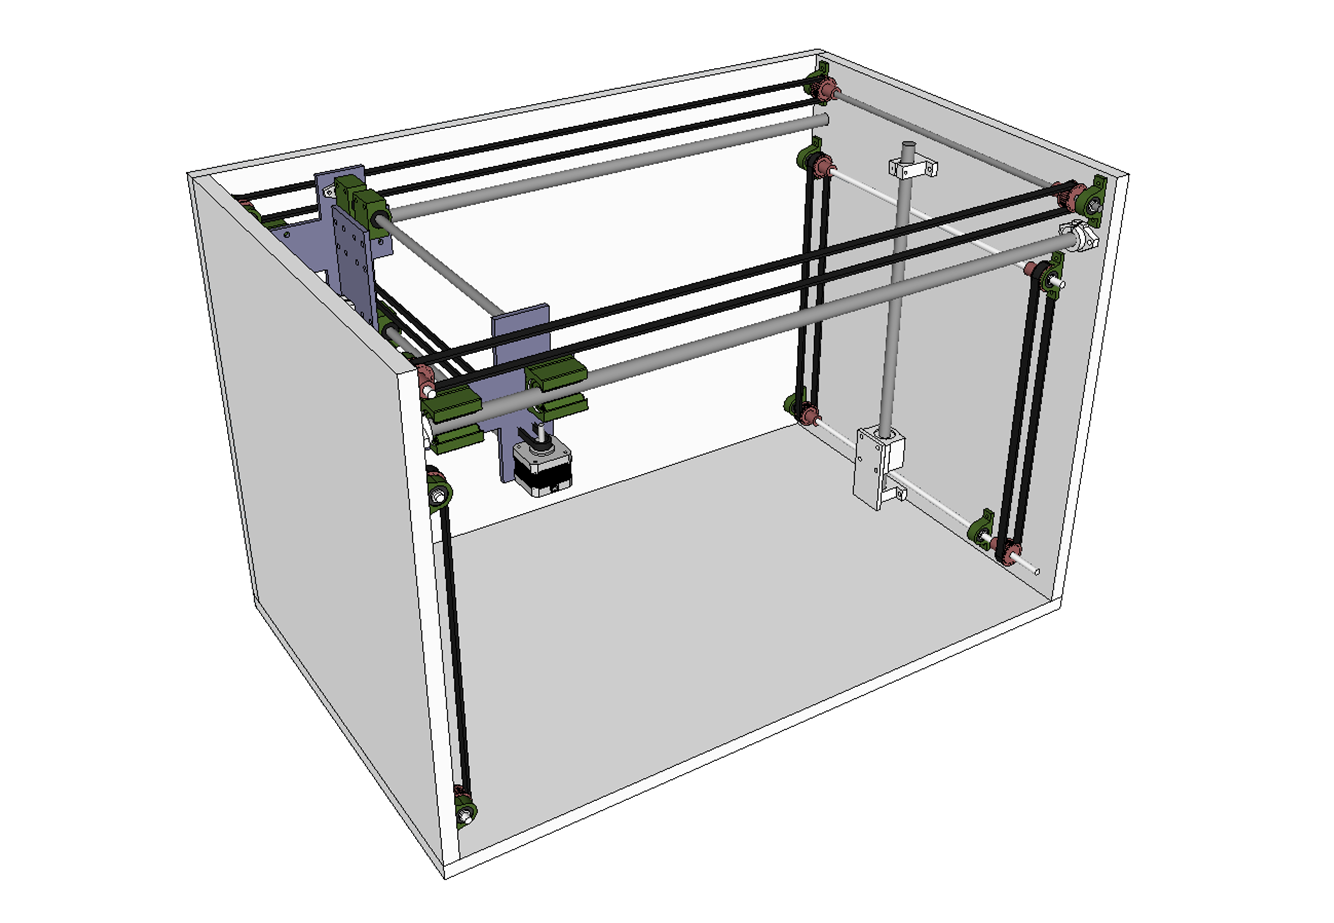
I am trying to do it on the cheap but want but I still want a quality printer. Here is what im thinking. A 3 axis machine with all axis driven by GT2 balt and yes I know about the z dropping issue but if a GT2 belt is good enough for the XY why not the Z right? I want the print space to be larger than X 250mm Y 600mm Z 300mmi also want more than 1 print head.
Each axis will be driven by open GT2 belts 1 on the X 2 on the Y and 4 on the Z. not shore of the stepper configuration yet but I would like to use ramps, I have made a 18mm plywood box to house it in and started on the X axis as shown in the photo
Am I heading in the right direction, or am I making a mistake that will limit my speed/quality?
I am a little bit stuck when it comes to motor selection, I have a G540 Geckodrive Stepper Controller driver at my disposal, can I wire this into ramps?
What type of stepper should I use? Should I use more then 1 motor per axis? I was thinking of using a nema23 1.9Nm 2.8A but the voltage is only rated to 3.2V, I think my driver is running 24v steppers at the moment with a 48v supply will the G540 work with them steppers with micro stepping accuracy?
is there any way I can drive more then 6 drivers with ramps? I may want to have more then 3 extruders one day
Any input would be greatly appreciated
Thank you
Nick
I am attempting to get into 3d printing and am in the process of building my first machine. Other than 1 year of playing around with my cnc router I am a complete novice when it comes to 3d printing so I have come here to find some advice and support.
I probably should have joined up and checked my idea before getting my parts. . . . but I tend to rush into things. This is what I was thinking and have so far
I am trying to do it on the cheap but want but I still want a quality printer. Here is what im thinking. A 3 axis machine with all axis driven by GT2 balt and yes I know about the z dropping issue but if a GT2 belt is good enough for the XY why not the Z right? I want the print space to be larger than X 250mm Y 600mm Z 300mmi also want more than 1 print head.
Each axis will be driven by open GT2 belts 1 on the X 2 on the Y and 4 on the Z. not shore of the stepper configuration yet but I would like to use ramps, I have made a 18mm plywood box to house it in and started on the X axis as shown in the photo
Am I heading in the right direction, or am I making a mistake that will limit my speed/quality?
I am a little bit stuck when it comes to motor selection, I have a G540 Geckodrive Stepper Controller driver at my disposal, can I wire this into ramps?
What type of stepper should I use? Should I use more then 1 motor per axis? I was thinking of using a nema23 1.9Nm 2.8A but the voltage is only rated to 3.2V, I think my driver is running 24v steppers at the moment with a 48v supply will the G540 work with them steppers with micro stepping accuracy?
is there any way I can drive more then 6 drivers with ramps? I may want to have more then 3 extruders one day
Any input would be greatly appreciated
Thank you
Nick
|
Re: First printer build March 02, 2016 07:21AM |
Registered: 8 years ago Posts: 34 |
|
Re: First printer build March 02, 2016 07:29AM |
Registered: 8 years ago Posts: 34 |

|
Re: First printer build March 02, 2016 01:23PM |
Registered: 8 years ago Posts: 318 |
While I'm not a particularly big fan of using z axis belts, I think with 4of them it should work. Though I can't imagine the bit of elasticity kind them is a good thing.
I'd go with a standard 2 z axis steppers and 1 x ( just noticed your x goes front to back, think that's usually called the y, but doesn't matter too much) probably 2 stepper on the y because it has to move the whole x axis assembly, though maybe you could get away with 1.
Nema 17s are the most common I think (could be 14 having a brain fart) and ramps boards use 12 v power for the steppers so I'm not sure if you want to go through the trouble of attaching your stepper driver as plug and play stepper drivers for the ramps go for $10 to $15 for a set on amazon
|
Re: First printer build March 02, 2016 01:23PM |
Registered: 8 years ago Posts: 318 |
While I'm not a particularly big fan of using z axis belts, I think with 4of them it should work. Though I can't imagine the bit of elasticity in them is a good thing. EDIT: The more I think about using z axis belts the few problems I have with them, after all delta printers work well and the use 3belts to control their 3 arms.
I'd go with a standard 2 z axis steppers and 1 x ( just noticed your x goes front to back, think that's usually called the y, but doesn't matter too much) probably 2 stepper on the y because it has to move the whole x axis assembly, though maybe you could get away with 1.
Nema 17s are the most common I think (could be 14 having a brain fart) and ramps boards use 12 v power for the steppers so I'm not sure if you want to go through the trouble of attaching your stepper driver because plug and play stepper drivers for the ramps go for $10 to $15 for a set on amazon
Edited 2 time(s). Last edit at 03/03/2016 08:36AM by DaGameFace.
|
Re: First printer build March 04, 2016 10:18PM |
Registered: 8 years ago Posts: 34 |
Glad to hear u think the z axis may work, I haven’t been able to find any information on it at all, it will only be temporary until I get some ball screws un less it’s a total success .
Yer I think Nema 17s are the most common which I was originally looking at but I worry they will be under powered for my machine especially if I hook 2 up in parallel on the outputs of a DRV8825 stepper motor driver. I wonder can u wire the drivers so 1 driver output signals drives 2 DRV8825 drivers??? That would give me more power and may work on the
Yes I would agree we u that I need 2 on the x and 2 on the y due to the mass it has to move.
thanks for the advice
nick
|
Re: First printer build March 05, 2016 03:39AM |
Registered: 10 years ago Posts: 14,672 |
When choosing motors, choose them to have a current rating within the capacity of the drivers, and a voltage several times lower than the supply voltage you will be using. A typical choice would be Nema 17 motors rated at about 1.7A and 3V.
For most Nema 17 stepper motors used in repraps, a pair of them will work well if connected in series and driven from a single driver.
The printer you are describing (dual extrusion, large heated bed) deserves better electronics than RAMPS. Also be aware that plug-in stepper drivers (as used on RAMPS) have nothing like enough PCB cooling area and are very prone to overheating. Stick-on heatsinks are useless, perhaps worse than useless because the driver chips are designed to be cooled from underneath. The exception is RAPS128 drivers, which use chips designed to be cooled from the top.
The DRV8825 drivers can be problematic. If you don't use fast decay mode, you get uneven steps. If you do, then the motors may become very noisy, depending on the motor inductance and the supply voltage.
If you want to use Nema 23 motors, then I suggest you either use external stepper motor drivers, or you choose motors with a rated current in the range 1.5 to 2.0A and drive them from a Duet or Smoothieboard with 24V power.
Large delta printer [miscsolutions.wordpress.com], E3D tool changer, Robotdigg SCARA printer, Crane Quad and Ormerod
Disclosure: I design Duet electronics and work on RepRapFirmware, [duet3d.com].
|
Re: First printer build March 05, 2016 07:42PM |
Registered: 8 years ago Posts: 1,671 |
|
Re: First printer build March 06, 2016 09:27AM |
Registered: 8 years ago Posts: 34 |
I have herd that the DRV8825 drivers are cooled from the underside of the ic package and there are vias on the pcb of the driver board to aid this process, perhaps it would be beneficial to cool from the underside. I could make them remotely wired in to the ramps board to give me space to mount the driver pcb underside to a larger cooled heat sink or I could just use lower power steppers.
With good cooling would I have any issues running this stepper?
Manufacturer Part Number 17HS19-2004S1
Step Angle 1.8°
Step Accuracy 5%
Holding Torque 59Ncm(83.6oz.in)
Rated Current/phase 2.0A
Phase Resistance 1.4ohms
Voltage 2.8V
Inductance 3.0mH±20%(1KHz)
Weight 400g
Also I am really curios to know if u can use 1 axis’s output from the controller to run 2 drivers? This way u could run 2 stepper motors in sync at the full rated power. I have the drivers already so I might just get 2 steppes to have a play with and see what happens.
I like the Duet, seems abit more expandable then the cheep ramps.
dyneema line sounds interesting what would be the advantages/disadvantages over GT2 belt?
|
Re: First printer build March 08, 2016 06:29PM |
Registered: 8 years ago Posts: 1,671 |
for me the advantage would be attaching it to the ends of the X, I want to join 2 lines into one, but I dont really want the bobbins and wheels that I would probably have to use with dyneema, so was hoping to figure something out with belts first, the thought of using line would only work for me in the Z, but I have the option to for my Z/X to be the XY if I rotate 90 deg, still not decided which way to go but am exploring both, so trying to create something that can do both with minimal changes.
|
Re: First printer build March 13, 2016 10:04PM |
Registered: 8 years ago Posts: 34 |
Just order the mentioned motors and couplings locally so I should have them in a few days, I will liquid cool the drivers from the underside if I have to so u can use the 2A motors. Also have the rest of the bits and pieces I need to get all the axes moving on there way from china. I’m now thinking I should use individual drivers and ramps driver outputs on the z that way I would be able to level the bed, or maybe I should just try and find a closed belt longer then 800mm to connect the 2 shafts. just brought 2 from china, this may also aid with locking z when the steppers are plowed down.
|
Re: First printer build September 29, 2016 09:57PM |
Registered: 8 years ago Posts: 34 |
Ok so im slowly getting there, hoping this design will get me to the stage where I can do some basic prints to improve on this design. The first thing I want to print will be a pulley reduction for the z axis steppers
Edited 1 time(s). Last edit at 09/29/2016 10:15PM by melb_maker.


Edited 1 time(s). Last edit at 09/29/2016 10:15PM by melb_maker.
|
Re: First printer build September 30, 2016 09:46AM |
Registered: 8 years ago Posts: 318 |
Looks pretty cool. Can tell you have a CNC from all that aluminum. Only thing that comes to mind is that getting that bed level might be a hassle. Oh and if you haven't ordered electronics get the DRV8825 stepper drivers, they can do 1/32 microstepping. You could use it on you Z and E motors.
Oh, I should have mentioned this before, but Z axis belts are definitely a thing. Almost all delta printers use exclusively vertical belts for their movement.
If you need some help, or don't understand what I just said, feel free to send me a PM anytime
Printer: Prusa i3, 2 E3D v6 Hotends, Arduino + RAMPS 1.4 with a Bypassed 5V Regulator, 400w Insignia ATX PSU, Custom Designed Bowden Extruders
|
Re: First printer build October 01, 2016 12:20AM |
Registered: 8 years ago Posts: 34 |
Trew i didnt think about the deltas kind of the same thing. With the heat bed i was planning on having 6 beds that are adjustable on 4 points each, still considering how i will make them all join together and adjust, going to use 6mm aluminum plates that i will machine flat ( i actually haven't done much aluminum work on my cnc yet, been using a band saw and hack saw). I have the DVR8825 but after reading that they may not micro step correctly under load i am going to order another set of different ones for testing. I was also going to de solder the header from the drivers and replace it with one that it like 4 times the lenth that way i can put a heat sink on the under side and blow air through to cool them better. Still waiting on some screws that missed the last order and i need to get my heat beds cut but i should be up to my first test print in a week or so hopefully
|
Re: First printer build December 18, 2016 08:32AM |
Registered: 8 years ago Posts: 34 |


Ok so I have gotten the printer up to the stage where I can print pla out of a .5 mm nozzle. So fare I am happy everything seems to be working as I hoped. I was able to stack two drivers on top of each other to run 2 steppers at highest possible current off of just 1 ramps output, and the parts I used enabled me to cool the drivers from both the top of the chip and bottom of the PCB. The belts on the z axis seem to work ok but I will see how it goes at smaller layer height. Im going to spend some money on heat beds and maybe a better hot end I don’t know how my one will go with abs.
originally I was thinking I would have 6 separate heat beds that would all be adjustable on 4 points. It would be very rear that I would be printing on all 6 beds at once, I am re considering this now as it may not be suitable to print some higher temp filaments.
Im using sketchup, slic3r and pronterface to do my test printing, 1 difficulty I am having it importing .stl to sketchup it just sits there using 50% cpu for hours until I kill it, I think trying this on another computer will fix it.
The printer still needs to be finished off but at least now I have one
Edited 2 time(s). Last edit at 12/18/2016 08:43AM by melb_maker.
|
Re: First printer build December 18, 2016 02:07PM |
Registered: 11 years ago Posts: 5,780 |
Forget about Sketchup for 3D printing. It will almost never produce a printable STL file without having to run it through an extra step of repairing it (using Netfabb or other program/web site) before you can print. Every other CAD package available will produce quality STL files that don't have to be repaired before printing. I know, SketchUp is easy to learn. Try DesignSpark Mechanical instead. It has a similar user interface (direct edit), is easy to learn, and has many more features and capabilities than SketchUp.
If you're willing to invest more time and effort into learning a pro level CAD package, try OnShape or Fusion 360.
Bed leveling should be done on 3 points, not 4. 3 points define a plane, 4 points define a potato chip. By definition, a 4 point "leveling" scheme will bend the bed plate rather than leveling it. I know it's very common and almost everyone uses 4 point "leveling". A lot of people voted for Trump, too. So much for the wisdom of crowds...
Ultra MegaMax Dominator 3D printer: [drmrehorst.blogspot.com]
|
Re: First printer build December 19, 2016 07:47PM |
Registered: 8 years ago Posts: 34 |
Yer i had noticed problems when slicing some more complicated stls from sketchup, hope u hit the nail on the head with that one. Going to try DesignSpark tonight thanks for the recommendation  and yer using a 3 point adjustment makes alot more sense will most likely implement this when i get my beds cut, glad you mentioned it befor hand as it looks like they will be slightly different sizes now
and yer using a 3 point adjustment makes alot more sense will most likely implement this when i get my beds cut, glad you mentioned it befor hand as it looks like they will be slightly different sizes now
|
Re: First printer build December 19, 2016 09:05PM |
Registered: 11 years ago Posts: 5,780 |
Cast aluminum tooling plate makes a great bed. It comes milled flat, is thermally conductive, and stays flat when heated. A layer of Kapton or PEI on it will stick most common print materials without any other goo or slop.
Ultra MegaMax Dominator 3D printer: [drmrehorst.blogspot.com]
Ultra MegaMax Dominator 3D printer: [drmrehorst.blogspot.com]
|
Re: First printer build December 22, 2016 07:48AM |
Registered: 8 years ago Posts: 34 |
yer that was what i was thinking and it also has the added benefit of being able to be picked up by and inductive sensor witch is a big bonus over thick plates of glass however they seem to be quite expensive. i was thinking of getting some 6mm (or 10mm if i can) sheet aluminum cut to size and machining it down my self but i have a feeling the way the sheets are manufactured will create warping when heated unlike the cast tooling plates. i have herd there is a something you can do to map the levelness of the bed using the inductive sensor so that the z axis will adjust for any un levelness during the print so i may be able to get away with it and perhaps get a small tooling plate for smaller prints later down the track. i am starting to lean towards using 3 beds now 300mm x 200mm witch would only leave 9 adjustment points, but before i do that i need to close in my printer so i can vent outside so i can print abs and not have to worry about the fumes, i am going to use 10mm thick foil laminated polystyrene to do this and down the road i was thinking of insulating the printer with the same material so i can heat the print space.
after i have insulated and have a print bed solution i am hoping that there will be software available so i can replicate something like this. Prometheus System i think this is grate because it would seem like it could be expanded to a lager number of extrudes (more then 2) at a low cost, your not always heating a unused filament and there is only 1 hot end. to do this i would need more driver outputs from my ramps board, i was thinking i could achieve this buy having a number of steeper drivers all wired in parallel and modifying the merlin firmware so that only the driver needed to run the extrude in use is enabled and the rest are disabled. this is a long way off thow, im just putting it out there because i believe this method will take off in the next fue years as software companys start to cater for it
after i have insulated and have a print bed solution i am hoping that there will be software available so i can replicate something like this. Prometheus System i think this is grate because it would seem like it could be expanded to a lager number of extrudes (more then 2) at a low cost, your not always heating a unused filament and there is only 1 hot end. to do this i would need more driver outputs from my ramps board, i was thinking i could achieve this buy having a number of steeper drivers all wired in parallel and modifying the merlin firmware so that only the driver needed to run the extrude in use is enabled and the rest are disabled. this is a long way off thow, im just putting it out there because i believe this method will take off in the next fue years as software companys start to cater for it
|
Re: First printer build December 22, 2016 02:06PM |
Registered: 11 years ago Posts: 5,780 |
How are you dealing with the bed dropping when the motors are disabled, the controller is reset, or the power is switched off?
Ultra MegaMax Dominator 3D printer: [drmrehorst.blogspot.com]
Ultra MegaMax Dominator 3D printer: [drmrehorst.blogspot.com]
|
Re: First printer build December 22, 2016 09:06PM |
Registered: 8 years ago Posts: 34 |
at the moment i have just deleted the command out of slicer that turns the motors off after finishing the print and set the merlin firmware motor time out to 0 but i suspect when i take gear the motors down to give me a higher resolution on the z the idle holding torque of the steppers will be sufficient to hold it in place. i currently home from the negative on the z (from the bottom) so before i power up the motors i push the z axis as for as it will go down on the 2 sides to level it, this activates the z end stop so when i home the z it travels up approximately 2 mm until the end stop clears. seems to work for now bur i would rely like to add my inductive sensor that i have for it.
i added a drag chains to the x and y last night well started, relay should have got some bigger ones it was a pain getting the cables through. i might go get some abs today before the shop closes for xmas
i added a drag chains to the x and y last night well started, relay should have got some bigger ones it was a pain getting the cables through. i might go get some abs today before the shop closes for xmas
|
Re: First printer build December 23, 2016 07:45AM |
Registered: 11 years ago Posts: 5,780 |
How much does the moving portion of the Z axis (undercarriage, bed, heater, bearings, etc.) weigh?
I'm working on this problem with a design I am building with a 3-4 kg Z axis and 700 mm of travel. It was quite shocking the first time I rebooted the controller with the bed raised! I'm looking at using a worm gear drive to increase resolution and eliminate bed-drop. You can get NEMA-23 sized motors with EM brakes that will stop the bed from dropping when power is cut, but unless you add some easy additional circuit (to provide power to the brake as long as motor enable is high), it won't help with controller reset or motor disable commands. It does not provide any increase in Z resolution.
Ultra MegaMax Dominator 3D printer: [drmrehorst.blogspot.com]
|
Re: First printer build December 23, 2016 11:08AM |
Registered: 7 years ago Posts: 8 |
Hi
Not sure how this project is coming along but the issue I had with my motors was noise I recently read a document about some new TMC2100 drivers they use there software to increase the microstepping and a setting called stelthchop to make the steeper motors silent. I have ordered one to test but have not yet had time to test it.
BR
Adam
|
Re: First printer build December 23, 2016 12:37PM |
Registered: 10 years ago Posts: 14,672 |
Quote
Adampeirce88
Hi
Not sure how this project is coming along but the issue I had with my motors was noise I recently read a document about some new TMC2100 drivers they use there software to increase the microstepping and a setting called stelthchop to make the steeper motors silent. I have ordered one to test but have not yet had time to test it.
BR
Adam
There is a series of driver chips from Trinamic with this facility:
TMC2100 - the oldest of the series. You can get these built into plug-in drivers ("silent stepsticks"), making them an easy upgrade, but with all the usual disadvantages of plug-in drivers i.e. inadequate cooling and lack of software-controlled motor current. Theoretical maximum output current is 1.7A peak, but you won't get anywhere near this using plug-in drivers.
TMC2130 - as TMC2100 but with an SPI interface. Capable of 1.8A peak if you cool them very well (again, not on plug-in drivers).
TMC2660 - with SPI interface and capable of higher current than the 2130. We use these on the Duet WiFi 3D printer control board. (see [www.duet3d.com]). The theoretical peak current is 4A although that requires both very good cooling and clever firmware. On the Duet WiFi we limit them conservatively to 2A peak at present, but we expect to increase this to somewhere between 2.5A and 3A soon.
There are a couple of other variants as well, one of which uses external mosfets to drive high-current motors.
Large delta printer [miscsolutions.wordpress.com], E3D tool changer, Robotdigg SCARA printer, Crane Quad and Ormerod
Disclosure: I design Duet electronics and work on RepRapFirmware, [duet3d.com].
|
Re: First printer build December 27, 2016 04:46AM |
Registered: 8 years ago Posts: 34 |


Im not sure how much it weighs now but it will weigh a lot more when I slap a 600mm x 300mm x 6mm plate of aluminum on it, I haven’t done any calculations but im shore the motors will not have enough power to lift it with no gear/belt system. I was looking into a stepper with built in gearing but I heard you could get play in the gears witch would create backlash (may not be noticeable on the z) but I thought a belt gearing system would be fun to make now that I can print
.Fusion 360 is free not for profit and has inbuilt cam for my router so I might give that one a go first
That Duet WiFi controller looks good, when im looking to add more then 2 extrudes I will definitely look in to it, I like the 5 driver extension board, that relay got my attention. Interesting driver to it would be nice to be able to set driver current in firmware. Can this run Merlin or dose it have a custom firmware?
I started re-wiring and added a drag chain the other day but got frustrated at the lack of wire I had and my inability to obtain more due to Christmas commitments so I gave up until today when I could get some hoping .12 mm wire will be ok for the steppers in less then a 2 meter run
Edited 1 time(s). Last edit at 12/27/2016 04:53AM by melb_maker.
|
Re: First printer build December 27, 2016 11:47AM |
Registered: 11 years ago Posts: 5,780 |
That's going to weigh at least 5 kg all-in. You'd better put some springs at the bottom of the z axis! If the bed is up and either the power is shut off or fails, the motors are disabled by command, or the controller board is reset, that thing is going to hit bottom like a sledge hammer. Your adjustments for level and zero won't last, and it's doubtful the wood enclosure will hold up for more than a few of those events. You could add counterweights to reduce the problem, but that could introduce backlash problems. Driving it with a pulley reduction system will only work if the reduction ratio multiplies the motor's detent torque enough to stop the bed from dropping. The more belts, pulleys, and gears you add, the more places there are for backlash to creep into the system. A combo of counterweights and a gear/pulley reduction system should work.
I don't know how much a pulley reduction system would add to cost and effort, but a worm gear drive can be pretty cheap if you're willing to put in some time and effort. See [www.servocity.com] for an idea of what's required. A lot of garage door openers are driven by worm gears and you can buy a set of replacement gears for about $10 (or even less if you get them from China). They usually have a 32:1 reduction ratio and use 1/2" shafts. Add in a few FR8zz bearings (about $1.50 each) and some aluminum scraps and you have a relatively simple and cheap solution to the bed drop problem. I can't tell you how strong these plastic gears are, but if they can lift a garage door and hold it they can lift and hold your printbed. With 32:1 reduction and a 20 tooth drive pulley, you'll have 160 full steps per mm of travel. Running the motor in full steps might be a little noisy, but mainly when you're running the bed up and down, not so much during printing. In a screw lifted Z axis you don't need antibacklash nuts because the weight of the bed keeps the nut's threads in contact with the screw threads at all times. The worm drive should be the same- the weight of the bed will keep the disc gear rotated against the worm gear at all times, even as it wears. The worm drive is essentially a screw drive in that respect.
If you don't like plastic gears, there are plenty of metal worm drive gear reducers available with or without motor attached. See [www.ebay.com]
It's about $100 for one with a motor and about $60 without a motor including shipping, usually from China. The 56 mm long stepper's will provide more than enough torque to lift the load with a 20 or 30:1 gear reducer (right now I'm lifting a 3+ kg Z axis directly with that size motor without any gear reduction). You could probably get away with a NEMA-17 motor, but none of these drives has that size of mount. The Ondrives/Rino parts are the cream of the crop.
Ultra MegaMax Dominator 3D printer: [drmrehorst.blogspot.com]
|
Re: First printer build December 27, 2016 04:29PM |
Registered: 10 years ago Posts: 14,672 |
Quote
melb_maker
That Duet WiFi controller looks good, when im looking to add more then 2 extrudes I will definitely look in to it, I like the 5 driver extension board, that relay got my attention. Interesting driver to it would be nice to be able to set driver current in firmware. Can this run Merlin or dose it have a custom firmware?
Why would you want to run Marlin on 32-bit electronics? Marlin is written for 8-bit electronics with limited resources. Unlike Marlin, firmwares written for 32-bit controllers support precise step time generation, network interfaces, and easy firmware configuration by editing a text file on the SD card instead of having to recompile the firmware. For the Duet you can even edit the configuration file in the web interface, or make configuration changes on the fly.
Edited 1 time(s). Last edit at 12/27/2016 04:30PM by dc42.
Large delta printer [miscsolutions.wordpress.com], E3D tool changer, Robotdigg SCARA printer, Crane Quad and Ormerod
Disclosure: I design Duet electronics and work on RepRapFirmware, [duet3d.com].
|
Re: First printer build May 16, 2019 07:20AM |
Registered: 8 years ago Posts: 34 |
Hey everyone I'm back again, it's been over 2 years now in which I have been printing consistently. Not the fastest and not the best quality but produced very useable things. Truth be told I brought some drones, got a little bit distracted and lost my motivation to expand it to its original intended capability. I hadn’t lost interest though, I have done a few small standard upgrades like:
Octoprint
BLtouch
changed the heat bed
added a fan
ventilation to outside
but recently I watch the Thomas Sanladerer MRRF2018 with the E3D tool changer, up until that point I couldn't really envisage how to achieve repeatable tool changing. The kinematic couplings they use is very smart.
Looks like I have lost interest in expanding my drone fleet now. . . .
So im looking into doing the following upgrades to my printer
Core XY conversion – i will get better belts and replace the y axis linear rails with lighter better quality parts. Going to keep the belts on the z axis as I I have had no issue with them yet and I want to see if they hold up to higher tolerance
Heat bed – I have 3 heat beds 200 x 300 om only using 1 at the moment but I intend on fitting the other 2 with external PID heat controllers (possible i2c controlled)
Tool changing – this is what gets me a bit excited, all the information is there now to implement it with out to much development. The parts needed are relatively cheep to, im just hoping I can get it to run on a 8 bit controller with 6 or so hot ends and extruders. $450AUD for a Duet is a lot of money so I want to see if I can get it to run on a ramps board. theoretically it should be capable but g code may be difficult and require post processing.
Just wanted to say thanks for the support, I like to bounce ideas off other people and see what they think.
I will start up another thread for my tool changing project hoping to have all the parts I need to start testing marlin limitations this weekend. Imagine that 5 extruders no oozing
Dose anyone know what gcode commands I would need to use in order change what hot end and extruder the gcode affects (tool change) but not changing the xy axis steppers
Edited 2 time(s). Last edit at 05/16/2019 07:22AM by melb_maker.
Sorry, only registered users may post in this forum.