Project: Teacup Firmware
Posted by Triffid_Hunter
|
Re: Project: Teacup Firmware December 13, 2013 02:36AM |
Registered: 11 years ago Posts: 290 |
Quote
phord
Thanks for the patch. I think I have embodied all your fixes in this patch:
[github.com]
Also in the mac-simulator branch.
Can you try it and let me know if it works ok for you?
Ya, it is working fine. I forgot to tell that compiler give warning on 'hot' and 'cold' attribute in this kind of statement:
./dda.h:205:63: warning: unknown attribute 'hot' ignored [-Wattributes]
...__attribute__ ((hot));
But I ignore it for now since it is working.
I just find the problem now. It is not config file related but instead of the undef of axis/movement direction i.e.: X_INVERT_DIR, Y_INVERT_DIR etc. I uncomment those lines to suite my machine.Quote
phord
The PIN settings in the configs should be ignored for the simulator (mostly) but I have not tested them all thoroughly. Can you explain a little more? I do not get a just a flat line when I tried it here just now.
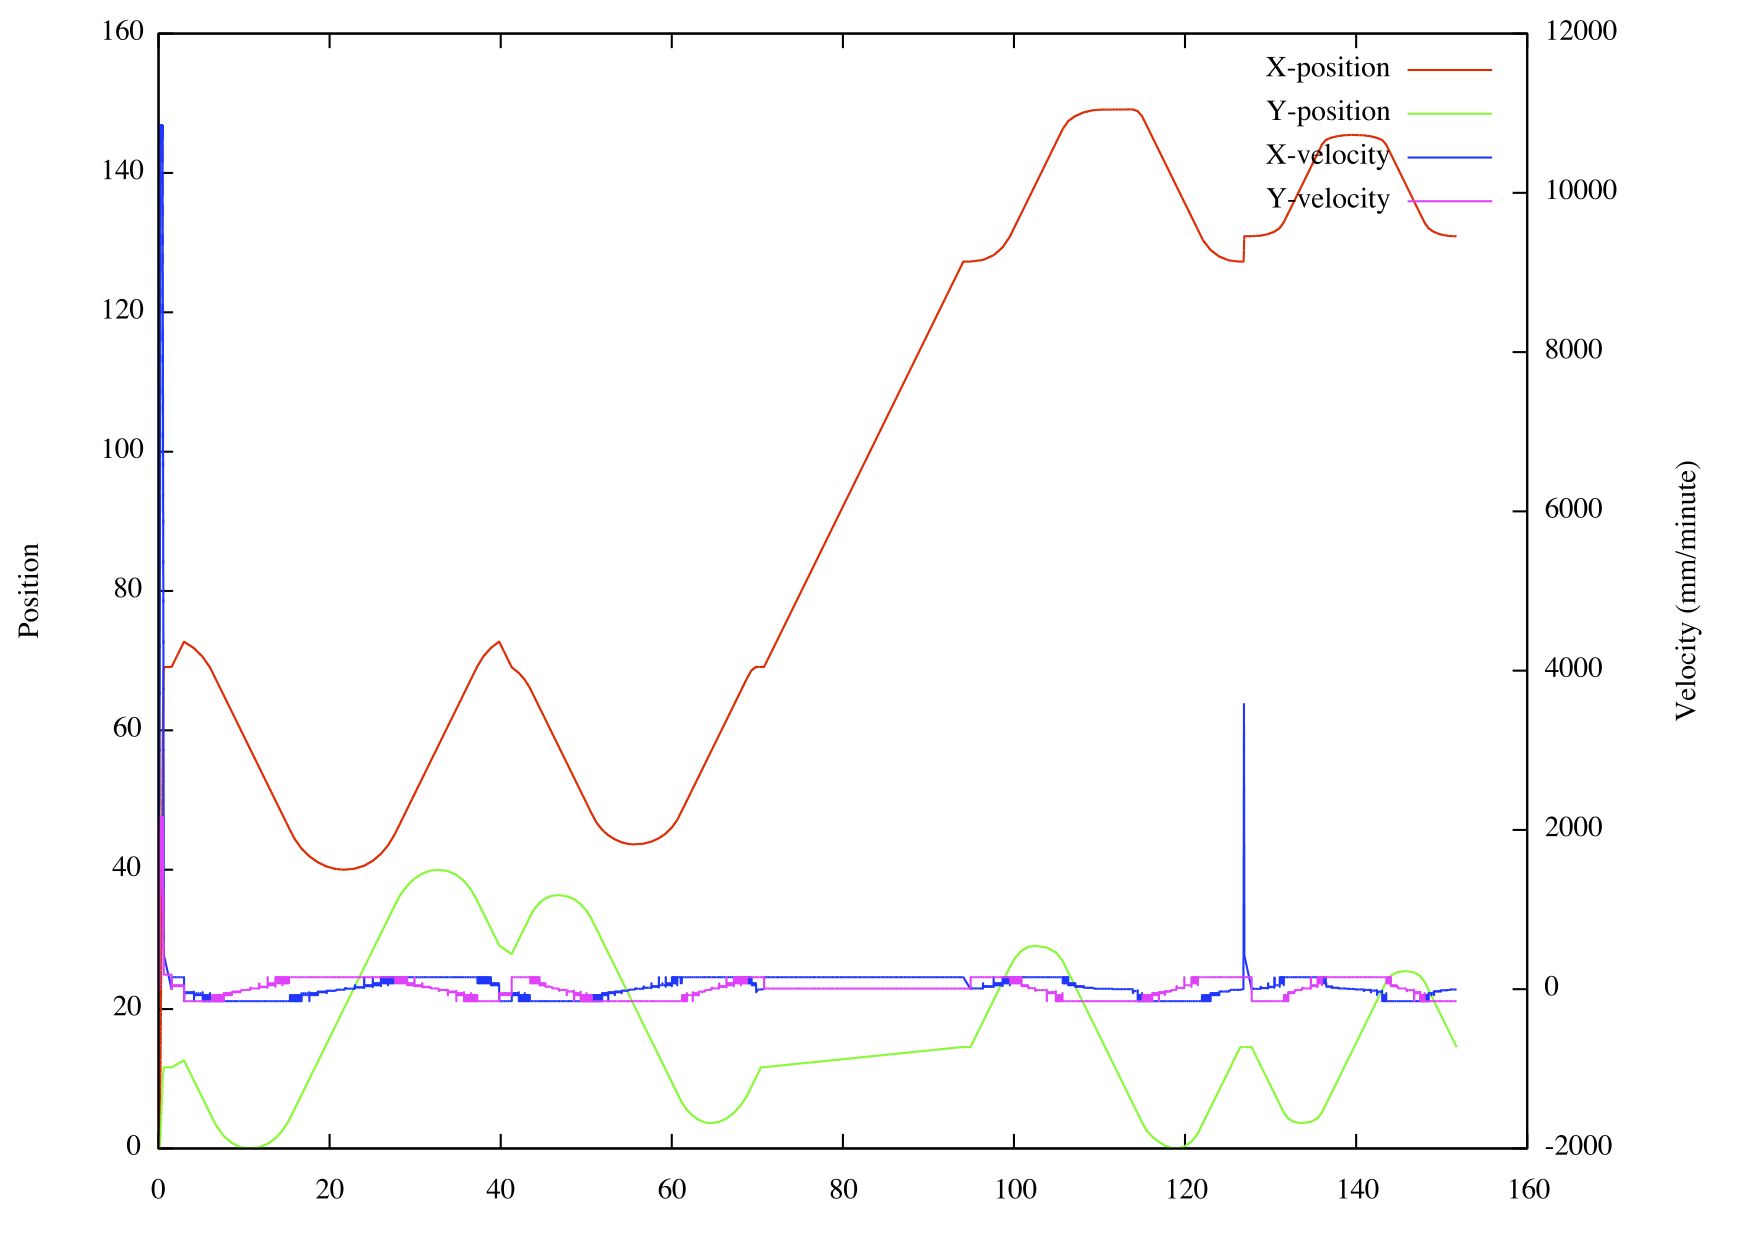
Attached the plot: 1 = the OK one, 2 = the flat one after uncommenting the [xyze]_invert_dir
|
Re: Project: Teacup Firmware December 13, 2013 08:47AM |
Registered: 13 years ago Posts: 7,616 |
Quote
Attached the plot
Oh, a speed bump at about second 128 in the first plot. On a real printer this likely means step losses. Shouldn't happen.
Quote
...__attribute__ ((hot));
Just removed these. Can't even find documentation for this for the AVR variant of gcc. On non-AVR gccs this means "optimize more agressively", which I hope isn't possible, because we optimize as much as possible anyways.
| Generation 7 Electronics | Teacup Firmware | RepRap DIY |
|
Re: Project: Teacup Firmware December 13, 2013 11:25AM |
Registered: 12 years ago Posts: 44 |
|
Re: Project: Teacup Firmware December 13, 2013 05:01PM |
Registered: 12 years ago Posts: 44 |
|
Re: Project: Teacup Firmware December 14, 2013 08:16AM |
Registered: 12 years ago Posts: 1,236 |
Quote
phord
Quote
Traumflug
Quote
Attached the plot
Oh, a speed bump at about second 128 in the first plot. On a real printer this likely means step losses. Shouldn't happen.
Yes, I was looking at that, too. The startup velocity at t=0 looks wacky, too.
There seem to be some other discontinuities as well, e.g. at 40, and something funny at 70-90. Unless I am reading it wrong?
What is Open Source?
What is Open Source Hardware?
Open Source in a nutshell: the Four Freedoms
CC BY-NC is not an Open Source license
|
Re: Project: Teacup Firmware December 15, 2013 07:25AM |
Registered: 13 years ago Posts: 7,616 |
The question is, is this the code from the master or experimental branch. I'm not sure wether all fixes for a smooth lookahead ride are on the master branch, because there's a fundamental flaw in jerk calculation. On experimental it's fixed. Experimental will go to master as soon as it's reasonably sure it doesn't introduce new flaws.
| Generation 7 Electronics | Teacup Firmware | RepRap DIY |
|
Re: Project: Teacup Firmware December 15, 2013 11:34AM |
Registered: 11 years ago Posts: 290 |
Quote
Traumflug
The question is, is this the code from the master or experimental branch. I'm not sure wether all fixes for a smooth lookahead ride are on the master branch, because there's a fundamental flaw in jerk calculation. On experimental it's fixed. Experimental will go to master as soon as it's reasonably sure it doesn't introduce new flaws.
I use the master branch. I thought the fix is already pushed into master branch. Attached another example. It is a first layer of belt-clamp sliced by Slic3r for Teacup's flavor. I notice lots of speed bump. I think I should test the experimental branch then.
|
Re: Project: Teacup Firmware December 16, 2013 04:34AM |
Registered: 11 years ago Posts: 290 |
I am running Teacup (master branch) on my machine and have this issue: It waits for target temp to achieve for every move, so the extruder just pause for a moment between moves.
Initially I suspect every move needs to check for waitfor_temp, but it is not; and waitfor_temp only set for the M116 or anything calling enqueue(NULL). So then I excerpt some of the gcode of the first layer and remove everything else and only leave the movement (no extrusion as well) then run it though the pronterface. It just working fine, the moves run smoothly without pausing. So I suspect this has something to do with setting waitfor_temp in the previous dda creation. I then add M104 and M116 command to the code and the problem back. (see attached file belt-clamp-strip.printing).
I guess this because the waifor_temp is not initialized when created so it takes abritary value other than zero (?). I then add this line in the dda_queue():
…
if (t != NULL) {
new_movebuffer->endstop_check = endstop_check;
new_movebuffer->endstop_stop_cond = endstop_stop_cond;
new_movebuffer->waitfor_temp = 0; //<--- set waitfor_temp to zero for non null move
}
else {
// it's a wait for temp
new_movebuffer->waitfor_temp = 1;
}
…
and it run OK now. Running another print to see if this failing other case.
|
Re: Project: Teacup Firmware December 16, 2013 08:17AM |
Registered: 13 years ago Posts: 7,616 |
Quote
I guess this because the waifor_temp is not initialized when created so it takes abritary value other than zero (?). I then add this line in the dda_queue():
Good catch! Once the flag was set, it would stick forever in this queue entry and as entries are re-used, every 8th line of G-code would wait for temperature instead of moving something. Fixed on the experimental branch: [github.com]
| Generation 7 Electronics | Teacup Firmware | RepRap DIY |
|
Re: Project: Teacup Firmware December 25, 2013 12:48PM |
Registered: 10 years ago Posts: 2 |
Quote
zungmann
Another one though, on the real running firmware I am stuck with M116 as could never get the 'Temp achieved' after heating the extruder to a target temp and wait for it. I configure Teacup with both using extruder and heat bed. And apparently M116 expects both extruder and bed temp to be set to return 'Temp achieved' whereas I just only want to heat the extruder and leave the bed cool. Is this on purpose that we have to set both temp if configured to use both?
Hi there.
I´m wondering if there is a solution for the above mentioned problem.
I´ve build my first printer and he´s working very well but he stucks very often at the M116 command.
Is the firmware expecting that the target temperature is reached exactly or is there a tolerance included?
Thanks for your help.
|
Re: Project: Teacup Firmware December 26, 2013 05:39AM |
Registered: 11 years ago Posts: 290 |
Quote
TOBE
Quote
zungmann
Another one though, on the real running firmware I am stuck with M116 as could never get the 'Temp achieved' after heating the extruder to a target temp and wait for it. I configure Teacup with both using extruder and heat bed. And apparently M116 expects both extruder and bed temp to be set to return 'Temp achieved' whereas I just only want to heat the extruder and leave the bed cool. Is this on purpose that we have to set both temp if configured to use both?
Hi there.
I´m wondering if there is a solution for the above mentioned problem.
I´ve build my first printer and he´s working very well but he stucks very often at the M116 command.
Is the firmware expecting that the target temperature is reached exactly or is there a tolerance included?
Thanks for your help.
Here is what I do now on my experimental branch:
- add a flag to temp_sensors_runtime, I call it active. This to indicate if the heater is being used. initially set to 0, means unused
- the flag is then set within temp_set function which is called by M104 or M140. But this set active only if the temperature is set above the heater 'normal room temperature'. My set up the room temperature for bed / extruder is around 26C. I add this room temp as 'MIN HEATING TEMPERATURE' in my config.h. There is no point set the temperature below the MIN HEATING TEMP, you will get forever wait by M116. To set the heater as inactive just set the temp below this MIN HEATING TEMP
- change the temp_achieved function to only include active heater
- also change the checking for temp hysteresis and residence within the temp_sensor_tick function
Here is my changes in the code:
+ uint8_t active:1; ///bool: is it active? ie. temperature is set (by M104 or M140)
} temp_sensors_runtime[NUM_TEMP_SENSORS];
void temp_init() {
temp_sensor_t i;
for (i = 0; i < NUM_TEMP_SENSORS; i++) {
+ temp_sensors_runtime.active = 0; /// set first as inactive
switch(temp_sensors.temp_type) {
#ifdef TEMP_MAX6675
// initialised when read
within temp_sensor_tick()
+ // Only check if it is active
+ if (temp_sensors_runtime.active) {
+ if (labs((int16_t)(temp_sensors_runtime.last_read_temp - temp_sensors_runtime.target_temp)) < (TEMP_HYSTERESIS*4)) {
+ if (temp_sensors_runtime.temp_residency < (TEMP_RESIDENCY_TIME*120))
+ temp_sensors_runtime.temp_residency++;
+ }
+ else {
+ // Deal with flakey sensors which occasionally report a wrong value
+ // by setting residency back, but not entirely to zero.
+ if (temp_sensors_runtime.temp_residency > 10)
+ temp_sensors_runtime.temp_residency -= 10;
+ else
+ temp_sensors_runtime.temp_residency = 0;
+ }
@@ -322,7 +327,8 @@ uint8_t temp_achieved() {
uint8_t all_ok = 255;
for (i = 0; i < NUM_TEMP_SENSORS; i++) {
- if (temp_sensors_runtime.temp_residency < (TEMP_RESIDENCY_TIME*100))
+ // exclude inactive temperature
+ if (temp_sensors_runtime.active && (temp_sensors_runtime.temp_residency < (TEMP_RESIDENCY_TIME*100)))
all_ok = 0;
@@ -335,6 +341,11 @@ void temp_set(temp_sensor_t index, uint16_t temperature) {
if (index >= NUM_TEMP_SENSORS)
return;
+ // activate temperature set only if target temp >= TEMP_MIN_HEATING, otherwise set inactive so it will not be checked by M116
+ temp_sensors_runtime[index].active = 1;
+ if (temperature < TEMP_MIN_HEATING) {
+ temp_sensors_runtime[index].active = 0;
+ }
Any comments are welcomed off course…
|
Re: Project: Teacup Firmware December 27, 2013 03:29AM |
Registered: 13 years ago Posts: 7,616 |
If you don't want the bed to be heated, why do you send a M140 command? Sending a M140 and then modifying the firmware to not heat anyways doesn't appear logical to me. A firmware should do what it's commanded to do and user wishes should be handled on the G-code generation side.
| Generation 7 Electronics | Teacup Firmware | RepRap DIY |
|
Re: Project: Teacup Firmware December 27, 2013 11:39PM |
Registered: 11 years ago Posts: 290 |
|
Re: Project: Teacup Firmware December 28, 2013 04:54AM |
Registered: 13 years ago Posts: 7,616 |
I see the problem, thanks for explaining it. Should be doable with less code, because target_temp set to zero already means "turned off". Put a possible solution onto the experimental branch, please test: [github.com]
| Generation 7 Electronics | Teacup Firmware | RepRap DIY |
|
Re: Project: Teacup Firmware December 28, 2013 02:21PM |
Registered: 10 years ago Posts: 2 |
|
Re: Project: Teacup Firmware January 22, 2014 01:38AM |
Registered: 12 years ago Posts: 258 |
Are these the units for the Teacup PID parameters?
P: counts/(C/4)*PID_SCALE
I: counts/((C/4)*(s*4)) *PID_SCALE = counts/(C*s)*PID_SCALE
D: counts/((C/4)/(s*4*TH_COUNT)) * PID_SCALE = counts/((C/16s)*TH_COUNT))*PID_SCALE or counts/(C/2s)*PID_SCALE
I Limit: C/4*s*4 = C*s
The default parameters are set around [github.com] while the PID_SCALE is 1024L and TH_COUNT is 8 in config.h
The s*4 factor is due to the 250 ms set by [github.com]
The C/4 unit is Teacup's 1/4 degree temperature measurement.
With this, Teacup's default PID of (8124, 512, 24576) would be a PID of (32,0.5,48) in a degree-second units interpretation.
|
Re: Project: Teacup Firmware February 04, 2014 11:48AM |
Registered: 12 years ago Posts: 258 |
Editing the D calculation a bit:
I opened [github.com] to think about this.
Quote
DaveX
Are these the units for the Teacup PID parameters?
P: counts/(C/4)*PID_SCALE
I: counts/((C/4)*(s*4)) *PID_SCALE = counts/(C*s)*PID_SCALE
D: counts/((C/4)/(TH_COUNT*s/4)) * PID_SCALE = counts/(C/(s*TH_COUNT))*PID_SCALE or counts/(C/8s)*PID_SCALE
I Limit: C/4*s*4 = C*s
The default parameters are set around [github.com] while the PID_SCALE is 1024L and TH_COUNT is 8 in config.h
The s*4 factor is due to the 250 ms set by [github.com]
The C/4 unit is Teacup's 1/4 degree temperature measurement.
With this, Teacup's default PID of (8124, 512, 24576) would be a PID of (32,0.5,3) in a degree-second units interpretation.
I opened [github.com] to think about this.
|
Re: Project: Teacup Firmware May 25, 2014 10:00AM |
Registered: 13 years ago Posts: 7,616 |
To partially solve this one: [forums.reprap.org] I yesterday raised the size of the S variable from 16 to 32 bits. Costs just 8 bytes binary size and 2 bytes RAM, so less negative impact than expected. And hopefully we have a positive impact :-)
It's on the experimental branch.
It's on the experimental branch.
| Generation 7 Electronics | Teacup Firmware | RepRap DIY |
|
Re: Project: Teacup Firmware May 25, 2014 10:09AM |
Registered: 13 years ago Posts: 7,616 |
Another detail showing Teacups dedication for physically sane movements.
Since yesterday there's an "issue-56" branch which implements adaptive homing feedrates. The idea is to properly decelerate when hitting an endstop to avoid harm to the mechanics. On the other side this means the carriage moves a bit over the endstop trigger point. To solve both problems, ENDSTOP_CLEARANCE_{XYZ} was introduced which tells how far a particular endstop allows to move over the trigger point. Teacup then simply moves slow enough to keep this distance at a given deceleration rate (set by ACCELERATION). More explanations in config.default.h. And SLOW_HOMING is gone, set ENDSTOP_CLEARANCE to zero instead.
Implemented for X_MIN only so far. If further tests are as positive as the first few, other axes will follow soon. It looks like this doesn't even raise binary size, as all the maths can be optimized away.
| Generation 7 Electronics | Teacup Firmware | RepRap DIY |
|
Re: Project: Teacup Firmware May 30, 2014 10:05AM |
Registered: 13 years ago Posts: 7,616 |
Adaptive homing feedrates are on the experimental branch now, working for all axes. The issue-56 branch is gone.
It's nice to see how homing happens without any bumps, just with smooth movements.
It's nice to see how homing happens without any bumps, just with smooth movements.
| Generation 7 Electronics | Teacup Firmware | RepRap DIY |
|
Re: Project: Teacup Firmware June 15, 2014 08:28PM |
Registered: 13 years ago Posts: 7,616 |
Just added a section about doing precision timing/performance measurements to the wiki page: [reprap.org]
This should allow to do even better fine tuning and help in detecting bottlenecks. Also help a lot in deciding wether some new code brings in bottlenecks or not.
That said, Teacup firmware is about to shrink by 1 kB, just due to better coding doing the same. Now I'm just waiting for somebody reporting which insane speeds one can reach on ARM based boards.
| Generation 7 Electronics | Teacup Firmware | RepRap DIY |
|
CoreXY, Delta, WhatTheFun? July 01, 2014 08:40AM |
Registered: 13 years ago Posts: 7,616 |
Over the last two weeks some 5 to 8 people asked about support for various non-cartesian robots like CoreXY or Deltas. This is more than the last two years together, a welcome surprise.
Can I ask what happened? A serious bug in Marlin?
Anyways, please just start. Write code, try, experiment, I'll happily help. An ATmega allows no less than 10.000 uploads, so you can try a really lot, no need to hesitate.
Can I ask what happened? A serious bug in Marlin?
Anyways, please just start. Write code, try, experiment, I'll happily help. An ATmega allows no less than 10.000 uploads, so you can try a really lot, no need to hesitate.
| Generation 7 Electronics | Teacup Firmware | RepRap DIY |
|
Re: CoreXY, Delta, WhatTheFun? July 01, 2014 09:23AM |
Registered: 11 years ago Posts: 72 |
I would like support for bipolar coordinate translation :-)
But I think one of my friends (software man) and I will try to port it to teacup our self soon. We need to fit it on at atmega328 and we can't get marlin down in size for that.
So Teacup could be the way to go for us tooo ;-)
Jesper
But I think one of my friends (software man) and I will try to port it to teacup our self soon. We need to fit it on at atmega328 and we can't get marlin down in size for that.
So Teacup could be the way to go for us tooo ;-)
Jesper
|
Teacup and brushless motors. July 10, 2014 06:25PM |
Registered: 13 years ago Posts: 7,616 |
From a PM:
Looks like you're a bit confused. A few bits, probably you know most of this already:
- You can program a Gen7 (and most other RepRap electronics) just like an Arduino. After installing Gen7 support package, selecting the board, etc. you can compile and upload these example sketches coming with the IDE. Same for almost everything else working on an plain Arduino.
- Teacup firmware doesn't use Arduino libraries at all. Arduino is used just as a compile tool. That's partly the reason why Teacup is so small and fast. Accordingly, you can use avr-libc functions, only, and there's no setup() and no loop().
- Teacup firmware is written in plain C, so no classes, function instead of method calls and .c file suffixes.
- Arduino compiles all files available, no matter wether they're used or not. Accordingly, every project with more than just the .ino file has to use its own directory.
- Trying to mix Teacup code with Arduino library calls is probably a recipe for disaster. Both have a main(), both occupy some interrupts, etc.
What would I do?
1. Get this motor running with an Arduino sketch in its own directory. You're on this track already, so this is likely the fastest way to first successes.
2. Arduino libraries are Open Source, so you can grab those parts of the code you need (or rewrite them easily) and stuff them into Teacups' folder. Only as much as neccessary, to avoid conflicts.
3. ... depends on what you want to achieve ...
Edited 1 time(s). Last edit at 07/10/2014 06:30PM by Traumflug.
Quote
I´m using Gen7 1.5 board with Teacup fw and i would like implement some code to control brushless motor. I tested this code with Arduino Uno and it is working very well. The problem is that when I put ino file in to Teacup folder and try to compile I get this error:
autoSpindleDriver.ino: In function 'void setup()':
autoSpindleDriver:29: error: 'delay' was not declared in this scope [...]
Looks like you're a bit confused. A few bits, probably you know most of this already:
- You can program a Gen7 (and most other RepRap electronics) just like an Arduino. After installing Gen7 support package, selecting the board, etc. you can compile and upload these example sketches coming with the IDE. Same for almost everything else working on an plain Arduino.
- Teacup firmware doesn't use Arduino libraries at all. Arduino is used just as a compile tool. That's partly the reason why Teacup is so small and fast. Accordingly, you can use avr-libc functions, only, and there's no setup() and no loop().
- Teacup firmware is written in plain C, so no classes, function instead of method calls and .c file suffixes.
- Arduino compiles all files available, no matter wether they're used or not. Accordingly, every project with more than just the .ino file has to use its own directory.
- Trying to mix Teacup code with Arduino library calls is probably a recipe for disaster. Both have a main(), both occupy some interrupts, etc.
What would I do?
1. Get this motor running with an Arduino sketch in its own directory. You're on this track already, so this is likely the fastest way to first successes.
2. Arduino libraries are Open Source, so you can grab those parts of the code you need (or rewrite them easily) and stuff them into Teacups' folder. Only as much as neccessary, to avoid conflicts.
3. ... depends on what you want to achieve ...
Edited 1 time(s). Last edit at 07/10/2014 06:30PM by Traumflug.
| Generation 7 Electronics | Teacup Firmware | RepRap DIY |
Just pushed a fix for a long standing bug where axes with a higher steps/mm than the X axis would not reach target speed, because acceleration wasn't steep enough. This also gets rid of the impression MAXIMUM_FEEDRATE_Z would not limit max feedrate, but a 6th of it.
For those used to the buggy version: expect your Z axis to become _much_ faster (and also accelerating faster) when sending the same F commands. Reducing F compensates this.
It's on the experimental branch, enjoy!
For those used to the buggy version: expect your Z axis to become _much_ faster (and also accelerating faster) when sending the same F commands. Reducing F compensates this.
It's on the experimental branch, enjoy!
| Generation 7 Electronics | Teacup Firmware | RepRap DIY |
|
Re: Teacup and brushless motors. July 11, 2014 10:29AM |
Registered: 13 years ago Posts: 7,616 |
I've looked up servo/brushless motor handling a bit. Glancing over this class it looks like you have to send pulses to a pin which sets a given servo into a position dependent on the pulse width. Pulse width is 544 to 2400 microseconds and pulses have to be repeated not more often than every 20 milliseconds.
The Ugly:
- This class occupies pretty much the whole ATmega (at least 3 timers). Which means you can either run a servo or run something else. To run steppers on the same Arduino/Gen7 at the same time you'd have to heavily modify it anyways.
- Even with this solved, writing a precise pulse in the microseconds range means disturbing interrupts, which also means disturbing stepper motors.
- Before you ask: this is true for any firmware, even those using Arduino libraries.
The Bad:
- Sending pulses might have to be squeezed somewhere in, in parallel to running steppers.
The good:
- Generating precise pulses in Teacup is trivial:
- Setting up a distinct timer for pulses, similar to the step timer, should be doable. This is the way to go when running servo pulses and steppers in parallel.
The unknown:
- The minimum between two pulses is 20'000 us = 20 ms. How much is the maximum interval? Would it be sufficient to send just one pulse to get the spindle running forever? This way it could be done before starting steppers, never disturbing them.
- Are there brushless motor drivers using something like SPI? Especially when continued pulses are required, this might be an easier way to go.
The Ugly:
- This class occupies pretty much the whole ATmega (at least 3 timers). Which means you can either run a servo or run something else. To run steppers on the same Arduino/Gen7 at the same time you'd have to heavily modify it anyways.
- Even with this solved, writing a precise pulse in the microseconds range means disturbing interrupts, which also means disturbing stepper motors.
- Before you ask: this is true for any firmware, even those using Arduino libraries.
The Bad:
- Sending pulses might have to be squeezed somewhere in, in parallel to running steppers.
The good:
- Generating precise pulses in Teacup is trivial:
// Pin Setup:
WRITE(pin, 0);
SET_OUTPUT(pin);

// For each pulse:
ATOMIC_START
  WRITE(pin, 1);
  delay_us(delay_in_microseconds);
  WRITE(pin, 0);
ATOMIC_END
- Setting up a distinct timer for pulses, similar to the step timer, should be doable. This is the way to go when running servo pulses and steppers in parallel.
The unknown:
- The minimum between two pulses is 20'000 us = 20 ms. How much is the maximum interval? Would it be sufficient to send just one pulse to get the spindle running forever? This way it could be done before starting steppers, never disturbing them.
- Are there brushless motor drivers using something like SPI? Especially when continued pulses are required, this might be an easier way to go.
| Generation 7 Electronics | Teacup Firmware | RepRap DIY |
|
Re: Project: Teacup Firmware July 11, 2014 06:30PM |
Registered: 10 years ago Posts: 1,381 |
|
Re: Teacup and brushless motors. July 11, 2014 06:30PM |
Registered: 9 years ago Posts: 4 |
I forget that Teacup fw is plain C so I thought this wil work. I will control motor with separate arduino. I was searching on the Internet how to control fan with Gen7 board but I did find nothing. Is this possible with your board? Could you please discribe how can I set it up? Many thanks for any help.
|
Re: Teacup and brushless motors. July 11, 2014 06:39PM |
Registered: 13 years ago Posts: 7,616 |
Quote
dronecz
Is this possible with your board? Could you please discribe how can I set it up?
Such requests make me wonder why I wrote two long, extended, detailed posts above, right on this page. If you don't care to read them I can write the code for you, but this requires cash.
| Generation 7 Electronics | Teacup Firmware | RepRap DIY |
|
Re: Teacup and brushless motors. July 11, 2014 06:50PM |
Registered: 9 years ago Posts: 4 |


Sorry, only registered users may post in this forum.