New experimental firmware: all kinematics in host
Posted by KevinOConnor
|
Re: New experimental firmware: all kinematics in host July 30, 2017 06:57AM |
Registered: 6 years ago Posts: 1 |
Getting teady to throw in the towel on klipper. I can connect, but in Octoprint terminal typing 'status' gives me a message about printer not being ready. Trying resert doesnt help. here is mk log file.
Starting Klippy...
Args: ['/home/pi/klipper/klippy/klippy.py', '/home/pi/printer.cfg', '-l', '/tmp/klippy.log']
Git version: 'v0.4.0-104-g981c536-dirty'
CPU: 4 core ARMv7 Processor rev 4 (v7l)
Python: '2.7.9 (default, Sep 17 2016, 20:26:04) \n[GCC 4.9.2]'
Start printer at Sun Jul 30 03:37:08 2017 (1501385828.3 11.5)
===== Config file =====
[stepper_x]
step_pin = ar54
dir_pin = ar55
enable_pin = !ar38
step_distance = .0125
endstop_pin = ^ar3
position_endstop = 0
position_max = 200
homing_speed = 50
[stepper_y]
step_pin = ar60
dir_pin = !ar61
enable_pin = !ar56
step_distance = .0125
endstop_pin = ^ar14
position_endstop = 0
position_max = 200
homing_speed = 50
[stepper_z]
step_pin = ar46
dir_pin = ar48
enable_pin = !ar62
step_distance = 0.00025
endstop_pin = ^ar18
position_endstop = 0.5
position_max = 200
[extruder]
step_pin = ar26
dir_pin = ar28
enable_pin = !ar24
step_distance = .002
nozzle_diameter = 0.400
filament_diameter = 1.750
heater_pin = ar10
sensor_type = EPCOS 100K B57560G104F
sensor_pin = analog13
control = pid
pid_kp = 22.2
pid_ki = 1.08
pid_kd = 114
min_temp = 0
max_temp = 250
[heater_bed]
heater_pin = ar8
sensor_type = EPCOS 100K B57560G104F
sensor_pin = analog14
control = watermark
min_temp = 0
max_temp = 130
[fan]
pin = ar9
[mcu]
serial = /dev/ttyUSB0
pin_map = arduino
[printer]
kinematics = cartesian
max_velocity = 300
max_accel = 3000
max_z_velocity = 5
max_z_accel = 100
=======================
Starting serial connect
Stats 11.6: gcodein=0 print_time=0.000 buffer_time=0.000 print_stall=0 mcu_awake=0.000 mcu_task_avg=0.000000 mcu_task_stddev=0.000000
Stats 12.6: gcodein=0 print_time=0.000 buffer_time=0.000 print_stall=0 bytes_write=16 bytes_read=0 bytes_retransmit=53 bytes_invalid=0 send_seq=3 receive_seq=1 retransmit_seq=2 srtt=0.000 rttvar=0.000 rto=0.800 ready_bytes=0 stalled_bytes=0 last_clock=0 last_clock_time=0.000 mcu_awake=0.000 mcu_task_avg=0.000000 mcu_task_stddev=0.000000
Stats 13.6: gcodein=0 print_time=0.000 buffer_time=0.000 print_stall=0 bytes_write=32 bytes_read=0 bytes_retransmit=86 bytes_invalid=0 send_seq=5 receive_seq=1 retransmit_seq=4 srtt=0.000 rttvar=0.000 rto=1.600 ready_bytes=0 stalled_bytes=0 last_clock=0 last_clock_time=0.000 mcu_awake=0.000 mcu_task_avg=0.000000 mcu_task_stddev=0.000000
Stats 14.6: gcodein=0 print_time=0.000 buffer_time=0.000 print_stall=0 bytes_write=48 bytes_read=0 bytes_retransmit=86 bytes_invalid=0 send_seq=7 receive_seq=1 retransmit_seq=4 srtt=0.000 rttvar=0.000 rto=1.600 ready_bytes=0 stalled_bytes=0 last_clock=0 last_clock_time=0.000 mcu_awake=0.000 mcu_task_avg=0.000000 mcu_task_stddev=0.000000
Stats 15.6: gcodein=0 print_time=0.000 buffer_time=0.000 print_stall=0 bytes_write=64 bytes_read=0 bytes_retransmit=143 bytes_invalid=0 send_seq=9 receive_seq=1 retransmit_seq=7 srtt=0.000 rttvar=0.000 rto=3.200 ready_bytes=0 stalled_bytes=0 last_clock=0 last_clock_time=0.000 mcu_awake=0.000 mcu_task_avg=0.000000 mcu_task_stddev=0.000000
Stats 16.6: gcodein=0 print_time=0.000 buffer_time=0.000 print_stall=0 bytes_write=80 bytes_read=0 bytes_retransmit=143 bytes_invalid=0 send_seq=11 receive_seq=1 retransmit_seq=7 srtt=0.000 rttvar=0.000 rto=3.200 ready_bytes=0 stalled_bytes=0 last_clock=0
|
Re: New experimental firmware: all kinematics in host July 30, 2017 08:37PM |
Registered: 7 years ago Posts: 7 |
|
Re: New experimental firmware: all kinematics in host August 09, 2017 05:05AM |
Registered: 11 years ago Posts: 23 |
Hi all
I'm trying to see if this new firmware is an interesting addition to my home made delta printer.
I have my printer pretty well dialed-in using the marlinkimbra MK4duo firmware running on a Due.
Before committing to trying out klipper I'd like to know if it is possible to migrate the existing delta settings (which are the result of a G33 delta auto calibration) to the klipper firmware.
As I know that there still is no calibration implemented in klipper migrating the existing configuration would be an incredible time saver.
Thanks for any help.
|
Re: New experimental firmware: all kinematics in host August 09, 2017 07:42AM |
Registered: 10 years ago Posts: 126 |
|
Re: New experimental firmware: all kinematics in host August 09, 2017 07:47AM |
Registered: 11 years ago Posts: 23 |
Thank you for the information.
I've given a look at the example config file but failed to see entries corresponding to z-height, or the tower position and radius corrections.
Is there a way to convert my current configuration to the klipper printer.cfg file? How did you implement your calibration values? And would you share your printer.cfg file with me?
Thanks
|
Re: New experimental firmware: all kinematics in host August 09, 2017 08:03AM |
Registered: 10 years ago Posts: 126 |
I tried Marlin on my Printer, but only for a very short time. My printer has an AVR and marlin is really bad in that configuration. At least compared to Klipper.
But Therefore I'm not sure what exactly those settings do.
z-height:
I assume that mean the print hight. That is configured by defining the position of the 3 end Stops. The End stops can have different heights that helps with fine tuning.
the tower position
Do you have the towers in a different configuration than 120° ?
radius corrections
I don't know what that is. Can you explain? I have only found the G33 explanation here and still don't understand it.
Anyway. My config is this:
# This file serves as documentation for config parameters of delta
# style printers. One may copy and edit this file to configure a new
# delta printer. Only parameters unique to delta printers are
# described here - see the "example.cfg" file for description of
# common config parameters.

# DO NOT COPY THIS FILE WITHOUT CAREFULLY READING AND UPDATING IT
# FIRST. Incorrectly configured parameters may cause damage.

# The stepper_a section describes the stepper controlling the front
# left tower (at 210 degrees). This section also controls the homing
# parameters (homing_speed, homing_retract_dist) and maximum tower
# length (position_max) for all towers.
[stepper_a]
step_pin: ar54
dir_pin: ar55
enable_pin: !ar38
step_distance: .01
endstop_pin: ^ar2
homing_speed: 50.0
position_endstop: 296.78
position_max: 300

# The stepper_b section describes the stepper controlling the front
# right tower (at 330 degrees)
[stepper_b]
step_pin: ar60
dir_pin: ar61
enable_pin: !ar56
step_distance: .01
endstop_pin: ^ar15
position_endstop: 296.78

# The stepper_c section describes the stepper controlling the rear
# tower (at 90 degrees)
[stepper_c]
step_pin: ar46
dir_pin: ar48
enable_pin: !ar62
step_distance: .01
endstop_pin: ^ar19
position_endstop: 296.78

[extruder]
step_pin: ar26
dir_pin: ar28
enable_pin: !ar24
step_distance: .0022
nozzle_diameter: 0.400
filament_diameter: 1.750
max_extrude_only_distance: 5000.0
heater_pin: ar10
sensor_pin: analog13
sensor_type: ATC Semitec 104GT-2
control: pid
pid_Kp: 22.2
pid_Ki: 1.08
pid_Kd: 114
min_extrude_temp: 100
min_temp: 1
max_temp: 250

[heater_bed]
heater_pin: ar8
sensor_pin: analog14
sensor_type: EPCOS 100K B57560G104F
control: watermark
min_temp: 1
max_temp: 130

# Extruder print fan (omit section if fan not present)
[fan]
pin: ar9
hard_pwm: 1

[mcu]
#serial: /dev/ttyACM0
serial: /dev/serial/by-id/usb-Arduino__www.arduino.cc__0042_75439323835351E0F140-if00
baud: 250000
pin_map: arduino

[printer]
kinematics: delta
#   This option must be "delta" for linear delta printers
max_velocity: 300
max_accel: 3000
max_z_velocity: 150
#   For delta printers this limits the maximum velocity (in mm/s) of
#   moves with z axis movement. This setting can be used to reduce the
#   maximum speed of up/down moves (which require a higher step rate
#   than other moves on a delta printer).
delta_arm_length: 333.0
#   Length (in mm) of the diagonal rods that connect the linear axes
#   to the print head
delta_radius: 174.75
#   Radius (in mm) of the horizontal circle formed by the three linear
#   axis towers. This parameter may also be calculated as:
#    delta_radius = smooth_rod_offset - effector_offset - carriage_offset
motor_off_time: 600
|
Re: New experimental firmware: all kinematics in host August 09, 2017 08:14AM |
Registered: 11 years ago Posts: 23 |
I think I got it for the Z height and it should not be too tough to "migrate" my configuration to Klipper.
The position and radius corrections are determined by the auto calibration procedure and serve to counter any printer mechanical issue (bad build to make it short), such as the angles between towers not being exactly 120°, or the length of the diagonal rods not being all exactly the same.
The auto calibration procedures from both marlin and marlinkimbra determine those corrections and then use them during the print process to improve the quality and geometry of the prints.
Going through the printer config file example (both the generic and the delta specific one) I did not find any parameter that would allow those adjustments to be configured in. I suppose that in fact Klipper is not yet able to use those corrections to influence the delta printer movements.
|
Re: New experimental firmware: all kinematics in host August 09, 2017 11:52AM |
Registered: 14 years ago Posts: 107 |
Quote
micheleamerica
The position and radius corrections are determined by the auto calibration procedure and serve to counter any printer mechanical issue (bad build to make it short), such as the angles between towers not being exactly 120°, or the length of the diagonal rods not being all exactly the same.
One may specify an "angle" parameter for each stepper tower - see the config/example-delta.cfg file.
It's not currently possible to customize the arm length for each tower. I'm not sure how the math would work with that. If you are interested in tackling it, take a look at klippy/delta.py and how "arm_length2" is currently used.
-Kevin
|
Re: New experimental firmware: all kinematics in host August 09, 2017 03:35PM |
Registered: 11 years ago Posts: 23 |
My bad... I missed the tower angle parameter. Can you please detail what is the reference (zero angle) and how adjustments could be made on those parameters (clockwise or counter-clockwise)?
I'll take a look at the code and compare it with code of firmwares that take the diagonal rod corrections per tower. Nonetheless I think you "virtual tower" method is very different from what is done is other firmwares to determine the stepper movements and that it will render any comparison complex to say the least.
In any case thanks for the details.
One additional question. My current setup has a number of configuration parameters stored in the EEPROM of the RADDS card. If I upload your controller code will I lose the contents of the EEPROM or will they still be there if I go back to the MK4duo firmware?
|
Re: New experimental firmware: all kinematics in host August 09, 2017 07:47PM |
Registered: 14 years ago Posts: 107 |
Quote
micheleamerica
My bad... I missed the tower angle parameter. Can you please detail what is the reference (zero angle) and how adjustments could be made on those parameters (clockwise or counter-clockwise)?
The default degrees of stepper_a is 210. If you needed to increase that by .1 degrees clockwise, then you'd set stepper_a.angle = 209.9 . The default degrees of stepper_b is 330, and the default of stepper_c is 90.
Quote
I'll take a look at the code and compare it with code of firmwares that take the diagonal rod corrections per tower. Nonetheless I think you "virtual tower" method is very different from what is done is other firmwares to determine the stepper movements and that it will render any comparison complex to say the least.
I don't recall seeing any firmware that supported calibrating the diagonal rod per-tower. (Klipper supports calibrating it across all towers as does most other firmwares.) If you can point out a firmware that supports that, then I'll look through the math.
Quote
In any case thanks for the details.
One additional question. My current setup has a number of configuration parameters stored in the EEPROM of the RADDS card. If I upload your controller code will I lose the contents of the EEPROM or will they still be there if I go back to the MK4duo firmware?
Klipper doesn't modify the EEPROM in any way. That said, I don't know if your existing firmware will alter the EEPROM if it is re-flashed.
Also, note, there have not been a lot of testers on the Due. I'd be interested in any results you have.
Thanks,
-Kevin
|
Re: New experimental firmware: all kinematics in host August 16, 2017 12:29AM |
Registered: 6 years ago Posts: 16 |
Hi Kevin - I'm interested in trying this out on my D-bot core x/y printer. I have a few questions:
1) In the example configs I'm seeing a position-endstop for z that is non-zero. Even in the corex/y sample its 0.5 and others in this forum I've seen at 0.1. Is there a reason that shouldn't be 0?
2) My hotend thermistor I believe is supported. However my heat bed would be 'type 11' in the Marlin config (sorry don't have the code here to look up the actual type). Would the fix for that be as simple as adding the new values to heater.py and then specifying in the config?
3) Is PID supported for the heatbed too? I don't think I saw it in any of the example configs - just wanted to confirm.
I think that's it for now.
Thanks for your great work on this project.
Mark
edit: Took out my question about multiple steppers for Z. Realized the two motors are being driven by the one stepper.
Edited 1 time(s). Last edit at 08/16/2017 08:50AM by MarkLogan.
|
Re: New experimental firmware: all kinematics in host August 16, 2017 11:34AM |
Registered: 14 years ago Posts: 107 |
Quote
MarkLogan
Hi Kevin - I'm interested in trying this out on my D-bot core x/y printer. I have a few questions:
1) In the example configs I'm seeing a position-endstop for z that is non-zero. Even in the corex/y sample its 0.5 and others in this forum I've seen at 0.1. Is there a reason that shouldn't be 0?
Zero is the point where the head would contact the bed (when the head is heated). I don't recommend placing the end-stop at zero because it risks the head colliding with the bed during homing (the switch is only triggering when the head contacts the bed). I'd recommend adjusting the switch to be a small distance (eg, 0.5mm) away so that the switch triggers before the head comes in contact with the bed. Almost all switches can then be over-driven a small distance so, for example, the head can still move to 0.2mm even if the switch triggers at 0.5mm.
Better yet, though, would be to home towards z-max if you can. I've found that to be easier to tune and it eliminates all the frustration with head crashes.
Quote
2) My hotend thermistor I believe is supported. However my heat bed would be 'type 11' in the Marlin config (sorry don't have the code here to look up the actual type). Would the fix for that be as simple as adding the new values to heater.py and then specifying in the config?
Yes - the Steinhart-Hart coefficients just need to be added to the top of heater.py.
Quote
3) Is PID supported for the heatbed too? I don't think I saw it in any of the example configs - just wanted to confirm.
It should work.
Quote
I think that's it for now.
Thanks for your great work on this project.
Mark
edit: Took out my question about multiple steppers for Z. Realized the two motors are being driven by the one stepper.
Thanks!
-Kevin
|
Re: New experimental firmware: all kinematics in host August 16, 2017 03:20PM |
Registered: 6 years ago Posts: 16 |
Ah, OK, I get it. I was thinking of the endstop as zero as opposed to where the head hits the bed. Based on my bed leveling I think I'll set this to 0.1 and give it a try. May need some tweaking.Quote
KevinOConnor
Hi Kevin - I'm interested in trying this out on my D-bot core x/y printer. I have a few questions:
1) In the example configs I'm seeing a position-endstop for z that is non-zero. Even in the corex/y sample its 0.5 and others in this forum I've seen at 0.1. Is there a reason that shouldn't be 0?
Zero is the point where the head would contact the bed (when the head is heated). I don't recommend placing the end-stop at zero because it risks the head colliding with the bed during homing (the switch is only triggering when the head contacts the bed). I'd recommend adjusting the switch to be a small distance (eg, 0.5mm) away so that the switch triggers before the head comes in contact with the bed. Almost all switches can then be over-driven a small distance so, for example, the head can still move to 0.2mm even if the switch triggers at 0.5mm.
Better yet, though, would be to home towards z-max if you can. I've found that to be easier to tune and it eliminates all the frustration with head crashes.
Quote
2) My hotend thermistor I believe is supported. However my heat bed would be 'type 11' in the Marlin config (sorry don't have the code here to look up the actual type). Would the fix for that be as simple as adding the new values to heater.py and then specifying in the config?
Yes - the Steinhart-Hart coefficients just need to be added to the top of heater.py.
Perfect, I'll populate it.
Quote
3) Is PID supported for the heatbed too? I don't think I saw it in any of the example configs - just wanted to confirm.
It should work.
Great. Will try it out and let you know if I run into any problems.
Quote
Thanks!
-Kevin
I'm out of town until Friday so I'll play with this on the weekend. Really looking forward to getting this working.
Thanks again,
Mark
|
Re: New experimental firmware: all kinematics in host August 17, 2017 12:40AM |
Registered: 6 years ago Posts: 16 |
Quote
MarkLogan
Quote
2) My hotend thermistor I believe is supported. However my heat bed would be 'type 11' in the Marlin config (sorry don't have the code here to look up the actual type). Would the fix for that be as simple as adding the new values to heater.py and then specifying in the config?
Yes - the Steinhart-Hart coefficients just need to be added to the top of heater.py.
Perfect, I'll populate it.
Seems I spoke a little soon on the Steinhart-Hart coefficients. I did a bunch of searching and couldn't find the values. I found calculators and tried to generate the values from datasheet, but they didn't seem right. So then I tried to replicate the coefficients you had for the already supported thermistors based on the values in the datasheets - and that didn't work. During my searching I did find the values you have, so no question yours are right. I just can't figure out how to generate the correct values. Any suggestions on how to do it or where I should look?
The thermistor I'm looking to support is 11 in marlin:
* 11 : 100k beta 3950 1% thermistor (4.7k pullup)
Mark
Edited 1 time(s). Last edit at 08/17/2017 01:11AM by MarkLogan.
|
Re: New experimental firmware: all kinematics in host August 17, 2017 10:58AM |
Registered: 14 years ago Posts: 107 |
Quote
MarkLogan
Seems I spoke a little soon on the Steinhart-Hart coefficients. I did a bunch of searching and couldn't find the values. I found calculators and tried to generate the values from datasheet, but they didn't seem right. So then I tried to replicate the coefficients you had for the already supported thermistors based on the values in the datasheets - and that didn't work. During my searching I did find the values you have, so no question yours are right. I just can't figure out how to generate the correct values. Any suggestions on how to do it or where I should look?
The thermistor I'm looking to support is 11 in marlin:
* 11 : 100k beta 3950 1% thermistor (4.7k pullup)
It looks like that table in Marlin was generated before Marlin used the Steinhart-Hart calculations. Looks like the table was produced with an old Marlin using:
createTemperatureLookupMarlin.py --r0=100000 --t0=25 --beta=3950 --r1=0 --r2=4700 --num-temps=50
From wikipedia we can translate that to Steinhart-Hart using:
c0=1/(t0 + 273.15) - ln(r0)/beta
c1=1/beta
c2=0
However, if you can find the datasheet for the thermistor, it'd probably be best to directly calculate the Steinhart-Hart coefficients from three temperature => resistance measurements.
-Kevin
|
Re: New experimental firmware: all kinematics in host August 17, 2017 03:22PM |
Registered: 14 years ago Posts: 107 |
Quote
KevinOConnor
Quote
MarkLogan
Seems I spoke a little soon on the Steinhart-Hart coefficients. I did a bunch of searching and couldn't find the values. I found calculators and tried to generate the values from datasheet, but they didn't seem right. So then I tried to replicate the coefficients you had for the already supported thermistors based on the values in the datasheets - and that didn't work. During my searching I did find the values you have, so no question yours are right. I just can't figure out how to generate the correct values. Any suggestions on how to do it or where I should look?
The thermistor I'm looking to support is 11 in marlin:
* 11 : 100k beta 3950 1% thermistor (4.7k pullup)
It looks like that table in Marlin was generated before Marlin used the Steinhart-Hart calculations. Looks like the table was produced with an old Marlin using:
createTemperatureLookupMarlin.py --r0=100000 --t0=25 --beta=3950 --r1=0 --r2=4700 --num-temps=50
From wikipedia we can translate that to Steinhart-Hart using:
c0=1/(t0 + 273.15) - ln(r0)/beta
c1=1/beta
c2=0
However, if you can find the datasheet for the thermistor, it'd probably be best to directly calculate the Steinhart-Hart coefficients from three temperature => resistance measurements.
It turns out the code wont handle a c3=0. So, I reworked the code a bit. With the latest code you can now directly add three temperature & resistance measurements to heater.py, or you can use a new "NTC 100K beta 3950" config setting.
-Kevin
|
Re: New experimental firmware: all kinematics in host August 18, 2017 12:16AM |
Registered: 6 years ago Posts: 16 |
Quote
KevinOConnor
Quote
KevinOConnor
Quote
MarkLogan
Seems I spoke a little soon on the Steinhart-Hart coefficients. I did a bunch of searching and couldn't find the values. I found calculators and tried to generate the values from datasheet, but they didn't seem right. So then I tried to replicate the coefficients you had for the already supported thermistors based on the values in the datasheets - and that didn't work. During my searching I did find the values you have, so no question yours are right. I just can't figure out how to generate the correct values. Any suggestions on how to do it or where I should look?
The thermistor I'm looking to support is 11 in marlin:
* 11 : 100k beta 3950 1% thermistor (4.7k pullup)
It looks like that table in Marlin was generated before Marlin used the Steinhart-Hart calculations. Looks like the table was produced with an old Marlin using:
createTemperatureLookupMarlin.py --r0=100000 --t0=25 --beta=3950 --r1=0 --r2=4700 --num-temps=50
From wikipedia we can translate that to Steinhart-Hart using:
c0=1/(t0 + 273.15) - ln(r0)/beta
c1=1/beta
c2=0
However, if you can find the datasheet for the thermistor, it'd probably be best to directly calculate the Steinhart-Hart coefficients from three temperature => resistance measurements.
It turns out the code wont handle a c3=0. So, I reworked the code a bit. With the latest code you can now directly add three temperature & resistance measurements to heater.py, or you can use a new "NTC 100K beta 3950" config setting.
-Kevin
Wow! Thank you so much. I just got home from my trip so I'm going to play with this tomorrow (when I should probably be working) and on the weekend. I will let you know how it goes.
Mark
|
Re: New experimental firmware: all kinematics in host August 18, 2017 01:46PM |
Registered: 6 years ago Posts: 16 |
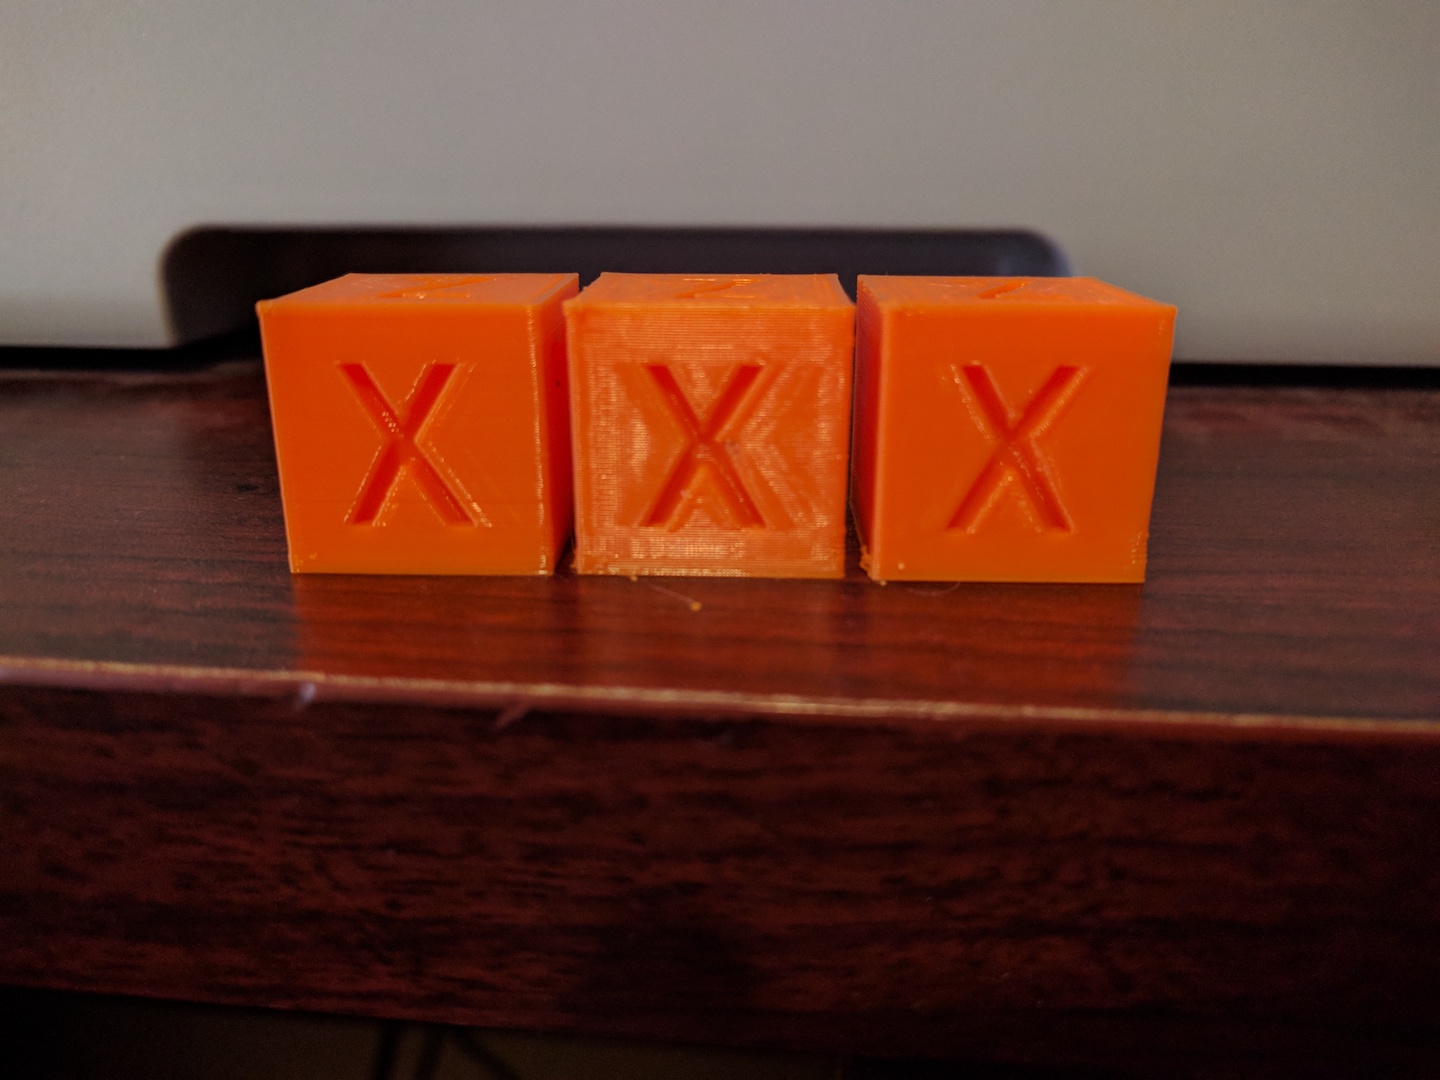
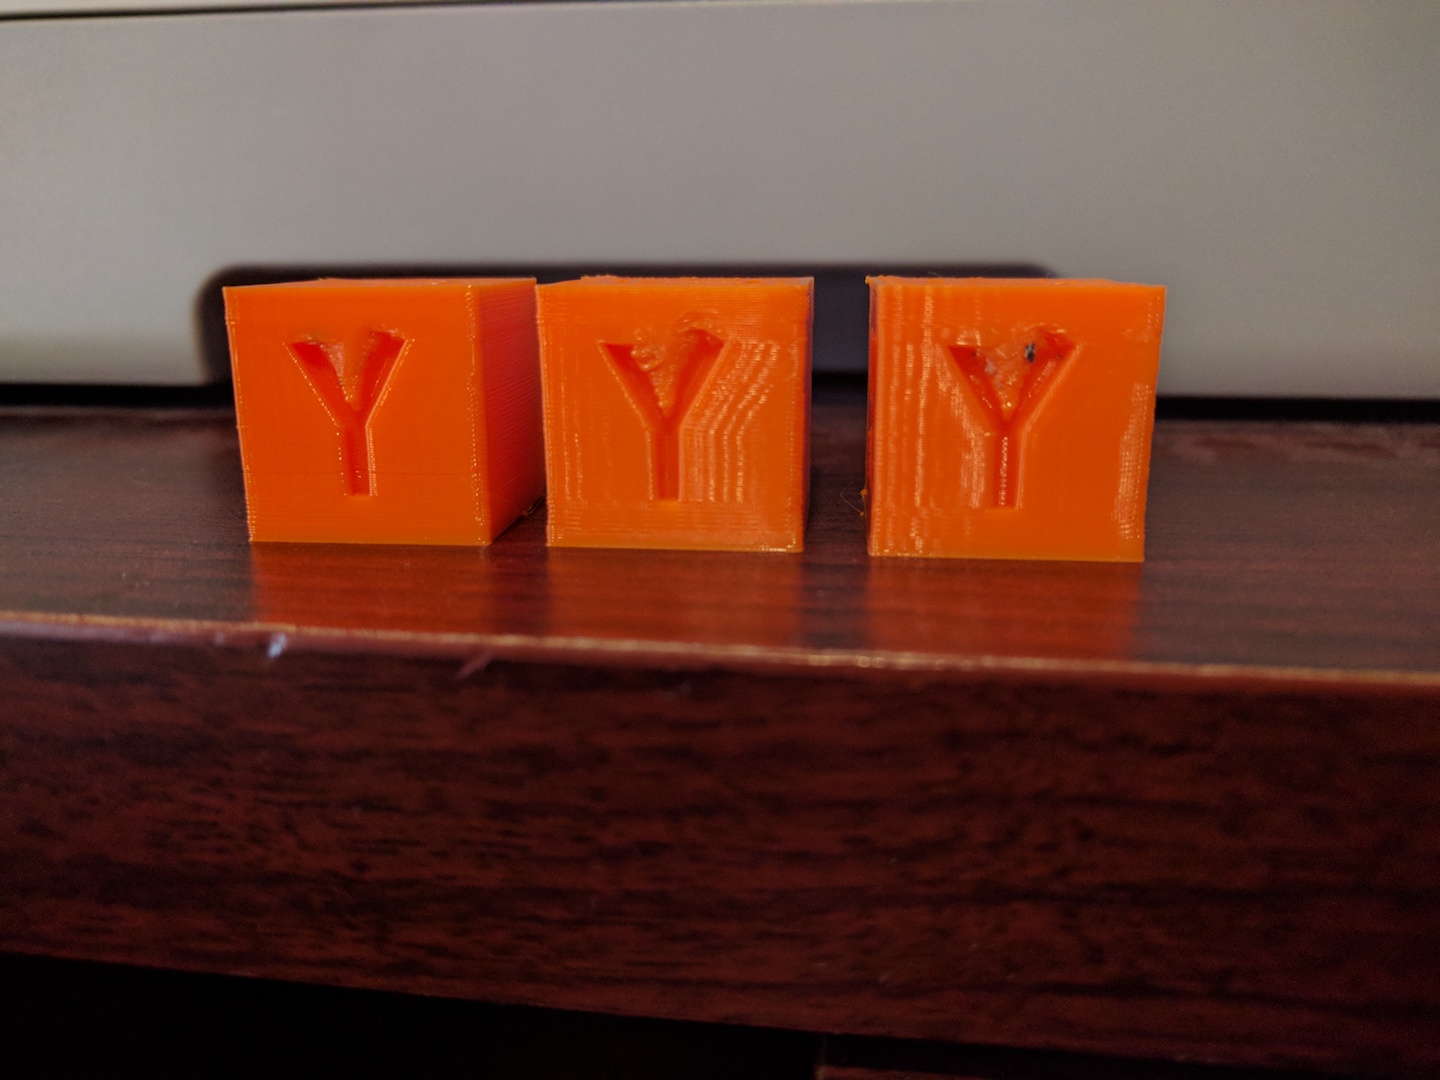
Well that went far smoother than I expected. I had a couple of config changes I needed to make to get the right movement direction and endstops. Otherwise it really just worked. The temperature on the heat bed was rock steady with the new thermistor type that was added and my existing PID values.
I printed 3 XYZ cubes at varying speeds: 80mm/s (my normal speed with Ramps board), 150 mm/s and 120 mm/s. They came out really well except at the top of the 'Y'. Interested in any suggestions as to what I could tweak to clean that up.
I printed 3 XYZ cubes at varying speeds: 80mm/s (my normal speed with Ramps board), 150 mm/s and 120 mm/s. They came out really well except at the top of the 'Y'. Interested in any suggestions as to what I could tweak to clean that up.
|
Re: New experimental firmware: all kinematics in host August 18, 2017 04:32PM |
Registered: 14 years ago Posts: 107 |
Quote
MarkLogan
Well that went far smoother than I expected. I had a couple of config changes I needed to make to get the right movement direction and endstops. Otherwise it really just worked. The temperature on the heat bed was rock steady with the new thermistor type that was added and my existing PID values.
I printed 3 XYZ cubes at varying speeds: 80mm/s (my normal speed with Ramps board), 150 mm/s and 120 mm/s. They came out really well except at the top of the 'Y'. Interested in any suggestions as to what I could tweak to clean that up.
Have you tuned pressure advance (as described here)? If you haven't, I suspect you'll see a noticeable improvement on your prints at high speed with it tuned.
I'm not sure why the Y is suffering (more than X is). Maybe when the head moves during the printing of that face of the cube there is more slop on the axis? You could try printing the cube when it is rotated to see if it is something to do with the Y or something to do with printing in that orientation.
-Kevin
|
Re: New experimental firmware: all kinematics in host August 19, 2017 01:31PM |
Registered: 6 years ago Posts: 16 |
Quote
KevinOConnor
Quote
MarkLogan
Well that went far smoother than I expected. I had a couple of config changes I needed to make to get the right movement direction and endstops. Otherwise it really just worked. The temperature on the heat bed was rock steady with the new thermistor type that was added and my existing PID values.
I printed 3 XYZ cubes at varying speeds: 80mm/s (my normal speed with Ramps board), 150 mm/s and 120 mm/s. They came out really well except at the top of the 'Y'. Interested in any suggestions as to what I could tweak to clean that up.
Have you tuned pressure advance (as described here)? If you haven't, I suspect you'll see a noticeable improvement on your prints at high speed with it tuned.
I'm not sure why the Y is suffering (more than X is). Maybe when the head moves during the printing of that face of the cube there is more slop on the axis? You could try printing the cube when it is rotated to see if it is something to do with the Y or something to do with printing in that orientation.
-Kevin
Quick update:
I tried to calibrate the pressure advance. I printed the test squares from 0 up to .25 and really I don't see much difference. My printer has a long bowden tube, not sure if that would mean I should go higher. Note that they all look pretty good so its not an issue of bad to better, its pretty consistently good.
Next I set the pressure_advance to 0.2 and the look ahead back to 0.01 and printed the xyz cube at 120 mm/s again. I cranked the part fan up and the 'Y' was not prefect but it was better. The corners were also improved a bit so I think the pressure_advance helped there. Finally I rotated the cube so the Y was at the front and the X was to the left (rather than X at front and Y at right). The whole cube came out perfectly, both the X and the Y. I'm going to try one more test where I rotate it the other way so the X will be on the right and the Y will be on the back.
Outside of this tweaking I have not run into any problems at all - very stable, very consistent results.
|
Re: New experimental firmware: all kinematics in host August 19, 2017 02:11PM |
Registered: 6 years ago Posts: 11 |
Hi all.
Following on from other successes, I thought I would try this on my Hypercube corexy, but being newer my progress was somewhat slower.
I am using cheap as you like Ramps 1.4 with A4988 with steps set to 16x with Arduino MEGA2560 and a Pi3 and Z axis with Trapezoidal threaded spindle RPTS right TR 8x1,5.
I struggled to organise the x and y config so that X and y moved in correct directions, but wanted to do so in software so I could switch back to the Merlin firmware without changing wiring.
There are 8 possible combinations as to which stepper is assigned to x or y and for each assignment which direction each one is configured to. Found mine on 4th try.
I then struggled to get Z working and there seems to be some speed issue?
I had steps configured to .0004961 (Wrong I know but within 80% of actual), but with Z configured with any max speed over 10 mm/s which i think would be approx 18,000 pulses a second the firmware would stop and halt MCU as soon as you try to home Z. I have uploaded Kllipy log in case it helps.
There error was from the firmware, not just with the stepper not moving. I am using piezo Z sensor, so I need to home the Z at a reasonable speed and the firmware would work with 5mm/s but that is too slow really for a piezo.
I have reconfigured ramps to 2x micro stepping instead of 16 and altered step distance accrodingly and i am now able to run Z at 10mm/s.
I notice second homing on Z seems to be slower, is there a place to alter the second homing speed.?
Very impressed with easy of set up on PI3 and once I determined the Arduino mega was on ttyUSB0 rather than example, the flashing was very quick and easy. Impressed with the performance too, but still trying to tune the printer physically.
Many thanks for this solution, definitely a quality one.
Reagrds
Chapelhill
|
Re: New experimental firmware: all kinematics in host August 19, 2017 05:55PM |
Registered: 14 years ago Posts: 107 |
Quote
chapelhill
I then struggled to get Z working and there seems to be some speed issue?
I had steps configured to .0004961 (Wrong I know but within 80% of actual), but with Z configured with any max speed over 10 mm/s which i think would be approx 18,000 pulses a second the firmware would stop and halt MCU as soon as you try to home Z. I have uploaded Kllipy log in case it helps.
Thanks for testing. If you have the Z tuned in Marlin, you can use a calculator to obtain 1 divided by Marlin's steps_per_mm and configure the stepper_z.step_distance to that value.
The problem shown in the log is not due to the step rate. Alas, you've hit a bug in Klipper triggered by the z step size. (Specifically, the choice of Z step size resonated with the step compression algorithm causing the Z homing operation to be larger than could fit in the Arduino ram.) To work around it for now, you can change your z step size slightly. A value of .000496 doesn't exhibit the problem (the difference between that and .0004961 is about the size of a hydrogen atom).
Quote
I notice second homing on Z seems to be slower, is there a place to alter the second homing speed.?
It's not currently configurable. If you want to test with a different value, you can find the "homing_speed/2.0" in klippy/corexy.py:home() and change it to a different value.
-Kevin
|
Re: New experimental firmware: all kinematics in host August 19, 2017 06:35PM |
Registered: 6 years ago Posts: 16 |
Quote
MarkLogan
Quote
KevinOConnor
Quote
MarkLogan
Well that went far smoother than I expected. I had a couple of config changes I needed to make to get the right movement direction and endstops. Otherwise it really just worked. The temperature on the heat bed was rock steady with the new thermistor type that was added and my existing PID values.
I printed 3 XYZ cubes at varying speeds: 80mm/s (my normal speed with Ramps board), 150 mm/s and 120 mm/s. They came out really well except at the top of the 'Y'. Interested in any suggestions as to what I could tweak to clean that up.
Have you tuned pressure advance (as described here)? If you haven't, I suspect you'll see a noticeable improvement on your prints at high speed with it tuned.
I'm not sure why the Y is suffering (more than X is). Maybe when the head moves during the printing of that face of the cube there is more slop on the axis? You could try printing the cube when it is rotated to see if it is something to do with the Y or something to do with printing in that orientation.
-Kevin
Quick update:
I tried to calibrate the pressure advance. I printed the test squares from 0 up to .25 and really I don't see much difference. My printer has a long bowden tube, not sure if that would mean I should go higher. Note that they all look pretty good so its not an issue of bad to better, its pretty consistently good.
Next I set the pressure_advance to 0.2 and the look ahead back to 0.01 and printed the xyz cube at 120 mm/s again. I cranked the part fan up and the 'Y' was not prefect but it was better. The corners were also improved a bit so I think the pressure_advance helped there. Finally I rotated the cube so the Y was at the front and the X was to the left (rather than X at front and Y at right). The whole cube came out perfectly, both the X and the Y. I'm going to try one more test where I rotate it the other way so the X will be on the right and the Y will be on the back.
Outside of this tweaking I have not run into any problems at all - very stable, very consistent results.
Well, the XYZ cube rotated as described above (X on the right hand side, Y on the back) came out perfectly. I definitely have more ringing on the Y axis so I will look into that.
Next I printed the base of the Squishy Turtle off thingiverse at 120 mm/s. Came out as close to identical as possible, compared to the one I printed at 80 mm/s on marlin/ramps.
Next I'm trying the articulated elephant off thingiverse and assuming it works OK I'm basically going to consider this as 'working' and my intent is to use it going forward.
If you're interested in adding my config as an example for other d-bot/c-bot users I would be happy to send it. Its very close to the standard corexy one - inverted Z direction, inverted end stops, set the correct step distances, etc
Thanks again for your amazing work on this. I'm going to post in the D-Bot Facebook group to let people know of this option. I think its a far superior method to the standard d-bot config with Ramps/Marlin.
Mark
|
Re: New experimental firmware: all kinematics in host August 21, 2017 10:41AM |
Registered: 8 years ago Posts: 10 |

|
Re: New experimental firmware: all kinematics in host August 28, 2017 03:49PM |
Registered: 6 years ago Posts: 11 |
Hi all.
I tried pressure advance on my corexy with it set to 0.20 ( I think that was default) but time parameter at 0. I have a geared extruder and over regions with lots of zig zig my extruder was going net further and further backwards leaving small regions with no filament. This was the object
v-block
It also sounded like it was hammering the extruder and pushed out PTFE from fitting but that could just be my settings.
I have presumed that pressure advance works in partnership with retraction settings.
I can get logs at the weekend.
Many thanks
Regards
Chapelhill
Edited 1 time(s). Last edit at 08/28/2017 03:51PM by chapelhill.
|
Re: New experimental firmware: all kinematics in host August 28, 2017 09:48PM |
Registered: 14 years ago Posts: 107 |
Quote
chapelhill
Hi all.
I tried pressure advance on my corexy with it set to 0.20 ( I think that was default) but time parameter at 0. I have a geared extruder and over regions with lots of zig zig my extruder was going net further and further backwards leaving small regions with no filament. This was the object
v-block
It also sounded like it was hammering the extruder and pushed out PTFE from fitting but that could just be my settings.
I have presumed that pressure advance works in partnership with retraction settings.
Did you arrive at 0.20 after following the directions at: https://github.com/KevinOConnor/klipper/blob/master/docs/Pressure_Advance.md ? Your description sounds like the pressure advance value is too high.
|
Re: New experimental firmware: all kinematics in host August 29, 2017 02:31AM |
Registered: 6 years ago Posts: 11 |
I followed instructions as per pressure advance document in increments of 0.05 and could not really see any difference in quality on corners of box but it is a new build where I still have some learning to do so left it at the final setting which I think was 0.2.
On subsequent prints I noticed on the short stroke diagonal in-fill sections on you could see the extruder going further and further backwards so that at the end of each pass the extruder was further back than the start of each pass about as much as you would expect it to go forwards. This was on a slower first layer too.
If the extruder finishes further back than starting point after trying to extrude material there has too be some issue with the calculation perhaps only on corexy kinematics as this was a diagonal in fill. I simply disabled pressure advance and was able to print first layers successfully.
Thanks
Regards
Chapelhill.
|
Re: New experimental firmware: all kinematics in host August 29, 2017 11:00AM |
Registered: 14 years ago Posts: 107 |
Quote
chapelhill
I followed instructions as per pressure advance document in increments of 0.05 and could not really see any difference in quality on corners of box but it is a new build where I still have some learning to do so left it at the final setting which I think was 0.2.
Interesting. Some users (along with my printer) report significant results with pressure_advance. Other users, like yourself, report no difference. Do you have a bowden or direct drive extruder? Did you see blobs at the corners of the test object even on the first print (with pressure_advance set to zero)?
In any case, definitely choose the lowest pressure_advance value that shows the desired quality. So, if you don't see any quality difference, go with a value of 0.
Quote
On subsequent prints I noticed on the short stroke diagonal in-fill sections on you could see the extruder going further and further backwards so that at the end of each pass the extruder was further back than the start of each pass about as much as you would expect it to go forwards. This was on a slower first layer too.
If the extruder finishes further back than starting point after trying to extrude material there has too be some issue with the calculation perhaps only on corexy kinematics as this was a diagonal in fill. I simply disabled pressure advance and was able to print first layers successfully.
Quote
It also sounded like it was hammering the extruder and pushed out PTFE from fitting but that could just be my settings.
That description indicates to me that pressure_advance is too high - during acceleration the extruder motor attempts to build up a higher pressure than it's capable of and it causes lost stepper steps. The stepper doesn't lose steps when it retracts during deceleration, however. The net result is lost steps going forward, but no lost steps going backwards - so it appears like the extruder is going a net backwards.
-Kevin
Edited 2 time(s). Last edit at 08/29/2017 11:05AM by KevinOConnor.
|
Re: New experimental firmware: all kinematics in host August 29, 2017 12:28PM |
Registered: 6 years ago Posts: 16 |
Quote
KevinOConnor
Quote
chapelhill
I followed instructions as per pressure advance document in increments of 0.05 and could not really see any difference in quality on corners of box but it is a new build where I still have some learning to do so left it at the final setting which I think was 0.2.
Interesting. Some users (along with my printer) report significant results with pressure_advance. Other users, like yourself, report no difference. Do you have a bowden or direct drive extruder? Did you see blobs at the corners of the test object even on the first print (with pressure_advance set to zero)?
In any case, definitely choose the lowest pressure_advance value that shows the desired quality. So, if you don't see any quality difference, go with a value of 0.
-Kevin
I didn't see much change with the various pressure advance values either. There is definitely a little blobbing at the corners on high speed, but the various pressure advance settings didn't seem to make much difference. I have it set to .2 and for the most part I'm getting good prints, although there have definitely been some prints where it skips steps/under extrudes in a couple of places. I think its very much related to the combination of retraction settings and pressure advance. Funny thing is that I was getting a lot of stringing, more so than with marlin, so I had to increase my retraction length which decreased the places where I was seeing under extrusion/skipped steps.
I'm on a corexy (D-bot) with a bowden extruder - with a particularly long bowden tube due to the size of the print area and the location of the extruder motor.
|
Re: New experimental firmware: all kinematics in host August 29, 2017 01:35PM |
Registered: 6 years ago Posts: 11 |
The loosing steps on the extruder sounds like the issue, I didn't think about that. I will try different pressure advance settings on the troublesome model at the weekend. I will also need to check maximum extrude speed and acceleration recommendations as I may have them too high. I have an alloy 60 tooth belt driven wheel with 20 tooth stepper wheel . I had the impression of the hammer noise in change of direction at the end of the pressure advance retracting when it should change direction back to extruding but I could be wrong. I will take some video with marker on the wheel so I can see how much it moves at each stage.
If I can resolve my other non Klipper related quality issues I will do another pressure advance test as per manuals too.
Thanks very much Kevin!
If I can resolve my other non Klipper related quality issues I will do another pressure advance test as per manuals too.
Thanks very much Kevin!


Sorry, only registered users may post in this forum.