Mold and pour mendel parts
Posted by goinreverse
|
Mold and pour mendel parts January 11, 2010 10:56PM |
Registered: 14 years ago Posts: 134 |
My plan here is to build a set of mendel parts using my mcwire and mold them so they can be cast in polyester resin. All the parts that cannot be laser cut that is. Is there a good reason no one else has done that? Say from the masters that made the first mendel? If someone ones to lend me parts it would take me about 2 weeks to complete the molds and start pouring sets, I am in US AZ. Seems like a really easy and inexpensive way to make a LOT of parts.
Does anyone know or can compute the total cubic volume of all the parts? With that I can give a materials cost easily.
Some drilling would still be needed but I think that is pretty reasonable,
Does anyone know or can compute the total cubic volume of all the parts? With that I can give a materials cost easily.
Some drilling would still be needed but I think that is pretty reasonable,
|
Re: Mold and pour mendel parts January 11, 2010 11:16PM |
Registered: 14 years ago Posts: 581 |
Lots of captive nuts, high fidelity silicone mold material is not cheap, good strength resin is not cheap. Most parts can be printed in twice the time it takes to cast them.
You to better to just run 2,3 printers. Same time, no fixed print design (If mendel 2 is uploaded tomorrow you don't have old design molds sitting around).
But as they always say here, if you do it, I will watch and cheer you all the way!
repraplogphase.blogspot.com
You to better to just run 2,3 printers. Same time, no fixed print design (If mendel 2 is uploaded tomorrow you don't have old design molds sitting around).
But as they always say here, if you do it, I will watch and cheer you all the way!
repraplogphase.blogspot.com
|
Re: Mold and pour mendel parts January 11, 2010 11:34PM |
Admin Registered: 17 years ago Posts: 1,791 |
Here's the Arizona forum, btw.
[dev.forums.reprap.org]
Most people's Mendel parts are busy making more mendels, making widgits, being given to friends, or getting sold online. You'll have better luck trying to buy a set, and you'll have printed your own before that happens.
If you guys want a dedicated casting/moldmaking forum, chime in here:
[dev.forums.reprap.org]
[dev.forums.reprap.org]
Most people's Mendel parts are busy making more mendels, making widgits, being given to friends, or getting sold online. You'll have better luck trying to buy a set, and you'll have printed your own before that happens.
If you guys want a dedicated casting/moldmaking forum, chime in here:
[dev.forums.reprap.org]
|
Re: Mold and pour mendel parts January 12, 2010 12:19AM |
Registered: 14 years ago Posts: 134 |
The thing with molding though is that you could easily make a mold of several copies, make the parts 10 at a time or ideally this looks like I can even do a one part mold for the whole thing:
[1.bp.blogspot.com]
I have access to the molding materials. Probably urethane mold rather than silicone for these types of parts. I read that darwin is approximately 80 cubic inches for the printed parts (not sure for mendel), that isn't even $50 of quick cast resin which sets in under an hour.
Maybe I have misunderstood the printing time but it seems like it takes a week or 2 to successfully print just one set of mendel parts? Is that wrong? Cost wise I can't think resin is going to be more than PLA or ABS wire, in fact I would guess it is cheaper...
I guess it could make sense to just mold the most print-time intensive parts.
I just don't see how supply will possibly keep up with demand with a printing time like that. I know at least 15 people here in AZ that would love to have a reprap but the 2-4 months and all the uncertainty is just too much (I think most budgets are $500-$1000). They could get a cupcake but the wait lists are going into the months now due to CES even if you want to spend $1100 and it has a too-small build volume in my opinion.
|
Re: Mold and pour mendel parts January 12, 2010 12:43AM |
Admin Registered: 17 years ago Posts: 1,791 |
goinreverse, you're right, but take a careful look at the parts with your favorite modeling program, do some cross-sections, and look at all those trapped nuts.
I think we may want to just design something else that is casting-friendly, "PourStrap".
We can even have a heavy variant that will make a decent milling base. Be lousy to ship across the country, but that's ok, especially once it's good enough to compete with the other hobby benchtop mills and benchtop cnc routers out there.
|
Re: Mold and pour mendel parts January 12, 2010 12:49AM |
Registered: 14 years ago Posts: 134 |
What tool and files do you use to look at cross sections? I mostly use sketchup and the dxfs import terribly.
The stl's I load in meshlab, i would prefer not to dig through a ton to find what you mean, is there a specific example?
By trapped nuts do you mean the hex head recesses? Urethane has a decent amount of give so those aren't like to be a problem.
I just randomly sampled 5 parts and pulled them up in meshlab and I don't see any issues, possibly some things you may need to dimple rather than fully cast but those could be finished with either a hot stamp, a dremel or a spiral cutter or even a spiral cutter on a drill press.
I see a minor issue on the extruder but I think that could be dimpled or possibly just opened up.
Do you know the URL for the page that has pretty pictures of all the individual parts, I can't seem to find it...
Edited 1 time(s). Last edit at 01/12/2010 01:06AM by goinreverse.
|
Re: Mold and pour mendel parts January 12, 2010 01:09AM |
Admin Registered: 17 years ago Posts: 1,791 |
Blender is free. The UI is a bunch of single-letter keyboard commands which is highly intuitive and fast as anything ... once you've spent a while mastering it. There's a decent bit of talk about it on the forum, but I think we need a tutorial up on the wiki, with a focus on "make a gear chain", or something.
Trapped nuts are a unique RepRap design feature invented by Ed Sells. It is basically an after-print metal hex nut that functions as threading.
The trapped nuts are hex nuts which sit against a rod. After a piece is printed, it's got a through-hole for a rod. Inside the through-hole is a little hollow dug into the wall. You slip the hex nut into the hollow, and then screw a grub screw into the nut. From the outside, via a different small diameter through hole.
Now slide in the rod, and tighten the grub screw, and it presses against the rod, locking it into the plastic part. And it doesn't tear out, because the pressure is distributed by the hex nut.
Darwin used a lot of them, I think Mendel does as well. Someone will come along and wiki it up with a render or photo under "Trapped Nut", hopefully. Using this seed text.
|
Re: Mold and pour mendel parts January 12, 2010 02:22AM |
Registered: 14 years ago Posts: 134 |
I use blender, you are definitely the only person I have ever heard call its interface as 'intuitive' though ... lol, I like meshlab a lot better for viewing parts but that is just me.
I think we are talking about the same thing, to me "trapped nut" = hex head recess, which is probably better than saying "nut recess" which just sounds dirty, but 'trapped nut' also paints a bad mental picture.
Depending on depth those could be dimpled in the mold (made just 1-2 MM deep) or possibly full depth depending on the other angles. The holes could be dimpled as well but would need to be drilled through. The hex head recesses would probably need some cleaning up with a dremel but to me that doesn't seem like too much to ask.
If it was really a big deal 2 part strip molds could be made of several parts at once.
|
Re: Mold and pour mendel parts January 12, 2010 10:18AM |
Registered: 14 years ago Posts: 323 |
if you cast the piece with the hex nut in it, the silicone would flow into the thread, then when you cast it there would be no need to put a hex nut in you could screw directly into the resin.
once at my work we were unable to find replacements of these strange metal nuts, so eventually i just cast them in resin with a silicone mould and they have worked fine so far. pretty light application though
once at my work we were unable to find replacements of these strange metal nuts, so eventually i just cast them in resin with a silicone mould and they have worked fine so far. pretty light application though
|
Re: Mold and pour mendel parts January 12, 2010 11:25AM |
>> if you cast the piece with the hex nut in it, the silicone would flow into the thread, then when you cast it there would be no need to put a hex nut in you could screw directly into the resin.
How would you separate the model from the mold, and later, the mold from the casts? Seems to me you'd have a bugger of a time separating multiple hardened 'threaded arms' firmly embedded into the threaded concave spaces, even with well placed multi-part separators.
I suspect the standard process for creating built in threads would involve post-processing by drilling and tapping?
|
Re: Mold and pour mendel parts January 12, 2010 12:12PM |
Admin Registered: 17 years ago Posts: 1,791 |
How would you separate the model from the mold, and later, the mold from the casts? Seems to me you'd have a bugger of a time separating multiple hardened 'threaded arms' firmly embedded into the threaded concave spaces, even with well placed multi-part separators.
I think a spray-on mold release agent will work for threads. Make sure your mold release agent is compatible with your molding compound.
Spray-on mold release agent are basically wax in a spray-can.
Other release agents:
Petroleum Jelly. Lots and lots of petroleum jelly. Not the baby-powder scented stuff. Buy your rubber gloves at the same time, and tell the cashier you're not throwing a party, it's for your 3D printer.
Petroleum Jelly will fill threads and obliterate fine detail, but is otherwise very good for casting-moldmaking.
I suspect the standard process for creating built in threads would involve post-processing by drilling and tapping?
It's rather tedious, and best to be avoided, as you're less willing to do it for a friend, and if you're selling them, it drives up the cost. We're using trapped nuts as a threaded insert.
Edited 1 time(s). Last edit at 01/12/2010 12:18PM by SebastienBailard.
|
Re: Mold and pour mendel parts January 12, 2010 12:36PM |
Registered: 14 years ago Posts: 323 |
|
Re: Mold and pour mendel parts January 12, 2010 02:03PM |
Admin Registered: 17 years ago Posts: 1,791 |
the silicone mould doesn't have to be tough it can be soft and easily slip out of the tight bits like the thread, i imagine you could take the casts out of the moulds with relative ease.
Have you tried making an interior thread on a casted object using a silicone mold? Because I'd guess it would lock in and tear.
Have you tried making an interior thread on a casted object using a silicone mold? Because I'd guess it would lock in and tear.
|
Re: Mold and pour mendel parts January 12, 2010 04:30PM |
Registered: 14 years ago Posts: 134 |
I don't think it is really a good idea to make a mold with nuts in the object, threads this small would not reproduce very well in urethane or silicone in my experience, YMMZ. My concern would be slight distortions of the thread, there would be no easy way to fix those.
Like I said I would plug all the holes but leave them dimpled, a small recess perhaps 1/32 or 1/16 deep so you can see the outline and drill out later. For the hex recesses I would do the same thing, though I might put a dowel/shaft in the central hole so there would be a dimple for both the hex recess and where the drilled through hole need to be. To complete you drill the through-holes and you dremel or hotstamp the hex recesses. Hot stamping could be done easily by heating the head of a head bolt the same size (holding it with vice grips) with a propane or map gass torch to just about melting temp or a little more and pressing into the cast material.
Alternatively use a dremel to remove the additional material in the hex recess.
Is someone willing to send me a sample mendel part? I will mold and pour however many additional ones you want and send 'em back.
|
Re: Mold and pour mendel parts January 12, 2010 11:05PM |
Registered: 14 years ago Posts: 323 |
SebastienBailard Wrote:
-------------------------------------------------------
> Have you tried making an interior thread on a
> casted object using a silicone mold? Because I'd
> guess it would lock in and tear.
yeah i have the silicone i'm using at the moment seems to pour into any thread larger than m4.
-------------------------------------------------------
> Have you tried making an interior thread on a
> casted object using a silicone mold? Because I'd
> guess it would lock in and tear.
yeah i have the silicone i'm using at the moment seems to pour into any thread larger than m4.
|
Re: Mold and pour mendel parts January 13, 2010 04:34PM |
Registered: 16 years ago Posts: 536 |
I've got a set of hand cast resin Darwin parts from Bits from Bytes in the UK. Every part that needed a trapped nut, they moulded in an M5 nut to provide the threads. There's quite a few of them, roughly 50 I'd guess in an entire Darwin. Probably one of the reasons the parts cost so much. It looked like they used bolts to position the nuts in the casting, then simply unscrewed the bolt when the resin had cured. Makes good threads, although they're pretty stiff to use. Mine has held up now over about 15 lbs of extruded plastic and a trip across Canada, although the extruder has now been replaced several times over.
The Mendel design pretty much dispenses with trapped nuts on the big frame pieces, but there's still a couple in the X carriage.
It might be worth looking up Ian at Bits from Bytes and getting some info on the casting process. I imagine there was a good reason why they switched to laser cut acrylic, even though they had all the moulds built for hand casting parts.
Wade
|
Re: Mold and pour mendel parts January 14, 2010 05:13PM |
Admin Registered: 17 years ago Posts: 1,791 |
So, would you guys find it useful to have a dedicated forum for that subject as well, re:
[dev.forums.reprap.org]
?
It might be worth looking up Ian at Bits from Bytes and getting some info on the casting process.
I imagine someone will drop him a line if he's not reading this already. Unfortunately, I'm willing to be he didn't photograph his process or anything, so we'll have to do it ourselves.
Also, we can probably print multi-part modes out of plastic, which would be useful. And fun to design.
|
Re: Mold and pour mendel parts January 14, 2010 11:57PM |
Admin Registered: 17 years ago Posts: 1,791 |
|
Re: Mold and pour mendel parts January 16, 2010 10:44PM |
Registered: 14 years ago Posts: 78 |
Ed explained that he'd designed Mendel to steer away from trapped nuts in the release video. I'm building molds for the pieces but I'm using styrene sheet flat pieces that just plug into a base for the mold. The molding and mold faces come away together once the compound has polymerised, and the flat sides split away from the molding. There are rods pushed through the cavity that slide out leaving the holes for rods and screws. I'm not using silicone or petroleum jelly as release, the mold pieces are faced with vinyl duct/jointing tape. It separates from polyester and epoxy without further treatment and doesn't leave residue on the pieces. The only thing that slows down molding with Mendel is that there are through-holes at right angles to each other, so the mold pins have to be withdrawn before the pieces can be removed from the molds. I've given some thought to modifying the pieces that have this issue to either break them into modules that can be molded with all of the pins parallel, or to mold halves, split along the axis of the longer through holes.
|
Re: Mold and pour mendel parts January 17, 2010 11:32AM |
Registered: 15 years ago Posts: 478 |
Wow That is a really nice and clever mould design will you post some pics as you build it and use it?
Now that really is a candidate for the Wiki to join in with Sebastien on extending the Wiki to cover all build methods and ideas.
Though I'm not sure I have the ability to visualize some thing in that way to design an efficient 3 dimensional mould like that.
Bodge It [reprap.org]
=======================================
My rep strap: [repstrapbertha.blogspot.com]
Buy the bits from B&Q pipestrap [diyrepstrap.blogspot.com]
How to Build a Darwin without any Rep Rap Parts [repstrapdarwin.blogspot.com]
Web Site [www.takeaway3dtech.com]
|
Re: Mold and pour mendel parts January 17, 2010 02:54PM |
Registered: 16 years ago Posts: 536 |
|
Re: Mold and pour mendel parts January 17, 2010 03:12PM |
Admin Registered: 16 years ago Posts: 13,884 |
Hi Murd,
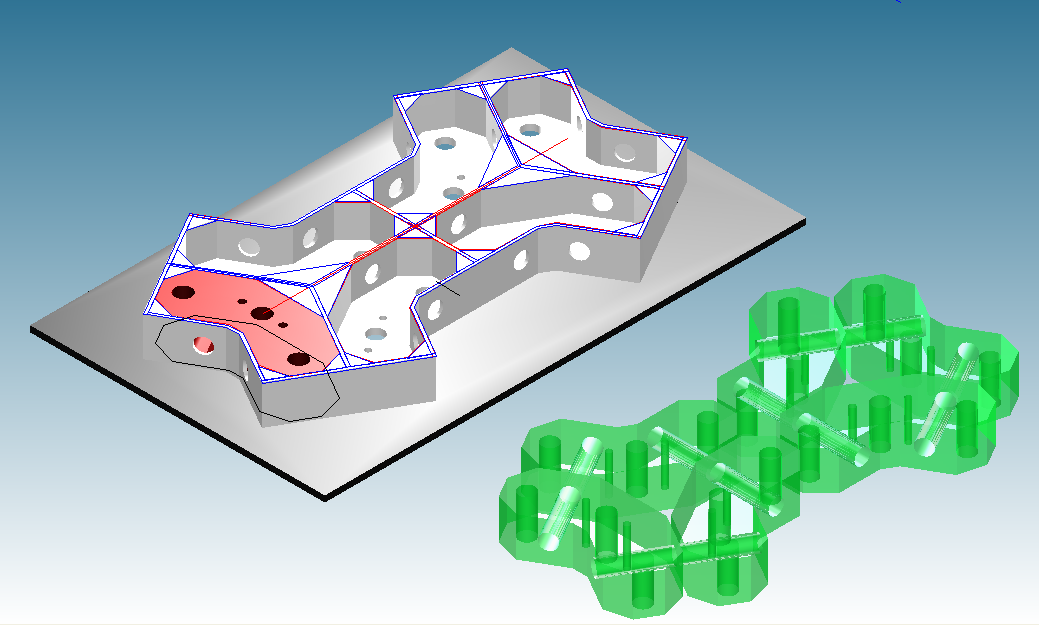
... your image let me remember my post "Paperwork or sheet-cutting for 3D-molds" from two years ago - go through the atached "K1-"-jpeg's ...
With pepakura it's really easy to design fold-up-moulds out from STL-files and cut or mill the forms from thin plates ... e.g. Dibond
Viktor
... your image let me remember my post "Paperwork or sheet-cutting for 3D-molds" from two years ago - go through the atached "K1-"-jpeg's ...
With pepakura it's really easy to design fold-up-moulds out from STL-files and cut or mill the forms from thin plates ... e.g. Dibond
Viktor
|
Re: Mold and pour mendel parts January 17, 2010 07:36PM |
Registered: 14 years ago Posts: 78 |
|
Re: Mold and pour mendel parts January 18, 2010 03:21AM |
Admin Registered: 16 years ago Posts: 13,884 |
Hi Murray,
> ... I think we're doppelgangers. ...
There are a lot of people presenting good ideas, but over time they're buried in the shear amount of posts and difficult to undig again
I think we need some 'data-miners' for searching/rescuing and representing them in the wiki ...
Viktor
> ... I think we're doppelgangers. ...
There are a lot of people presenting good ideas, but over time they're buried in the shear amount of posts and difficult to undig again
I think we need some 'data-miners' for searching/rescuing and representing them in the wiki ...
Viktor
|
Re: Mold and pour mendel parts January 18, 2010 04:36AM |
Registered: 15 years ago Posts: 478 |
Victor
It would be really great if as a user you could tag a particular post or thread with a flag. For local user reference. Or to publish as a forum post in the form of links.
So a user could create lists like this in their local forum user account settings:
To do
Research this
Use this for (flashing CPU, making extruder, setting up host)
New project ideas.
Cool application links
Technical reference links .. and s on.
Bodge It [reprap.org]
=======================================
My rep strap: [repstrapbertha.blogspot.com]
Buy the bits from B&Q pipestrap [diyrepstrap.blogspot.com]
How to Build a Darwin without any Rep Rap Parts [repstrapdarwin.blogspot.com]
Web Site [www.takeaway3dtech.com]
|
Re: Mold and pour mendel parts January 23, 2010 02:09PM |
Admin Registered: 17 years ago Posts: 1,791 |
It would be really great if as a user you could tag a particular post or thread with a flag. For local user reference. Or to publish as a forum post in the form of links.
Yup. We need to make very clever UI changes to the forum. First, adding mailinglist capability. Second, adding "favoriting" like on metafilter.com.
This is probably a library issue.
Yup. We need to make very clever UI changes to the forum. First, adding mailinglist capability. Second, adding "favoriting" like on metafilter.com.
This is probably a library issue.
|
Re: Mold and pour mendel parts January 30, 2010 06:39PM |
Registered: 14 years ago Posts: 25 |
I'm new here, but I've been using RTV silicone and polyurethane fast-cast resins for a couple of years now. I'm in London, England, and can think of a few ways of going about making the parts from moulds.
Multi-part moulds would solve some of the issues. I've made odd-shaped silicone "plugs" to place into setting PU that eliminate my need to precisely drill them out once set.
As far as the threading issue goes with the hex recesses, why not just drill out a nut and braze it a piece of smooth barstock?
From the printed parts glossary, I count 74 holes that couldn't be made by a 3-axis CNC mill. If someone could knock out one of each part on a hobby mill, think someone would consider it an even trade for getting back a full set of Mendel parts a month or two later once they'd been hand finished and replicated? The rough milled versions would be fine in any plastic, or hell even wood!
I've got mixable PU-dyes, so could make them any colour they like too, if that'd sweeten the deal? Got a home made degasser too, so the cast parts would be rock solid.
Failing that, anyone know someone who wouldn't charge too much for such a milling-run? And by too much, I mean less than the cost of making a mill myself.
Multi-part moulds would solve some of the issues. I've made odd-shaped silicone "plugs" to place into setting PU that eliminate my need to precisely drill them out once set.
As far as the threading issue goes with the hex recesses, why not just drill out a nut and braze it a piece of smooth barstock?
From the printed parts glossary, I count 74 holes that couldn't be made by a 3-axis CNC mill. If someone could knock out one of each part on a hobby mill, think someone would consider it an even trade for getting back a full set of Mendel parts a month or two later once they'd been hand finished and replicated? The rough milled versions would be fine in any plastic, or hell even wood!
I've got mixable PU-dyes, so could make them any colour they like too, if that'd sweeten the deal?
Got a home made degasser too, so the cast parts would be rock solid.Failing that, anyone know someone who wouldn't charge too much for such a milling-run? And by too much, I mean less than the cost of making a mill myself.
|
Re: Mold and pour mendel parts January 31, 2010 09:01PM |
Registered: 14 years ago Posts: 41 |
|
Re: Mold and pour mendel parts January 31, 2010 10:49PM |
Registered: 14 years ago Posts: 25 |
From my POV; mostly the rough surfaces the printed parts have as well as the undercuts.
The silicone will seep through any gaps in the printed parts, so you could end up with a part fused to the mould. Rough surfaces also wear the moulds out a lot faster as they provide more points the silicone can rip or split from. Plus for multi-part moulds, a rough surface would make it much harder to mate parts to each other without providing gaps for the resin to leak into. I'd rather not have to manually re-drill 72 holes. Though could be feasible if you don't mind buying unfinished parts.
Waiting to hear back from a couple of affordable-sounding CNC places.. Ultimately comes down to what's economical in time and money.
|
Re: Mold and pour mendel parts February 01, 2010 07:10PM |
Registered: 14 years ago Posts: 25 |
Last 24 hours I've been going over the files. Found I can print them out perfectly scaled using Pepakura Designer of all things (well, except "x-vert-drive-side-plate-360-end_2off" because the rear face splits up too much, and I can't join the seams).
Since the Mendel design appears to be over-engineered in places to account for possible printing flaws, and the positioning of the parts can be varied due to their positions on threaded bar frame, I think most of the parts can be cut from layers of 10mm and 5mm sheet material. At least for making mould masters.
There's 6 that I think would still need CNC due to the angles;
# x-carriage-lower_1off
# x-carriage-upper_1off
# y-bearing-360-inner_2off
# y-bearing-360-outer-left_1off
# y-bearing-360-outer-right_1off
# z-leadscrew-base_2off
And there's the 8-tooth gear, which I'm not sure about in the length specified. Unless you get a 30mm width belt to cut down and cut a chunk out of it before splitting. Hmm..
Will keep thinking on it. Some possibilities for the bearing and leadscrew ones, but the carriage ones.. no idea beyond CNC yet.

Sorry, only registered users may post in this forum.