New Design: The Simplified Ball Bearing Mendel
Posted by j_andberg
|
New Design: The Simplified Ball Bearing Mendel February 03, 2012 04:20PM |
Registered: 13 years ago Posts: 49 |
Hi All:
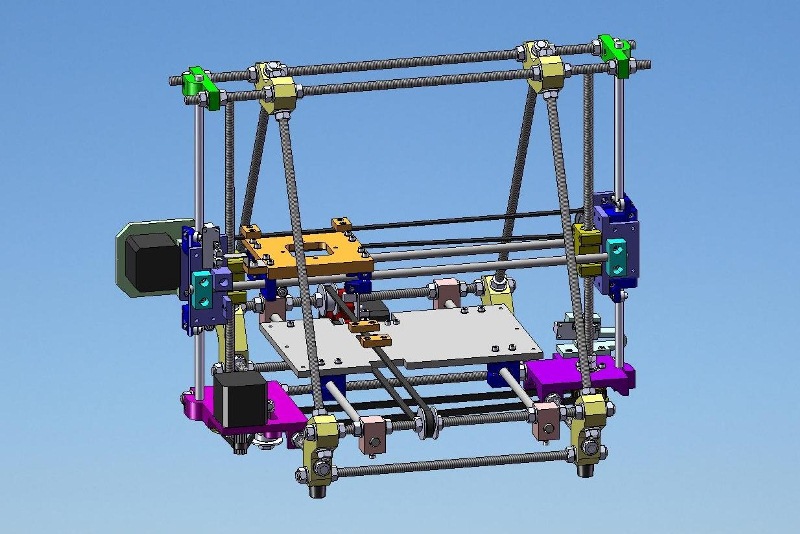
I would like to announce the birth of a new Mendel design, the Simplified Ball Bearing Mendel. I have been working on the design, build and documentation for the last 6 months. It feature set includes:
1. Low printed parts count (15 distinct parts).
2, Printable in ABS with heated bed (no tall parts, all thin and flat on the bed).
3. All ball bearings are held in 2 standard housings, a 3 bearing and a 2 bearing housing.
4. Only one fastener, M3x12!!!!
5. Ball bearing design.
6. 623 bearings, same as Huxley.
7. Very easy to adjust.
8. Vertical x belt to eliminate sag under gravity against washers.
9. All basic dimensions same as Sells Mendel (rod length, spacing, jigging; except 2 shorter
smooth rods.)
10. Belt in z, but very much simplified.
11. Able to adjust y belt tension without disassembly of heated bed!!!!
12. English/Metric dual dimensions (mostly): T5 or XL belts, 5/16 or M8 frame, 5/16 or M8 rod.
13. X axis belt returns under extruder, allows Wades extruder with vertical x belt (unlike Prusa).
14. Wade’s or Adrian’s extruder in their proper orientations.
15. Heated bed support at 4 or 3 points for flexible or rigid bed.
16. Simple hand cut frog.
17. Anti-backlash nuts on z (as on Prusa).
18. Uses printed (8 tooth) or purchased (10 tooth) pulleys (adjust code) and motor position.
Strongly suggest use of purchased 10 tooth pulleys.
19. Well integrated support for optoswitches.
20. Optoswitch flags mount with 2 screws, no rotation and hitting the switch housing.
21. All belts travel over 608 bearings to minimize bumps from belt teeth on prints.
22. Uses less than 1.5lb of ABS for a complete set (25% infill).
23. Z axis threaded rod must be M8, all SHCS must be M3X12.
Please check it out. Build documentation and stl files may be found by searching for "Simplified Ball Bearing Mendel", and there is a link under Mendel Improvements. Simplified Ball Bearing Mendel
I will continue to clean up the documentation, and eventually post assembly step files.
Please download, build, multiply and enjoy....
john
|
Re: New Design: The Simplified Ball Bearing Mendel February 06, 2012 02:11PM |
Registered: 13 years ago Posts: 339 |

|
Re: New Design: The Simplified Ball Bearing Mendel February 27, 2012 06:59PM |
Registered: 13 years ago Posts: 49 |
|
Re: New Design: The Simplified Ball Bearing Mendel May 31, 2012 03:36AM |
Registered: 11 years ago Posts: 40 |
I'm learning about RepRap, and just discovered your design.
I'd like to thank you for submitting such an outstanding series of build documents! I'm sure that must have taken a lot of time. The care you put into it certainly sets it apart from the (well intended but sometimes spotty) instructions elsewhere on the wiki.
And, I'll be keeping your enumerated summary handy as I learn more. Points of experience like that are invaluable when examining other designs, but so far yours is certainly a top contender for my first RepRap.
I note that this post is now a few months old. How is it working? Have you made any adjustments to the design?
Elsewhere on the forum, I learned that you're in/near Santa Cruz; I'm in Oakland. Do you regularly attend any sort of gathering, where I might have a closer look?
-Matt
|
Re: New Design: The Simplified Ball Bearing Mendel June 01, 2012 12:42AM |
Registered: 13 years ago Posts: 49 |
Hi Matt:
Many thanks for the kind comments. It makes the efforts worthwhile. Based on the suggestions from people that built it, I have beefed up the x motor mount to avoid any flex with keeping the x belt tension high. I will post a new zip file that includes the redesigned part in the next day or so.
I have generated a big assembly step file that I will also post, and a native SW 2007 file.
I am fussing with modern electronics and a light print bed (mine was 6mm AL and caused missed steps in the y direction at higher speeds). Note that a Prusa heated bed will need some mounting bars to transfer the corner mounting points to the standard Sells frog locations that mine uses. I need to consider this issue, and perhaps re-design the frog (or just use thin aluminum and resistors as Adrians design).
Soon, I will post a design for a 35K rpm drill press for PCBs built around the same bearing holders. Need to do the documentation on it.
We are trying to get a users group together in SC. Even the south bay might be better for most people.
thenks,
john
|
Re: New Design: The Simplified Ball Bearing Mendel June 01, 2012 03:35PM |
Registered: 11 years ago Posts: 40 |
John,
Now that I've read your build notes more carefully, I'm curious about something. I note that you reoriented the X-axis belt, to avoid issues with the belt slipping and rubbing against the guide washers... but the Z-axis belt is oriented the same way as the old x-axis belt. Why doesn't it have the same problem?
For that matter, I wonder if it wouldn't be simpler to just use two steppers for the Z axis, as on the Prusa Mendel and others. I was surprised to find that an extra stepper costs about the same as the belt and pulleys it would replace. Now I understand why so many designs make that choice.
-Matt
|
Re: New Design: The Simplified Ball Bearing Mendel June 01, 2012 06:01PM |
Registered: 13 years ago Posts: 49 |
Hi Matt:
The z axis turns only one way, and a fraction of a turn for each layer, at that. There is also no idler. I was having trouble with the x belt having excessive friction between the bearing and the stationary fender washers on the Sells. I also had misgivings about the 2 motors on one driver on the z. In an industrial setup, that would require another driver and slaved axis to implement properly. There would also always be issues if one was asccidentally moved when power was off...
Obviously people get away with a Prusa style, but 3 printed pulleys, belt ($5) and 2 x 50 cent bearings versus a new stepper and the choice was to go with the old way.... I am tempted to do a re-design since everyone seems to like Prusa style z, but it does not really seem superior. Of course, my design is a bit more expensive because I found machined pulleys to reduce x-y backlash. That is overkill on z, but it was easier to use them everywhere.
john
|
Re: New Design: The Simplified Ball Bearing Mendel June 01, 2012 07:29PM |
Registered: 12 years ago Posts: 179 |
j_andberg Wrote:
-------------------------------------------------------
> Hi Matt:
>
> The z axis turns only one way, and a fraction of a
> turn for each layer, at that.
Not any more - slic3r has a "lift" option, which raises Z by a fraction when retraction is needed, to combat strings.
There is also no
> idler. I was having trouble with the x belt having
> excessive friction between the bearing and the
> stationary fender washers on the Sells. I also had
> misgivings about the 2 motors on one driver on the
> z. In an industrial setup, that would require
> another driver and slaved axis to implement
> properly.
Even in an industrial setup, having two drivers would give zero advantage, unless the drivers were designed to detect missed steps.
> There would also always be issues if one
> was asccidentally moved when power was off...
Being able to move one side of Z separately from the other, without having to loosen the belt carries more advantage than disadvantage.
Leveling z in the Y plane on sells = remove belt, twist screws, replace belt, find you did it wrong, start over...
Leveling Z in the Y plane on prusa = turn off motors, twist 1 screw.
>
> Obviously people get away with a Prusa style, but
> 3 printed pulleys, belt ($5) and 2 x 50 cent
> bearings versus a new stepper and the choice was
> to go with the old way.... I am tempted to do a
> re-design since everyone seems to like Prusa style
> z, but it does not really seem superior. Of
> course, my design is a bit more expensive because
> I found machined pulleys to reduce x-y backlash.
> That is overkill on z, but it was easier to use
> them everywhere.
>
> john
My experience was that by far the biggest advantage to machined pulleys was that they don't work loose, and start wobbling on the drive shaft. Certainly a worthwhile upgrade. As for machined pulleys on Z - backlash becomes a factor on Z when you start using all of the slicing software's features, so having them there is also a worthwhile upgrade.
Sorry, only registered users may post in this forum.