OB1 Prism
Posted by Wired1
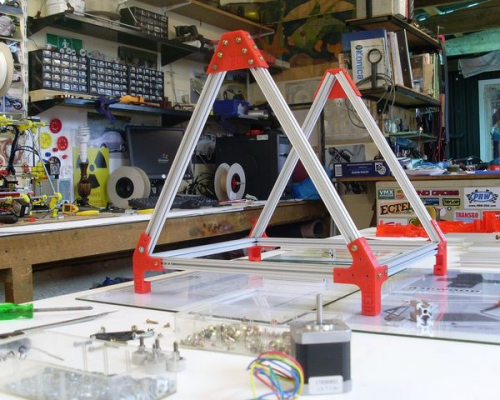
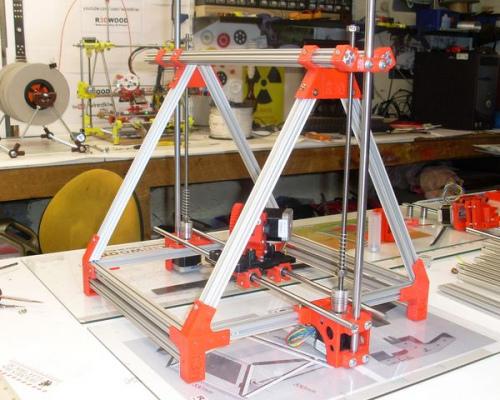
I am currently building a prism-based printer out of Open Beam which is a 15mm x 15mm aluminium extrusion. This came about as a local importer of the extrusion posted on the NZ user group forum asking for some of us to have a go with this product so that's what I and at least one other are doing currently.
The original thread is here: [forums.reprap.org]
And the build blog is here: Simon's OB1 Prism blog
_________________________________________________________________________________________
Richmond, New Zealand
Thingiverse ~ YouTube
The original thread is here: [forums.reprap.org]
And the build blog is here: Simon's OB1 Prism blog
_________________________________________________________________________________________
Richmond, New Zealand
Thingiverse ~ YouTube
|
Re: OB1 Prism October 22, 2012 10:20PM |
Registered: 16 years ago Posts: 80 |
Nice. I was actually working on a design using openbeam or hfs-1515 from misumi (they are both 15x15 and can use m3 nuts). Though, I was doing something similar to the 'aluminum mendel. The prism shape isn't really needed when using precise aluminum extrusion. At least, that seems to be the consensus.
|
Re: OB1 Prism October 23, 2012 03:11AM |
Registered: 11 years ago Posts: 525 |
What does that look like?
One of the attractions of this extrusion other than the simple and cheap hardware, is the purchase cost. Here in New Zealand, the cost of the Misumi extrusions make it almost prohibitively expensive to building a printer. I am also building a Mendel max 1.5 and have managed to source a Chinese equilvalent of the 2020 that is amazingly high quality and low cost, but this product is similarly priced to that and best of all, is available locally so only takes a couple of days to arrive.
Edited 1 time(s). Last edit at 10/23/2012 03:12AM by Wired1.
_________________________________________________________________________________________
Richmond, New Zealand
Thingiverse ~ YouTube
|
Re: OB1 Prism October 28, 2012 12:39AM |
Registered: 11 years ago Posts: 525 |
The frame is basically finished, now to do the y axis. I am using a stock x-ends and my x-carriage and extruder.
_________________________________________________________________________________________
Richmond, New Zealand
Thingiverse ~ YouTube
_________________________________________________________________________________________
Richmond, New Zealand
Thingiverse ~ YouTube
|
Re: OB1 Prism November 07, 2012 04:14AM |
Registered: 11 years ago Posts: 525 |
Baby Prism uploaded to Thingiverse here: [www.thingiverse.com]
_________________________________________________________________________________________
Richmond, New Zealand
Thingiverse ~ YouTube
_________________________________________________________________________________________
Richmond, New Zealand
Thingiverse ~ YouTube
|
Re: OB1 Prism November 29, 2012 10:38PM |
Registered: 12 years ago Posts: 809 |
Your machine is looking really good! I saw your video of it printing - very nice. The Atzeeg X3 looks very smoothI really like the look of the helios bed. How is it performing for you? Thinking of using one for my next build.
- akhlut
Just remember - Iterate, Iterate, Iterate!
[myhomelessmind.blogspot.com]
- akhlut
Just remember - Iterate, Iterate, Iterate!
[myhomelessmind.blogspot.com]
|
Re: OB1 Prism November 29, 2012 11:59PM |
Registered: 11 years ago Posts: 525 |
I am very impressed with the Panucatt Helios hot bed, it is a lot thicker than the others and flatter. Plus the wiring is so easy with the thermistor tracks etched in already. I am a little suspicious of the accuracy of the bed as it seems to run a little too hot when compared with the non-contact thermometer but it would only be 5 degrees difference and I can adjust that out in the g-code. I am using the same thermistor I have used with the other brands of hot bed so I'm not sure why it is reading wrong in this situation other than it is soldered to the board.
The Azteeg is very easy to program and is performing flawlessly. It is easy to wire up and it costs about the same as other controllers so if you want dual extruders then it is the way to go. I still have a new Printrboard to use on a printer I am building as a commission so I will see after that one which one I will buy next time but the Azteeg seems to tick all the boxes for me.
_________________________________________________________________________________________
Richmond, New Zealand
Thingiverse ~ YouTube
|
Re: OB1 Prism November 30, 2012 03:21PM |
Registered: 11 years ago Posts: 1,320 |
I was going to build a mendel 90 as my next printer, but I'm leaning towards the OB1 design. I just ordered my extrusions from openbeamusa.com, and my Helios hot bed from Panucatt. I think I'm just going to use my RAMPS1.4/Arduino - at least initially.
I was going to order lead screws/nuts, but didn't see a spec either on your blog or over at thingiverse. Are you using a lead screw, or simple threaded rod? If a lead screw, do you have a source that you'd care to share? I see terrawatt industries has a reasonably priced set of leadscrews, but I'm not sure of the overall length, and I'd sure like to get ones that do not have a full circular flange.
Thanks
|
Re: OB1 Prism November 30, 2012 04:03PM |
Registered: 11 years ago Posts: 525 |
I need to get started on the documentation (oops) it is lots of fun building it but not so much documenting it.
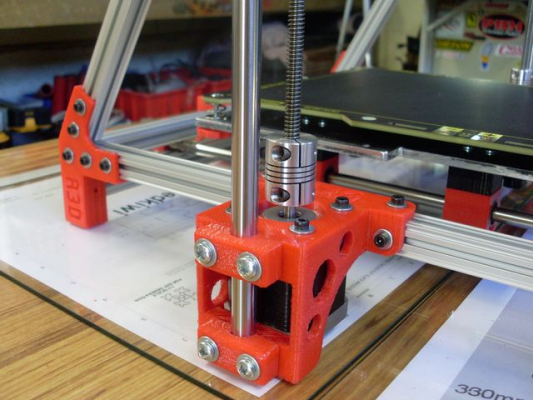
I used acme lead screws and nuts from Nate at Techpaladin TechPaladin - Nate is super helful and his shipping cost are very reasonable.
_________________________________________________________________________________________
Richmond, New Zealand
Thingiverse ~ YouTube
I used acme lead screws and nuts from Nate at Techpaladin TechPaladin - Nate is super helful and his shipping cost are very reasonable.
_________________________________________________________________________________________
Richmond, New Zealand
Thingiverse ~ YouTube
|
Re: OB1 Prism November 30, 2012 04:24PM |
Registered: 12 years ago Posts: 809 |
That terrawatt leadscrew looks great! It better be...@$70 for two...
mcmcaster.com 1/4"-16 ACME screw $7 for 3'. Add (4) matching nuts @ $2 each and you have essentially the same resolution for $15 (1.59mm vs 1.5mm per turn). Bonus is that you can use standard M8 X-ends. Even better - you'll reduce the chance of Z-wobble with the smaller screws. And you can order all your M3/M8/M10 hardware from mcmcaster at very reasonable prices.
BTW - I just ordered some 5mm-6.35mm (1/4") couplers from trinity labs. $10 for two. Great price.
- akhlut
Just remember - Iterate, Iterate, Iterate!
[myhomelessmind.blogspot.com]
|
Re: OB1 Prism November 30, 2012 07:51PM |
Registered: 11 years ago Posts: 1,320 |
|
Re: OB1 Prism November 30, 2012 09:07PM |
Registered: 12 years ago Posts: 809 |
Mcmaster Part # 98935A803 Plain steel 1/4"-16 ACME rod, 3ft. $7.71
Granted - they are plain steel and *will* rust if left unprotected. But a nice coating of PTFE grease will prevent that from happening and help produce silky smooth motion.

I know there is a lot to sort through at Mcmaster. But totally worth it to browse and look for deals. They are THE source in the US for Metric hardware - for me anyway.
- akhlut
Just remember - Iterate, Iterate, Iterate!
[myhomelessmind.blogspot.com]
Granted - they are plain steel and *will* rust if left unprotected. But a nice coating of PTFE grease will prevent that from happening and help produce silky smooth motion.

I know there is a lot to sort through at Mcmaster. But totally worth it to browse and look for deals. They are THE source in the US for Metric hardware - for me anyway.
- akhlut
Just remember - Iterate, Iterate, Iterate!
[myhomelessmind.blogspot.com]
|
Re: OB1 Prism December 01, 2012 06:37PM |
Registered: 11 years ago Posts: 525 |
Do they ship outside the US?
_________________________________________________________________________________________
Richmond, New Zealand
Thingiverse ~ YouTube
_________________________________________________________________________________________
Richmond, New Zealand
Thingiverse ~ YouTube
|
Re: OB1 Prism December 01, 2012 08:42PM |
Registered: 12 years ago Posts: 809 |
I wish they would.  I think they have some contract with the US Gvt to supply the military, so they won't ship outside the US. Not even to Canada.
- akhlut
Just remember - Iterate, Iterate, Iterate!
[myhomelessmind.blogspot.com]
 I think they have some contract with the US Gvt to supply the military, so they won't ship outside the US. Not even to Canada.
- akhlut
Just remember - Iterate, Iterate, Iterate!
[myhomelessmind.blogspot.com]
|
Re: OB1 Prism December 04, 2012 12:56AM |
Registered: 11 years ago Posts: 1,320 |
|
Re: OB1 Prism December 04, 2012 01:30AM |
Registered: 11 years ago Posts: 525 |
Yes I made it from a piece of 6mm thick aluminium. I went along to an aluminium joiner and asked him to cut me a piece 230mm square and then drilled it out at home. You could make it from acrylic sheet or even MDF/plywood and it would work just as well but I agree it looks nicer in alloy.
_________________________________________________________________________________________
Richmond, New Zealand
Thingiverse ~ YouTube
_________________________________________________________________________________________
Richmond, New Zealand
Thingiverse ~ YouTube
|
Re: OB1 Prism December 05, 2012 12:57PM |
Registered: 11 years ago Posts: 1,320 |
I just ordered a custom-cut aluminum sheet - 1/4 inch thick and 9.055 inches square - basically 6mm x 230mm x 230mm - from speedymetal.com. They quoted me $10 (plus shipping). I thought that was a fair price. I'm able to do the drilling at home, but I don't have the tooling to make clean cuts on something like this.
|
Re: OB1 Prism December 06, 2012 12:57AM |
Registered: 11 years ago Posts: 1,320 |
I guess you're using slic3r as opposed to skeinforge. Ztop and ycarriage both had significant slicing issues with skeinforge, but sliced perfectly with slic3r. I was never really happy with my results when using slic3r, probably because I never spent any significant time with it, but maybe I should make the investment.
|
Re: OB1 Prism December 06, 2012 04:19AM |
Registered: 11 years ago Posts: 525 |
I've only used Slic3r and I am using the version 0.9.3 without any problems. I'm not sure how an STL could work better with one slicer than another but I'll take you word for it. I take a lot of care to measure the filament but other than that I run with the default settings and it mostly comes out right 
_________________________________________________________________________________________
Richmond, New Zealand
Thingiverse ~ YouTube

_________________________________________________________________________________________
Richmond, New Zealand
Thingiverse ~ YouTube
|
Re: OB1 Prism December 28, 2012 11:24PM |
Registered: 11 years ago Posts: 1,320 |
OK - today I finished basic assembly of my printer, and rough wired everything just to see how things were working. Still a far way from actually printing, but I've made significant progress. I have had some issues though:
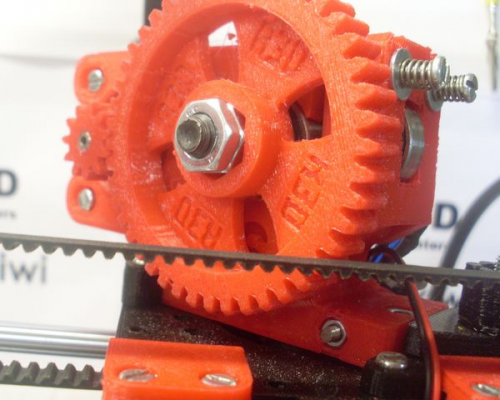
1) the quick-release X carriage. When I mount the extruder at a 45 degree angle and use the quick mechanism, the large gear hits the X axis belt. Not just brushes it either - it pushes it a full 6-8 mm out of its normal path. Obviously that can't work like that, so, for the time being at least, I've mounted the extruder the old-fashioned way, parallel to the axis with 2 M4 bolts.
2) you claim a Z height of ~125, but I don't see near that height, and the issue is NOT the extruder hitting the top, instead it's the X belt hitting the frame. It's hard to be exact about the height because I haven't mounted the Helios yet, but with a rough estimation of where the bed is going to be, I'm guessing that the collision happens somewhere in the 96mm - 100mm range. And it's a shame because there is still so much room above the extruder - at least another 25-30mm. Perhaps after everything is up and running I can work on some way to address this.
3) I'm having a hard time getting the Y idler to work properly. The belt keeps walking off to one side or the other. I've been pretty careful about the alignment of the belt and the pulleys, clamps, etc. I've also tried springs and bolts with varying degrees of tension. The only thing I found that seemed to help was to cover the bearing with a crowned pulley.
All of these issues are being exacerbated by the fact that I decommissioned my Prusa to move the motors and electronics over to the new printer, so if I have an issue, I can't even print a part to help solve it
Still, all things considered, I think I'm in pretty good shape and ought to be printing before the weekend is out (or at least by the new year)
|
Re: OB1 Prism December 29, 2012 12:30AM |
Registered: 11 years ago Posts: 525 |
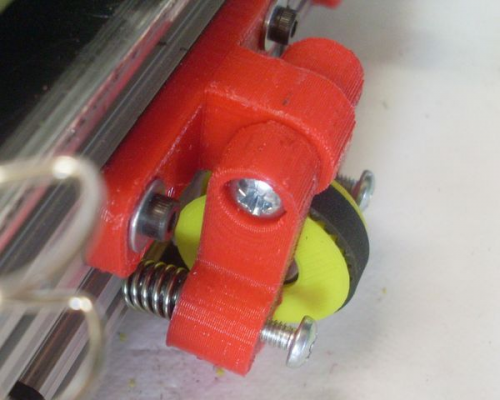
Yes I had some issues with the y-idler too. I replaced the springs with 4mm machine screws and nuts and have got it right now but you do have to muck about with each side to get the belt to stay central. This part needs a re-think and probably 2 608 bearings will fix it.
The overall height thing was a bit of a guess when i was building it but on mine I get 110mm maximum and have set the firmware to this figure. In retrospect I should have moved the side bars away from the 60 degrees. Your extruder may be taller than mine or you may be using a spacer between the extruder and the hot end. My extruder is intended to take the j-head type extruder directly into the body to gain another 10mm or so but this would be a problem if you were printing with ABS as the heat of the hot end might be too hot for the extruder body but it works fine on PLA. I guess if you made the extruder from ABS it should be fine to print ABS with it logically.
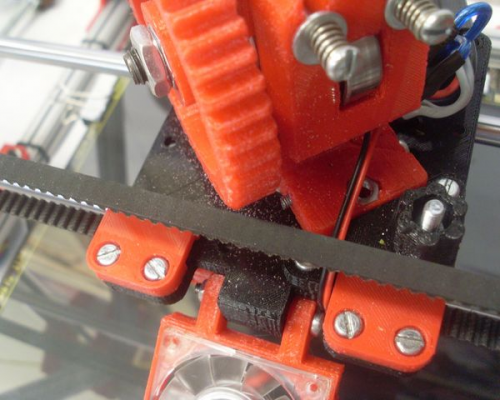
The photo below shows how close the x-belt is to the extruder gear but it does clear. This is the gear set I designed so it might be slightly smaller than what you are using. I am going off the whole quick fit thing now and thinking more toward a bowden tube style extruder which gets all this weight and complexity off the x-carriage.
I'll keep you posted about the y-idler but knowing that mine works might be enough to encourage you to keep trying although i agree it is not the easiest thing to set up.
_________________________________________________________________________________________
Richmond, New Zealand
Thingiverse ~ YouTube
|
Re: OB1 Prism December 29, 2012 01:55AM |
Registered: 11 years ago Posts: 1,320 |
I'm actually using all of your parts for the x carriage and the extruder, including the gears. One thing that might be different though is the diameter of the pulley I am using on the X axis. Mine's quite large - just barely fits in the cutout in the X end. The net result of this is that it raises the belt itself which might be responsible for the gear hitting it. I could easilty switch to a smaller pulley. I'm using a 608 bearing inside a printed bearing guide on the X idler side. If I went with a smaller diameter pulley, I'd probably need to go with something smaller on the idler side too. That would also mitigate the height issue. What are you using on the idler side?
I also want to emphasize regarding the height - it's the belt that limits the height. Not the extruder. I still have plenty of room above the extruder.
Tomorrow I'll take a picture to show you where it's hitting
I also want to emphasize regarding the height - it's the belt that limits the height. Not the extruder. I still have plenty of room above the extruder.
Tomorrow I'll take a picture to show you where it's hitting
|
Re: OB1 Prism December 29, 2012 02:53AM |
Registered: 11 years ago Posts: 525 |
I am using just a 608 bearing on the idler side and the printed 23 tooth pulley on the other side. I am a bit annoyed at this limitation as it would have been easy to correct it with the angle of the sides had I known. Maybe version 2. I too have at least 30mm spare above the extruder.
As you say, if the drive pulley and idler bearing could be smaller you would get more height. I originally was thinking I could have a smaller pulley here but Marlin insists on having the X and Y pulleys the same size. I think I'll also have a closer look at marlin and see if this can be corrected somewhere to give them different variables for the pulley teeth.
_________________________________________________________________________________________
Richmond, New Zealand
Thingiverse ~ YouTube
|
Re: OB1 Prism December 29, 2012 10:49AM |
Registered: 11 years ago Posts: 1,320 |
|
Re: OB1 Prism December 29, 2012 04:07PM |
Registered: 11 years ago Posts: 525 |
Yes in configuration.h it does do the steps/mm for each but unfortunately it defines "#define GEAR_TEETH 23 // Enter number of teeth on X and Y gears"
_________________________________________________________________________________________
Richmond, New Zealand
Thingiverse ~ YouTube
_________________________________________________________________________________________
Richmond, New Zealand
Thingiverse ~ YouTube
|
Re: OB1 Prism December 29, 2012 07:03PM |
Registered: 11 years ago Posts: 525 |
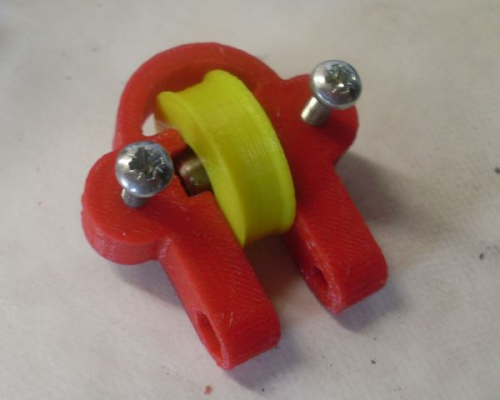
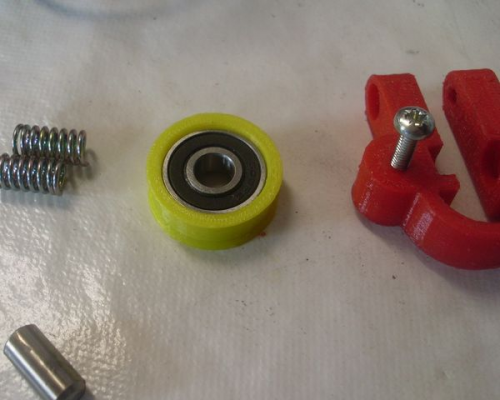
I have made a guided roller today that fits over the 608 bearing and works with the existing y-idler tensioner. The 608 is a press fit and I used a plain flat washer on the open side and it seems to be a good solution to the belt wandering problem. Sorry about the colour combination but I had yellow on the printer at the time 
It's on the bottom of the OB1 page on thingiverse: OB1 Prism
_________________________________________________________________________________________
Richmond, New Zealand
Thingiverse ~ YouTube

It's on the bottom of the OB1 page on thingiverse: OB1 Prism
_________________________________________________________________________________________
Richmond, New Zealand
Thingiverse ~ YouTube
|
Re: OB1 Prism December 30, 2012 02:02AM |
Registered: 11 years ago Posts: 1,320 |
Interesting. I printed something similar that I found on thingverse, but haven't gotten around to installing it yet. I wasn't 100% happy with it so maybe I'll print yours instead.
The important word in the previous paragraph is "printed". Yes - I'm up and running, or should I say limping - but I am printing. I decided to go back to my old x carriage because it was much more open, and that made it easier, I thought, to observe the printing. I still have some end stop issues - x and z axes are jury-rigged for now, and I'm not yet 100% happy with bed levelling and other calibration issues, but the good news is I can print the parts I need.
I love the new frame - so much more structurally sound than the prusa frame. The only issue I have is with the max height. I was thinking that if the 4 corner pieces bent up at say 70 degrees instead of 60, and a new apex was designed, maybe even using a small length of the open beam, then the changes wouldn't be too drastic, and it could be retrofitted right onto an existing printer.
|
Re: OB1 Prism December 30, 2012 02:21AM |
Registered: 11 years ago Posts: 525 |
I have been thinking all day about this limitation and have a slight modification I am testing at the moment. The idea is the front two uprights are the problem so I am moving them back to directly under the middle of the two top bars and 90 degrees to the base so side on it looks like the number 4. The upright will not be in the way of anything and it give complete freedom with the belt selection. I think this will still be as stable as the equilateral triangle and it is the least number of parts to change: the top apex and a new foot the will mount on top of the existing z-motor mount plus a simplified front foot each side. As you suggest I want to keep as many of the original parts as possible. I will print the first part out tonight and post a picture when it is done.
Edited 1 time(s). Last edit at 12/30/2012 02:26AM by Wired1.
_________________________________________________________________________________________
Richmond, New Zealand
Thingiverse ~ YouTube
Edited 1 time(s). Last edit at 12/30/2012 02:26AM by Wired1.
_________________________________________________________________________________________
Richmond, New Zealand
Thingiverse ~ YouTube
|
Re: OB1 Prism December 30, 2012 06:11PM |
Registered: 11 years ago Posts: 1,320 |
|
Re: OB1 Prism December 31, 2012 12:14AM |
Registered: 11 years ago Posts: 1,320 |
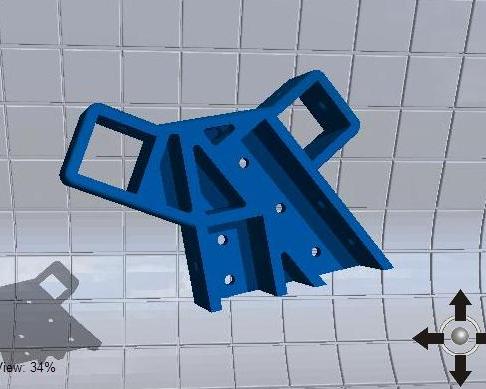
This is the direction I was thinking of. Attached are two stl files. I worked this out in openscad. One stl file contains the lower corners with the angle of the upright changed from 60 to 70. I worked out the trigonometry, and calculated that at 70 degrees, the 330 mm uprights will be 104.266 mm apart at the top, so I designed the new apex and ztop pieces in the second stl file.
This is just a concept. I haven't printed anything yet. Since it's based on your design, I wanted to run this by you. I have no issue if you want to incorporate this into your design.
This is just a concept. I haven't printed anything yet. Since it's based on your design, I wanted to run this by you. I have no issue if you want to incorporate this into your design.
Sorry, only registered users may post in this forum.
