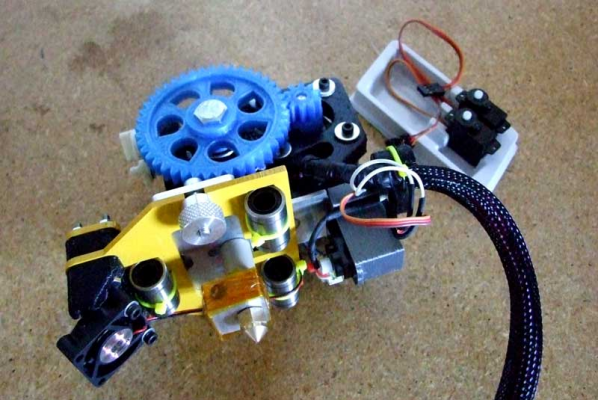
Bed Auto Leveling.. check this out
Posted by AlexBorro
|
Re: Bed Auto Leveling.. check this out November 12, 2013 05:09PM |
Registered: 10 years ago Posts: 24 |
|
Re: Bed Auto Leveling.. check this out November 12, 2013 08:16PM |
Registered: 11 years ago Posts: 791 |
Quote
RicardoGA
regpye let me know if you have a problem, i leave you my configuration and configuration adv files, i´m using 2 pololu to drive my z axis
Thanks RicardoGA,
I have checked my configuration.h and the Z feedrates are very small. Will try the dual motors later and see if it makes any difference.
I will use your files as a quide.
Cheers.
[regpye.com.au]
"Experience is the mother of all knowledge." --Leonardo da Vinci
|
Re: Bed Auto Leveling.. check this out November 12, 2013 09:11PM |
Registered: 10 years ago Posts: 24 |
|
Re: Bed Auto Leveling.. check this out November 13, 2013 04:59AM |
Registered: 10 years ago Posts: 10 |
There is a problem in the code for the feedrates when moving for bed leveling.
#define XY_TRAVEL_SPEED 6000 // X and Y axis travel speed between probes, in mm/min
This is not only used for XY travel but also for Z travel. That is the reason the Z motor stall.
I fixed some things in the code so that the Z moves uses the homing_feedrate and not XY_TRAVEL_SPEED This fixed the stalling Z motor problems for me.
You could also set the XY_TRAVEL_SPEED to someting like 150 but that means XY travel would be very slow.
static void do_blocking_move_to(float x, float y, float z) {
    float oldFeedRate = feedrate;

    feedrate = homing_feedrate[Z_AXIS];

    current_position[Z_AXIS] = z;
    plan_buffer_line(current_position[X_AXIS], current_position[Y_AXIS], current_position[Z_AXIS], current_position[E_AXIS], feedrate/60, active_extruder);
    st_synchronize();

    feedrate = XY_TRAVEL_SPEED;

    current_position[X_AXIS] = x;
    current_position[Y_AXIS] = y;
    plan_buffer_line(current_position[X_AXIS], current_position[Y_AXIS], current_position[Z_AXIS], current_position[E_AXIS], feedrate/60, active_extruder);
    st_synchronize();

    feedrate = oldFeedRate;
}
|
Re: Bed Auto Leveling.. check this out November 13, 2013 06:03PM |
Registered: 11 years ago Posts: 791 |
I have changed the settings to be very small for the Z axis, and it is working fine now.
Next step is to print new mounts for the hotend cooling fan and also the servo and swap their positions so that the servo will be able to reach the bed while homing. It was silly of me not to have seen that when I first designed the mount.
I guess I will then have to re-calculate all the positions again.
Anyway, on a test without changing the positions, the motors are working fine now and the auto leveling seems to be working too, as I see the z motors turning as the XY movements being done.
[regpye.com.au]
"Experience is the mother of all knowledge." --Leonardo da Vinci
|
Re: Bed Auto Leveling.. check this out November 13, 2013 06:25PM |
Registered: 10 years ago Posts: 10 |
Quote
regpye
I have changed the settings to be very small for the Z axis, and it is working fine now.
Next step is to print new mounts for the hotend cooling fan and also the servo and swap their positions so that the servo will be able to reach the bed while homing. It was silly of me not to have seen that when I first designed the mount.
I guess I will then have to re-calculate all the positions again.
Anyway, on a test without changing the positions, the motors are working fine now and the auto leveling seems to be working too, as I see the z motors turning as the XY movements being done.
Did you change the code or only the config?
Well I got mine working even with the probe outside of the bed. I needed to change some code to get it working. I'll post it later when I have time to clean it up.
Still one problem the bedleveling is not very acurate. I printed 4 test pieces at once each in one corner of the bed and it seems they are a little different in height. Need to look into that.
|
Re: Bed Auto Leveling.. check this out November 13, 2013 09:34PM |
Registered: 10 years ago Posts: 1,433 |
|
Re: Bed Auto Leveling.. check this out November 14, 2013 03:12AM |
Registered: 11 years ago Posts: 791 |
I only changed the code in the config at this stage, will try with the config.adv as well. Also the Marlin_main.cpp code, will check that out too.
I have to try and fit many things into the day and night, so I don't have a lot of time to work on the printer as I would like.
[regpye.com.au]
"Experience is the mother of all knowledge." --Leonardo da Vinci
I have to try and fit many things into the day and night, so I don't have a lot of time to work on the printer as I would like.
[regpye.com.au]
"Experience is the mother of all knowledge." --Leonardo da Vinci
|
Re: Bed Auto Leveling.. check this out November 14, 2013 05:26PM |
Registered: 10 years ago Posts: 10 |
Quote
uncle_bob
The bed leveling can only do so much. If your bed is not stable through the length of the print, it's not going to fix all your Z axis issues. There are a lot of things (like filament feed) that can throw things off during a print ...
Z-Axis was defenitely an issue I had those tubes as couplers. I replaced them with aluminium couplers and that solved a lot. BUT the biggest culprit is the micro switch. I get wildly different result when probing one spot repeatetly sometimes difference of 0.2 mm so on the hunt for a better micro switch. I think I'll solve that problem in software, do several probings and take the average values and store them somewhere. I'm mainly a software guy so I'm learning a lot about mechanics and hardware so this is really a very good learning experience.
|
Re: Bed Auto Leveling.. check this out November 14, 2013 06:38PM |
Registered: 10 years ago Posts: 1,433 |
The micro switch *should* be very consistent if the speed is fairly slow. It's a millisecond action / milliseconds bounce sort of gizmo.
If you use the plastic tube, it can wear out. You also don't want to much or to little plastic between the motor and the thread rod. You need an air gap, but not much of one. How much is that ... I don't know ... looks like about a mm or so.
If you use the plastic tube, it can wear out. You also don't want to much or to little plastic between the motor and the thread rod. You need an air gap, but not much of one. How much is that ... I don't know ... looks like about a mm or so.
|
Re: Bed Auto Leveling.. check this out November 14, 2013 07:14PM |
Registered: 11 years ago Posts: 791 |
wdl1908 , I would have to agree about the micro switches.
I found the same problem when using for Z homing on my machines before auto bed levelling, I could never get an accurate repeatable homing using a micro switch.
I changed to several different ones and some where more repeatable than others.
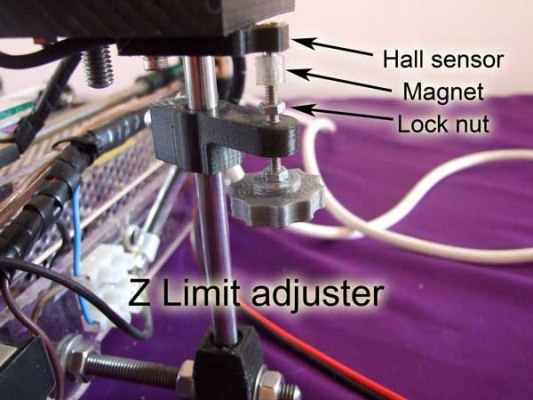
In the end I changed over to using a hall effect sensor and a magnet.
The magnet I mounted to a micrometer type adjuster so that I had accurate control of its position.
Once set I got repeatable homing each time.
Here is a photo of an earlier design, I have refined it a lot since then. The new housing for the hall effect sensor on my later ones has a LED to show that it has homed. Size is a bit smaller too.
[regpye.com.au]
"Experience is the mother of all knowledge." --Leonardo da Vinci
|
Re: Bed Auto Leveling.. check this out November 14, 2013 07:21PM |
Registered: 11 years ago Posts: 791 |
Quote
uncle_bob
The micro switch *should* be very consistent if the speed is fairly slow. It's a millisecond action / milliseconds bounce sort of gizmo.
If you use the plastic tube, it can wear out. You also don't want to much or to little plastic between the motor and the thread rod. You need an air gap, but not much of one. How much is that ... I don't know ... looks like about a mm or so.
Also I found that if using the aluminium flexible connectors, it is important not to have the threaded rod touching the motor shaft when assembling, there needs to be some room for movement. A good way around this is to place a 4mm ball in between the threaded rod and motor shaft, then they can touch and the ball allows movement as needed. This also takes a lot of slack out of the coupling and makes for a smoother connection as the coupling can't compress, it can only expand.
[regpye.com.au]
"Experience is the mother of all knowledge." --Leonardo da Vinci
|
Re: Bed Auto Leveling.. check this out November 14, 2013 07:40PM |
Registered: 10 years ago Posts: 1,433 |
If the end of the thread rod makes contact with the top of the motor shaft as it rocks back and forth you have a really bad situation. You loose all isolation when that happens. With the plastic tube you need enough tube to allow for some flex as well. Depending on the design of the coupler you could have very similar issues.
|
Re: Bed Auto Leveling.. check this out November 14, 2013 08:24PM |
Registered: 11 years ago Posts: 791 |
Quote
uncle_bob
If the end of the thread rod makes contact with the top of the motor shaft as it rocks back and forth you have a really bad situation. You loose all isolation when that happens. With the plastic tube you need enough tube to allow for some flex as well. Depending on the design of the coupler you could have very similar issues.
That is why I use a ball, it removes the problem. If the shafts themselves were to touch, then as you say there would be a big problem.
I have tried it all ways and found the ball the best of them all. Next best is a small pace between the two shafts, but this also allows compression to take place that gives downward movement that can be avoided. Upward movement is not such an issue as the weight of the assembly keeps a downward pressure naturally and still allows any needed movement to take place for any misalignment.
[regpye.com.au]
"Experience is the mother of all knowledge." --Leonardo da Vinci
|
Re: Bed Auto Leveling.. check this out November 15, 2013 02:53PM |
Registered: 11 years ago Posts: 329 |
|
Re: Bed Auto Leveling.. check this out November 15, 2013 04:11PM |
Registered: 10 years ago Posts: 10 |
|
Re: Bed Auto Leveling.. check this out November 15, 2013 09:11PM |
Registered: 11 years ago Posts: 791 |
I noticed on my setup that the homing and the second probing point are very close together.
Although the levelling is working fine, I feel it would be better if mine was to have the second probing in the opposite corner.
I have tried changing the locations in the setup, but have not been successful in getting it right.
Here are a couple of images to show what I mean a little clearer. (you may need to click on the image holder)
Can anyone assist with this small issue?
Thanks
[regpye.com.au]
"Experience is the mother of all knowledge." --Leonardo da Vinci
|
Re: Bed Auto Leveling.. check this out November 16, 2013 01:06PM |
Registered: 10 years ago Posts: 10 |
Quote
regpye
I have tried changing the locations in the setup, but have not been successful in getting it right.
Can anyone assist with this small issue?
Thanks
Not without a code change. The position and algorithm is hard coded for those three points. But I don' think it matters.
Attached are some pictures of a first layer print I did after bed leveling.
Bed leveling
The top left is ok.
The left bottom panel lost a small piece on the right.
The right top and bottom are a disaster. they contain ridges Probably due to innacuracies of the vector calculation for the bed leveling. And I mean the calculation not the probing.
This is printed with 0.3mm first layer and 0.2mm second layer.
So doing prints with 0.1 layer with bed leveling is out of the question.
So for me bed leveling is out I will try to use the G30 command to do probing and then manually level the bed.
|
Re: Bed Auto Leveling.. check this out November 16, 2013 02:20PM |
Registered: 10 years ago Posts: 10 |
And here is the result of using G30 to level the bed manually.
Bed leveling Manual adjustment
Almost perfect print.
Bed leveling Manual adjustment
Almost perfect print.
|
Re: Bed Auto Leveling.. check this out November 17, 2013 10:40AM |
Registered: 10 years ago Posts: 12 |
|
Re: Bed Auto Leveling.. check this out November 17, 2013 08:26PM |
Registered: 11 years ago Posts: 791 |
Quote
danlyc
Alex,
Do you still want to perform the "semi auto" EEPROM test?
I am ok if you need help.
Cheers
Daniel
I am willing to test it too
[regpye.com.au]
"Experience is the mother of all knowledge." --Leonardo da Vinci
|
Re: Bed Auto Leveling.. check this out November 19, 2013 12:54PM |
Registered: 10 years ago Posts: 10 |
impressive feature, thanks.
I read the thread and it seems that everyone uses a Prusa i3.
I still use my Prusa i2 and just wanted to check out if anyone has got an idea on how to mount this Z-probe-holder on the X-carriage of a Prusa i2.
I use this carriage (http://www.thingiverse.com/thing:18657). I would be very pleased if someone could help me.
Thanks
|
Re: Bed Auto Leveling.. check this out November 20, 2013 02:37PM |
Registered: 11 years ago Posts: 329 |
|
Re: Bed Auto Leveling.. check this out November 21, 2013 01:10PM |
Registered: 10 years ago Posts: 1,433 |
If you talk to the airplane guys (they use a lot of servos) not all servos are created equal. The term 9 gram servo covers a vast range of parts that don't have the same interface / size / footprint / torque / range / .... We probably need to get a bit more specific on which servos are working well and which ones are best avoided.
|
Re: Bed Auto Leveling.. check this out November 21, 2013 04:25PM |
Registered: 11 years ago Posts: 791 |
Quote
uncle_bob
If you talk to the airplane guys (they use a lot of servos) not all servos are created equal. The term 9 gram servo covers a vast range of parts that don't have the same interface / size / footprint / torque / range / .... We probably need to get a bit more specific on which servos are working well and which ones are best avoided.
I am having success with a servo bought from HobbyKing. The price is about $4 and under $10 for 3 servos.
The model and numbers are TURNIGY Micro Servo TGY-1800A
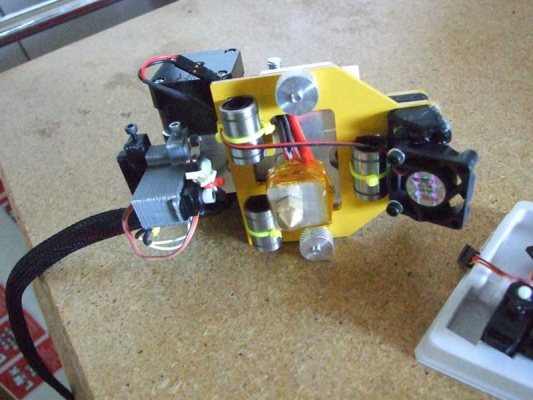
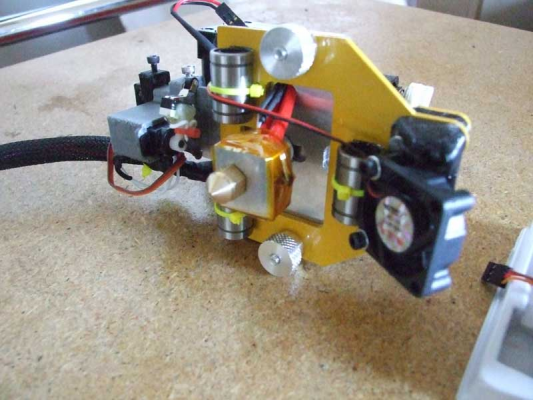
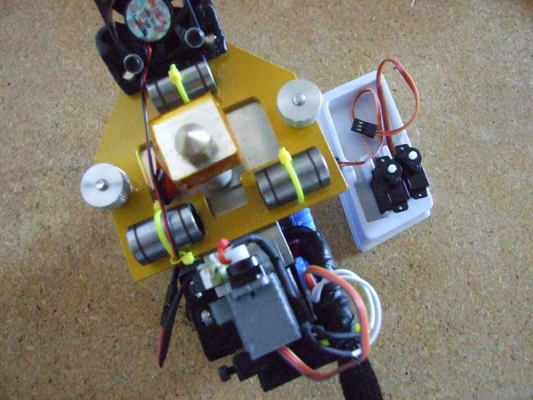
The servo comes with 3 different shaped levers and I picked the shorter fat one. This I glued to a sub-miniature micro switch with epoxy and also put a zip tie around to hold the wires close together and firmly so the wires would not break off with movement. The servo has a torque of 1.7 Kg, so it is more than enough to do the job.
I have had no problems using these, they swing up and down flawlessly with no "twitching"
Here are some photos of my setup. It will be different to most of you, but maybe some ideas will be gained from what I have done. There are 15 wires in the loom for the assembly, so this needed a means of holding the bunch together, so a printed clip support has been added that can be removed easily when needed.
The servo bracket uses the same type of attachment. The extruder is mounted onto an aluminium plate that these two brackets also slide on. The aluminium plate not only acts as a support for all three pieces, but is also a heat sink. This method could be used for many different setups.
[regpye.com.au]
"Experience is the mother of all knowledge." --Leonardo da Vinci
|
Re: Bed Auto Leveling.. check this out November 21, 2013 05:06PM |
Registered: 10 years ago Posts: 1,433 |
|
Re: Bed Auto Leveling.. check this out November 21, 2013 06:31PM |
Registered: 11 years ago Posts: 791 |
Quote
uncle_bob
Any idea how much current the servo pulls? I'd guess the answer at rest is "next to nothing". It's the curent while the arm is swinging that I'm wondering about.
It doesn't seem to be much. Not been able to measure any.
Anyway, here is the link to some further information about it.
Turnigy micro servo TGY-1800A
[regpye.com.au]
"Experience is the mother of all knowledge." --Leonardo da Vinci
|
Re: Bed Auto Leveling.. check this out November 21, 2013 09:17PM |
Registered: 10 years ago Posts: 1,433 |
Like most servo information, it's not really very detailed. That's not a knock on this specific one, none of them seem to be spec'd out the way a NEMA-17 stepper would be.
My concern is that you only have a limited amount of current available from the Mega regulator. If one has their +12 running ummm .... errrrr... a bit high, it's a bit more of a concern. On the other hand, if the servo pulls < 10 ma no matter what, I'll live with it. Yes I could tack in a 7805 or a 3A switcher or something else. I'd prefer to avoid even more wires going here and there.
My concern is that you only have a limited amount of current available from the Mega regulator. If one has their +12 running ummm .... errrrr... a bit high, it's a bit more of a concern. On the other hand, if the servo pulls < 10 ma no matter what, I'll live with it. Yes I could tack in a 7805 or a 3A switcher or something else. I'd prefer to avoid even more wires going here and there.
|
Re: Bed Auto Leveling.. check this out November 21, 2013 09:25PM |
Registered: 11 years ago Posts: 791 |
Quote
uncle_bob
Like most servo information, it's not really very detailed. That's not a knock on this specific one, none of them seem to be spec'd out the way a NEMA-17 stepper would be.
My concern is that you only have a limited amount of current available from the Mega regulator. If one has their +12 running ummm .... errrrr... a bit high, it's a bit more of a concern. On the other hand, if the servo pulls < 10 ma no matter what, I'll live with it. Yes I could tack in a 7805 or a 3A switcher or something else. I'd prefer to avoid even more wires going here and there.
I am using a 7805 to supply the power. Very simple to connect, just two legs go into the power in plug on the Ardiuno and the third leg (5 volt out) goes to the 5V servo pin on the RAMPS board. Very neat and easy to do, just one short wire.
Cost of a 7805 is under $1
[regpye.com.au]
"Experience is the mother of all knowledge." --Leonardo da Vinci
|
Re: Bed Auto Leveling.. check this out November 21, 2013 09:30PM |
Registered: 10 years ago Posts: 10 |
Quote
regpye
Quote
uncle_bob
Like most servo information, it's not really very detailed. That's not a knock on this specific one, none of them seem to be spec'd out the way a NEMA-17 stepper would be.
My concern is that you only have a limited amount of current available from the Mega regulator. If one has their +12 running ummm .... errrrr... a bit high, it's a bit more of a concern. On the other hand, if the servo pulls < 10 ma no matter what, I'll live with it. Yes I could tack in a 7805 or a 3A switcher or something else. I'd prefer to avoid even more wires going here and there.
I am using a 7805 to supply the power. Very simple to connect, just two legs go into the power in plug on the Ardiuno and the third leg (5 volt out) goes to the 5V servo pin on the RAMPS board. Very neat and easy to do, just one short wire.
Cost of a 7805 is under $1
Most small servo's are rated 6V I'v seen servo's do the stragest thing when only supplied with 5V. And yes I have also a jittery servo mostly due to bad contacts (I use an extension cable with connectors. Need to solder them on instead). Also the arduino pin for the servo is I believe a software PWM not hardware PWM so some jitter should be expected as the arduino is doing a lot.
Sorry, only registered users may post in this forum.
