Bed Auto Leveling.. check this out
Posted by AlexBorro
|
Re: Bed Auto Leveling.. check this out December 30, 2013 06:16AM |
Registered: 10 years ago Posts: 2 |
For those trying to use a RUMBA board like me.
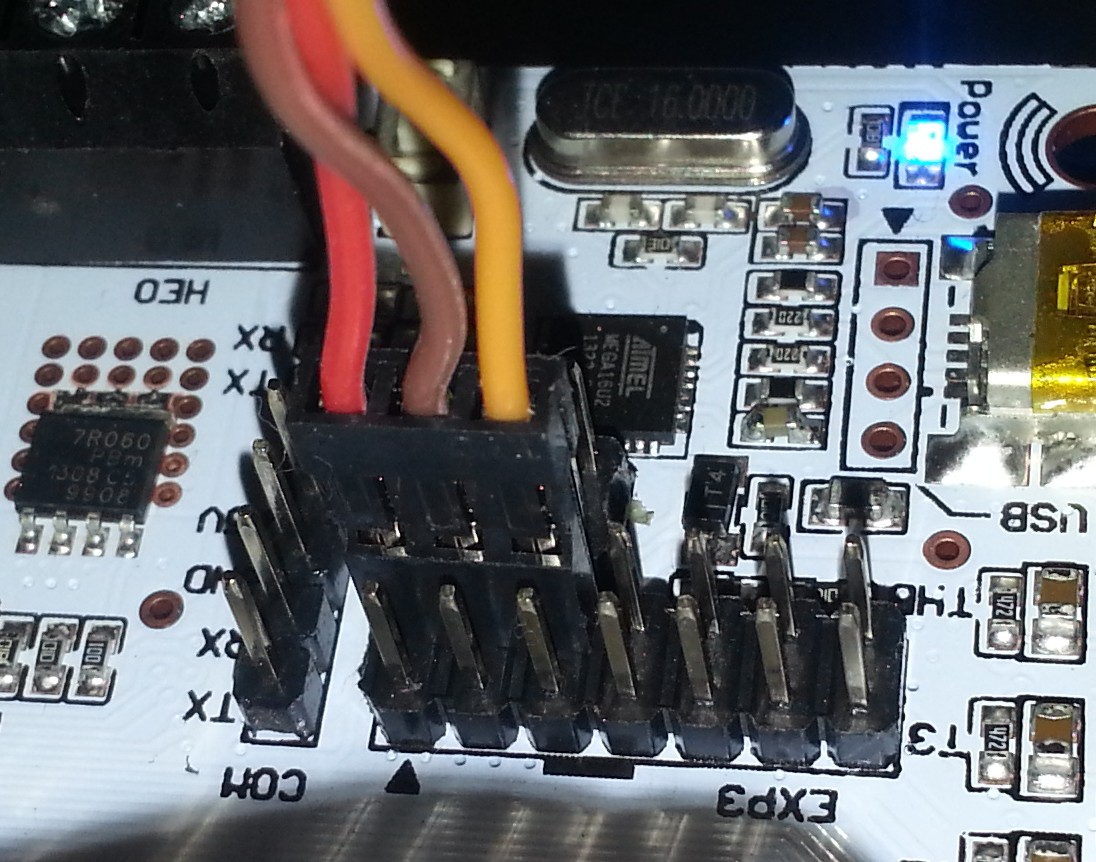
I've managed to operate a hobby servo connected on ext3. Pins 2 / 4 / 6 has +5v / gnd / pwm2 signals.
I've added on pins.h file the following text in red:
------------------------------------------------------------------------------------------------------------------------------------------
#define LCD_PINS_D6 41
#define LCD_PINS_D7 40
#define BTN_EN1 11
#define BTN_EN2 12
#define BTN_ENC 43
#ifdef NUM_SERVOS
#define SERVO0_PIN 5
#if NUM_SERVOS > 1
#define SERVO1_PIN 4
#endif
#endif
#endif //MOTHERBOARD==80
------------------------------------------------------------------------------------------------------------------------------------------
Be careful about polarity for the servo. Servo's plug normally has +Vcc in the middle, I switched possitive and negative servo wires position and connected as in the attached photo and works ok. Pay lots of attention to polarity of possitive and negative wires or you'll burn the servo and/or damage the board.
The servo I'm using for tests it's a hextronik mg14, no problems, min/max position for me are 0 / 90.
Greets
Fernando
|
Re: Bed Auto Leveling.. z reveresed December 30, 2013 09:53AM |
Registered: 10 years ago Posts: 6 |
Thanks everyone for their work on this feature.
I have been pretty successful in getting this feature setup in regards to HW and config, but I also have been plagued by Z-axis reversed that results in the Extruder digging into the bed when I try to print. If I zero/Home X and Y it stops, but then the auto-level feature is not working (I suspect because G28 X0 command still defaults the measured print plane/grid obtained by the G29 command.
A little background:
I am using RAMPS 1.4
Marlin FW from Dec 24th
a SG-90 servo.
Microswitch
Mounted using: [www.thingiverse.com] for the servo mount to the extruder and [www.thingiverse.com] for the servo to switch connection.
Here is an excerpt of Configuration.h file settings:
#define LEFT_PROBE_BED_POSITION 50 // print head is in about the 3mm location (X) when switch is at 50
#define RIGHT_PROBE_BED_POSITION 200 //print head is in about the 153mm location (X) when switch is at 200
#define BACK_PROBE_BED_POSITION 10 //print head is about the 3mm location (Y) when switch is at 10
#define FRONT_PROBE_BED_POSITION 170 // print head is about the 163 locaiton (Y) when switch is at 170
#define X_PROBE_OFFSET_FROM_EXTRUDER 47 //My switch is to the right of the print head by 47 mm
#define Y_PROBE_OFFSET_FROM_EXTRUDER 7 // I tried to get the print head and the switch to alight, but failed to account for the lever, so off by a few mm.
#define Z_PROBE_OFFSET_FROM_EXTRUDER -0.6 //my print head is above the level of my servo based switch.
#define Z_RAISE_BEFORE_HOMING 4 // (in mm) Raise Z before homing (G28) for Probe Clearance.
#define XY_TRAVEL_SPEED 8000 // X and Y axis travel speed between probes, in mm/min
#define Z_RAISE_BEFORE_PROBING 5 // How much the extruder will be raised before traveling to the first probing point.
#define Z_RAISE_BETWEEN_PROBINGS 5
#define PROBE_SERVO_DEACTIVATION_DELAY 300
(safe homing enabled) (complete file attached if needed)
When I perform:
G28 results in head moving to about the center of the print head, drops switch to "down" and zero's Z and then returns "up'. (expected results). display reads: X 55 Y 95 Z .6 (which makes sense: 205 (max x) /2 - 47 (switch offset) = 55, (same is true for Y, just less 7 instead of 47 for switch offset)
G29 results in:
Bed x: 50 y: 10 z: 0.48
Bed x: 50 y: 170 z: 2.00
Bed x: 200 y: 170 z: 1.89
echo:endstops hit: Z:1.89
(So one can calculate that x: 200 y: 10 location would result in Z being: ~ +0.37 (if I did my middle school math right).
The extruder does not move after completing the final meaurement and the display now shows: x 153 y: - Z: .69 the "-" for Y seems odd..
As soon as I try to print, Z moves in the negative direction (down) as X moves to 0 and the head diggs into the plate.
Another Odd behavior is when I move the X by 100 manually, Z does not dig in, but the printer actually moves x and Y at the same time (diagonal back towards 0,0 even though I only sent it to move x.....
I did see a post from AlexBorro in this thread from about 2 months ago identifying a bug in Mid Oct that cause the Z to move in the opposite direction and indicated it was fixed.
I upgraded to the latest Marlin 1.1 code that was downloaded on the 24th of Dec and still see this behavior and only see 1 few notes on merged ErikZalm branches. I am not familiar enough with github to know what version control is in place to know exactly when files were altered and if any changes were reverted, etc. (or for that matter, what version I actually downloaded)...
Also in this thread there was a note from Snowfly that the had similar issue and that his measurement coordinates were swapped, but I dont seem to have that issue... Maybe I am not looking at the right coordinates to swap?
Does anyone have any suggestions or know any details of what was changed to correct this bug?
Update: I downloaded marlin again this morning (12/30) to make sure I was not missing something but Z is still reversed.
Thanks in advance...
Edited 2 time(s). Last edit at 12/30/2013 10:54PM by TobinatorCO.
|
Re: Bed Auto Leveling.. check this out December 30, 2013 02:17PM |
Registered: 10 years ago Posts: 1,433 |
|
Re: Bed Auto Leveling.. check this out December 30, 2013 02:54PM |
Registered: 11 years ago Posts: 2,469 |

|
Re: Bed Auto Leveling.. check this out December 30, 2013 03:47PM |
Registered: 10 years ago Posts: 6 |
thanks for the reply uncle_bob.
To confirm what you mean by "temperature stable", I *think* you mean that the Servo will react differently (Degrees of movement when actuated or retracted) when it is at room temperature compared to when it is "heated" in proximity to the extruder head? I did notice some variation when I was first implementing, so I "cheated" and set "mechanical zero" to the "straight down/extended" location and "up/outof the way" to 65 degrees. The Firmware allowed me to change how the firmware made it go up and down with the command in configuraiton.h (specifically, the 10,65 is reversed order from some of the examples):
#define SERVO_ENDSTOP_ANGLES {0,0, 0,0, 10,65}
I found that after about 12 or degrees on the signal, it hit the mechanical stop before the actual "zero" of the servo, so I used a number slightly smaller (10).
One issue that arose from doing this way is that when it is in the "up" position the servo tended to move around slightly (kindof of bounce up and down) while other axis' move, so I needed the following command to disable the servo when it was not needed:
#define PROBE_SERVO_DEACTIVATION_DELAY 300
After the level, it seems pretty stable to level the extruder at about ~.1 or .2 mm above the bed. (can slide a piece of paper under it with some resistance to start with).
The Z axis is definitely going in a negative direction. If I try to "go up" it diggs deeper into the bed.
|
Re: Bed Auto Leveling.. check this out December 30, 2013 04:08PM |
Registered: 10 years ago Posts: 6 |
Lee-Saw,
Based on your ""INVERT_(axis)_DIR" settings being all being set to "true", it is a little confusing to me which way is which. is your "home" position in the back right of the plate?
But I would check check your position and offset settings. you have:
#define X_PROBE_OFFSET_FROM_EXTRUDER 0
#define Y_PROBE_OFFSET_FROM_EXTRUDER -63
#define Z_PROBE_OFFSET_FROM_EXTRUDER -12.
and
#define LEFT_PROBE_BED_POSITION 15
#define RIGHT_PROBE_BED_POSITION 170
#define BACK_PROBE_BED_POSITION 180
#define FRONT_PROBE_BED_POSITION 20
From what I understand, This is saying that your extruder tip and switch are exactly in line in the X (left right) direction (so directly inline in front of, or behind each other) and that your extruder and switch are 63mm in front of the extruder. When you go all the way forward the Y would be at -43 location (offset of -63 +the bed probe position of 20) = -43 and it is probably getting confused on that location and not moving.
Simple way to be sure, set your "potions" to something closer together near the center of your plate, just to see how it reacts.
FOR TESTING ONLY try:
#define LEFT_PROBE_BED_POSITION 80 <-- slowly decrease this number to move this testing location closer to the left edge
#define RIGHT_PROBE_BED_POSITION 120 <-- slowly increase this number to move this testing location closer to the right edge
#define BACK_PROBE_BED_POSITION 80 <-- slowly decrease this number to move this testing location closer to the back edge
#define FRONT_PROBE_BED_POSITION 120 <-- slowly increase this number to move this testing location closer to the front edge
You will want to move these settings back closer to the edges for your operational settings. the larger your delta between front/back, and left/right are, the more accurately the firmware can calculate a level grid...
hope this helps...
|
Re: Bed Auto Leveling.. check this out December 30, 2013 04:28PM |
Registered: 11 years ago Posts: 2,469 |
Yes is .Quote
TobinatorCO
Lee-Saw,
Based on your ""INVERT_(axis)_DIR" settings being all being set to "true", it is a little confusing to me which way is which. is your "home" position in the back right of the plate?
i have 2 max-endstop and only z is min-endstop
and i have made this in the middle of my heatbed, is this the problem?
i will test your help in the next 20 mins.
then we will see
|
Re: Bed Auto Leveling.. check this out December 30, 2013 05:27PM |
Registered: 11 years ago Posts: 2,469 |

|
Re: Bed Auto Leveling.. check this out December 30, 2013 08:42PM |
Registered: 10 years ago Posts: 25 |
|
Re: Bed Auto Leveling.. z reveresed December 30, 2013 10:56PM |
Registered: 10 years ago Posts: 6 |
Lee-Seaw,
Glad you got past that hurdle, but now you are facing the same problem I have. your Z axis sounds like it is moving down instead of up. If you have the same problem I have, if you perform a G28 X0, it will go back to working like normal, but you clear the grid determined by the G29 command. If you figure it out, please let me know because I too have the same issue.
Glad you got past that hurdle, but now you are facing the same problem I have. your Z axis sounds like it is moving down instead of up. If you have the same problem I have, if you perform a G28 X0, it will go back to working like normal, but you clear the grid determined by the G29 command. If you figure it out, please let me know because I too have the same issue.
|
Re: Bed Auto Leveling.. check this out December 31, 2013 12:32AM |
Registered: 11 years ago Posts: 791 |
Quote
uncle_bob
If you have a servo that is not temperature stable (many of them are not), you will get the Z axis to low after a bed level.
If you run the servo direct from the RAMPS board power, there is often not enough power available, so the work around is to put a 7805 voltage regulator in the main power line.
Servos need quiet a bit to run them and can rob the RAMPS board as well making the whole system unstable.
Better to spend an extra dollar and get a 7805 regulator, very easy to connect into the power plug of the RAMPS and the outlet lead from the regulator goes to the 5 volt connection on the RAMPS board. (just one wire to connect as the common and power in to the regulator can go into the screw down connectors of the power supply plug.)
[regpye.com.au]
"Experience is the mother of all knowledge." --Leonardo da Vinci
|
Re: Bed Auto Leveling.. check this out December 31, 2013 08:43AM |
Registered: 11 years ago Posts: 2,469 |
so now i change all to min endstops
now with g28 x and y homing
z say is out from bed, this is right (y -60)
if i move from hand to y 60 then homing z
g29 dont work , only i move x and y to max 205/205)
then work are without z lift ??
so if i homing z and my bedlevel is 2 mm different i have an problem with my servo holder
and now z is invert if g29 finish
only go down.
Edited 1 time(s). Last edit at 12/31/2013 09:36AM by Le-Seaw.
|
Re: Bed Auto Leveling.. check this out December 31, 2013 10:40AM |
Registered: 11 years ago Posts: 329 |
yeah i run a servo direct from ramps for over a month and its caused the arduino mega to fail (Voltage regulator on the arduino heavily overheating). was also getting lockups on ramps due to the 5V line being all over the place.
iv now gone down the 7805 route and working fine.
you can also get nice sealed units from ebay if you don't want to be making them your self (just search for 12V to 5V)
iv now gone down the 7805 route and working fine.
you can also get nice sealed units from ebay if you don't want to be making them your self (just search for 12V to 5V)
|
Re: Bed Auto Leveling.. check this out December 31, 2013 09:45PM |
Registered: 10 years ago Posts: 25 |
|
Re: Bed Auto Leveling.. check this out January 01, 2014 02:01AM |
Registered: 12 years ago Posts: 56 |
alright guys I am having a wierd ting happen
I am atempting a semi manual auto leveling with a jig and a switch much like the kossel on my prusa
I am using a sangionlolu with a 1284p in it
but once I enable auto leveling my z moves up when ever I home it
rather than down as I would like
anyone have any ideas
when I run a g29 my z just moves up at each location
I may have found my issuse how ever
I am not to sure going to test more tomarrow
I am going to test enabling
ENDSTOPS_ONLY_FOR_HOMING
I have software limits and my machine has been running for a while
slicers are setup and such I doubt I will be over running
anything and every thing homes first
Edited 2 time(s). Last edit at 01/01/2014 06:05AM by broncosis.
|
Re: Bed Auto Leveling.. check this out January 01, 2014 05:50AM |
Registered: 11 years ago Posts: 791 |
Quote
edn
Yes, I have the Marlin code ported to the PrintrBoard with Auto-Bed Leveling working... I do have some issues but getting close to getting them resolved.
.
Can you please share how you connected the servo to the Prinrboard?
[regpye.com.au]
"Experience is the mother of all knowledge." --Leonardo da Vinci
|
Re: Bed Auto Leveling.. check this out January 01, 2014 05:54AM |
Registered: 11 years ago Posts: 791 |
Quote
edn
I have Auto_Bed_Leveling working on the PrintrBoard. (I do have some issues but I'm working through them). What I've got is this code in the PINS.H file for motherboard type 81:
#ifdef NUM_SERVOS
#define SERVO0_PIN 11
#define Z_MIN_PIN 30 //needs to be updated to what ever wire is used.
That logical pin is the corner pin on the Expansion-2 Header that is closest to the main power connector. Wire that pin to your servo control wire and you should see things start to come alive.
Thanks,
I just saw this post.
[regpye.com.au]
"Experience is the mother of all knowledge." --Leonardo da Vinci
|
Re: Bed Auto Leveling.. check this out January 01, 2014 06:10AM |
Registered: 11 years ago Posts: 791 |
Quote
p40whk
Quote
regpye
After you have it working, you need to do some small adjustments to the Z offset to get it perfect.
Do the normal measurements using the nozzle down 0.01 in Pronterface followed by a M119 to get the endstop status and once you have the exact measurement that shows in the lower right hand window, use this to set your offset.
After testing you may need to adjust this amount very slightly one way or the other. It is really worth spending a bit of time to do this as it will make a huge difference to your final prints.
Once the first layer is down the rest prints nicely anyway, but the first layer is the all important layer in my opinion.
Regpye,
I've performed the nozzle offeset measurements using the M119 to verify my probe hit it's endstop and followed that with an M114 to get the offset coordinates but how do you know if you need to adjust this afterwards and in what direction?
The easiest way I have found to make the measurement is to use the G28 to do a Z homing. The probe will lift up after probing and if you get a set of drills that have 0.1mm increments (I bought a set of 100 drills for the workshop, only $80) take one that is close to the distance between the nozzle tip and the bed and keep trying a different one until you find the exact distance. This takes just a couple of minutes to do, is very accurate and after you have found the true distance use this measurement in the code with a negative symbol in front of it (example if the drill is a 9.7mm put -9.7 in the code) The drills I got locally but I think they were made in China, sizes 0.5mm - 13mm
[regpye.com.au]
"Experience is the mother of all knowledge." --Leonardo da Vinci
|
Re: Bed Auto Leveling.. check this out January 01, 2014 10:37AM |
Registered: 11 years ago Posts: 2,469 |
the firmware is wrong
i download marlin 28.12.2013
this f.... firmware is wrong.
i use the same config.h in this firmware and in alex borro firmware.
in marlin branch dont work, every time tells me, z ist bed outside.
i must change -65 in 65 and then you can do an z homing.
g29 dont work longer, i change every value to the right position are dont work.
If i use alex borro frimware i have no problems with g29
only one thing, why the f.. z dont move up if i start g29.
and why g1 z20 dont work right?
|
Re: Bed Auto Leveling.. check this out January 01, 2014 02:50PM |
Registered: 10 years ago Posts: 37 |
Quote
regpye
Quote
edn
Yes, I have the Marlin code ported to the PrintrBoard with Auto-Bed Leveling working... I do have some issues but getting close to getting them resolved.
.
Can you please share how you connected the servo to the Prinrboard?
Here you go. This is my current Marlin PrintrBoard build environment. I have a couple of comments for you.
- My Z-Axis probe is on the front of and to the left of the extruder. Because of this, it was best to rotate my origin to the back right side of the bed. This helps keep all probed points in positive space for me. This is no longer necessary, but in earlier renditions I had to shrink my print bed to keep the probe over the bed. The control wire for the servo should go to corner pin of the Expansion-2 header that is closest to the power connector. This will be referenced as logical pin-11 in the firmware.
- Your servo should get its power from some place other than the PrintrBoard. You can verify correctness of your servo type and wiring by issuing M46 commands. M46 is a debug command added to this release of the firmware to allow the user to position the servo at different positions. The important thing about this command is it allows the servo to be moved a small amount and then rest until the next step movement. This is useful to see if you can talk to the servo and to determine if the servo is taking too much power. You can issue commands such as "M46 P11 D100 J4 S50" to move the servo on pin 11 to an angle of 50 degress with 4 degree steps and delays of 100 milisecond between the steps. A command of "M46 P11 D250 J1 S50" will allow the servo to move slow enough that it can be powered from the PrintrBoard.
- This firmware also has the M600 command implemented to do filament changes at a given level in the GCode. It assumes a switch is wired to the Expansion-2 header on the other corner closest to the big processor chip. That switch should be normally open and short to ground when closed. You do not need to implement this switch to use this firmware.
Edited 1 time(s). Last edit at 01/01/2014 02:51PM by edn.
|
Re: Bed Auto Leveling.. check this out January 01, 2014 03:11PM |
Registered: 10 years ago Posts: 25 |
|
Re: Bed Auto Leveling.. check this out January 01, 2014 06:03PM |
Registered: 11 years ago Posts: 791 |
Quote
regpye
Quote
uncle_bob
I've tried several servos. None of them have created issues for the Mega 5V regulator.
The last machine that I just built yesterday I just shorted the 5v and the VVC pins together using a jumper link.
It is working fine, no problems. Still using a TGY-1800A servo, they seem to be good and only cost $3.99.
Bought the servos from HobbyKing, cheaper to buy in a 3 pack.
I have had to change the wiring from the VCC and 5 volt link on the Mega to using a 7805 regulator from the main power supply. After several hours of it working correctly using the link, I started getting drop outs and found the board was getting hot. Put a 7805 regulator in and ran all day without any issues.
[regpye.com.au]
"Experience is the mother of all knowledge." --Leonardo da Vinci
|
Re: Bed Auto Leveling.. check this out January 01, 2014 06:07PM |
Registered: 11 years ago Posts: 791 |
Quote
edn
Quote
regpye
Quote
edn
Yes, I have the Marlin code ported to the PrintrBoard with Auto-Bed Leveling working... I do have some issues but getting close to getting them resolved.
.
Can you please share how you connected the servo to the Prinrboard?
Here you go. This is my current Marlin PrintrBoard build environment. I have a couple of comments for you.
.
Thanks for all that info, very much appreciated.
[regpye.com.au]
"Experience is the mother of all knowledge." --Leonardo da Vinci
|
Re: Bed Auto Leveling.. check this out January 01, 2014 06:08PM |
Registered: 10 years ago Posts: 25 |
Darn, just had the servo start moving on it's own again during a print. It wasn't moving like crazy like it was before the 7805, but it was every once in a while moving a little down. Probably 2-3 times a small amount.
I don't understand why it would be getting any power during a print anyway...
I don't understand why it would be getting any power during a print anyway...
|
Re: Bed Auto Leveling.. check this out January 01, 2014 06:44PM |
Registered: 11 years ago Posts: 791 |
Quote
Happycamper
Darn, just had the servo start moving on it's own again during a print. It wasn't moving like crazy like it was before the 7805, but it was every once in a while moving a little down. Probably 2-3 times a small amount.
I don't understand why it would be getting any power during a print anyway...
Maybe this is what you need to look at?
//If defined, the Probe servo will be turned on only during movement and then turned off to avoid jerk
//The value is the delay to turn the servo off after powered on - depends on the servo speed; 300ms is good value, but you can try lower it.
// You MUST HAVE the SERVO_ENDSTOPS defined to use here a value higher than zero otherwise your code will not compile.
#define PROBE_SERVO_DEACTIVATION_DELAY 500
// #define PROBE_SERVO_DEACTIVATION_DELAY 0
[regpye.com.au]
"Experience is the mother of all knowledge." --Leonardo da Vinci
|
Re: Bed Auto Leveling.. check this out January 01, 2014 07:41PM |
Registered: 10 years ago Posts: 25 |
|
Re: Bed Auto Leveling.. check this out January 02, 2014 08:05AM |
Registered: 12 years ago Posts: 40 |
|
Re: Bed Auto Leveling.. check this out January 03, 2014 12:31PM |
Registered: 10 years ago Posts: 6 |
Happy camper:
My apologies for the long reply, hope it helps....
Regarding the variable:
#define PROBE_SERVO_DEACTIVATION_DELAY 500
Maybe I misunderstood the description of how that timer value works, but this is what I understand:
This timer defines how long to keep the server "active" and looking that the signal pin. By "active servo" I mean the controller circuit in the servo is looking at the signal coming from the Pot in the servo and deciding if it needs to apply "forward" or "backwards" movement to keep it within certain range/angle. Check out [pcbheaven.com] for more detailed info on servos in general....
If I am correct, (and I might have missed the boat here) A larger number for the deactivation delay keeps the servo "active" longer after it is used, where a smaller number turns it off earlier. Once the servo is "off" it won't bounce around because the servo controller inside the servo stops looking at the pot inside the servo and stops trying to "correct" the angle.
Turning this value "off" (commenting it out in the config) will never turn the servo off and it will always be susceptible to bounce around as the servo is trying to keep the arm at a specific angle..... If I misunderstood, please let me know. Have you tried a smaller value (say 200 or 300) versus commenting it out? The only disadvantage to making the number smaller is that you will need to re-issue X and Y homing before you can home Z once this deactivation delay timer expires... Personally I never do a Z home without a X and Y homing first to ensure that the probe does not miss the bed and I end up driving my extruder into bed..
Also, where are you getting your VCC from (arduino itself or separate power supply feed?) Uncle bob makes a good point that these servos seem to vary greatly and can be power hungry. From the schematic of the servo itself, it looks like the POT that is measuring the angle is tied to the VCC and the servo controller looks at the voltage on the signal to determine the angle. If the input voltage is unstable, then the voltage on the signal will also move, telling the controller to move the motor... the 7805 VR will sure help with that but only so much, especially if your VCC is dropping below the stable output voltage needed by the servo.
|
Re: Bed Auto Leveling.. check this out January 03, 2014 07:15PM |
Registered: 12 years ago Posts: 56 |
so when I enable bed leveling the only home switch that works properly in my y switch
x and z both move away from the home in switch almost like as though they are not even hooked up
so after relocating and changing my n/o switches to n/c
I have reasonable behavoir
how ever if I run g28 then g29 it seem to be forgeting that the probe and the hotend are offset and trys to run off the end on my axis
and of course then everything is measusement wise is messed up
I have attched my config.h file
but sofar this looks quite promising semi automatic bedd leveling on a sanguinlolou with a lcd display and sd reader
no servo used
Edited 1 time(s). Last edit at 01/04/2014 06:08AM by broncosis.
|
Re: Bed Auto Leveling.. check this out January 04, 2014 11:10AM |
Registered: 10 years ago Posts: 25 |
TobinatorCO,
Thanks for the reply.
My understanding of the #define PROBE_SERVO_DEACTIVATION_DELAY 500 is this... It turns power on to the servo and after the delay of what is set such as 500, the power is turned off. Unless of course it is turned back on, it will stay on for the delay value. I initially had it set at the default which was 300 or 250, can't remember. The problem was it wasn't staying on long enough for the arm to reach it's full length. When I switched it to 750, it worked fine and I could hear it turn off.
I think I have figured out the issue though...
If I touch anything metal on my machine, for a split second, the servo wants to move. This doesn't happen every time, just sometimes. I think a static charge builds up on me and a little discharge happens and wants to make the servo move. I noticed it happen when I touch the hot end with a razor blade. Then it won't do it for a while, but if I walk around the room, then touch something metal on the machine it does it again.
Why would this be? If I touch the smooth rod, lead screw, a motor, the hot end, pretty much anything, the servo gets a little movement. Do I need to run a ground somewhere somehow? I wired it as stated above and ran power and ground to the 7805. Then then the 5v wire from the 7805 to the 5v spot on the ramps board. Did I need to run a ground there too or something?


Sorry, only registered users may post in this forum.