MendelMax 2.0 Z Quality
Posted by JohnSL
|
MendelMax 2.0 Z Quality January 09, 2014 12:07AM |
Registered: 10 years ago Posts: 110 |
I've been on a quest to improve the print quality on my MendelMax 2.0 ever since I got it last spring.
The Z artifacts have been driving me crazy because it's hard to figure out what's causing them. I've done some prints on a Replicator 2 and the rows are perfectly aligned, and of exactly the same thickness. I have my MM 2 very well tuned now, and it's getting closer, but I'm still getting some artifacts you can see when the light is just right. I've just uploaded yet another improvement that helps a little more. Here is what I'm using so far:
Stiff Z Couplers: [www.thingiverse.com]. I created these because the flex couplers can, and seem to, change length slightly. You can experience this yourself by pushing and pulling on the couplers when they're not attached.
OhmEye's Z isolators: [www.dropbox.com]
Z Hole Cover: [www.thingiverse.com]. Someone on one of the forums mentioned that Ohmeye's isolator was snagging against the screw hole in the bracket. So I created this part to cover all three screw holes and provide a smooth surface for his isolator.
All of these upgrades have helped a lot. Now I'm getting the best quality I've ever gotten. While it's getting close to the quality from a Replicator 2, it's still not there yet. The Z artifacts seem to be result of slight variations in Z position, causing the layers to be squished more or less (I'm using 0.2mm high layers).
So, now the questions. First, does anyone have any idea why Z artifacts seem to be so hard to eliminate completely on this printer? And second, does anyone have any more ideas on ways to improve the print quality?
|
Re: MendelMax 2.0 Z Quality January 10, 2014 05:51AM |
Registered: 10 years ago Posts: 7 |
|
Re: MendelMax 2.0 Z Quality January 12, 2014 01:02AM |
Registered: 10 years ago Posts: 110 |
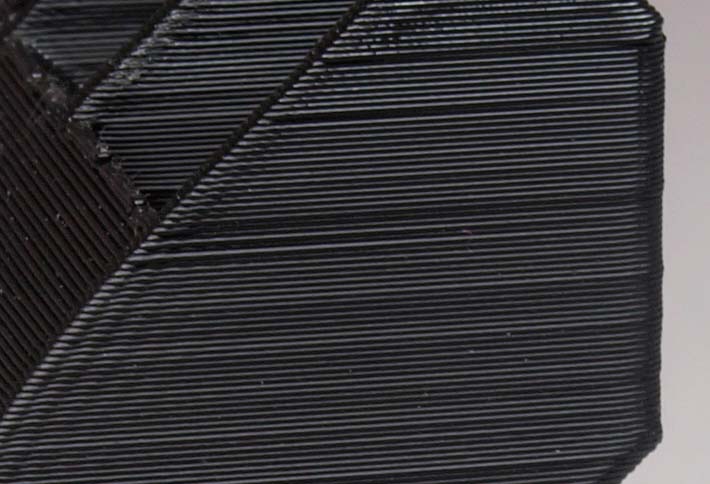
Here is an example. If you look on the right, you can see the Z artifacts I'm referring to. I've looked very closely under a microscope, and I can see that the problem is a result of slight variations in layer thickness, not shifting from side to side (the layer height is 0.2 mm).
Some people say I'm trying too hard, and they have a hard time seeing these imperfections. And they're probably right. My question stands: why did it take so much work for me to get my printer to this point, while the Replicator 2 produces even better results?
Edited 2 time(s). Last edit at 01/12/2014 01:05AM by JohnSL.
|
Re: MendelMax 2.0 Z Quality January 12, 2014 02:54AM |
Registered: 10 years ago Posts: 22 |
Hi JohnSL I completely understand how you feel. My school had a Makerbot Replicator and I was amazed by the details it could print (perfectly straight edge, smooth surface with no warps, etc.) I purchased the MM2 from Maker Tools Works (very supportive team on the IRC channel) back in July because of its boasted printing speed (300mm) and linear rail system (well after my Prusa i3 I realized precision rods might be better). However, after 4 months I was frustrated by the print quality (I actually did not produce anything from PLA on my MM2). I sold the frame on Ebay and got a Prusa i3 from 3D Printer Czar. I have since produced great prints that are definitely comparable to my school's makerbot replicator. I believe you have tried many things to debug your MM2 at this point and the print looks pretty decent. Anyways, I would like to suggest the following additional debug steps based on my own experience. Hope it would be valuable to solving your unaligned row issues.
Hypothesis1: Extruder too heavy
the original extruder mounting plate extends beyond the x axis, and the entire weight of the extruder sits on top of the thing (this also applies to my Prusa i3. I'm thinking about making a more rigid x axis with 3 rods). The plate is rather thin and I see it vibrating a little bit during printing (I use a Wade's Extruder). This little bit of wobbling could cause uneven layers. I have seen Makerbot's extruder and it is definitely much more rigid than this.
Solution: try a lighter extruder such as a bowden system.
Hypothesis 2: Hotend nozzle partially clogged.
I first used a hotend from RPOne lab (called MG Plus). What I noticed after a while is that the extruded filament always curves to one side, forming a "J" shape. My guess is that this could cause even sticking (the hook of the "J" always points at the same direction). I switched to a new hotend and I do see improved prints.
Solution: use a new hotend.
Hypothesis 3: filament didn't cool properly.
If the extruded filament is too hot and your print is relatively small, the new layer could sink a little bit into the previous layer. This could severely worsen your print. My guess is this could be one of the main reasons.
Solution: add a fan to cool your print, or try a big print with multiple parts.
Hypothesis 4: build plate too heavy.
MM2 probably has one of the heaviest build plate in all RepRap machine. The aluminum Y plate, the aluminum sheet, and borosilicate glass add up to a lot of weight. If your motor is not strong enough, certain micro movements might not occur properly. If you try the Prusa i3, you will see how much lighter and smoother the plate moves on i3.
solution: tune up motor current, lubricate your y axis a lot.
Here are things that I've tried and please let me know if any works for you. If print bed size is not too important to you, I would suggest you switch to a Prusa i3. There's also more support on this model, and much cheaper than MM2. The i3 I bought from www.3dprinterczar.com is only $499. The i3 is also designed to self-replicate so you could build more i3 in the future. Anyways, hope these could help and please let me know if you get your MM2 print well.
Edited 1 time(s). Last edit at 01/12/2014 02:59AM by myohmy11.
|
Re: MendelMax 2.0 Z Quality January 12, 2014 03:06AM |
Registered: 10 years ago Posts: 7 |
|
Re: MendelMax 2.0 Z Quality January 12, 2014 04:54AM |
Registered: 11 years ago Posts: 791 |
Quote
JohnSL
I created these because the flex couplers can, and seem to, change length slightly. You can experience this yourself by pushing and pulling on the couplers when they're not attached.
A fix for this is a 4mm ball bearing ball that goes between the threaded shaft and the motor shaft. The ball will take out any play in the compression direction, still allow flexibility and the weight of the load on the shaft from the carriage, etc will take up the play in the expansion direction. Been using this idea for a while now and it works a treat.
[regpye.com.au]
"Experience is the mother of all knowledge." --Leonardo da Vinci
|
Re: MendelMax 2.0 Z Quality June 12, 2014 10:28AM |
Registered: 9 years ago Posts: 2 |
Hello JohnSL,
I purchased the mendelmax 2.0 five months ago, and from there I'm still strugglin with exactly the same problem as your's.
I did exactly the same mods than you on the printer, mostly using your models (thanks by the way : stiff z-couplers, z-holes covers, z-isolators, centrifugal fan.
I also shortened the x-carriage, so the hot-end is as close as possible to the rails (in case some vibrations came from the fact that hot-end was hanging to much "in air" on the front of x-axis).
I also made an extra filament guide, which is clamped on the extruder motor, and have a hole 4cm above the actual filament guide. the filament pass through a little piece of drilled ptfe cylinder, to reduce friction. This was inspired by the mods from Bruce Murray on MTW forum (http://www.makerstoolworks.com/wp-content/uploads/2014/01/Changes-to-Basic-Mendel-Max-2.pdf).
I also reversed the x-axis motor (again from Bruce Murrays's idea) to have a better repartition of masses.
And finally, I did another big filament guide near the spool, to make a "structural point" avoiding the filament to come periodically loose and tight when extruder pull on the spool. (inspired by the reprap magazine issue 1, article about "taxonomy of z-axis artifact" by whosawhatsis).
After doing all those mods, I'm still having z-artifacts...
There must be an accurate explanation, what can be the cause of this problem ?
Did you finally found anything that can be even the beginning of an answer ? It must be possible to resolve this, but right now I don't have anymore ideas on what I can try anymore...
Thank you for any recommandations !
I purchased the mendelmax 2.0 five months ago, and from there I'm still strugglin with exactly the same problem as your's.
I did exactly the same mods than you on the printer, mostly using your models (thanks by the way
: stiff z-couplers, z-holes covers, z-isolators, centrifugal fan. I also shortened the x-carriage, so the hot-end is as close as possible to the rails (in case some vibrations came from the fact that hot-end was hanging to much "in air" on the front of x-axis).
I also made an extra filament guide, which is clamped on the extruder motor, and have a hole 4cm above the actual filament guide. the filament pass through a little piece of drilled ptfe cylinder, to reduce friction. This was inspired by the mods from Bruce Murray on MTW forum (http://www.makerstoolworks.com/wp-content/uploads/2014/01/Changes-to-Basic-Mendel-Max-2.pdf).
I also reversed the x-axis motor (again from Bruce Murrays's idea) to have a better repartition of masses.
And finally, I did another big filament guide near the spool, to make a "structural point" avoiding the filament to come periodically loose and tight when extruder pull on the spool. (inspired by the reprap magazine issue 1, article about "taxonomy of z-axis artifact" by whosawhatsis).
After doing all those mods, I'm still having z-artifacts...
There must be an accurate explanation, what can be the cause of this problem ?
Did you finally found anything that can be even the beginning of an answer ? It must be possible to resolve this, but right now I don't have anymore ideas on what I can try anymore...
Thank you for any recommandations !
|
Re: MendelMax 2.0 Z Quality June 13, 2014 06:24PM |
Registered: 9 years ago Posts: 189 |
Did you consider the possibility of an accumulation error caused by slightly off Z-hieght?
What i mean: - depending on your Pulley/Steps per mm of Z - Setup, I would suggest exactly calculating the correspondingZ-Layer height for your printer.
Often it will not be like 0.1 or 0.2mm because every 5th or every 10th line that results in some fractions of a mm error.
I think there is this prusa calculator which let`s you exactly calculate the needed Z-Layer-height for oyur printer so that this does not happen.
check this link out:
[calculator.josefprusa.cz]
For some printers this might be 1.975mm for example or some other odd number.
I would give it a try,
Alex
|
Re: MendelMax 2.0 Z Quality June 14, 2014 03:31PM |
Registered: 9 years ago Posts: 2 |
Hi Alex,
As far as I know, the rounding error in layer height concern mostly imperial screws. The MendelMax 2.0 uses 10mm diameter lead screws, with a 2mm pitch. According the Prusa calculator, those specifications are perfect for nice round numbers, as 0.2 or 0.3mm for layer height. I actually always print with LH of 0.2 or 0.3.
But, even if my lead screws were sold as "m10 / 2mm pitch", is there a possibility that during manufacturing there is very slight variations in diameter/pitch? In that case I would have to (very) precisely measure diameter and pitch and use the new value in the prusa calculator to have the "perfect" layer height.
I never thought this could be possible, but I will check this.
Sorry, only registered users may post in this forum.