My first RepRap build and experiences
Posted by JHart96
|
My first RepRap build and experiences January 28, 2014 06:48PM |
Registered: 10 years ago Posts: 19 |
Hello Everyone,
My name is Jordan and I'm a 17 year old student in the UK. Over the past Christmas holidays I put together my first RepRap. It took me a year to source the materials as I wanted to spread the cost a bit. I decided to start this thread to share my own experiences in putting together a Prusa Mendel i2 and the modifications I have made myself to it, in the hope that others can learn from my mistakes and that I can learn from other much more experienced people in the RepRap community.
I ordered the printed parts from ebay, which set me back around £55. This was one of the larger investments in the project. The parts came with Greg's Accessible Extruder, however I didn't like the bevelling on the edge of the gear as they didn't seem to mesh as well as I would've hoped, and I believe the Hot-End mount was designed for the Arcol Hot-End. I am using a J-Head MKVII which I also bought from eBay (I got pretty much everything from there) and found that the extruder would've needed a fair bit of modification and I really wanted something that would work out of the box. I opted to buy an extruder that would fit my Hot-End and also have nice deep teeth on the gears, the only drawback was that it is purple, and the rest of my printer is white. I am using the Sanguinololu 1.3a with StepStick drivers.
The entire build took about 3 days from beginning the build to getting a first print. The biggest issues along the way were that I ordered too few M3 screws, I ought to have ordered a wider variety and a larger quantity. If I were to assemble the printer again, I'd order 150 M3 screws of various lengths between 5mm and 70mm, as well as choosing machine allen heads over the weaker philips heads which easily strip, which is especially easy to do when working in more awkward positions. I was lucky enough to get access to a laser cutter in school and I cut my own bed out in school from acrylic. Unfortunately I laser cut the wrong mounting holes and therefore had to laser cut new bearing mounts, which were too short and therefore restrict my Y length. To get over this, I have printed out - but not yet fitted - 10mm spacers, which I'll use to raise the bed above the pulley, hopefully giving me a larger print area. The 3mm acrylic seems to be holding up well, however if I apply any pressure on the bed by hand, it bends very easily, making bed levelling that little bit more difficult.
I used the RepRap wiki and Gary Hodgeson's absolutely fantastic instructions to assist my building. However, I did find that the Prusa i2 build is nowhere near as well documented as the original and therefore I didn't buy the right length of bar and ended up with a Z axis that is too small. To compensate for this, I cut down some 8mm smooth rod and finished it off on a lathe, to allow it to fit into the modified piece that came with my printed parts. This is a temporary measure that desperately needs changing.
One thing that I really dislike about the Prusa i2 design is the floating Z axis, I encountered issues with it after less than 12 hours, I found that the self amalgamating tape I used to pack the couplings had slipped due to the weight of the entire X-Carriage and therefore ruined any calibration I'd attempted. I would like to try the aluminium flexible couplings from China, they seem quite sturdy and I doubt they would give the same issues.
Here's a coupling I printed next to another one being printed!
The final main issue I encountered was the stepper motor x end itself. There is a small bridge of plastic which puts a good amount of pressure on the part's weak spot and causes the layers to separate and for the pieces to split apart. I'd like to emphasise that this happened as soon as I screwed the motor on. I think this is probably both fault in the design and the printing.
Here's what happens when I undo the top screw into the stepper motor...
Apart from the above issues I mentioned, the printer is now running really well. I was originally running Slic3r and Printrun/Pronterface, but Slic3r has been giving me trouble through it's interface (changing values back to their previous setting, not changing print speed etc) so I gave repetier a go. Repetier seems like a very nice piece of software, however I ran into communication issues, which brought me onto Cura. Cura is a nice, user friendly way of printing. I didn't like the automated approach of controlling the heaters (I'd really like to keep control of them) but I did really like the ability to play about with the print speed. It's a good way to compare the print quality at different speeds. However, I've now run into communication issues with Cura and decided that perhaps Sprinter wasn't the best firmware to use. I've now swapped to Marlin and am still in the process of configuring it (my hot end is -32).
The only big problem that remains with the mechanics is the extruder. It is still rather hit and miss. Once it starts printing there is no issue at all, and once it has been running it performs perfectly, but when starting from the cold, the filament often jams and shreds of plastic get stuck in the hobbed bolt and cause it to lose grip on everything. I'm not sure how to fix this yet so if anybody has any potential solutions I'd love to hear your suggestions.
In terms of electronics, I ran into just two problems. One of them was the Heated Bed which drew far too much current through the MOSFET and through the board (which worried me), also the 7805 voltage regulator got very hot in the process. The other was in the initial 3 days, where the filament wasn't being extruded properly. The filament problem happened because the StepStick potentiometer was slightly too low, and it caused the extruder to only extrude very small amounts of plastic, which worked fine for very slow speeds but it failed at higher speeds. This is definitely something to watch out for as it took me a good couple of hours to figure. The other overheating problem was solved by hooking up the MOSFET source and drain to a relay coil and plonking two 12v wires from the ATX supply to one of the terminals. I connected the other end to the heated bed, and then the gnd on the heated bed to two gnd wires from the ATX. My problem has now been solved and it heats up in much less time.
At some point in the future I'm going to add a filament absence detector to pause the print when the filament runs out as well as hopefully adding an LCD with SD card reader. In terms of mechanics, I'd definitely like to add a bowden extruder to the Prusa and use a minimalist X carriage, with the possibility of turning it into a dual extuder as some point.
If you have any questions or tips or anything I'd love to hear from you
Jordan
My name is Jordan and I'm a 17 year old student in the UK. Over the past Christmas holidays I put together my first RepRap. It took me a year to source the materials as I wanted to spread the cost a bit. I decided to start this thread to share my own experiences in putting together a Prusa Mendel i2 and the modifications I have made myself to it, in the hope that others can learn from my mistakes and that I can learn from other much more experienced people in the RepRap community.
I ordered the printed parts from ebay, which set me back around £55. This was one of the larger investments in the project. The parts came with Greg's Accessible Extruder, however I didn't like the bevelling on the edge of the gear as they didn't seem to mesh as well as I would've hoped, and I believe the Hot-End mount was designed for the Arcol Hot-End. I am using a J-Head MKVII which I also bought from eBay (I got pretty much everything from there) and found that the extruder would've needed a fair bit of modification and I really wanted something that would work out of the box. I opted to buy an extruder that would fit my Hot-End and also have nice deep teeth on the gears, the only drawback was that it is purple, and the rest of my printer is white. I am using the Sanguinololu 1.3a with StepStick drivers.
The entire build took about 3 days from beginning the build to getting a first print. The biggest issues along the way were that I ordered too few M3 screws, I ought to have ordered a wider variety and a larger quantity. If I were to assemble the printer again, I'd order 150 M3 screws of various lengths between 5mm and 70mm, as well as choosing machine allen heads over the weaker philips heads which easily strip, which is especially easy to do when working in more awkward positions. I was lucky enough to get access to a laser cutter in school and I cut my own bed out in school from acrylic. Unfortunately I laser cut the wrong mounting holes and therefore had to laser cut new bearing mounts, which were too short and therefore restrict my Y length. To get over this, I have printed out - but not yet fitted - 10mm spacers, which I'll use to raise the bed above the pulley, hopefully giving me a larger print area. The 3mm acrylic seems to be holding up well, however if I apply any pressure on the bed by hand, it bends very easily, making bed levelling that little bit more difficult.

I used the RepRap wiki and Gary Hodgeson's absolutely fantastic instructions to assist my building. However, I did find that the Prusa i2 build is nowhere near as well documented as the original and therefore I didn't buy the right length of bar and ended up with a Z axis that is too small. To compensate for this, I cut down some 8mm smooth rod and finished it off on a lathe, to allow it to fit into the modified piece that came with my printed parts. This is a temporary measure that desperately needs changing.

One thing that I really dislike about the Prusa i2 design is the floating Z axis, I encountered issues with it after less than 12 hours, I found that the self amalgamating tape I used to pack the couplings had slipped due to the weight of the entire X-Carriage and therefore ruined any calibration I'd attempted. I would like to try the aluminium flexible couplings from China, they seem quite sturdy and I doubt they would give the same issues.

Here's a coupling I printed next to another one being printed!
The final main issue I encountered was the stepper motor x end itself. There is a small bridge of plastic which puts a good amount of pressure on the part's weak spot and causes the layers to separate and for the pieces to split apart. I'd like to emphasise that this happened as soon as I screwed the motor on. I think this is probably both fault in the design and the printing.


Here's what happens when I undo the top screw into the stepper motor...
Apart from the above issues I mentioned, the printer is now running really well. I was originally running Slic3r and Printrun/Pronterface, but Slic3r has been giving me trouble through it's interface (changing values back to their previous setting, not changing print speed etc) so I gave repetier a go. Repetier seems like a very nice piece of software, however I ran into communication issues, which brought me onto Cura. Cura is a nice, user friendly way of printing. I didn't like the automated approach of controlling the heaters (I'd really like to keep control of them) but I did really like the ability to play about with the print speed. It's a good way to compare the print quality at different speeds. However, I've now run into communication issues with Cura and decided that perhaps Sprinter wasn't the best firmware to use. I've now swapped to Marlin and am still in the process of configuring it (my hot end is -32).
The only big problem that remains with the mechanics is the extruder. It is still rather hit and miss. Once it starts printing there is no issue at all, and once it has been running it performs perfectly, but when starting from the cold, the filament often jams and shreds of plastic get stuck in the hobbed bolt and cause it to lose grip on everything. I'm not sure how to fix this yet so if anybody has any potential solutions I'd love to hear your suggestions.
In terms of electronics, I ran into just two problems. One of them was the Heated Bed which drew far too much current through the MOSFET and through the board (which worried me), also the 7805 voltage regulator got very hot in the process. The other was in the initial 3 days, where the filament wasn't being extruded properly. The filament problem happened because the StepStick potentiometer was slightly too low, and it caused the extruder to only extrude very small amounts of plastic, which worked fine for very slow speeds but it failed at higher speeds. This is definitely something to watch out for as it took me a good couple of hours to figure. The other overheating problem was solved by hooking up the MOSFET source and drain to a relay coil and plonking two 12v wires from the ATX supply to one of the terminals. I connected the other end to the heated bed, and then the gnd on the heated bed to two gnd wires from the ATX. My problem has now been solved and it heats up in much less time.

At some point in the future I'm going to add a filament absence detector to pause the print when the filament runs out as well as hopefully adding an LCD with SD card reader. In terms of mechanics, I'd definitely like to add a bowden extruder to the Prusa and use a minimalist X carriage, with the possibility of turning it into a dual extuder as some point.
If you have any questions or tips or anything I'd love to hear from you
Jordan
|
Re: My first RepRap build and experiences January 29, 2014 05:36PM |
Registered: 11 years ago Posts: 349 |
Welcome
Good effort, all looks good.
You say you dont like the floating z axis? It is commonly accepted that floating z axis is better. It greatly reduces z wobble. If you are struggling to get the z couplers to stay on the motor shaft I would recommend a small piece of fish tank air pipe over the stepper shaft then put the coupler on. It holds very well that way and should never move, unlike tape as you have found out. I would avoid the flexible metal couplers as they are not designed to hold weight and will fail quickly on an i2.
You say you are using a j-head MKVII? I hope that is a typo as im sure they dont exist. I would suggest you read [jheadnozzle.blogspot.co.uk] and [jheadnozzle.blogspot.co.uk] then decide if you would be better off getting another. I tried with a cheap ebay j-head and it gave me nothing but trouble until it died. Got a real one and everything was 100x easier.
But so far, tidy machine, I hope your having fun with it.
ps where in the uk you from?
|
Re: My first RepRap build and experiences January 29, 2014 07:04PM |
Registered: 10 years ago Posts: 19 |
Hey,
Thanks for your reply. It's interesting to see what other people's opinions are on things!
I see your point on the floating z axis, perhaps I've managed to escape that issue though using the smooth 8mm bar on the bottom, it takes the weight off the stepper motor, but allows the threaded rod some movement at the same time. Not a permanent solution though :/
Thanks for pointing out that typo, I'm actually using a MKV from eBay. The seller seems reputable and the hot-end seems to be of very solid construction, but after all it is a chinese clone so only time will tell whether or not it will perform okay. So far I haven't had any issues with it at all though, but it's still early days. What issues did you have with your eBay one?
I'm on the Wirral, near Liverpool.
Also, what is everyone's opinion on attaching a thermistor to a heated bed? For a while I've been using a scrap of kapton tape that came on the bed, but I read that some thermal paste would be a good idea. In the process of putting a thin smudge of paste on the board, I ruined the tape and have now resorted to using sellotape. It seems to be holding up for the time being and hasn't been affected by the heat yet. Looking to buy a small roll of kapton tape in the future though!
Jordan
|
Re: My first RepRap build and experiences January 30, 2014 02:18AM |
Registered: 11 years ago Posts: 349 |
When I had a Chinese clone it was just unreliable. It would jam often, required a lot of force to extrude and just caused all sorts of inconsistencies that I thought were due to how I had set it up. Basicelly I spent more time trying to figure out what I was doing wrong than printing.
Cello tape on the thermistor is a bad idea. It will fail , it's just a matter of when. If your lucky when it fails it won't cause a problem. If not your bed could over heat, which could cause something to catch fire. Or just ruin your print. So yeah get some kapton. As for the thermal past a bit on the thermistor then poke it in the hole works well.
Cello tape on the thermistor is a bad idea. It will fail , it's just a matter of when. If your lucky when it fails it won't cause a problem. If not your bed could over heat, which could cause something to catch fire. Or just ruin your print. So yeah get some kapton. As for the thermal past a bit on the thermistor then poke it in the hole works well.
|
Re: My first RepRap build and experiences January 30, 2014 01:47PM |
Registered: 10 years ago Posts: 19 |
Ahh okay, thankfully there shouldn't be any safety issues thanks to my power supply being right at it's limit when heating the bed, the hottest it gets is 105 ish no matter how long I leave the relay on. Nonetheless though, I'm definitely going to replace it with some kapton tape.
How many wires are attached to your heated bed? I use a single pair and find that they get slightly warm but not too hot. I think I could probably achieve a higher temperature if i used two pairs, but it actually performs really well at the moment so I think I'll leave it.
Does anyone have any experience with the bowden extruder? I intend to try it out at some point using the minimalistic x carriage at:
I forgot to include in my last post that I was concerned about the floating Z axis causing unnecessary weight on the stepper motor and it's bearings. Is this something I ought to be concerned about?
Jordan
|
Re: My first RepRap build and experiences January 30, 2014 02:15PM |
Registered: 11 years ago Posts: 349 |
My heat bed just uses one pair of 14awg silicone wire ( very flexible and resistant to temperatures greater than a heated bed can get to). which is from here www.ebay.co.uk/itm/121190914940 and yes more wire = less resistance so higher temperatures.
I wouldnt be concerned about the motor bearing. they spend very little time spinning.
I wouldnt be concerned about the motor bearing. they spend very little time spinning.
|
Re: My first RepRap build and experiences February 10, 2014 01:14PM |
Registered: 10 years ago Posts: 19 |
So I decided to keep you up to date on what's new with my RepRap and the issue's I've ran into.
I bought some new filament from eBay (as always). It works much better than the other filament and seems to be bleached very white. I find it is softer, which caused me to loosen the tension on the idler on my extruder. The previous filament wouldn't grip unless it was very tight, whereas this one got squashed. It melts at a nicer temperature and I'm rather pleased with it. The filament is from a company called PrintMe3D.
I also added a spool holder which turns very smoothly and nicely using 608zz bearings, and added a new mount for my electronics on the side of my printer. Hopefully I can get it all wired up soon.
But now for the bad news...
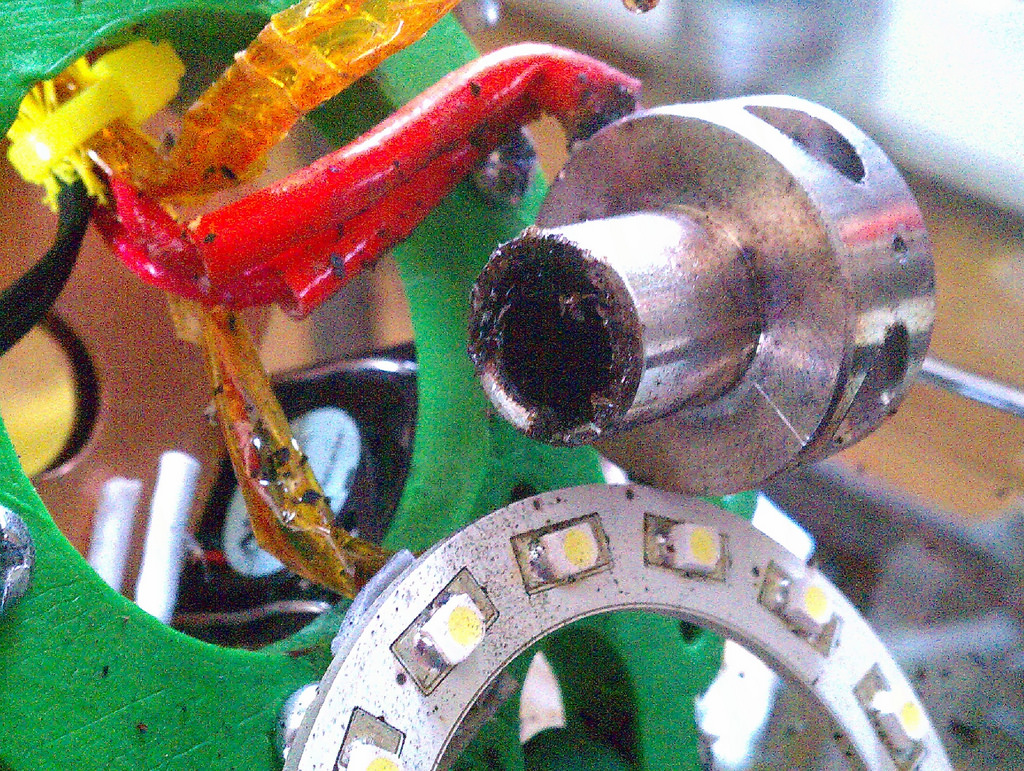
The thermistor in my hot end has broken, which caused the hot end to melt down and I couldn't kill it in time to prevent the PEEK from melting. I disassembled the hot end and found that the thermistor had actually snapped, the ceramicy material itself had snapped. My only explanation for this display of dramatic failure is that the wires might've been under too much tension and caused it to snap, but I somehow doubt it as the wires were never that tight, they always had a bit of slack. If anyone has any ideas why that might've happened I'd love to know. I managed to salvage the nozzle holder and with a bit of work on the lack cleaned up most of the damage to the lower thread. The length of the PEEK is now about 2.5mm shorter than previously, which means that it doesn't quite sit flush to the heater block, I don't think this will cause any problems but I'm yet to find out. I'm waiting on the seller to decide if they'll send out a replacement or if I'm going to have to aquire a new thermistor before I can run the printer again... Perfect opportunity to rewire the printer!
I have my eye on the E3D all metal extruder or the Budaschnozzle. They both look like very nice hot ends and I might save up for one in the future. I'm even toying with the idea of machining an aluminium J-Head myself. I don't have access to a miller but I might be able to make some design compensations?
I've gotten my hands on a new power supply which can supply 15A on the 12v line over the 10A I currently have for the heated bed, hopefully that should speed things up!
I'm looking forward to suggestions about what might've caused my melt down issue.
Jordan
Edited 1 time(s). Last edit at 02/10/2014 01:17PM by JHart96.
I bought some new filament from eBay (as always). It works much better than the other filament and seems to be bleached very white. I find it is softer, which caused me to loosen the tension on the idler on my extruder. The previous filament wouldn't grip unless it was very tight, whereas this one got squashed. It melts at a nicer temperature and I'm rather pleased with it. The filament is from a company called PrintMe3D.
I also added a spool holder which turns very smoothly and nicely using 608zz bearings, and added a new mount for my electronics on the side of my printer. Hopefully I can get it all wired up soon.

But now for the bad news...
The thermistor in my hot end has broken, which caused the hot end to melt down and I couldn't kill it in time to prevent the PEEK from melting. I disassembled the hot end and found that the thermistor had actually snapped, the ceramicy material itself had snapped. My only explanation for this display of dramatic failure is that the wires might've been under too much tension and caused it to snap, but I somehow doubt it as the wires were never that tight, they always had a bit of slack. If anyone has any ideas why that might've happened I'd love to know. I managed to salvage the nozzle holder and with a bit of work on the lack cleaned up most of the damage to the lower thread. The length of the PEEK is now about 2.5mm shorter than previously, which means that it doesn't quite sit flush to the heater block, I don't think this will cause any problems but I'm yet to find out. I'm waiting on the seller to decide if they'll send out a replacement or if I'm going to have to aquire a new thermistor before I can run the printer again... Perfect opportunity to rewire the printer!
I have my eye on the E3D all metal extruder or the Budaschnozzle. They both look like very nice hot ends and I might save up for one in the future. I'm even toying with the idea of machining an aluminium J-Head myself. I don't have access to a miller but I might be able to make some design compensations?
I've gotten my hands on a new power supply which can supply 15A on the 12v line over the 10A I currently have for the heated bed, hopefully that should speed things up!
I'm looking forward to suggestions about what might've caused my melt down issue.
Jordan
Edited 1 time(s). Last edit at 02/10/2014 01:17PM by JHart96.
|
Re: My first RepRap build and experiences February 11, 2014 11:26PM |
Registered: 13 years ago Posts: 1,780 |
A break or a short in the thermistor leads would read a very low (below 25C) or a very high temperature reading that the Marlin firmware should have been set to deal with. There are maximum and minimum temperature limits in the firmware. If the reading goes beyond these limits, the firmware will shut off the heaters and motors. This would be enough to prevent your hotend from getting damaged. It's more likely that you didn't have the correct PID parameters for the temperature control in the firmware. Bad PID parameters can also result in large overshoots that would be enough to melt the PEEK. It's important to use the autotune feature of Marlin to get the correct settings and save it in firmware of EEPROM.
|
Re: My first RepRap build and experiences February 12, 2014 03:05PM |
Registered: 10 years ago Posts: 19 |
Hey,
The leads of the thermistor weren't shorting to the best of my knowledge, I was getting a reading of between 50 - 90 degrees, the PID is set up on my board which is what really annoyed me. As I was heating the machine from cold, it wasn't as if it suddenly dropped from a high temperature to a low.
One thing that I did feel was a bit odd though, was that I actually turned off both heaters when the thermistor reading spiked to 700 degrees, yet the board kept providing power as I hadn't turned the power supply off, which I thought was a bit weird, not sure if that was an issue with Repetier though. I intend to test that when I get my new hotend, it should be arriving soon!
Thanks,
Jordan
|
Re: My first RepRap build and experiences February 12, 2014 08:02PM |
Registered: 12 years ago Posts: 27 |
@JHart96 ---> Your misery has company...
Attached are the remnants of my newly built 3D printer's hotend fire. This miniature catastrophic event was yesterday (2/11/14). Now, do I re-design and build or purchase a new hotend and build? Either way it is redesign of mounting, building, machine calibrations, more testing....
Fire cause: A good functioning properly calibrated 'loose' thermistor.
Results: The thermistor had slipped out of position from another repair action. Since the thermistor was no longer in proper position for accurate temperature readings - the hotend temperature was higher than indicated. The hotend got to somewhere north of 343°C (650°F) and parts began to melt, smolder, bubble and burn. Fiberglass became scorched and brittler. PEEK bubbled, foamed, smoked and turned black. PTFE simply melted into a goo while the kapton tape's adhesive evaporated. The shiny aluminum riser piece shown, not the direct cause, was a riser, improperly made with a nearly non-existing wall between the interior ID and the exterior thread ID diameter. This riser failure initiated the first hotend rebuild which dislodged the thermistor which caused the melt-down. Oh, What a Happy Day... NOT!!!
Salvageable? The hotend was in a Delta printer with an ABS effector - WOW! The effector has no signs of heat effects from the close 7mm proximity to 650°F. The heater is discolored from the high temperatures but, other wise seems fine. The thermistor should be OK since - ha, ha, it never reached those temperatures having been dislodged. The aluminum block with the nozzle? I need a torch to burn it out and I do not have such.
Actions? Build it new or buy another? Bunda... is too big an bulky & $$$. The other $$$. Dilemas.
P.S. 650°F (343°C) is melting point of PEEK. Kinda out of range of a bad PID.
Edited 1 time(s). Last edit at 02/12/2014 08:33PM by bstott.
|
Re: My first RepRap build and experiences February 13, 2014 11:48AM |
Registered: 10 years ago Posts: 19 |
Wow that's quite a catastrophic meltdown. Which hotend were you using? Thankfully my melt down wasn't quite as bad, I managed to restore the holder the working order, although the thread had melted pretty badly.
How long was it melting for? Was it supervised at the time or was it doing a print on it's own? I was lucky that I was with the printer at the time and I caught it before it was too late!
Fortunately the seller agreed to send a new one to me, which I can't really argue with. If yours is also brand new, perhaps you might be able to get some sort of replacement, otherwise I really have my eye on the E3D hot end, they look well built and are all metal so there shouldn't be any chance of a melt down, and really good for experimenting with, too!
Keep me posted on which path you choose, especially if you get an all metal hot end.
Jordan
|
Re: My first RepRap build and experiences February 13, 2014 12:05PM |
Registered: 13 years ago Posts: 1,780 |
|
Re: My first RepRap build and experiences April 02, 2014 06:53PM |
Registered: 10 years ago Posts: 12 |
Nice looking printer.
JB Weld is a good epoxy that can handle a lot of heat.
If you set up for Nylon printing, you wont need a heated bed, Nylon is a little bit cheaper than PLA and ABS, plus it can be dyed with cheap off the shelf dyes.........Nylon is is the toughest printable plastic out there for now...
JB Weld is a good epoxy that can handle a lot of heat.
If you set up for Nylon printing, you wont need a heated bed, Nylon is a little bit cheaper than PLA and ABS, plus it can be dyed with cheap off the shelf dyes.........Nylon is is the toughest printable plastic out there for now...
Sorry, only registered users may post in this forum.