My building of a Mendel
Posted by yadavid
|
My building of a Mendel January 26, 2011 04:35PM |
Registered: 13 years ago Posts: 7 |
Hi,
I'm new here and I'm building a new Mendel. I'm going to log my building procedure here, hopefully, it will be useful for other builders. Also, please let me know if I'm making any mistake.
I'm not sure if I'm allowed to post comercial links. So just pure description first.
So far I've got,
1. the Mendel hardware kit including screw, nut, the long screw bar, round bar, betl, etc. It is 84GBP + 10GBP P&P. I've found the round bar is not very straight. When two ends fixed, the centre has +/- 0.2mm run out tested on my lath with a dial. So I'm also ordering some stainless round bar for 16EUR + VAT + P&P. Wondering why Mendel does not use standard round rail and linear bearing, which are not expensive.
2. the plastic parts. I'm waiting for a set for 80GBP + free P&P made from cast resin. I've also ordered another PLA set as back up for 95GBP + 12.5GBP P&P.
4. Extruder. I've ordered the extruding head parts for 37.99EUR. The gear and mount are included in the plastic part set. However, I also bought some ready made mod 1, 60 teeth gear, 10pcs for 2.65GBP + VAT + P&P. The quality looks good.
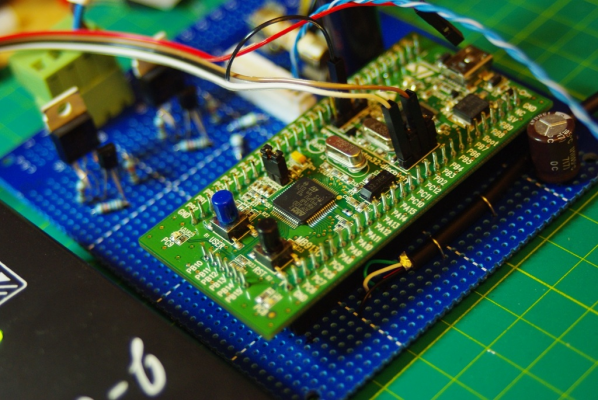
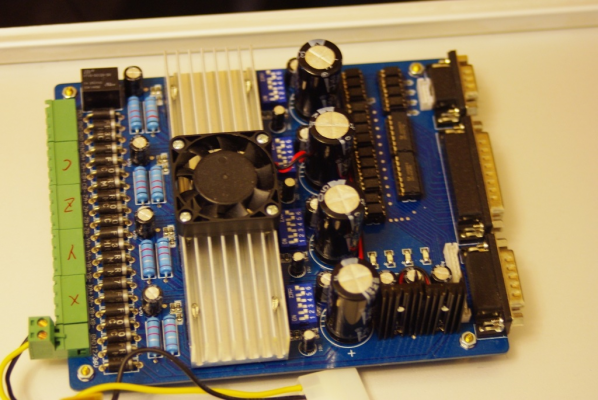
5. electronics. I've ordered a 4 axis stepper driver board for 54.99GBP + free P&P. I'm going to use EMC2, which is a great CNC controller I've used for years. I think I'll need to build a dual channel temperature controller for the extruder and for the heated bed. I'm thinking to use the STM32 value line evaluation kit. It is normally just 6~7GBP with USB interface. The power supply is going to be a 500W+ PC power supply and the whole electronic thing should be in that PC case as well.
6. Filament and etc. I've ordered 5.5kg ABS filament for 76.95GBP + P&P, and some Kapton tape. Aluminium frog board and bed board ordered. Q: where can I find PLA at good price from UK?
Let me know if I missed anything. Or there is any better options.
Will keep posting.
Regards
David
|
Re: My building of a Mendel January 26, 2011 07:45PM |
Registered: 13 years ago Posts: 39 |
|
Re: My building of a Mendel January 26, 2011 11:27PM |
Admin Registered: 17 years ago Posts: 1,791 |
I'm not sure if I'm allowed to post commercial links. So just pure description first.
If the cast Mendel parts are good, that's something the community needs to know. If the cast Mendel parts aren't good ...
Let me know if I missed anything.
Only one crit. You should probably join our official dev list,
[reprap.org]
since you're probably a reprap developer.
-Sebastien, RepRap.org library gnome.
Remember, you're all RepRap developers (once you've joined the super-secret developer mailing list), and the wiki, RepRap.org, [reprap.org] is for everyone and everything!
If the cast Mendel parts are good, that's something the community needs to know. If the cast Mendel parts aren't good ...
Let me know if I missed anything.
Only one crit. You should probably join our official dev list,
[reprap.org]
since you're probably a reprap developer.

-Sebastien, RepRap.org library gnome.
Remember, you're all RepRap developers (once you've joined the super-secret developer mailing list), and the wiki, RepRap.org, [reprap.org] is for everyone and everything!

|
Re: My building of a Mendel January 27, 2011 04:51AM |
Registered: 13 years ago Posts: 7 |
Woodsmoke Wrote:
-------------------------------------------------------
> Opto end stops and optos?
For my CNC task, I never need an end-stop, as I always need to manually align the cutter with the material. For Mendel, I think the stop switch is useful. You don't need opto ones, they are prone to dust, and you would need both LED and sensor wire. Some micro-switch will do. If just for homing purpose, you can serial/parallel they all together.
> Where did you source your ABS? Thanks.
Here is the ABS [reprapkit.com] Obviously, I haven't tried it, but sounds good quality from others feedback.
SebastienBailard Wrote:
-------------------------------------------------------
> If the cast Mendel parts are good, that's
> something the community needs to know. If the
> cast Mendel parts aren't good ...
I'm not so sure about casting, as there are orthogonal holes on many parts, which is not very easy with casting. But I'm interested to find out as well.
-------------------------------------------------------
> Opto end stops and optos?
For my CNC task, I never need an end-stop, as I always need to manually align the cutter with the material. For Mendel, I think the stop switch is useful. You don't need opto ones, they are prone to dust, and you would need both LED and sensor wire. Some micro-switch will do. If just for homing purpose, you can serial/parallel they all together.
> Where did you source your ABS? Thanks.
Here is the ABS [reprapkit.com] Obviously, I haven't tried it, but sounds good quality from others feedback.
SebastienBailard Wrote:
-------------------------------------------------------
> If the cast Mendel parts are good, that's
> something the community needs to know. If the
> cast Mendel parts aren't good ...
I'm not so sure about casting, as there are orthogonal holes on many parts, which is not very easy with casting. But I'm interested to find out as well.
|
Re: My building of a Mendel February 15, 2011 05:55PM |
Registered: 13 years ago Posts: 7 |
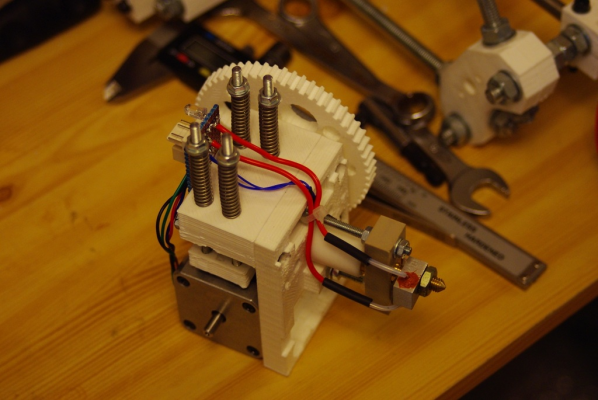
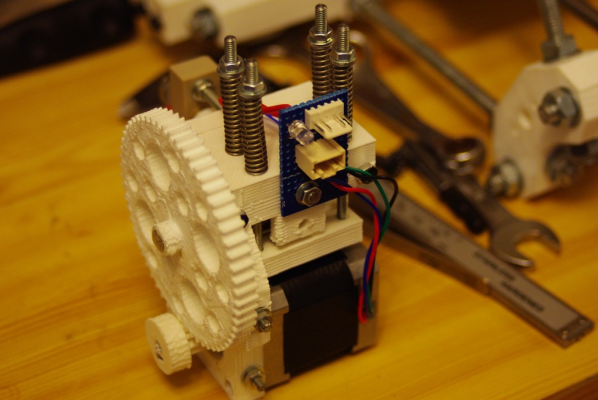
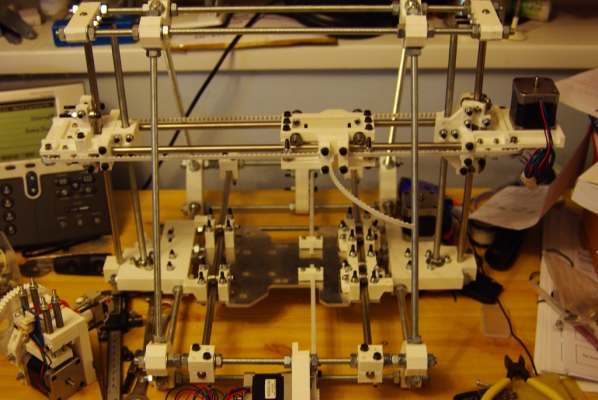
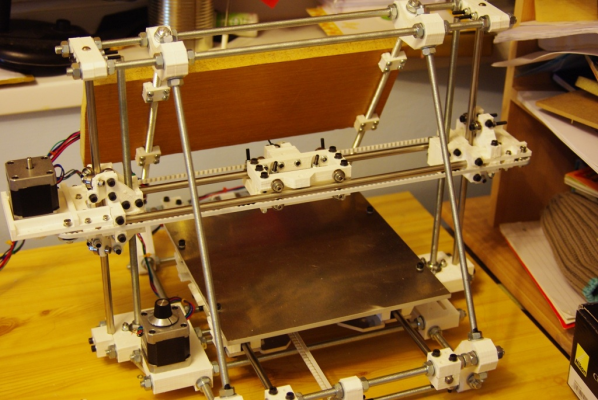
Nearly finish, some photos. sorry about the dark light
The extruder
The frame
The extruder
The frame
|
Re: My building of a Mendel February 16, 2011 01:59AM |
Registered: 13 years ago Posts: 1,780 |
Looks good.
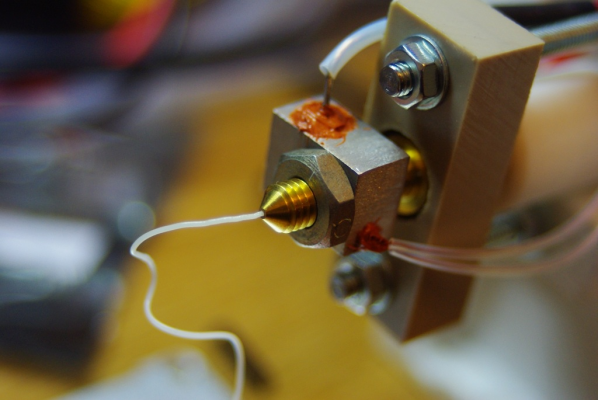
1. I think you need to move the heater as close to the tip as possible. This is were the 3 mm filament has to melt and flow through a hole which is usually 0.5 mm but can be smaller depending on your tip.
2. The spring/screws that provide tension to the idler bearing looks a little bit long to me. It might run into the z lead screw.
3. The belt for the x-axis looks like it's inside out. The teeth should be facing out, not in.
4. It seems that the driven gear on the extruder doesn't have a nut to hold it. The gear on the motor might be on backwards.
Edited 3 time(s). Last edit at 02/16/2011 07:31AM by brnrd.
|
Re: My building of a Mendel February 16, 2011 05:22AM |
Registered: 13 years ago Posts: 482 |
Very pretty
Onwe thing though. I would recomend placing headers for all connections onto and out of tour board on the extruder mechanism rather than actually soldering the thermistor, heater and motor wires to the board and only providing headers for the connections to the extruder controller.
My motivation for this is that you may end up dismantling your extruder many times before it is running sucesfully. Having your motor and heater block permanently connected to your bit of stripboard is a real pain when you do this...
|
Re: My building of a Mendel February 16, 2011 09:19AM |
Admin Registered: 17 years ago Posts: 7,879 |
Quote
3. The belt for the x-axis looks like it's inside out. The teeth should be facing out, not in.
No with the updated x-motor bracket the belt faces inwards. The old design bends the belt back on itself through too tight a radius. That caused the wires in the belt to snap after about 100 hours of use.
[www.hydraraptor.blogspot.com]
|
Re: My building of a Mendel February 16, 2011 10:22PM |
Registered: 13 years ago Posts: 1,780 |
|
Re: My building of a Mendel February 17, 2011 04:12PM |
Registered: 13 years ago Posts: 7 |
>
> 1. I think you need to move the heater as close to
> the tip as possible. This is were the 3 mm
> filament has to melt and flow through a hole which
> is usually 0.5 mm but can be smaller depending on
> your tip.
>
> 2. The spring/screws that provide tension to the
> idler bearing looks a little bit long to me. It
> might run into the z lead screw.
>
> 3. The belt for the x-axis looks like it's inside
> out. The teeth should be facing out, not in.
>
> 4. It seems that the driven gear on the extruder
> doesn't have a nut to hold it. The gear on the
> motor might be on backwards.
Thanks for the comments.
1. as I didn't build such thing before, I'm not sure if placing the heater right at the tip would allow enough time for the plastic to melt as plastic is generally not good for heat conduction. Backward a few mm gives more time. Temperature wise, there might be a few degree drop at the tip, increasing the heater temperature should be able to offset it.
2. they are a bit too long, since I don't have other springs. These springs were recycled from a water cooled CPU sink. Actually it is the stripboard that hits the Z lead screw a few mms early than the normal X travel end.
3. as explained by nophead. I think it was already found that the diameter of some belt pulley is too small. In the RP part set, I could find some bigger pulley and some small pulley. I just used the bigger ones. IIRC, even for small timing belt, the diameter shouldn't be smaller than 15mm (e.g. MXL, S2M, S3M), otherwise the belt may snap early.
4. I feel metel nut on such small plastic won't give much hold anyway. It is currently pretty tight, I'm going to glue it after test.
|
Re: My building of a Mendel February 17, 2011 07:53PM |
Registered: 13 years ago Posts: 7 |
Another update:
The extruder appears to work
The filament was ABS. I could easily and smoothly rotate the gear by hand. The temperature was set to 200C, and it was controlled by this board
It is a cheap yet powerful evaluation board. 24MHz 32bit ARM processor with 128KB flash 12bit ADC a lot of other IO for less than 10 quids. The control is simple on and off. The control frequency is 100Hz. The power switch device is just a N channel MOSFET. Even a 1000Hz control rate is not an issue.
The machine motor, including the exturder will be driven by this board
it is going to connect to a PC running EMC2. Also, when an independent CNC controller is available the driver can still be reused.
Here is a better finished machine.
The "thick" board is only to machine the frame stronger.
|
Re: My building of a Mendel February 17, 2011 10:31PM |
Registered: 13 years ago Posts: 1,780 |
yadavid Wrote:
-------------------------------------------------------
...
>
> 1. as I didn't build such thing before, I'm not
> sure if placing the heater right at the tip would
> allow enough time for the plastic to melt as
> plastic is generally not good for heat conduction.
> Backward a few mm gives more time. Temperature
> wise, there might be a few degree drop at the tip,
> increasing the heater temperature should be able
> to offset it.
I've only built one of these before so I don't have a lot of experience either. But the 3 mm filament (2.9 in my case) doesn't move that fast relative to the time it takes to melt the filament. I wound nichrome wire on mine and most of the time, ooze happens less than 1 minute from turning on the heater. Also, the brass does conduct heat. My thoughts are that with the heater close to the tip, there will be a temperature gradient from the tip to the thermal break so that the plastic will be preheated before it gets to the melt zone. If you melt too much of the filament by moving too high up on the hot end, it might be harder to control ooze.
>
> 4. I feel metel nut on such small plastic won't
> give much hold anyway. It is currently pretty
> tight, I'm going to glue it after test.
I think the nut is there to keep the gear pressed against the wing-nut. I have a washer on mine as you should whenever you have a nut on plastic. Its needed to keep the gear pressed against the wing nut. Without it, it might pop out as the torque is quite high. Glue might not be strong enough. I'm not sure why you are overly concerned about metal nut/washer on plastic when it's all over the Mendel. You might get more clearance for a nut/washer if you move the machined filament drive on the threaded screw further away from the gear.
|
Re: My building of a Mendel February 19, 2011 10:05AM |
Registered: 13 years ago Posts: 485 |
An interesting build. I'm looking forward to seeing how your use of EMC2 works out.
What I really want to comment on is your discovery of what appears to be an excellent name for a mis-tuned or malfunctioning extruder:
> The machine motor, including the exturder will be
> driven by this board
What I really want to comment on is your discovery of what appears to be an excellent name for a mis-tuned or malfunctioning extruder:
> The machine motor, including the exturder will be
> driven by this board
Sorry, only registered users may post in this forum.
