My first corexz
Posted by jaded
|
My first corexz July 19, 2018 03:51PM |
Registered: 7 years ago Posts: 58 |
Hello all.
I wanted to play with a different kinematic system and I was interested in nicholas sewards corexz build but wanted something a bit bigger scale compared to my anet a8's.
I came across the micromake c1 hbot kit and while it was not a "true corexz" I examined the contents (online) and determined that it would be a good starting point to build my corexz printer.
The kit itself was cheap enough and came with most of the parts I needed to complete my build. After getting the kit assembled I immediately flashed marlin1.1.8 onto the board as I did not like the idea of using modified cura software just to control and update the firmware.
Luckily marlin has an example config file for the micromake so that made things faster to get up and running.
After I flashed the firmware and did some homing and movement tests I observed how the system worked (hbot stock) and understood how the two motors worked to achieve the movements. I didn't even do a test print.
I immediately broke the system down and started building my frame from the parts I purchased months back for another build that never got off the ground.
The changes from the micromake kit to the frame I built:
Extruded aluminum frame with 2020 and 2040 arranged in a square base and h-frame for the z axis (based on the cr10 series).
Vertical supports for the z axis with 2040 vslots
300x300 pcb heatbed (the micromake c1 did not come with a heatbed)
Cr10 bed subframe (stock cr 10 steel piece)
12v30a power supply
Heatbed mosfet
Reprap discount full graphics smart controller
Added a part cooler fan and duct (the micromake c1 did not come with a part cooler )
)
3d printed parts for the conversion from hbot to corexz - most of the parts were taken from existing designs and modified to fit my build
- Upper bearing idlers left and right
- Z axis 3 wheel brackets
- X axis 3 wheel extruder mount
- Y axis motor mount and belt tensioner
- 2040 angled bracket for z axis vertical brace
- Endstop switch mounts
- X axis wire guide/retainer
- Extruder cooling duct
My goal for this build also is at least a second extruder up to three so I can do multi-color or multi-filament prints (soluble supports).
It currently prints amazingly well compared to how well I have managed to get my a8's to print. It is also using marlins abl bilinear feature with no probe (probe manually). Along with my a8's it is currently connected to my repetier print server on my raspberry pi for control of all 3 printers from one interface.
Overall, I am happy with the success of the build. No leadscrews to deal with, less noise overall, print quality is amazing, auto tramming works. I have printed at 150mm/s for testing and it handled it well. Though honestly I prefer slower speeds for the quality.
For now my to-do list on this build is to clean up the power supply and motherboard mounting and wiring and then get the aux board working for the extra extruders. I plan to do a mixing extruder versus the diamond hotend.
Image of printer near build completion alongside my a8's
[www.dropbox.com]
Image running a test print for auto tramming and first layer adhesion (Success)
[www.dropbox.com]
I wanted to play with a different kinematic system and I was interested in nicholas sewards corexz build but wanted something a bit bigger scale compared to my anet a8's.
I came across the micromake c1 hbot kit and while it was not a "true corexz" I examined the contents (online) and determined that it would be a good starting point to build my corexz printer.
The kit itself was cheap enough and came with most of the parts I needed to complete my build. After getting the kit assembled I immediately flashed marlin1.1.8 onto the board as I did not like the idea of using modified cura software just to control and update the firmware.
Luckily marlin has an example config file for the micromake so that made things faster to get up and running.
After I flashed the firmware and did some homing and movement tests I observed how the system worked (hbot stock) and understood how the two motors worked to achieve the movements. I didn't even do a test print.
I immediately broke the system down and started building my frame from the parts I purchased months back for another build that never got off the ground.
The changes from the micromake kit to the frame I built:
Extruded aluminum frame with 2020 and 2040 arranged in a square base and h-frame for the z axis (based on the cr10 series).
Vertical supports for the z axis with 2040 vslots
300x300 pcb heatbed (the micromake c1 did not come with a heatbed)
Cr10 bed subframe (stock cr 10 steel piece)
12v30a power supply
Heatbed mosfet
Reprap discount full graphics smart controller
Added a part cooler fan and duct (the micromake c1 did not come with a part cooler
 )
)3d printed parts for the conversion from hbot to corexz - most of the parts were taken from existing designs and modified to fit my build
- Upper bearing idlers left and right
- Z axis 3 wheel brackets
- X axis 3 wheel extruder mount
- Y axis motor mount and belt tensioner
- 2040 angled bracket for z axis vertical brace
- Endstop switch mounts
- X axis wire guide/retainer
- Extruder cooling duct
My goal for this build also is at least a second extruder up to three so I can do multi-color or multi-filament prints (soluble supports).
It currently prints amazingly well compared to how well I have managed to get my a8's to print. It is also using marlins abl bilinear feature with no probe (probe manually). Along with my a8's it is currently connected to my repetier print server on my raspberry pi for control of all 3 printers from one interface.
Overall, I am happy with the success of the build. No leadscrews to deal with, less noise overall, print quality is amazing, auto tramming works. I have printed at 150mm/s for testing and it handled it well. Though honestly I prefer slower speeds for the quality.
For now my to-do list on this build is to clean up the power supply and motherboard mounting and wiring and then get the aux board working for the extra extruders. I plan to do a mixing extruder versus the diamond hotend.
Image of printer near build completion alongside my a8's
[www.dropbox.com]
Image running a test print for auto tramming and first layer adhesion (Success)
[www.dropbox.com]
|
Re: My first corexz July 20, 2018 01:04AM |
Registered: 8 years ago Posts: 5,232 |
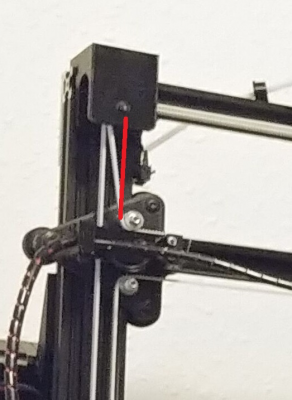
You'll get problems with belt tension, when the parts of the belts that changes length aren't aligned parallel. I marked in red, how it should be.
Edited 1 time(s). Last edit at 07/20/2018 01:09AM by o_lampe.
Edited 1 time(s). Last edit at 07/20/2018 01:09AM by o_lampe.
|
Re: My first corexz July 20, 2018 10:04AM |
Registered: 7 years ago Posts: 58 |
Quote
o_lampe
You'll get problems with belt tension, when the parts of the belts that changes length aren't aligned parallel. I marked in red, how it should be.
I was concerned about that too. I have done a handful of prints now with the system to include a 3 hour job yesterday. I have been keeping an eye on the belts and tension and so far all appears to be in working order. I am not saying you are wrong, I am only stating what I am observing on the system.
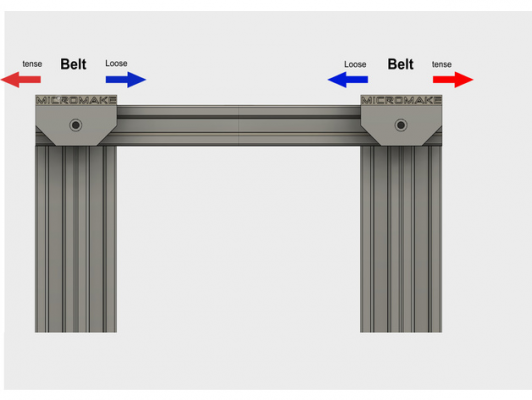
As a side note, in the attached image is where I got the idea for the idlers.
In the image it shows the belts loose when both sides are pushed in and tensed when both sides are pushed out. I set the belts taut enough to not slack while in the loose position then moved the idlers to the tensed position. Since I have my z axis homing to the top (max endstop) I can observe the belt path and so far through z and x movements it is holding tight.
Edited 1 time(s). Last edit at 07/20/2018 10:06AM by jaded.
|
Re: My first corexz July 20, 2018 04:57PM |
Registered: 11 years ago Posts: 5,780 |
Olampe is right. A corexz, like a corexy, needs to have belts segments parallel to the guide rails or the result is varying tension with extruder carriage position and distortion in the prints. In your case, if the angles of the upper segments are matched on the right and left side, the distortion will be in the form of varying layer thickness. Layers will get thinner as the print gets taller. If the angles on the right and left don't match, it will cause the X axis to tilt especially as you get higher up in Z. You can use your imagination to figure out the result of that.
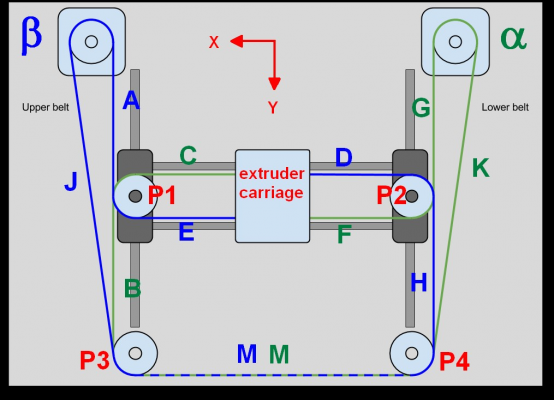
This diagram shows how a coreXY mechanism should be built, assuming stacked belts type arrangement. This applies equally to corexz- just substitute Z for Y in the diagram. Segments A-H all must all be parallel to their respective guide rails.
In the picture you posted above, moving the pulleys to tension the belts the way you are doing it is equivalent to moving the P3 and P4 pulleys in my diagram in the X direction, which moves segments B and H out of parallel with the Z axis guide rails. If you're going to move P3 and P4, you have to move them in the Z direction so the belts will remain parallel to the Z axis guide rails.
When I built my corexy machine, the easiest way to tension the belts was to make the motor mounts positionable in slots oriented along the Y direction (Z in your case). Tensioning the belts that way doesn't affect the angles the belts make with the guide rails. You could move P3 or P4 in the Y direction (Z in your case), or tension the belts at the extruder carriage.
Note that the diagram is 2D. It is also critical that belt segments A-H be parallel to the rails in the XZ and YZ planes for the same reasons they have to be parallel to the rails in the XY plane.
From what I've seen in these and other forums, about 50% of the people who build their first corexy mechanisms get this critical part wrong.
Edited 2 time(s). Last edit at 07/20/2018 05:03PM by the_digital_dentist.
Ultra MegaMax Dominator 3D printer: [drmrehorst.blogspot.com]
|
Re: My first corexz July 26, 2018 11:00AM |
Registered: 7 years ago Posts: 58 |
I haven't had any issues with the build so far.
However, I am now ready to add the second extruder and while I am at it I will redesign the belt path.
Does anyone happen to know if there is a "ps on" pin on the makeboard mini?
I am trying to add a cnc shield v3 board but finding it difficult to find a12/d66 for the cnc shield board.
I am trying to avoid buying a new board altogether especially since I actually like this makeboard mini board...just want to add a second extruder.
|
Re: My first corexz July 28, 2018 08:57PM |
Registered: 7 years ago Posts: 58 |
Sorry, only registered users may post in this forum.


