DIY printhead
Posted by johnrpm
|
Re: DIY printhead August 03, 2012 02:33AM |
Registered: 14 years ago Posts: 196 |
Martino, very nice work. Another thing you might try to help address the leakage problem is to make your nozzle in something that is strongly hydrophobic (Teflon or polystyrene, for example). It is also possible to coat metal nozzles with Teflon. You'll still need to control the water pressure either by controlling the height of the water column above the nozzle or creating a back pressure (as you've done), but it should help a bit.
|
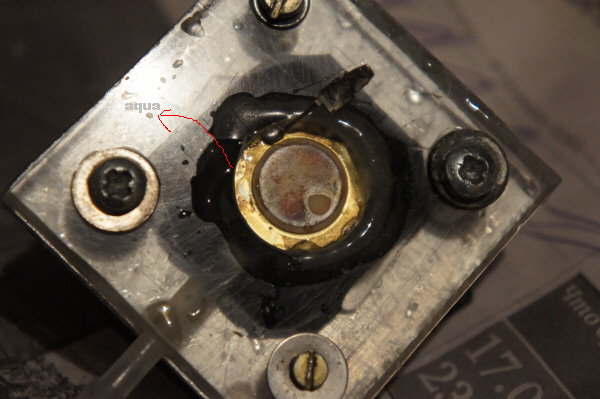
Re: DIY printhead August 29, 2012 02:43AM |
Finally I got it to work 
I am using micro dispensing heads (luer lok) with 50 um or 100 um holes. Dispensing needles will not work but these "Micron-S Precision Nozzles" works just great. Much better flow rate than in needles and no air bubbles back when properly tuned.
I am using 30 mm od piezo (with 20 mm diam. piezo layer). It is connected with o-ring seal into chamber (chamber has 20 mm diameter and approx 0,2 mm depth). It works even without constant pressure. Fluid level can be as low as the upper part of the chamber. Piezo is vertically mounted.
Driving electronics is pretty simple. 555 timer with pulse width and frequency tuning. Output is done by h-bridge mosfet driver and voltage can be tuned with step-up/down converter.
I did also add a led in parallel with piezo. The drops are lighted in air,
Now I want to do the piezo and led driver with arduino. I would add two different leds, for example red and blue. Even and odd pulses would be with different colours. This would help to tune the piezo driver so that it is easy to see if the drops collisions in air. Led pulses should be with constant pulse length and with ~ 1 Hz below piezo firing frequency. This will give a vision of slowly moving drops where even and odd drops are with different colours.
Could somebody help me with arduino code? I am not sure how to implement such kind of timers.
So how to do this kind of pulse generator, where the frequency (200-4000 Hz) and pulse duration (0,5-5 us) are controlled and another frequency (depended on the first freq) with fixed pulse duration (several us) is generated? Is it even possible with arduino?
If odd and even led pulses can not be done by arduino, it is easy to do it with discrete logic. So that two channel led driver is optional.
|
Re: DIY printhead August 29, 2012 02:50AM |
^ For next setup I will maybe add a flow through channel for liquid. I have seen that kind of solution in some industrial print heads (Xaar maybe?). So there is liquid in and also out. Liquid flows constantly through the chamber so the bubbles will flow back into tank. I will use a peristaltic pump or a small printer pump.
In my case the liquids are pretty expensive (starting from several thousand euros per ml).. So the liquid volume must be kept as small as possible. This is why I did not do that flow-through channel in that first prototype.
In my case the liquids are pretty expensive (starting from several thousand euros per ml).. So the liquid volume must be kept as small as possible. This is why I did not do that flow-through channel in that first prototype.
|
Re: DIY printhead August 29, 2012 03:21AM |
Admin Registered: 16 years ago Posts: 13,884 |
... how fast and accurate have you to be?
Some years ago I've invented a micro-/nano-dispenser, that was able to place singe extreme precise droplets with diameters from some hundred microns down to sub-microns with repetier-rates of some Hertz.
Can't place a link to the depatisnet results, so search on your own for the patent file DE102004007512A1
Here's an image of a droplet-array with 30 microns diameter each (the bigger one at the bottom was triple): [forums.reprap.org]
... or read here for some more infos: [forums.reprap.org]
Viktor
--------
Aufruf zum Projekt "Müll-freie Meere" - [reprap.org] -- Deutsche Facebook-Gruppe - [www.facebook.com]
Call for the project "garbage-free seas" - [reprap.org]
|
Re: DIY printhead August 30, 2012 12:52AM |
I am using it for printing a line into nitrocellulose membrans. The surface is very sensitive, so this is a great way to do it without contact. Flow rate should be approx 1 ul/cm (or 8 ul/cm for another membran).
This is used for my own r&d projects. I have some kind of idea about the uC controlled pulses... I am not sure how to do it (with timers and interrupts) but I will give it a try...
This is used for my own r&d projects. I have some kind of idea about the uC controlled pulses... I am not sure how to do it (with timers and interrupts) but I will give it a try...
|
Re: DIY printhead September 27, 2012 03:54AM |
Registered: 11 years ago Posts: 6 |
|
Re: DIY printhead September 27, 2012 04:53AM |
Admin Registered: 16 years ago Posts: 13,884 |
... recently I've read an article about a new type of 'hypodermic' syringe - here you simply have two small chambers, separated by a membrane, one filled with water, the other with the fluid to print and with a small hole (some microns wide) to release the jet.
With a laser-beam focussed into the water-reservoir the water is instantly heated until a steam-bulb will pop up and squeeze the volume in the other chamber, so a thin jet with speed up to 30m/s will be ejected.
This jets were aimed to inject subcutaneous medicines without harming the skin, but could be built for ink-jetting and bigger droplets/volumes too ...
Viktor
--------
Aufruf zum Projekt "Müll-freie Meere" - [reprap.org] -- Deutsche Facebook-Gruppe - [www.facebook.com]
Call for the project "garbage-free seas" - [reprap.org]
|
Re: DIY printhead September 27, 2012 06:07PM |
Registered: 11 years ago Posts: 6 |
|
Re: DIY printhead September 28, 2012 02:27AM |
Admin Registered: 16 years ago Posts: 13,884 |
laser = many times faster than resistor!
A small resistor has first to heat his body with the driving current to something to above 200°C and below 400°C (so he won't wreck itself and the surrounding parts) to start a small steam-bubble, popping up fast enough, to drive a sufficient pressure-front. This will take some ms to create a droplet and is limited to the max energy you can transform by the resistor-volume (where only a fraction will be 'productive').
With a laser you can heat a specific volume of the fluid (essentially the laser focus) instantly to some thousand centigrades, so you'll get a sort of micro-explosion with starting times and durations of nanoseconds, so the resulting pressure-front can travel with hyper-sonic speeds, if wished!
I've tested a similar application twenty years ago with a 5Watt-CO2-RF-Laser and pure water ... but you can use dark ink, which will absorb the N-IR-wavelengths of common high-power-IR-diodelasers or the cheap blue 445nm@1W-diodes. I have small 975nm-IR-types with 5 to 25Watts optical power, focussable to a spot of smaller than 0.1mm, so more than enough 'brute force'
Viktor
--------
Aufruf zum Projekt "Müll-freie Meere" - [reprap.org] -- Deutsche Facebook-Gruppe - [www.facebook.com]
Call for the project "garbage-free seas" - [reprap.org]
|
Re: DIY printhead September 28, 2012 04:57AM |
Registered: 11 years ago Posts: 6 |
|
Re: DIY printhead September 28, 2012 05:39AM |
Admin Registered: 16 years ago Posts: 13,884 |
... you have two cavities separated by a membrane - one (closed, laser-target) contains the 'power-generating' medium, that you can select freely so it will perfectly fit to your laser ... behind the separating membrane ist the cavity (with nozzle) holding your printing fluid, that can be complete different ...
Viktor
--------
Aufruf zum Projekt "Müll-freie Meere" - [reprap.org] -- Deutsche Facebook-Gruppe - [www.facebook.com]
Call for the project "garbage-free seas" - [reprap.org]
Viktor
--------
Aufruf zum Projekt "Müll-freie Meere" - [reprap.org] -- Deutsche Facebook-Gruppe - [www.facebook.com]
Call for the project "garbage-free seas" - [reprap.org]
|
Re: DIY printhead October 15, 2012 01:58PM |
Registered: 11 years ago Posts: 6 |
|
Re: DIY printhead October 18, 2012 02:52AM |
Registered: 11 years ago Posts: 6 |
|
DIY printhead - Piezo Polarity April 04, 2013 01:41PM |
|
DIY Printhead - Conclusion April 04, 2013 01:47PM |
Sorry to be joining this conversation about 2 years too late. I was wondering if anyone has completed their work here?
Also, has anyone considered other applications for what a single nozzle piezo can do? We could use this as a way to label pin numbers for the PLA printed part. Or it can be used to put a simple greyscale image onto a part.
I'm looking to use this as a "mask" for PC Board prototyping.
Hope to hear back frmo some of you. What I've seen clearly works and needs to be packeaged a little more neatly into a single package with built in back pressure.
Thanks and take care,
Mikeal
|
Re: DIY printhead May 10, 2013 08:38PM |
Registered: 12 years ago Posts: 18 |
So I'm interested in this subject too. Mainly for depositing liquids far too thick for normal printhead in a controllable array of drops. A head like this might lead to a diy polyjet. Granted this would require a tremendous amount of work on miniaturization. Then there is the control for a multi nozzle dispenser, that's a lot of work.
|
In need for a working piezo inkjet nozzle May 11, 2013 02:12PM |
Registered: 10 years ago Posts: 5 |
I got a working 3D powder printer that is capable of holding a inkjet nozzle. More information about that can be found here: http://focussls.blogspot.nl/.
All of my own attempts to this have failed. I will continue to work on it myself, but if there is anyone willing to help with this it would be greatly appreciated.
you can reply, reply here: http://forums.reprap.org/read.php?153,207581, or send me a mail to focuspowderprinter@gmail.com.
Any help from the netherlands would be awesome, and I am specifically looking @ martino, who built one in a dutch fablab.
Many thanks in advance
Edited 1 time(s). Last edit at 05/11/2013 02:18PM by dragonnator.
|
Re: DIY printhead May 29, 2013 03:14PM |
Registered: 11 years ago Posts: 6 |
|
Re: DIY printhead May 29, 2013 05:43PM |
Registered: 13 years ago Posts: 406 |
something I intended doing but never had time, was have a peizo lighter unit or units, acting on a shim, similar to the origonal design on the wiki, but the lighter units could act on two faces or shims to get amplitude, and could go to a higher frequency, anyone up for it.
Random Precision
Random Precision
|
Re: DIY printhead October 15, 2013 09:08PM |
Registered: 11 years ago Posts: 1 |
Hi im following this topic and im really interested in reproduce this attempt. recently i have found this sensor that would be implemented
[meas-spec.com] any suggestions?
Edited 1 time(s). Last edit at 10/15/2013 09:08PM by 1125lbs.
[meas-spec.com] any suggestions?
Edited 1 time(s). Last edit at 10/15/2013 09:08PM by 1125lbs.
|
Re: DIY printhead October 16, 2013 02:17PM |
Registered: 13 years ago Posts: 406 |
|
Re: DIY printhead October 16, 2013 03:40PM |
Registered: 10 years ago Posts: 3 |
Wow! I've got to say I'm enormously impressed at what johnrpm and madscifi have already done. Some promising posts recently on this too, so it seems there are still things going on with this. I spent most of the afternoon reading this entire thread and it must have seemed like a dauntingly thankless task at times. So, way to go you guys!
I've been looking for a method of cheaply dispensing relatively small volumes of aqueous liquids for a while. I wanted a method more reliable that peri pumps (without the routine calibration hassle these come with after wear and tear etc.) for a medical testing app. I was thinking of trying to 3D print small syringes but I have eight different liquids to dispense and the size of the steppers was going to be an issue! The volumes I'm looking to dispense are between 25 - 500 ul so they're pretty large compared to what you guys are aiming for, but I'm thinking I can save on valuable reagents if I can reduce this and maintain precision dispensing.
For my part, I've made a few adjustments to Adrian's design to see if I can find a way of getting the thing to auto-prime and stay primed. I have a few years in the medical devices industry under my belt, so I've come across these issues before and have a couple of simple ideas which are worth a try. Since I don't own a printer I'm left to Shapeways parts but I've found their Fine Ultra Detail material (MJM process) to be pretty good for this type of fluid handling. I've got parts ordered in that and I'll report back with what I find.
Nathan
|
Re: DIY printhead October 17, 2013 01:04PM |
Registered: 10 years ago Posts: 3 |
OK, so I got my parts ordered for the head but I cannot for the life of me figure out the electronics. I can work the Arduino part out and can alter the frequencies I send to the Piezo but I'm having trouble ramping up the voltage to get anything like loud out of it - it's certainly not the fire alarm it took it from which was driving me nuts in the middle of the night, that's for sure! The ones I ordered Maplin have also arrived but I've no more luck with them either really.
Any help would be appreciated at this point.
N
Any help would be appreciated at this point.
N
|
Re: DIY printhead October 17, 2013 02:52PM |
Registered: 13 years ago Posts: 406 |
|
Re: DIY printhead October 17, 2013 03:58PM |
Admin Registered: 17 years ago Posts: 7,879 |
Piezo sirens rely on resonance to make them so loud. A single impulse is never going to very loud.
[www.hydraraptor.blogspot.com]
[www.hydraraptor.blogspot.com]
|
Re: DIY printhead October 17, 2013 04:51PM |
Registered: 13 years ago Posts: 406 |
Don't know how I missed this, excellent stuff, he is printing hot wax. [reprap.org]
his circuit looks good to me, but electronics experts would give a better opinion, no mames but the previous poster comes to mind.
Random Precision
his circuit looks good to me, but electronics experts would give a better opinion, no mames but the previous poster comes to mind.
Random Precision
|
Re: DIY printhead October 18, 2013 07:01AM |
Registered: 10 years ago Posts: 3 |
Thanks for the Heated Piezo link John!
Hmm I'm getting the impression that even given the circuit diagram he shows there, I'm going to need help to build it without killing myself. I'm going to speak with a friend tonight who has a lot of expertise in electronics. At least if I'm working with him on this then I can learn plenty at the same time. In the meantime, I'll stick to what I know...
I'm looking to orient my heads vertically, with the inlet at the top and the outlet at the bottom, despite this not being ideal in terms of purge air from the head. I'm still thinking about purging air from the head but I've got an idea on this which involves an additional output at the top of the head which could be used to prime the head. I've added a debubbler before the inlet which should help prevent any air in the feed getting inside. It won't stop dissolved gas, but it's something. After the debubbler, I've added a check valve on the inlet in the hope that this will remove the need for head pressure but I doubt it and think this will need work. The check valve I've integrated is a simple ball check valve but I think the actuation time and internal volume will be too great. I'm thinking that replacing this with a elastomer duckbill valve might resolve this issue though. Finally, I've already come up with a stackable design which will allow me to sandwich the heads together in a space and component efficient way in order to keep costs down. This will give me my eight different heads integrated into a single assembly (perhaps even a 4x2 arrangement to limit the offsets on the X-Y positioning system).
Parts should arrive over the next week or two, so I'll keep you posted!
|
Re: DIY printhead October 18, 2013 05:28PM |
Registered: 13 years ago Posts: 406 |
|
Re: In need for a working piezo inkjet nozzle November 05, 2013 05:10PM |
Registered: 10 years ago Posts: 115 |
I'm a bit late arriving, although I thought I would put forward a possible idea to make piezo inkjets a bit easier to make. I haven't got a clue if this would work or not. Let me know if you think it has potential. The following design shows how the print head is constructed:
The basic idea is to make almost the entire thing 3D printable. After 3D printing you would give the plastic some sort of treatment to make it watertight and ink resistant. Varnish may work for this. Once you have the printed part you can then make the small nozzle by using the epoxy/hot glue and a needle method. The piezo then sits on an O-ring to create a cavity for the ink. Next to that cavity is a reservoir to hold the rest of the ink. The main reason for this is to remove the need for the tubing and other equipment. To prime the nozzle you would fill the cavity with ink up to the top of the O-ring. A 3D printed clamp could then be used to secure the piezo on top.
Edited 1 time(s). Last edit at 11/05/2013 05:12PM by samp20.
|
Re: In need for a working piezo inkjet nozzle November 24, 2013 09:18PM |
Registered: 11 years ago Posts: 374 |


Sorry, only registered users may post in this forum.